TL;DR
- The Necromancy of Thay requires progression from Act 1 to Act 3 for full completion
- Success requires passing three escalating Wisdom saving throws with DC10, DC15, and DC20 checks
- Strategic character selection (Gale or high-Wisdom main character) significantly improves success rates
- The Phase Spider Matriarch can be defeated using environmental tactics for easier progression
- Final rewards include the powerful Danse Macabre spell for summoning undead minions
Baldur’s Gate 3 conceals numerous arcane secrets, but few tempt players toward such perilous paths as the Necromancy of Thay. This forbidden tome represents one of the game’s most complex multi-act quests, challenging adventurers to follow the footsteps of ancient dark magicians. Our comprehensive guide details the complete journey to obtain and unlock this powerful artifact’s full potential.
The Necromancy of Thay quest spans from early Act 1 exploration to late-game Act 3 content, requiring strategic planning and careful execution. Understanding the mechanics behind this challenge will help you avoid common pitfalls that could permanently lock you out of the book’s rewards.
Initiating the Baldur’s Gate 3 Search the Cellar quest requires precise navigation through the Blighted Village. Here’s an enhanced step-by-step approach:
- Locate the specific house positioned left of the Blighted Village entrance at coordinates X:37; Y:379.
- Examine the Apothecary’s Ledger resting on the counter to officially begin the questline.
- Descend into the cellar using the wooden hatch discovered nearby.
- Study the Healer’s Log thoroughly to learn about balsam ointment applications, which becomes crucial for subsequent challenges.
- Identify the concealed lever hidden behind stacked crates and activate it to reveal the secret passage.
- Employ stealth tactics to bypass the coffin chamber’s hostile entities, targeting the Ornate Mirror in the tunnel’s side passage.


Left: Blighted Village cellar entrance; Right: Lever and hidden passageway.
The Ornate Mirror
The Baldur’s Gate 3 Ornate Mirror presents a sophisticated interrogation sequence requiring convincing responses. Based on extensive testing, these dialogue choices yield optimal results:
- Provide your character’s actual name when prompted for identification.
- Assert “Yes, an ally! An ally of your master’s” to establish proper allegiance.
- When questioned about Szass Tam, declare: “A foul lich. May he die a thousand more deaths.”
- Regarding balsam knowledge, respond: “I read a doctor’s journal. He used balsam to clean a wound.”
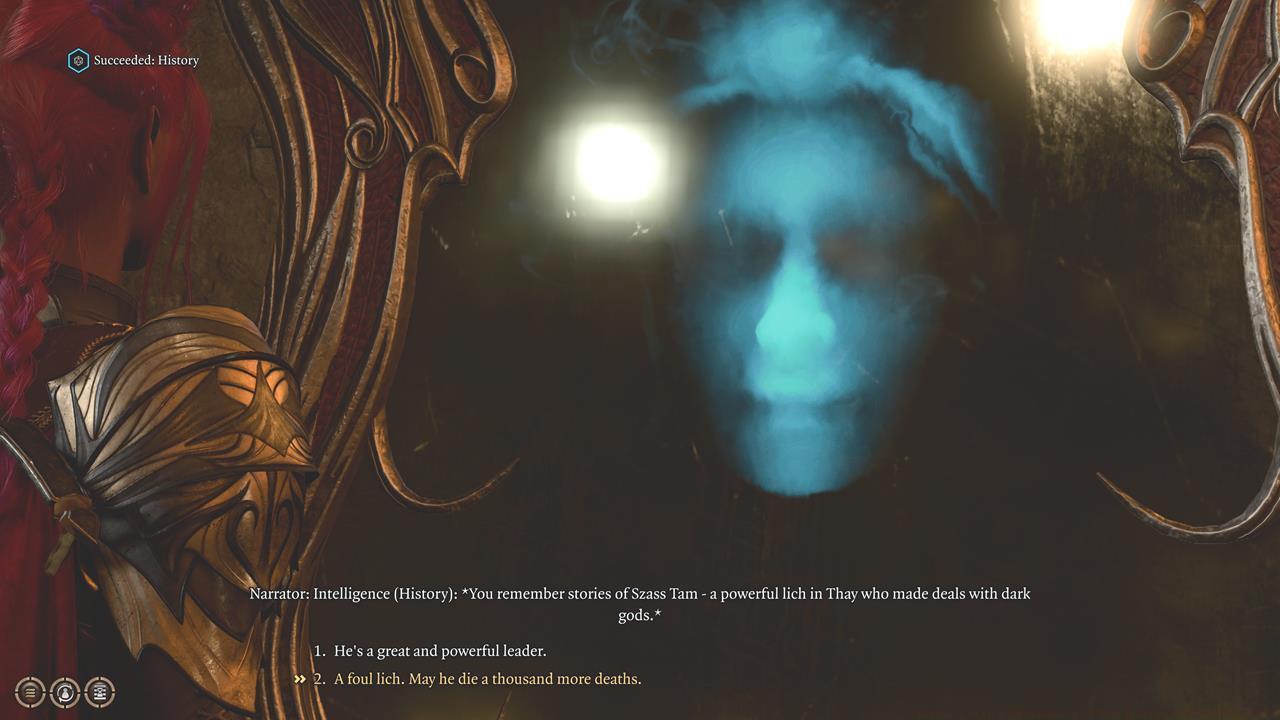
Answer the Ornate Mirror’s questions correctly to gain entry.
Successfully convincing the Ornate Mirror grants access to proceed with the Baldur’s Gate 3 Search the Cellar objective’s critical phase. The dark magician’s lair contains multiple environmental hazards requiring careful management:
- Navigate rightward to acquire the essential rusted key. The adjacent lever manipulates the wall mechanism, providing an escape route back to the cellar entrance if needed.
- Proceed to the lair’s left section where you’ll encounter a floor trap that skilled rogues can disarm.
- Utilize the rusted key to unlock the secured door blocking progress.
- Before interacting with the altar’s tome, systematically disarm both gargoyle traps, though be prepared for potential forced turn-based mode activation.
Upon reaching this stage, you can finally acquire the Baldur’s Gate 3 Necromancy of Thay. Strategic character assignment proves crucial for optimal outcomes:
- Gale offers superior lore compatibility as a Wizard with Sage background, naturally inclined toward arcane discovery.
- Your protagonist should ideally possess robust Wisdom attributes, as multiple dialogue checks will test this stat later in the questline.

The Necromancy of Thay holds untold power.
Immediate access to the Baldur’s Gate 3 Necromancy of Thay remains blocked until you secure the essential Dark Amethyst component.
The Dark Amethyst resides within the Whispering Depths cavern network beneath the Blighted Village. Access options include descending through the village center well or utilizing the blacksmith’s forge cellar from the Finish the Masterwork Weapon side quest. Execute these advanced tactical steps:
- Maintain party-wide stealth positioning during movement, as you’ll encounter multiple Phase Spiders possessing venomous attacks and teleportation capabilities.
- Target the caverns’ northwestern sector at coordinates X:-565; Y:-355. This area features protection by the formidable Phase Spider Matriarch, boasting 125 hit points.
- The most effective Phase Spider Matriarch elimination method involves party separation, deploying a character with Thunderwave (or comparable abilities) to stealthily approach from behind. This strategic positioning enables pushing the arachnid queen into the bottomless chasms below.
- Rapidly defeating the Phase Spider Matriarch also unlocks the “Pest Control” achievement, rewarding players who eliminate the creature before egg hatching sequences.


Left: Sneak around before engaging the spider mobs; Right: Stay stealthed and push the Phase Spider Matriarch to its doom.
After eliminating all hostile creatures, collect the Dark Amethyst. You can now employ this component to unlock the Necromancy of Thay’s secrets.
Prepare for three sequential Wisdom saving throw challenges with escalating difficulty: DC10, DC15, and DC20. Maximize your success probability by utilizing all available buffs, as failure might permanently seal the tome. Maintain backup save files as insurance. Alternatively, postpone reading additional pages until acquiring feats or equipment that enhance Wisdom capabilities.

The Wisdom saving throws will get progressively tougher.
The Sorcerous Sundries location integrates with Gale’s companion narrative arc, accessible exclusively during Act 3. For comprehensive task details, consult our Sorcerous Sundries Vault guide. Here’s an optimized procedural summary:
- Within the vault complex, traverse the Silverhand portal entrance.
- Subsequently, proceed through the Evocation gateway to reach the subsequent chamber.
- Select the Wish entrance and manipulate the control mechanism.
- Choose the Foresight portal to return to the primary area.
This sequence grants entry to Elminster’s chamber, containing the Tharchiate Codex within a protective display case. Access the codex and study its contents (ensure application of Remove Curse to eliminate detrimental effects).
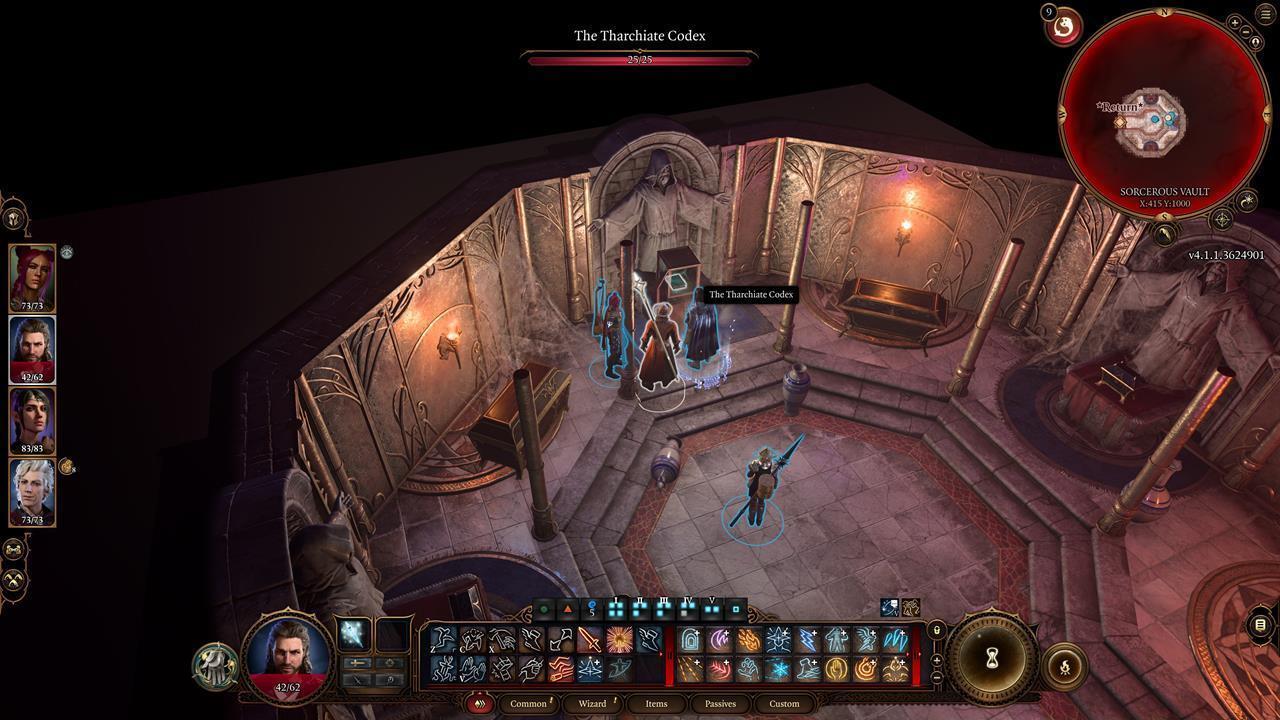
You’ll need to reach the Sorcerous Sundries Vault if you want to see the final reward from the Necromancy of Thay.
Your primary character or Gale (whichever individual studied the Necromancy of Thay previously) should now possess the capability to decode the runic inscriptions. This achievement unlocks the Danse Macabre incantation, enabling summoning of ghastly servants during combat encounters.
This concludes our exhaustive coverage of the Baldur’s Gate 3 Necromancy of Thay and Search the Cellar mission objectives. The extensive journey concludes with mastering the tome’s concealed arcane knowledge.
Baldur’s Gate 3 overflows with diverse activities and hidden mysteries. Your adventure will undoubtedly encompass countless hours of exploration. For additional strategic guidance, explore our Complete Guide to similar complex questlines.
Action Checklist
- Complete Blighted Village cellar exploration and Ornate Mirror dialogue sequence
- Navigate dark magician’s lair traps and acquire Necromancy of Thay
- Defeat Phase Spider Matriarch in Whispering Depths and secure Dark Amethyst
- Pass three Wisdom saving throws (DC10, DC15, DC20) using buffs and preparation
- Progress to Act 3 and complete Sorcerous Sundries vault sequence
No reproduction without permission:SeeYouSoon Game Club » Baldur’s Gate 3 – Necromancy Of Thay And Search The Cellar Guide Complete guide to unlocking the Necromancy of Thay's dark powers across multiple Baldur's Gate 3 acts