TL;DR
- Haunted One background requires Dark Urge origin and provides Intimidation/Medicine skill bonuses
- Inspiration points enable skill check rerolls and are earned through specific evil-aligned actions
- Critical choices in Act 1 permanently affect companion availability and story progression
- Act 2 inspirations involve eliminating key NPCs with major questline consequences
- Strategic planning required to balance inspiration gains with playthrough objectives
Embrace the sinister impulses of your Dark Urge character in Baldur’s Gate 3’s most morally complex origin story.
Baldur’s Gate 3 presents players with diverse character backgrounds that determine skill proficiencies and roleplaying opportunities. The Haunted One stands apart as an exclusive option reserved for those selecting the Dark Urge origin. This background forces you to constantly wrestle with sadistic compulsions, presenting opportunities to either suppress violent tendencies or fully indulge them. Our comprehensive guide details proven methods to acquire Haunted One Inspiration points while navigating the game’s darkest narrative paths. Be advised: this content reveals significant plot developments and character fates.
The Baldur’s Gate 3 Haunted One Inspirations connect specifically to the Dark Urge origin, which we explore thoroughly in our Dark Urge guide. Selecting this background grants automatic proficiency bonuses to both Intimidation and Medicine skills, providing tactical advantages in social interactions and combat recovery scenarios.
Furthermore, as you progress along the path of malevolence and brutality, particular decisions reward you with Inspiration points. These valuable resources permit rerolls on failed ability checks, dramatically improving success rates for critical story moments. We cover this essential game system in depth within our Inspiration points guide.
We’ve compiled the complete Baldur’s Gate 3 Haunted One Inspirations discovered throughout our extensive playtesting. This compilation remains incomplete since Baldur’s Gate 3 features enormous scale and countless narrative branching possibilities.
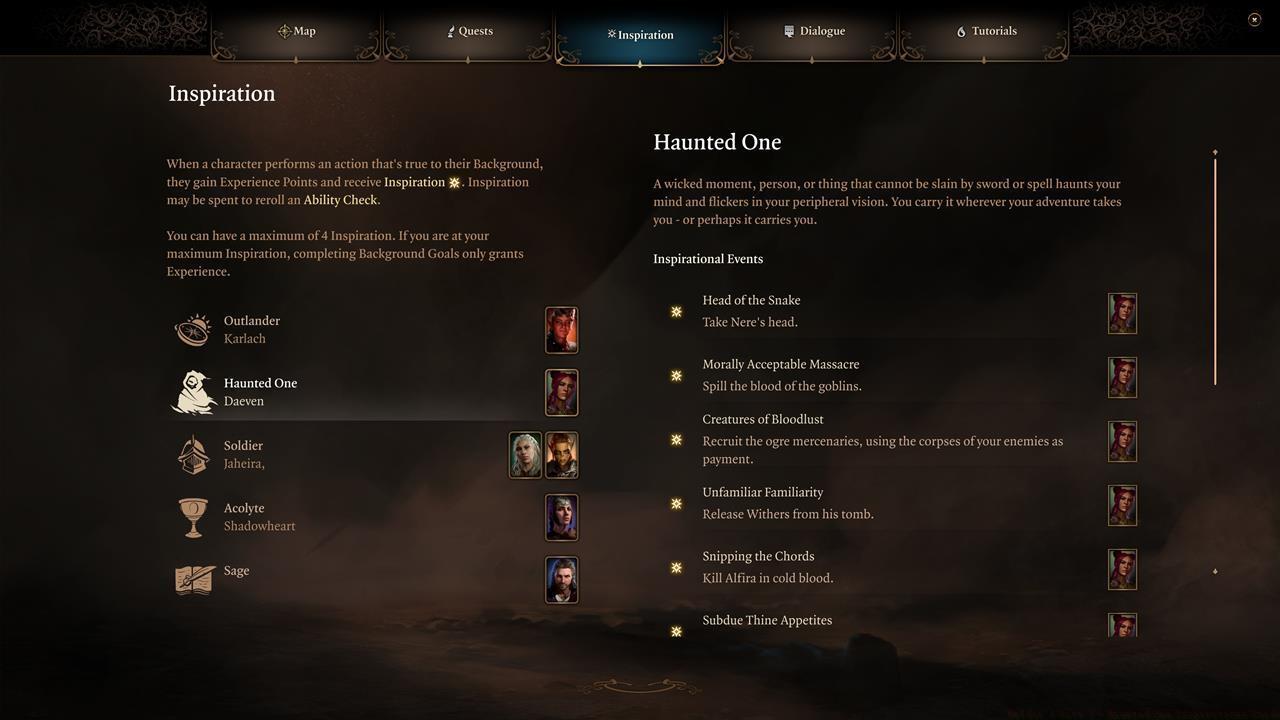
You can see the Inspirations you’ve found by pressing the P key.
Act 1 Inspirations
Subdue Thine Appetites or Indulge Thine Appetites
Resist or surrender to your Dark Urge during the initial encounter – This pivotal moment typically occurs when first interacting with Gale. You face the decision to either rescue him from the magical portal or sever his hand (permanently excluding him from party recruitment).
Fresh Kindle for the Fire
Abandon the impaled Benryn to fiery demise – We secured this inspiration upon discovering the injured Mindflayer at the crash location. Simply departing without intervention triggers this outcome.
Unfamiliar Familiarity
Liberate Withers from his ancient resting place – Access the northern ruins from the starting beach area and release Withers from his stone coffin. He subsequently relocates to your camp, providing class respecification and mercenary hiring options.
Snipping the Chords
Execute Alfira through calculated murder – During your initial extended rest period, a Tiefling Bard called Alfira requests overnight shelter. Upon awakening, you’ll discover her brutally disfigured corpse. Evidence suggests you committed this atrocity despite having no recollection of the events. This incident prompts an appearance by Scleritas Fel, your designated “butler” within the Dark Urge narrative.
Creatures of Bloodlust
Enlist Ogre mercenary services by offering enemy remains as compensation – Journey to the Blighted Village located west of the Druid Grove. Persuade the Ogre fighters to provide their combat assistance in exchange for fallen adversaries’ flesh. You’ll ultimately obtain Lump’s War Horn as reward.
Morally Acceptable Massacre or Camaraderie in Bloodlust
Slaughter the Goblin forces or massacre the Tiefling refugees – You can elect to either rescue the Tiefling displaced persons or align with Minthara’s invading forces.
Head of the Snake
Claim Nere’s severed head – After arriving at Grymforge, detonate the obstructed wall segment to release Nere, then engage him combat. Ensure you avoid eliminating him using elemental magic attacks (for instance, fire-based projectiles will incinerate his corpse). This enables decapitation following the battle conclusion.


Left: Gale could end up dead pretty early; Right: Jaheira can die by your hands.
Act 2 Inspirations
Lunar Eclipse
Eliminate the guardian of Last Light sanctuary – The Cleric, Isobel, maintains protective barriers around Last Light Inn. She can perish during the opening demon assault, as component of Dark Urge objectives, or resulting from aggressive choices during Nightsong encounters. Her death inevitably dooms all Last Light inhabitants, causing multiple questlines to terminate prematurely.
Forced Retirement
Terminate Jaheira’s adventuring career permanently – Certainly, you can recruit Jaheira, which represents the preferable outcome. Nevertheless, if Isobel dies by your direct action (i.e., Dark Urge) or as fallout from poor decision-making (i.e., Nightsong), then Jaheira will likewise expire.
Lack of Moderation is Key
Assassinate the brewer utilizing his own alcoholic creations – The Waning Moon Tavern situates south of Last Light Inn. There, you’ll encounter Thisobald Thorm, the monstrous brewmaster. To circumvent direct confrontation, you must continuously consume his toxic mixtures. This process demands successive Constitution and Charisma saving throws. Upon completing the drinking competition, he’ll fatally collapse from self-intoxication.
Self-Flagellation
Destroy your duplicate reflection during Shar’s sacred examination – You’ll locate the Self-Same Chamber within the Gauntlet of Shar. Mirror images of your complete party will materialize, requiring you to eliminate your personal copy.
Killer Poetry
Deceive the Orthon through fabricated contractual exemptions – You’ll also discover the Orthon within Shar’s Gauntlet. Persuade the creature that eliminating all potential witnesses, including itself, within the dungeon confines becomes necessary. This approach, however, mandates passing an Arcana verification merely to unlock the conversation options, followed by additional challenging skill tests to successfully mislead it.
Bleeding the Corpse Dry
Slay the necromancer – Vanquish Balthazar upon encountering the Nightsong.
Lesser of the Three
Annihilate the representative of Myrkul – Defeat Ketheric Thorm during Act 2’s climactic conclusion.
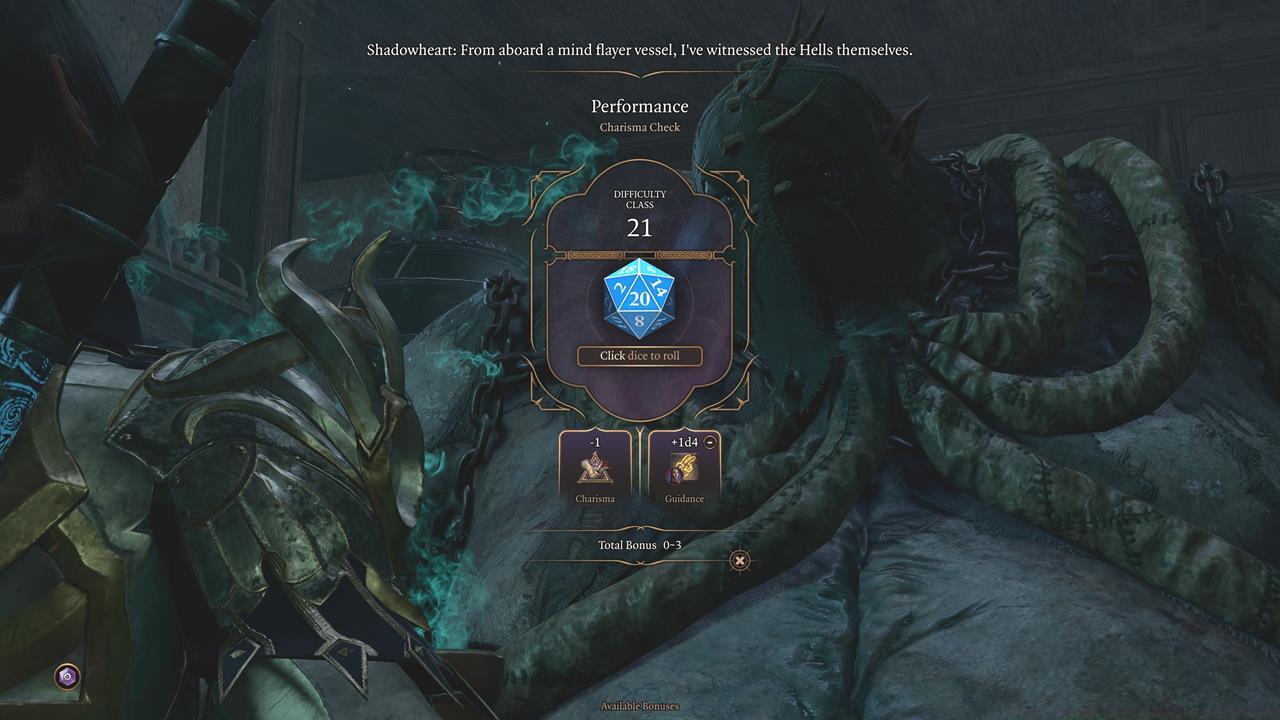
We needed a stupendously lucky roll due to a DC 21 and with a -1 Charisma penalty. Getting a 20 allowed us to continue drinking until the brewer fell dead.
These represent the Haunted One Inspirations we’ve identified throughout our Baldur’s Gate 3 experience. Additional opportunities likely emerge during later campaign segments. We’ll refresh our guide accordingly, so maintain vigilance for updates.
Baldur’s Gate 3 overflows with engagements and hidden content. You’ll undoubtedly participate in an epic journey requiring innumerable hours to finish completely. For supplementary guidance, access our BG3 guides central repository.
Strategic Inspiration Point Management
Effectively utilizing Haunted One Inspirations requires careful planning throughout your campaign. Unlike standard backgrounds where inspiration points accumulate through positive character-appropriate actions, the Dark Urge path rewards malevolent behavior and calculated cruelty. Advanced players should prioritize inspirations that align with their overall playthrough objectives while minimizing unnecessary narrative casualties.
Common Pitfalls and Avoidance Strategies
Many players inadvertently lock themselves out of critical content by pursuing inspirations too aggressively. For instance, eliminating Isobel at Last Light Inn prematurely concludes seven major questlines and prevents access to valuable merchant inventories. Strategic timing of dark actions ensures maximum inspiration gain while preserving essential story elements.
Party Composition Considerations
Your companion selection dramatically impacts available Haunted One inspiration opportunities. Characters like Gale and Wyll may abandon your party permanently if you commit particularly heinous acts, while Astarion and Lae’zel typically remain tolerant of violent tendencies. Consider your long-term party goals before executing inspiration-triggering decisions.
Action Checklist
- Select Dark Urge origin during character creation to unlock Haunted One background
- Make your first Dark Urge decision with Gale at the portal
- Complete Withers’ tomb liberation in northern ruins
- Execute Alfira during first long rest to trigger butler encounter
- Secure Ogre mercenary services in Blighted Village using corpse payment
- Choose faction alignment between Tieflings and Goblins
- Eliminate key Act 2 NPCs including Isobel, Thisobald, and Balthazar
No reproduction without permission:SeeYouSoon Game Club » Baldur’s Gate 3 – Haunted One Inspirations Guide Master the Dark Urge background with comprehensive Haunted One Inspiration strategies and consequences guide