TL;DR
- Discover 25 unique perks through exploration and complete specific in-game challenges
- Manage limited perk slots strategically by swapping badges at Meditation Points
- Prioritize combat-enhancing perks like increased damage and defense for difficult encounters
- Combine exploration perks with combat badges for balanced progression through different game phases
- Adapt your perk loadout based on current objectives and enemy types for maximum effectiveness
Mastering the perk badge system in Star Wars Jedi: Survivor requires strategic planning and regular adjustments at Meditation Points scattered throughout the galaxy. These special locations serve as your customization hubs where you can equip discovered perks to enhance Cal Kestis’s capabilities.
Star Wars Jedi: Survivor features 25 distinct perks waiting to be uncovered, each offering unique gameplay advantages. With only a restricted number of active perk slots available, making informed decisions about which badges to activate becomes crucial for overcoming the game’s toughest challenges. This comprehensive guide provides expert strategies for locating all perks and building optimal loadouts.
The slot limitation system forces players to make meaningful choices about their playstyle specialization. Unlike many RPG systems where you can eventually equip everything, Jedi: Survivor maintains strategic depth by requiring you to prioritize certain enhancements over others based on your immediate goals and preferred combat approach.
Finding all 25 perks demands thorough exploration and completion of specific challenges. Many badges are hidden in remote areas or locked behind combat encounters, requiring you to venture off the main path frequently.
Systematic exploration proves essential for perk discovery. Focus on investigating dead ends, solving environmental puzzles, and returning to previously inaccessible areas with new Force abilities. Some perks only become available after reaching certain story milestones or defeating particular bosses.
Common mistakes include overlooking hidden passages or assuming perks are only found in obvious locations. Many players miss valuable badges by rushing through areas without thoroughly scanning their surroundings with the scanner function.
Combat-focused perks typically provide the most immediate value, especially on higher difficulty settings. Damage amplification, defensive enhancements, and Force power improvements should take priority in your limited slot allocation.
For players struggling with combat encounters, prioritizing perks that increase survivability or damage output can dramatically improve performance. These badges often make the difference between barely surviving and dominating enemy encounters.
Exploration perks become increasingly valuable during collection-heavy gameplay phases. When hunting for collectibles or completing side content, swapping to mobility or discovery enhancements can save significant time.
Advanced players should focus on creating synergistic perk combinations that complement their chosen lightsaber stance and playstyle. Some badges work exceptionally well together, creating powerful combinations that exceed their individual benefits.
Early game builds should prioritize utility and survival, while late game loadouts can specialize in specific combat styles. Don’t hesitate to frequently revisit Meditation Points to reconfigure your perks based on upcoming challenges.
For those seeking to master the game’s combat system, our Class Guide offers additional strategic insights that apply to perk selection as well.
In Star Wars Jedi: Survivor, perks operate as persistent passive abilities that enhance Cal Kestis’s combat capabilities throughout your journey. These game-changing modifiers can be obtained through two primary methods: purchasing from Zee the Droid vendor or discovering blue Essence Crystals during exploration. It’s crucial to distinguish between standard Essence Crystals that boost health, Force, or experience points versus the rare crystals that actually grant new perk badges.
Once you’ve acquired a perk badge, you’ll need to equip it through the Perks menu accessible at any fast travel location. Each perk carries a specific slot cost, with your initial capacity limited to three slots. You can expand this by exchanging Datadiscs with Zee or discovering additional slots during your planetary explorations.
Strategic slot management becomes essential since higher-tier perks often demand multiple slots, forcing you to make meaningful choices about which abilities best complement your combat approach.
Zee becomes available as a perk vendor after you complete the Forest Array main story mission. You’ll find this helpful droid on the second floor of Pyloon’s Saloon, where she exchanges Datadiscs for powerful abilities. When prioritizing purchases, consider obtaining additional perk slots before investing in expensive three-slot perks to maximize your build flexibility.
- Equilibrium – Enhances your next Lightsaber strike after using any Force ability; occupies three slots making it ideal for Force-heavy builds.
- Versatility – Provides temporary damage amplification following stance switches; perfect for players who frequently adapt their combat style mid-encounter.
- Wisdom – Boosts experience gains from defeated opponents, accelerating skill progression at the cost of three slots.
- Elixir – Healing Stims now partially recharge your super meter; moderately priced at two slots.
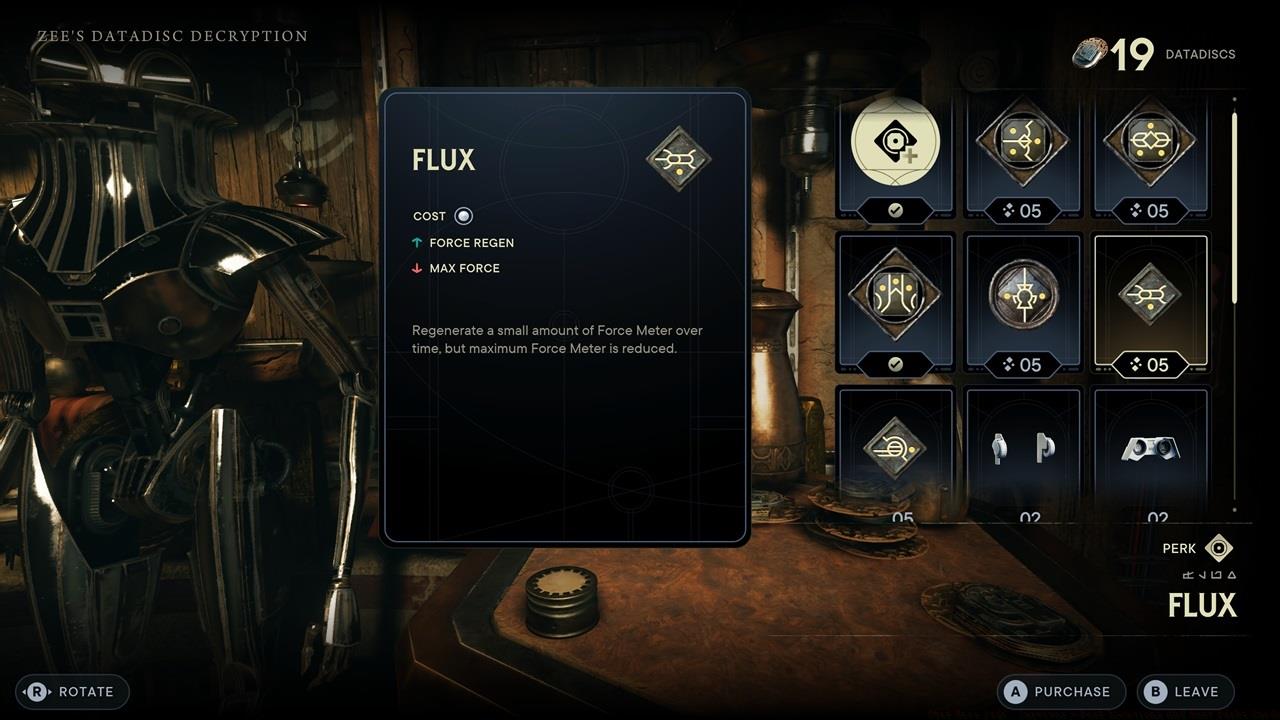
- Flux – Generates gradual Force regeneration while reducing your maximum Force pool; budget-friendly one-slot option.
- Steadfast – Prevents interruption from single hits while sprinting; economical one-slot choice for mobile fighters.
- Resilience – Expands your block meter capacity; essential for defensive playstyles at only one slot cost.
Strategic Datadisc spending should prioritize slot expansion before premium perks.
Koboh Perk Discoveries
- Shatter Perk – Located in Koboh’s Sodden Grotto near Rambler’s Reach Outpost. You must defeat the Rancor Legendary Enemy in its cave to access the crystal. Effect: Significantly improves guard-breaking capability with attacks; costs two slots.
- Dexterity Perk – Found in the Chamber of Reason within Basalt Rifts. The entrance appears just before encountering a Mogu creature. Effect: Amplifies Lightsaber Throw damage; requires two slots.
- Fortification Perk – Hidden along a narrow passageway in Forest Array that bypasses a gunner position. Effect: Enables health regeneration up to a baseline threshold; premium three-slot investment.
- Fellowship Perk – Reward for clearing the Chamber of Clarity Jedi Temple near Fort Kah’lin. Effect: Grants BD-1 an additional Stim charge; expensive at four slots.


From left to right: Rancor cave (Shatter); Chamber of Reason (Dexterity); Forest Array narrow passage (Fortification).
Jedha and Shattered Moon Perks
- Gambler Perk – Acquired after defeating the Sutaban Alpha in Crypt of Uhrma. Effect: Substantial XP gain increase but eliminates post-death Restore capability; high-risk four-slot option.
- Centered Perk – Reward for defeating the campaign boss on Shattered Moon. Effect: Creates area stagger during healing animations and prevents single-hit interruptions; moderately priced at two slots.
- Unflinching Perk – Located in Jedha’s Desert Ridge via Anchorite Base. Triggers Golden Skriton Legendary Enemy spawn. Effect: Maintains Blaster charge through one hit; economical one-slot choice for blaster enthusiasts.


From left to right: Chamber of Clarity (Fellowship); Koboh Grinder (Precision); Manse rooftop (Gambler).
Advanced Perk Acquisition Challenges
- Perplexity Perk – Reward for defeating the campaign boss at Mountain Observatory. Effect: Enhances damage from Confusion-affected enemies; reasonably priced at two slots.
- Recuperation Perk – Found in Chamber of Connection via Viscid Bog access from Gorge Crash Site. This involves complex navigation including Force Lift doors, Relter flights, and multi-stage ziplines. The interior puzzle requires Koboh Grinder flame connection expertise.
- Persistence Perk – Located in Chamber of Fortitude beneath Southern Reach. Requires dome opening and Corroded Silo traversal before battling Anoth Estra boss. Effect: Health restoration per enemy kill during Slow Time; efficient two-slot selection.
When you embark on a New Game Plus adventure, you automatically receive three special perks that operate outside the standard slot system. These exclusive abilities provide unique gameplay modifications that significantly alter your second playthrough experience without consuming your precious perk capacity.
- Warrior – Transforms standard encounters by introducing more formidable opponents like Purge Troopers and Sentry Droids in previously cleared areas.
- Purity – Universally amplifies damage output for Cal, allied characters, and hostile forces alike.
- Trendsetter – Randomizes all equipped cosmetic items upon death, adding an element of visual unpredictability to your journey.
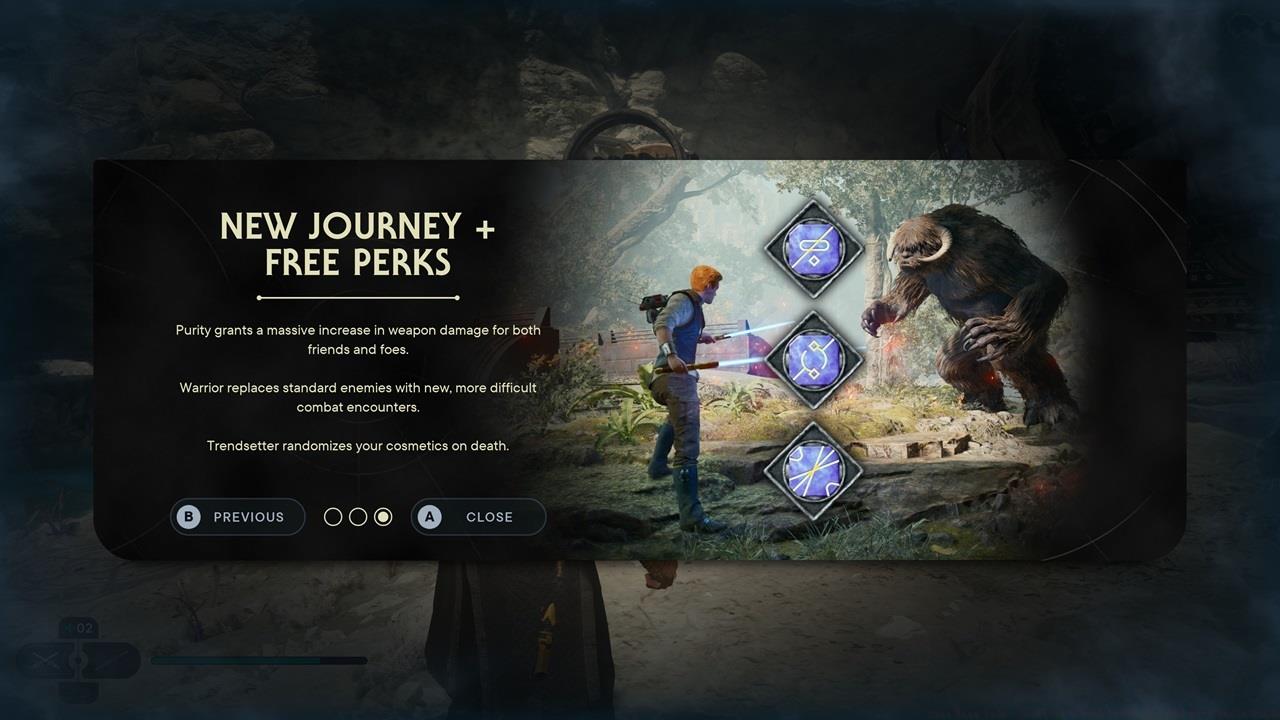
New Game Plus perks enable advanced build combinations and challenge run possibilities.
These bonus perks create opportunities for specialized playthroughs. Warrior enhances combat difficulty for veterans seeking greater challenges, Purity creates faster-paced engagements for speedrunners, and Trendsetter adds cosmetic variety for completionists. Since they don’t occupy slots, you can layer them with your standard perk selections for truly customized gameplay experiences.
Building an effective perk combination requires understanding both your combat preferences and the specific challenges you’ll face. Early game players should prioritize cost-effective one-slot perks that provide immediate survivability benefits before investing in premium multi-slot abilities.
Resilience – This remains valuable throughout your entire campaign due to its minimal slot investment and consistent defensive utility. The expanded block meter proves particularly beneficial when using Dual-Wield stance with its inherent stamina limitations.
Shatter – Dramatically improves your offensive pressure against guarded enemies, causing them to stagger more frequently during sustained assault sequences.
Wisdom – Despite its three-slot cost, this perk delivers exceptional value by accelerating your skill point acquisition through enhanced experience gains.
Gambler – Offers superior XP amplification compared to Wisdom but carries the significant drawback of eliminating post-death recovery options. Ideal for dedicated farming sessions where you systematically eliminate enemy groups and reset via Meditation Circles.
Unflinching – Essential for Blaster stance enthusiasts, ensuring uninterrupted charged shots despite taking damage during the charging process.
Fortitude – Functions as a high-stakes gambit that boosts both your Lightsaber damage and incoming enemy damage simultaneously.
When planning your perk loadout, consider creating synergistic combinations that complement your chosen combat style. Defensive builds benefit from pairing Resilience with Fortification, while aggressive players might combine Shatter with Equilibrium for maximum damage output. Remember to balance slot costs with practical benefits, and always prioritize acquiring additional slots when possible to expand your tactical options.
Star Wars Jedi Survivor offers extensive exploration opportunities and hidden mechanics. For comprehensive gameplay assistance, consult our Complete Guide covering all aspects of Cal’s adventure across the galaxy.
In Star Wars Jedi: Survivor, perks operate as persistent passive enhancements that remain active once equipped. These game-changing abilities can fundamentally alter your combat approach and progression efficiency. Most perks become available through two primary acquisition methods: purchasing from Zee the Droid at Pyloon’s Saloon or discovering them within blue Essence Crystals scattered throughout the game world.
It’s crucial to understand that Essence Crystals serve dual purposes. While some provide permanent stat increases to health, Force capacity, or experience gain, only specific crystals actually unlock new perk badges. For comprehensive guidance on locating these valuable stat-boosting crystals, consult our detailed Essence Crystal locations guide to maximize your character’s potential.
Once obtained, perk badges require activation through the Perks menu accessible at any meditation point. Each perk carries a specific slot cost, creating meaningful trade-offs in your build decisions. Your starting configuration includes three perk slots, with additional capacity unlockable through Datadisc exchanges with Zee and discovery during planetary exploration.
Zee the Droid becomes your primary perk vendor following completion of the Forest Array storyline mission. Located on the upper level of Pyloon’s Saloon, she exchanges perks for Datadiscs collected during your adventures. This NPC provides reliable access to specific perks, allowing for targeted build development as you progress through the campaign.
Exploration remains essential for maximizing your perk potential. Beyond the additional slot from Zee’s Datadisc exchange, several hidden perk slots await discovery in remote regions of each planet. These rewards encourage thorough exploration and often provide significant power spikes when found.
The acquisition strategy should balance between vendor purchases and crystal hunting. Early game focus should prioritize easily accessible perks that provide immediate combat advantages, while mid-to-late game exploration can uncover specialized abilities for specific encounter types.
Strategic perk combinations can create powerful synergies. Pairing Equilibrium with Elixir allows aggressive players to maintain high super meter uptime while dealing enhanced damage. Versatility complements stance-dancing playstyles, rewarding tactical adaptability in prolonged engagements.
Advanced players should consider perk rotation based on anticipated challenges. Boss encounters may warrant different configurations than exploration segments or enemy-dense areas. The flexibility to adjust your loadout at meditation points enables tactical adaptation to specific combat scenarios.
Avoid the common mistake of over-investing in high-cost perks early game. With limited slots available initially, spreading your investment across multiple lower-cost abilities often provides more consistent benefits than dedicating all slots to a single expensive perk.
Maximize perk efficiency by aligning your selections with your dominant playstyle. Aggressive combatants benefit from damage amplification perks, while tactical players may prefer utility enhancements that support survival and resource management.
For players struggling with specific encounter types, our BF6 Class Selection Guide offers complementary strategic insights that can inform your perk choices. Similarly, understanding weapon mechanics through our Weapons Unlock guide can help identify which perks complement your preferred arsenal.
Legendary perks represent the most powerful upgrades available in Star Wars Jedi: Survivor, offering game-changing abilities that can significantly alter your combat approach. Unlike standard perks, these require overcoming substantial challenges to obtain, from defeating formidable legendary enemies to solving intricate environmental puzzles. Understanding their strategic value and optimal implementation is crucial for maximizing your effectiveness in both standard gameplay and challenging encounters.
These exclusive enhancements provide unique advantages that can’t be found through normal progression, making them essential targets for players seeking to optimize their character build. The slot cost system means you’ll need to make strategic decisions about which legendary perks to equip based on your preferred combat style and current challenges.
Location: Koboh (Fogged Expanse) – After conquering the Vile Bilemaw legendary foe, proceed deeper through the Fogged Expanse region until encountering a precipice area populated by approximately six Roller Mines. A specific ledge provides access downward to a mudslide pathway that ultimately leads to this formidable creature’s dwelling place.
Combat Strategy: The Vile Bilemaw presents a substantial challenge requiring careful preparation. This creature utilizes area denial attacks and environmental hazards, making mobility and positioning critical. Recommended approach includes using high-damage single-target abilities and maintaining distance during its most dangerous attack phases.
Perk Effect: Boosts Lightsaber damage output while simultaneously increasing all incoming damage received; occupies four perk slots.
Strategic Analysis: This high-risk, high-reward perk dramatically amplifies your offensive capabilities but demands exceptional defensive play to mitigate the increased damage vulnerability. Ideal for aggressive players who can consistently avoid enemy attacks while maximizing their own damage windows.
Location: Jedha (Desert Ridge) – Travel to Desert Ridge via the Anchorite Base pathway. A constricted passageway contains a crystalline formation at its terminus. When you advance toward this crystal, the Golden Skriton Legendary Enemy emerges automatically.
Spawn Mechanics: The Golden Skriton only appears when you approach the specific crystal formation, making it easy to miss if you don’t thoroughly explore the area. The spawn trigger has a specific activation range, so approaching cautiously allows for better combat preparation.
Perk Effect: Enables sustaining one hit while charging your Blaster without interruption; requires one slot.
Usage Scenarios: This perk proves invaluable for blaster-focused builds, particularly when facing enemies with quick interrupt attacks. It allows you to maintain offensive pressure in situations where you’d normally be forced to evade or defend. Particularly effective against agile opponents who attempt to disrupt your charged attacks.
Location: Koboh (Chamber of Detachment) – This ancient temple’s entry point resides within the Mountain Ascent area. Starting from the fast travel location, proceed through the dual green energy barriers and investigate the area concealed behind the waterfall. The environmental puzzle here demands manipulation of two substantial blocks.
Puzzle Solution: The objective involves positioning one block on the ground plate, which subsequently elevates the second block to the required height. Strategic block placement and understanding the lift mechanics are essential for solving this challenge efficiently.
Perk Effect: Activating Slow Time capability restores a portion of your health; consumes three slots.
Combat Applications: This perk transforms Slow Time from a purely defensive ability into a hybrid survival tool. Perfect for situations where you’re low on health but need to create space for recovery while maintaining combat effectiveness. The health restoration occurs immediately upon activation, providing crucial sustain during intense engagements.
Location: Koboh (Stone Spires/Chamber of Ambidexterity) – This additional enhancement discovery within the Stone Spires territory. Beginning from the manse courtyard area, utilize the Relter transport to reach the cleverly concealed alcove situated beneath the Force Tear. A segment obscured by viscous substance blocks progress.
Environmental Challenges: You must employ another Relter to reach the opposing side of this obstructed section, then recalibrate the laser emitter to target a position adjacent to the cavern entrance. Following this adjustment, deploy your Koboh Grinder tool to establish a fiery pathway into the chamber interior.
Perk Effect: Striking foes with your Blaster augments the damage inflicted by your Lightsaber assaults; utilizes three slots.
Build Optimization: This perk excels for hybrid combat styles that alternate between ranged and melee engagement. The damage buff typically lasts for a limited duration after each blaster hit, encouraging rhythmic switching between weapons for maximum damage output.
Mastering legendary perks requires understanding their slot economy and synergistic potential. With limited total slots available, choosing which legendary perks to equip becomes a critical strategic decision that should align with your overall combat approach and current mission objectives.
Slot Management: The four-slot cost of Persistence means sacrificing multiple other perks, while one-slot Resilience offers excellent value for minimal investment. Consider your playstyle: aggressive players might prioritize damage amplification, while tactical players may value survivability enhancements.
Combo Potential: Certain legendary perks work exceptionally well together. For instance, combining Synergy with Persistence creates a devastating damage combination, while Fortitude provides the sustainability to leverage these high-risk approaches effectively.
For comprehensive character building strategies, check out our Class Guide to optimize your overall approach to combat encounters and ability selection.
Action Checklist
- Scan every new area thoroughly using your focus ability to identify hidden perk locations
- Prioritize combat perks for story missions and defensive badges for exploration phases
- Return to previous locations with new Force abilities to access previously unreachable perks
- Experiment with different perk combinations at Meditation Points before major encounters
- Complete Forest Array to unlock Zee as a perk vendor in Pyloon’s Saloon
- Prioritize purchasing additional perk slots before expensive three-slot perks
- Systematically collect Datadiscs for vendor perk acquisition
- Defeat Legendary Enemies guarding exploration-based perks
- Experiment with perk combinations that complement your preferred combat stance
- Start New Game Plus to access exclusive Warrior, Purity, and Trendsetter perks
- Complete Forest Array mission to unlock Zee as perk vendor
- Collect Datadiscs for additional perk slot and vendor purchases
- Prioritize early game perks that complement your combat style
- Explore thoroughly to discover hidden perk slots and Essence Crystals
- Experiment with perk combinations against different enemy types
- Defeat Vile Bilemaw in Fogged Expanse then follow mudslide to Persistence perk
- Travel to Jedha’s Desert Ridge and approach the crystal to spawn Golden Skriton
- Solve the block puzzle in Chamber of Detachment behind Mountain Ascent waterfall
- Navigate Stone Spires laser puzzle using Relters and Koboh Grinder for Synergy perk
- Evaluate perk combinations and slot allocation based on your preferred combat style
No reproduction without permission:SeeYouSoon Game Club » Star Wars Jedi: Survivor – Perk Locations And Best Perks Guide