TL;DR
- Pharah excels at vertical positioning but requires precise fuel management and direct rocket hits
- Master the Jump Jet and Hover Jet combination for unpredictable aerial movement patterns
- Positioning above enemy sightlines creates constant pressure while minimizing vulnerability
- Direct rocket impacts now deal significantly more damage than splash damage in Overwatch 2
- Effective Pharah play demands constant movement and environmental awareness
Pharah represents one of Overwatch 2’s most technically demanding damage heroes, requiring exceptional aerial control and predictive aiming skills to maximize effectiveness. While available immediately to new players after tutorial completion, her high skill ceiling means true mastery demands extensive practice and strategic understanding.
Veteran Overwatch players will find Pharah familiar yet refined, with her core identity as the ‘Queen of the Skies’ remaining intact while receiving crucial balance adjustments. Her gameplay revolves around establishing vertical dominance through precise rocket barrages and evasive aerial maneuvers that disrupt enemy formations.
The transition to Overwatch 2 brought significant changes to Pharah’s damage profile: direct rocket impacts now inflict substantially more damage while area-of-effect splash damage has been reduced. This shift demands greater accuracy but rewards skilled players with faster eliminations. Additionally, her Concussive Blast received enhanced knockback and damage potential, while reload speed improvements allow for more consistent pressure application.
Mastering Pharah’s aerial mobility requires understanding both vertical positioning and horizontal evasion techniques.
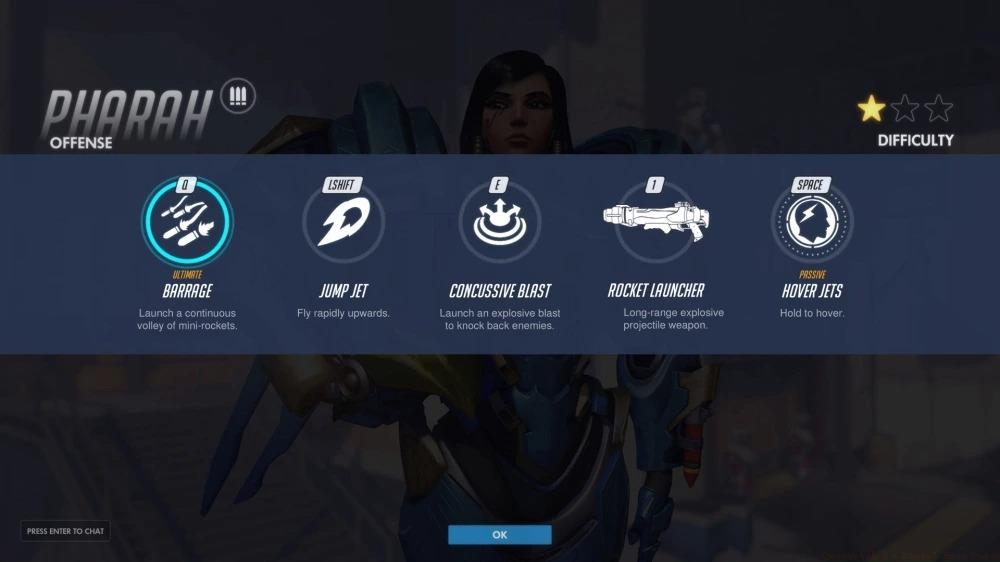
Pharah’s kit centers around her Rocket Launcher, which fires slow-moving but high-impact projectiles that demand leading targets and predicting enemy movement. The recent damage redistribution means direct hits now eliminate targets 15-20% faster than in the original game, while missed shots provide significantly less value.
The Jump Jet ability provides instantaneous vertical lift, ideally combined with Hover Jets for sustained aerial presence. Advanced technique: activate Jump Jet while already hovering to create unpredictable movement patterns that confuse enemy hitscan players.
Concussive Blast serves multiple functions beyond damage: environmental eliminations, self-propulsion for rapid repositioning, and disrupting enemy formations. Pro tip: use it against walls or floors near yourself for sudden directional changes that break enemy aim.
Barrage, Pharah’s ultimate, demands careful positioning and timing. Effective deployment requires either surprise angles or protective barriers from teammates. Common mistake: activating Barrage at ground level or without escape routes leaves you vulnerable to immediate counterfire.
Ability execution requires understanding both individual mechanics and synergistic combinations between tools.
Rocket jump technique: fire at your feet while jumping to gain additional height without using abilities. This advanced movement option conserves cooldowns for combat situations while providing alternative elevation paths.
Effective Pharah gameplay demands constant motion and positional awareness. The core principle: never remain stationary for more than 2-3 seconds in aerial positions. Movement should follow irregular patterns—alternating between sudden ascents, horizontal drifts, and rapid descents to minimize enemy tracking.
Fuel management separates novice and expert Pharah players. Optimal technique: use short Hover Jet bursts rather than sustained flight, conserving fuel for evasive maneuvers when targeted.
Positioning above choke points and objective areas creates constant pressure while maintaining relative safety. However, beware of maps with low ceilings or abundant cover that neutralize your aerial advantages.
Environmental mastery includes identifying perches and ledges for quick fuel regeneration between engagements. Advanced tactic: use map geometry for cover rather than relying solely on altitude—partial cover often provides better survival than complete exposure at high altitudes.
For comprehensive tactical approaches across different game modes, our Battlefield 6 Complete Guide offers valuable cross-game insights.
Successful Pharah engagements require understanding matchups against common counters. Against hitscan heroes like Soldier: 76 or Widowmaker, employ peek-and-shoot tactics from cover rather than sustained aerial duels.
Target priority should focus on enemy supports and stationary damage dealers first. However, avoid overcommitting to eliminations that pull you out of position or consume excessive resources.
Team coordination elevates Pharah’s effectiveness dramatically. Communicate with your Zarya for protective barriers during Barrage or with Mercy for damage-boosted rocket combinations.
Map-specific approaches vary significantly. Open maps like Ilios Well favor aggressive aerial play, while enclosed spaces like Temple of Anubis require more conservative positioning and peek shooting.
Weapon optimization parallels can be found in our BF6 Weapons Unlock Guide, which discusses similar projectile leading techniques.
For understanding how Pharah fits into broader team compositions, the BF6 Class Selection Guide provides complementary strategic frameworks.
Common positioning errors include flying at predictable altitudes, using the same attack angles repeatedly, and overstaying in contested airspace after being spotted.
Action Checklist
- Practice direct rocket hits in training range for 10 minutes daily
- Master fuel-efficient hovering using short bursts instead of continuous flight
- Learn 3 different Barrage positions on each map
- Develop peeking techniques against hitscan heroes on 5 different maps
- Practice Concussive Blast mobility for rapid repositioning
No reproduction without permission:SeeYouSoon Game Club » Overwatch 2 – Pharah Hero Guide Master Overwatch 2's aerial combat specialist with advanced movement techniques and strategic positioning tactics