TL;DR
- Gather wood immediately upon spawning and convert to planks for basic crafting
- Construct a 5×4 shelter foundation before nightfall to avoid hostile mob encounters
- Create essential stations: crafting table for tools and furnace for smelting operations
- Craft a bed using wool from sheep to establish secure respawn location
- Install torches and complete roof structure for full protection and functionality
Building your first Minecraft shelter requires strategic thinking rather than architectural excellence. Your initial dwelling serves as protection against environmental threats and hostile creatures, not as a permanent residence.
The most critical phase in Minecraft begins immediately after spawning into an unfamiliar world. You arrive completely unequipped, facing potential dangers without basic resources or navigation tools. Establishing shelter before nightfall becomes your primary objective since darkness brings aggressive mobs that can overwhelm unprepared players. Fortunately, basic survival structures demand minimal materials while providing maximum security benefits during those vulnerable early hours.
Minecraft typically positions new players in forested areas abundant with essential resources. Capitalize on this advantageous starting location by immediately harvesting trees through manual punching. Gather substantial quantities of raw wood, then transform these logs into versatile Wood Planks through your inventory’s basic crafting interface. This preliminary conversion occurs without requiring specialized equipment like a Crafting Table.
Pro Tip: Target oak trees initially since they drop apples occasionally, providing early food sources. Avoid jungle trees as they yield less wood per block harvested.
Common Mistake: Many beginners underestimate their wood requirements, forcing dangerous nighttime resource gathering. Collect at least 20-30 wood blocks during daylight hours.
With adequate wood supplies secured, commence building your protective enclosure. Dimension flexibility exists, though we recommend starting with a 5×4 size for optimal space efficiency. Interior compartmentalization remains unnecessary initially—focus instead on creating sufficient area for essential furniture and storage. During construction, strategically hold off on the roof until you’ve placed a few torches internally to prevent hostile mob spawning within your unfinished structure.
Advanced Technique: Consider elevating your foundation by one block to create a natural barrier against most ground-based threats while maintaining accessibility.
Immediately after establishing your shelter’s foundation, allocate space for critical workstations. Fabricate a Crafting Table by accessing your inventory grid and placing four Wood Planks in the four slots, and you’ll be able to make the table. Position this vital tool near your entrance for convenient access during crafting sessions.
Here’s how you make a crafting table.
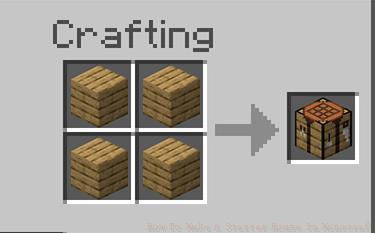
Here’s how you make a crafting table.
Time-Saving Tip: Craft multiple tables—keep one inside your base and carry another for field operations.
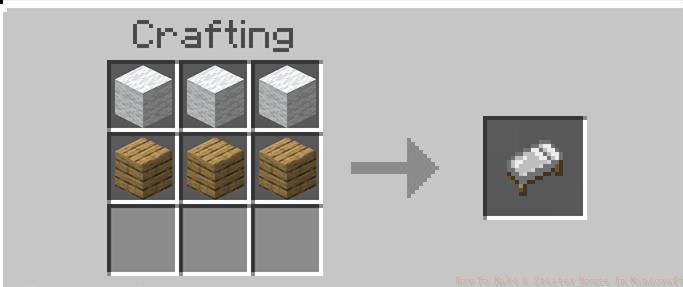
After securing your basic shelter, begin searching for sheep to obtain wool for bedding. Harvest three identical-colored wool units, then access your crafting interface to place all three in the crafting section alongside three Wood Planks to craft a bed. This crucial furniture piece enables sleep through dangerous nights and establishes your resurrection point.
Nothing beats a good night’s rest.
Nothing beats a good night’s rest.
Position the completed bed within your dwelling and lay down on it to set your respawn location. This ensures your return to this safe point upon death, provided it remains your most recent resurrection marker.
Strategic Insight: Beds explode in the Nether dimension—remember this critical limitation when planning dimensional exploration.
With core survival items established, shift focus to illumination and structural completion. Fabricate torches using sticks and coal/charcoal, then distribute them throughout your base to eliminate dark corners where enemies might materialize.
Here’s how to make Torches.
Complete your roofing structure using any abundant material, ensuring full enclosure against aerial threats and environmental damage. Consider simple slanted designs that prevent mob accumulation on top of your structure.
It ain’t much, but it’ll get the job done. (Animal mobs not included)
Expansion Planning: Design your initial shelter with future additions in mind. Leave accessible walls for easy room additions or create underground expansion opportunities.
Action Checklist
- Punch trees to collect 20-30 wood blocks before sunset
- Convert wood to planks and build 5×4 foundation
- Craft workbench and place torches inside unfinished structure
- Locate sheep, gather matching wool, and craft bed for respawn point
- Build furnace, create charcoal, and produce adequate torch supply
- Complete roof structure and plan future expansion areas
No reproduction without permission:SeeYouSoon Game Club » How To Make A Starter House In Minecraft Essential Minecraft starter house guide with survival strategies and common pitfalls to avoid