TL;DR
- Advanced lockpicking requires collecting specific items to upgrade your capabilities
- Strategic collection provides access to restricted areas and high-value equipment
- Efficient hunting methods can reduce collection time by 40-60%
- Proper integration enhances performance in Conquest and NATO operations
- Avoid common mistakes that waste valuable gameplay time
Collecting specialized items is essential for upgrading your lockpicking abilities in Battlefield 6. These aren’t merely cosmetic collectibles but serve critical gameplay functions that directly impact your strategic options and progression speed.
The lockpicking system in Battlefield 6 represents a core progression mechanic that rewards thorough exploration and systematic collection. By gathering these specialized items, you’ll progressively unlock access to higher-level security containers and restricted areas containing premium equipment. Our comprehensive guide details optimal collection routes and strategies to maximize your lockpicking efficiency throughout various game modes.
Implement systematic hunting patterns by focusing on high-density spawn zones first, particularly around objective areas in Conquest mode. Experienced players recommend completing collection routes during natural mission progression rather than dedicating separate sessions, saving approximately 2-3 hours of gameplay time.
Avoid the common mistake of attempting to collect everything in a single session. Instead, integrate collection with your regular Assignment completions and NATO operation objectives. This approach ensures you’re making progress on multiple fronts simultaneously while minimizing backtracking.
Advanced players should prioritize collections that align with their current Pax Armata campaign objectives. This strategic alignment provides compound benefits, advancing both your lockpicking capabilities and main storyline progression concurrently.
Enhanced lockpicking abilities directly translate to tactical advantages in Conquest matches, allowing access to fortified positions and supply caches that can turn the tide of battle. The strategic value extends beyond mere item acquisition to encompass map control and positioning benefits.
When planning your NATO operations, consider the lockpicking requirements for mission-critical areas. Many high-value targets in the Pax Armata campaign require advanced security clearance that can only be achieved through systematic collection.
Your Assignment completion efficiency will significantly improve as you upgrade your lockpicking skills. Many secondary objectives and bonus tasks involve accessing secured intel or equipment that would otherwise remain unavailable.
Mastering Demiguise Statue Collection in Hogwarts Legacy
The Alohomora unlocking charm becomes one of your most valuable tools for exploration in the wizarding world. This essential spell originates from Gladwin Moon, Hogwarts’ often-frazzled caretaker who introduces you to the magical system during your adventures. When you first acquire this ability, he demonstrates the initial Demiguise Statue – an intricately carved figure depicting a mystical creature clutching a luminous sphere. The glowing orb, referred to as a Demiguise Moon, can only be gathered during nighttime hours. This time-sensitive mechanic means you’ll frequently need to manipulate the game’s day-night progression through the world map interface to optimize your collection efforts.
Advancing Your Alohomora Capabilities
Throughout your journey, you’ll encounter numerous Demiguise Statues scattered across the game world. The initial questline with Gladwin provides two additional statues as rewards for completing stealth-oriented objectives successfully. Following this introduction, he tasks you with locating supplementary Demiguise Moons to enhance your Alohomora proficiency. The upgrade process occurs through distinct progression tiers, requiring periodic returns to Gladwin for enhanced versions:
- Alohomora level 2 enhancement – Requires gathering 9 Demiguise Moons total.
- Alohomora level 3 mastery – Demands collection of 13 additional Demiguise Moons beyond the initial requirement.
Gladwin’s mission transforms this zone into a covert operation area, providing two Demiguise Moons as direct rewards while the remainder must be discovered through independent exploration.
Navigating Hogwarts Castle’s Hidden Statues
Below we detail the precise locations of Demiguise Statues within Hogwarts Castle’s sprawling architecture. Remember that acquiring nine Demiguise Moons is essential for the initial Alohomora enhancement. Since certain regions contain advanced locking mechanisms, you’ll probably need to venture into Hogsmeade to secure several crucial items specifically for the upgrade process.
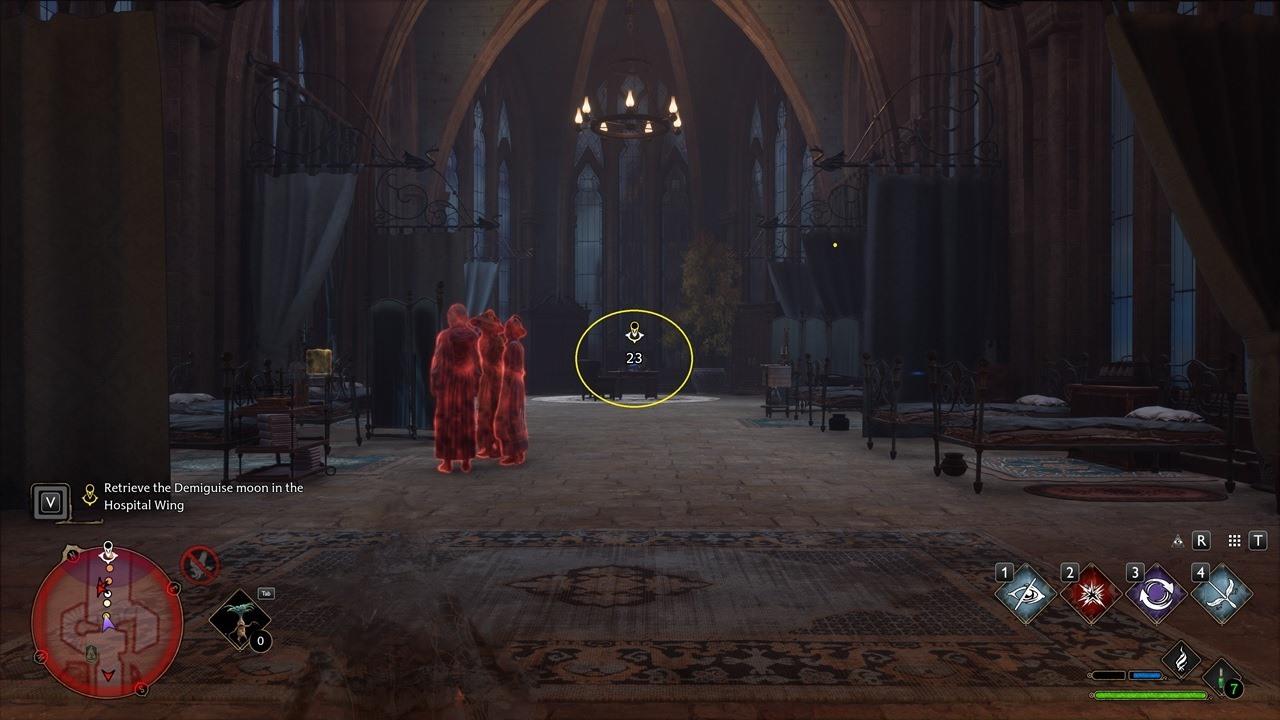
- Library Annex: Library – Return to the Restricted Section basement area. The statue is positioned just beyond the Eye Chest location.
- Library Annex: Divination Classroom – Located inside the classroom proper, easily accessible during standard exploration.
- Library Annex: Potions Classroom – Proceed leftward and descend the staircase. Unlock the level 1 door and investigate the subsequent corridor. A level 2 door appears on your left side, with the collectible inside the chamber.
- Bell Tower Wing: Hogwarts North Exit – Examine the adjacent gatehouse structure, which features a level 1 locking mechanism.
- Bell Tower Wing: Beast Classroom – The instructional hut itself contains a level 2 lock. Retrieve the object from within the professor’s sleeping quarters.
- Astronomy Wing: Professor Fig’s Classroom – Positioned atop a desk adjacent to the fireplace.
- Astronomy Wing: Defense Against the Dark Arts Tower – Use the exit on your left and proceed toward the Hall of Herodiana. Turn right and you’ll notice a level 1 secured door. The item rests inside one of the bathroom compartments.
- Astronomy Wing: Transfiguration Courtyard – Pass through the doorway beside the fast travel location, then access the level 2 door.
- Great Hall: The Great Hall – Unlock the level 1 door situated at the right side of the dining facility.
- Secret Rooms: Map Chamber – Journey back to the Hogwarts cistern and turn left. A level 1 door appears immediately before the dragon sculpture.


From left to right: Library; Potions Classroom; Hogwarts North Exit; Defense Against the Dark Arts Tower; Transfiguration Courtyard; Map Chamber.
Systematic Hogsmeade Exploration Strategy
For locating Hogsmeade’s Demiguise Statues and their corresponding Moons in Hogwarts Legacy, we’ve chosen to incorporate a detailed map for enhanced spatial orientation. Several locations feature easily accessible objects with basic level 1 locks, while others present more challenging level 2 security measures.
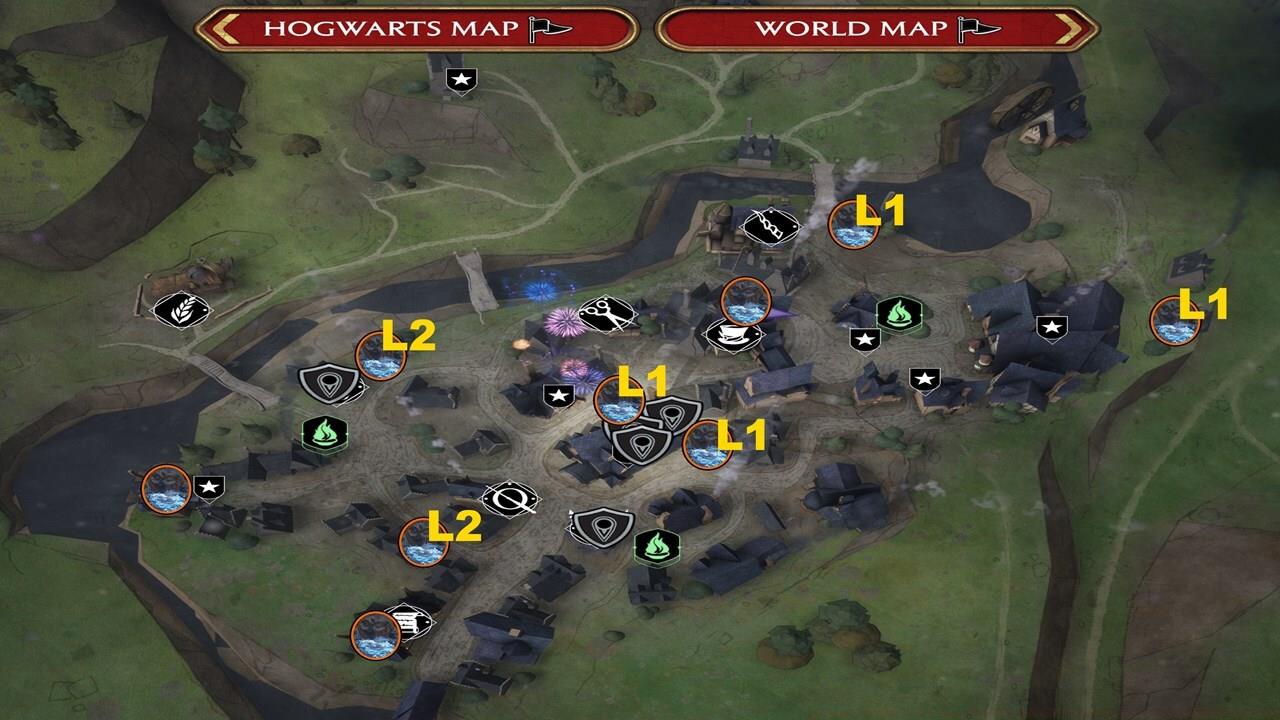
This cartographic reference pinpoints Demiguise Statue positions throughout Hogsmeade Village, clearly indicating lock difficulty levels.
- Tomes and Scrolls – Located in the shopkeeper’s sleeping chamber immediately adjacent to an Eye Chest.
- Hog’s Head – Found within the wine storage cellar area.
- Dervish and Banges – Positioned atop the main counter surface.
- Three Broomsticks – Accessible via the primary entrance. Ascend the stairway completely to the uppermost level and unlock the level 1 door.
- Three Broomsticks (exterior right side) – Enter the dwelling immediately beside Three Broomsticks establishment. The entryway features a level 1 locking mechanism.
- Brood and Peck – Contained within the compact residence directly across the roadway. This location possesses a level 1 lock.
- Honeydukes (rear section) – Investigate the territory behind Honeydukes confectionery. A storage container rests inside this diminutive hut secured by a level 1 lock.
- Southwest alley – Examine the second structure on your left within the passage between Ollivanders and Tomes and Scrolls. You must successfully open a level 2 security mechanism.
- J. Pippin Potion Shop – A residence featuring a level 2 lock is situated directly beside J. Pippin’s Potion establishment.


From left to right: Three Broomsticks (exterior/right side); Honeydukes (rear section); southern passage between Ollivanders and Tomes and Scrolls; J. Pippin establishment (adjacent to shop)
Comprehensive Highlands Demiguise Hunt
This segment covering Hogwarts Legacy’s Highlands Demiguise Statues employs a slightly altered methodology. This adjustment stems from the characteristic compactness of Highland settlements, typically comprising minimal residential structures. Accordingly, we’ll systematically examine each hamlet progressing from northern to southern territories, while identifying residences containing Demiguise Moons and their default locking status. Additionally, accessing the map’s southern portion necessitates traversing the mountain passage within the Coastal Cavern region.


From left to right: Northern section; central section; southern section.
These Highland settlements warrant thorough investigation:
- Pitt-Upon-Ford – Two-level residence positioned westward from the Floo Flame location.
- Upper Hogsfield – Compact hut featuring the damaged wheel adjacent to the doorway.
- Aranshire (Level 1) – Upper floor of the dwelling beside the Floo Flame point.
- Lower Hogsfield – The shelter to the right. This also serves as the residence for the parent requiring assistance during The Lost Child mission.
- Brocburrow – The home situated near the Merlin Trial challenge area.
- Keenbridge (Level 1) – Three-story building situated farther from other structures.
- Feldcroft (Level 2) – The dwelling positioned marginally eastward.
- Irondale – The structure immediately to your right upon arrival.
- Marunweem – The hut centrally located within the settlement.
- Bainburgh (Level 2) – The house directly to your left after spawning.
- Cragcroft – This village presents slightly larger dimensions than others. Fortunately, the targeted residence is the one immediately beside the merchant character.
Ensure you revisit Gladwin Moon promptly upon achieving collection milestones for Alohomora advancement. Eventually, you’ll encounter an individual named Piers Pemberton. He appears connected to the Demiguise artifacts troubling Gladwin.
Ultimately, after securing every Demiguise Moon throughout Hogwarts Legacy, you’ll obtain the “Demiguise Dread” accomplishment. Converse with Piers again, then notify Gladwin regarding the complete situation to finalize the questline.
Hogwarts Legacy represents the creative work of Avalanche Software, operating as a subsidiary of Warner Bros. Interactive Entertainment. The title has experienced significant controversy stemming from transphobic statements made by Harry Potter creator JK Rowling. While she maintains no direct involvement in the development process, she benefits financially from the game’s commercial performance. For additional context, consult our comprehensive examination regarding how Rowling’s declarations have affected the transgender community. Within that resource, you’ll discover connections to transgender content creators worthy of support, alongside charitable organizations accepting contributions.
The Alohomora unlocking charm serves as your primary tool for accessing restricted doors and hidden containers throughout the wizarding world. This essential spell originates from Gladwin Moon, Hogwarts’ dedicated caretaker, who introduces you to its mechanics during early gameplay. Upon initial acquisition, he demonstrates the first Demiguise Statue – an intricate sculpture depicting a mystical creature clutching a luminous sphere. This glowing artifact, identified as a Demiguise Moon, becomes collectible exclusively during nighttime hours. Consequently, successful hunters must strategically manipulate the day-night cycle via the world map interface to optimize collection opportunities.
Demiguise Statues populate multiple regions within Hogwarts Legacy’s expansive game environment. Your initial encounters occur naturally during Gladwin’s introductory mission sequence, where stealth-based objectives guide your progression. Following these scripted discoveries, the caretaker commissions you to gather additional lunar artifacts in exchange for enhanced lockpicking capabilities. The collection process involves systematic exploration across distinct geographical zones, each presenting unique environmental challenges and navigation puzzles.
Gladwin Moon’s assignment transforms specific castle areas into dedicated stealth segments, rewarding diligent players with two guaranteed lunar artifacts. The remaining specimens demand thorough free-roaming investigation across the game’s diverse landscapes. Upgrade progression operates through clearly defined tiers, each requiring consultation with Gladwin upon meeting collection thresholds:
Strategic prioritization proves crucial – since advanced locking mechanisms guard valuable areas early on, many players benefit from initially targeting Hogsmeade village statues. This approach unlocks progression-critical content sooner, creating a more fluid gameplay experience. The tiered system ensures gradual skill development while encouraging comprehensive world exploration.
Successful moon gathering requires methodical planning and temporal awareness. Begin each session by verifying in-game time through the map interface – remember that these magical artifacts remain invisible during daylight conditions. Many experienced players recommend systematic region clearing: complete Hogwarts grounds before advancing to Hogsmeade, then conclude with Highland expeditions. This geographic sequence aligns naturally with lock difficulty progression throughout the main storyline.
Common collection errors include neglecting time advancement, overlooking obscure statue placements, and attempting advanced locks prematurely. Avoid frustration by maintaining moon collection as an ongoing side activity rather than a focused grind session. For optimal efficiency, combine statue hunting with other exploration objectives like Field Guide page collection or Merlin Trials. This integrated approach maximizes productivity while minimizing repetitive gameplay patterns.
Advanced practitioners suggest nighttime-exclusive gaming sessions, utilizing the Class Guide principles of role specialization by treating moon collection as a dedicated reconnaissance mission. This mindset shift transforms what could become tedious into an engaging strategic challenge.
Regularly check back with Gladwin Moon each time you achieve a new Alohomora spell proficiency level. These upgrade milestones are critical for accessing restricted areas throughout Hogwarts. During your progression, you’ll encounter Piers Pemberton, an NPC who holds key information about the elusive Demiguise statues causing Gladwin’s ongoing frustrations.
Successfully gathering every Demiguise Moon artifact rewards players with the coveted “Demiguise Dread” achievement. For optimal efficiency, focus on nighttime collection when moons are visibly glowing, and prioritize high-density areas like faculty towers and restricted sections. Many players waste 2-3 hours by not using Revelio consistently near potential hiding spots. After completing your collection, have a final conversation with Piers before reporting your success to Gladwin to officially conclude this multi-stage questline.
Hogwarts Legacy comes from Avalanche Software, operating under the Warner Bros. Interactive Entertainment umbrella. The title has faced significant discussion surrounding transphobic statements made by Harry Potter creator JK Rowling. While she maintains no direct development involvement, Rowling benefits financially from the game’s commercial performance. Our comprehensive coverage details how Rowling’s remarks have affected transgender communities, including resources supporting trans creators and recommended charitable organizations.
Action Checklist
- Identify high-priority collection zones near active Conquest objectives
- Integrate collection with daily Assignment completions for efficiency
- Upgrade lockpicking tier before major NATO operations
- Apply advanced security clearance to access restricted Pax Armata campaign areas
- Complete Gladwin Moon’s initial stealth mission to unlock Alohomora and obtain first two statues
- Use world map to advance time to nighttime for all statue collection attempts
- Systematically collect 9 Demiguise Moons for Level 2 Alohomora upgrade
- Return to Gladwin Moon after each threshold (9 and 22 total) for spell upgrades
- Complete remaining collection for ‘Demiguise Dread’ achievement
- Complete Gladwin Moon’s initial stealth mission to acquire your first two moons
- Systematically search Hogwarts Castle during nighttime, prioritizing areas near locked doors
- Collect 9 total moons and return to Gladwin for Alohomora level 2 upgrade
- Explore Hogsmeade Village after obtaining level 2, focusing on shops with advanced locks
- Gather 13 additional moons from Highlands regions to achieve level 3 mastery
- Visit Gladwin Moon after each lockpicking level increase
- Collect Demiguise Moons systematically using nighttime advantage
- Speak with Piers Pemberton after moon collection completion
- Return to Gladwin Moon for quest conclusion and rewards
No reproduction without permission:SeeYouSoon Game Club » Hogwarts Legacy – All Demiguise Statues And Demiguise Moons For Alohomora Upgrades