TL;DR
- Sentinel Prime blends narrative progression with intense combat encounters
- The Gladiator boss requires precise timing for counter-attacks during green flashes
- Phase two introduces flail spinning and projectile barriers requiring dash mastery
- Return to Fortress of Doom involves clearing enemies before system restoration
- Strategic weapon selection and movement are crucial for mission success
Sentinel Prime delivers a compelling mix of narrative depth and high-intensity combat scenarios that will test your demon-slaying prowess.
Doom Eternal’s eighth chapter emphasizes story progression while maintaining the series’ signature aggressive gameplay. Despite the increased narrative focus, you’ll encounter one of the game’s most challenging boss encounters, demanding sharp reflexes and tactical awareness. This comprehensive guide provides detailed strategies to overcome every obstacle and emerge victorious from Sentinel Prime’s demonic challenges.
For additional Doom Eternal mission assistance, explore our complete guide collection covering all campaign chapters. New walkthroughs are regularly added to support your progression. If you need fundamental gameplay guidance, consult our essential tips covering critical mechanics and strategies. Alternatively, check our detailed game analysis for deeper insights.
Begin by following the designated path onto the elevator system, continuing forward after cinematic sequences conclude. Upon exiting through the subsequent doorway, observe the substantial structural breach in the adjacent building to your right. Proceed from this location, turning left in the following chamber and ascending the elevated platform to reach the upper level. Navigate right through the next entrance and climb the staircase to access another elevator, then advance directly forward to prepare for the impending boss confrontation.
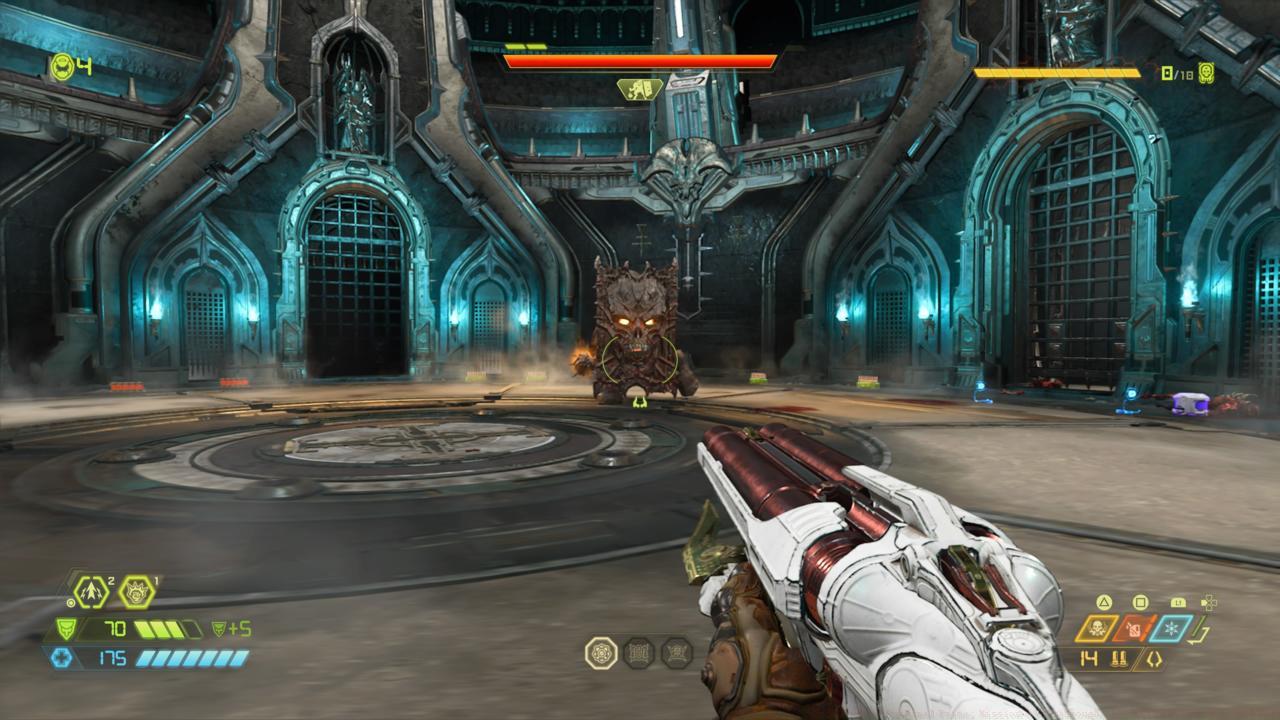
The Gladiator combatant operates on similar principles to the Marauder enemy type, requiring precise counter-attacks when visual indicators flash green. Specifically, the ocular features on the Gladiator’s demonic protective shield will illuminate green immediately preceding offensive maneuvers. Maintain constant lateral movement around the boss arena while readying your attacks for these critical flash moments. A successfully timed counter-strike creates an opening for executing a Glory Kill sequence, removing significant portions of the Gladiator’s health reservoir.
Once the health gauge diminishes to approximately fifty percent capacity, the adversary begins projecting shield replicas toward your position. These projectile attacks are relatively straightforward to evade through sidestepping maneuvers—remain vigilant for the characteristic shield bash animation that signals their imminent arrival.
Advanced Phase One Strategies: Utilize the Super Shotgun for maximum damage during counter-attack windows. The Ballista proves equally effective for maintaining distance while dealing substantial harm. Avoid wasting ammunition during non-vulnerability periods, as the Gladiator will deflect standard attacks effortlessly. Monitor your armor and health levels consistently, using flame belch strategically to maintain resources during this demanding encounter.
After completely depleting the Gladiator’s initial health bar, the confrontation transitions into its secondary stage. The combatant abandons shield usage in favor of spinning one flail weapon continuously for several seconds. Refrain from discharging your weapons during this spinning animation, as projectiles will rebound directly toward your position. Engage the Gladiator exclusively during periods when it ceases weapon rotation, employing rapid Dash maneuvers to evade attacks when flail components flash.
Periodically, the boss will generate two containment barriers on opposing sides of your location, launching assorted projectiles in your direction. Deploy the Dash ability to swiftly reposition yourself beneath the apex of these incoming projectiles to avoid impact. After inflicting sufficient damage, conclude the encounter with a final Glory Kill execution.
Phase Two Optimization: The Rocket Launcher’s lock-on burst mod delivers exceptional damage during stationary attack phases. Time your dashes carefully to conserve boost capacity for emergency evasion. The Chaingun with mobile turret mod provides sustained damage output while maintaining mobility. Remember that precision weaponry like the Precision Bolt can target vulnerable spots during brief stationary moments.
Your subsequent return to the Fortress of Doom introduces distinctive variations from previous visits. With Khan Maykr compromising the fortress operational systems, you must eliminate numerous lesser adversaries before advancing further. This segment remains relatively straightforward—once all hostiles are neutralized, simply follow the navigation marker to reinstate power functionality, then traverse through the portal gateway to access the subsequent mission assignment.
Efficient Clearing Tactics: Deploy the Combat Shotgun with sticky bombs for rapid crowd control. The weapon proficiency developed throughout your campaign proves invaluable here. Utilize environmental hazards and choke points to manage enemy numbers effectively. This intermission typically requires 3-5 minutes for completion, depending on your chosen combat approach and difficulty setting.
Action Checklist
- Navigate initial path to elevator, continuing post-cutscene
- Counter-attack Gladiator during green shield flashes
- Avoid shooting during flail spinning phases in stage two
- Use dash to position beneath projectile arcs during barrier attacks
- Clear fortress enemies and restore systems post-boss battle
No reproduction without permission:SeeYouSoon Game Club » Doom Eternal Sentinel Prime: Mission 8 Walkthrough, Gladiator Boss Fight, And Tips Master the Gladiator boss fight and navigate Sentinel Prime with expert strategies and practical tips