TL;DR
- Ship Command skill provides the foundation with +4 to +8 crew capacity increases per rank
- Kon-Tiki B-500 Bridge and Stroud Battle Station 2×2 offer optimal station bonuses
- Technical modules contribute fractional capacity that accumulates significantly
- Your final crew limit equals the lowest value among three calculation categories
- Advanced modules require complementary skill investments in Piloting and Starship Design
Expanding your vessel’s personnel capacity in Starfield requires careful planning and resource allocation. Having adequate crew stations transforms your spacecraft from a basic transport into a fully-functional mobile base with specialized roles.
Managing your ship’s complement involves balancing three distinct calculation categories that determine your maximum allowed crew:
- Ship Command skill – Your personal leadership capability
- Cockpit and habitation modules – Physical workstation availability
- Technical support systems – Reactor, weapon, engine, and shield capacities
The game employs a bottleneck principle where your active crew limit equals the lowest value among these three categories. If you aim for five crew members, all three systems must support at least that number.
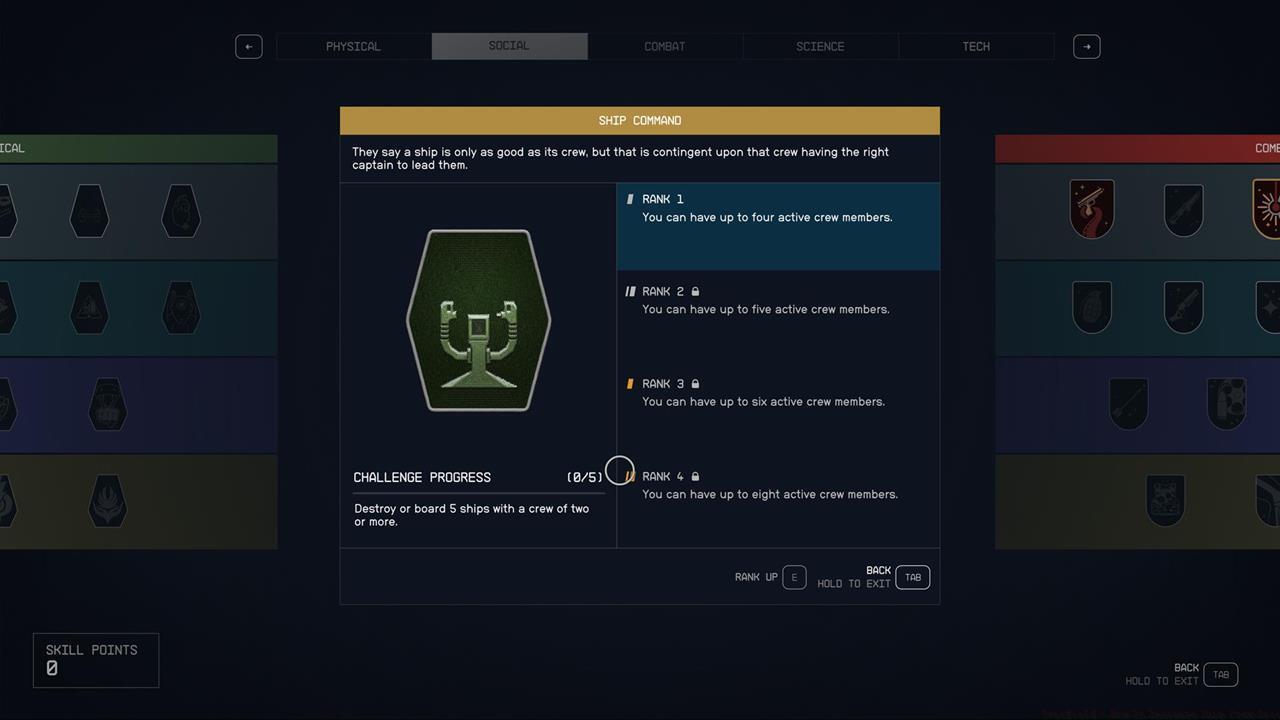
Ship Command represents a tier 4 Social skill that significantly enhances your command capabilities. This proficiency stands among the most valuable investments for players focused on ship management and combat effectiveness.
Each rank progression delivers substantial crew capacity improvements:
- Rank 1: +4 crew members
- Rank 2: +5 crew members
- Rank 3: +6 crew members
- Rank 4: +8 crew members
Advancing through the ranks requires completing specific challenges tied to your current crew complement. You must destroy or successfully board enemy vessels while maintaining specific crew levels, creating a progressive skill development path.
Strategic skill point allocation is crucial for Ship Command advancement.
Common mistake: Many players underestimate the time investment required for rank progression challenges. Plan for 2-3 hours of focused gameplay per rank advancement.
Strategic module selection forms the physical foundation of your crew capacity. While ships can accommodate multiple habitation modules, they’re restricted to a single cockpit, making that selection particularly critical.
Our testing reveals optimal configurations for maximizing workstation availability:
- Cockpit: Kon-Tiki B-500 Bridge (available at Stroud-Ecklund shop in Neon) – provides +6 crew stations
- Habitation: Stroud Battle Station 2×2 (also at Stroud-Ecklund in Neon) – adds +6 crew stations
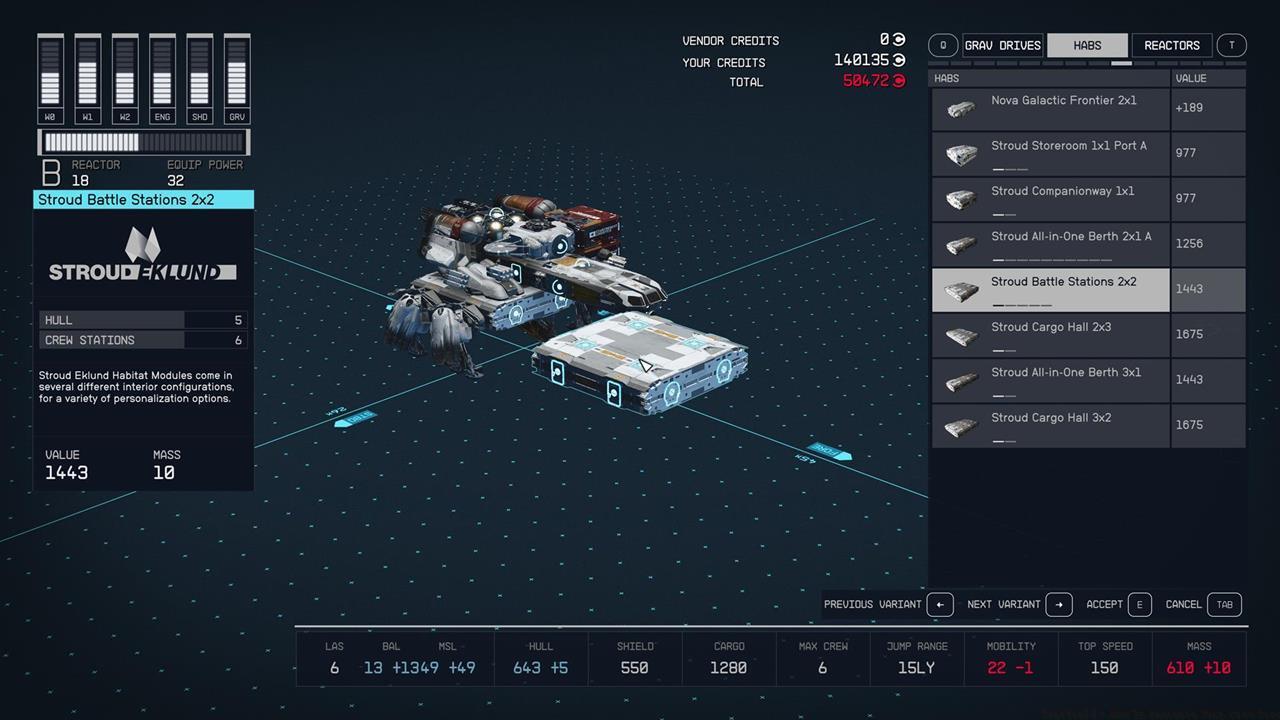
The Stroud Battle Station represents the pinnacle of habitation module efficiency.
Advanced tip: Combine multiple Stroud Battle Station habs when space permits, as their bonuses stack multiplicatively with proper ship design.
Remember that higher-tier modules often require advanced Piloting skill or Starship Design skill investments. For comprehensive ship building strategies, consult our Complete Guide to master all aspects of vessel customization.
Your ship’s technical infrastructure contributes fractional crew capacity that accumulates into significant bonuses. Understanding these mechanics prevents unexpected limitations during ship customization.
Reactor systems: Limited to one unit per vessel; SF, Pinch, or Fusor variants provide +3 crew capacity
Weapon arrays: Each individual weapon contributes 0.5 crew capacity. While you’re restricted to three weapon model types, you can install multiple units of each approved variant.
Engine configurations: Multiple engines are permitted, with each adding +0.25 crew capacity. However, you cannot exceed your reactor’s power allocation limits.
Shield generators: Single module restriction; provides +0.5 crew capacity
Advanced technical modules demand corresponding skill investments for optimal performance.
Optimization strategy: Balance weapon and engine quantities against your reactor’s maximum output. Overloading systems reduces overall efficiency and crew capacity.
For detailed weapon optimization, our Weapons Unlock Guide provides comprehensive loadout recommendations.
To demonstrate practical crew capacity calculations, we conducted controlled experiments starting with bare ship frames and systematically adding capacity-enhancing components.
Basic configuration example:
- Reactor group: Single reactor (+3), six weapons (+3), one shield (+0.5), and two engines (+0.5) = +7 total
- Cockpit/hab group: Kon-Tiki Bridge (+6) only
- Final capacity: 6 crew members (limited by cockpit group)
Intermediate configuration:
- Added Stroud Battle Station 2×2 (+6)
- Reactor group: +7
- Cockpit/hab group: +12
- Final capacity: 7 crew members (reactor group becomes bottleneck)
Advanced configuration:
- Additional weapons: +3 capacity
- Reactor group: +10
- Cockpit/hab group: +12
- Final capacity: 10 crew members (exceeding Ship Command skill limit)
- Invest skill points in Ship Command social skill tree
- Visit Stroud-Ecklund shop in Neon for optimal modules
- Install Kon-Tiki B-500 Bridge cockpit for +6 crew stations
- Add Stroud Battle Station 2×2 hab modules strategically
- Balance reactor output with weapon and engine requirements
Visual documentation of crew capacity progression across different ship configurations.
These experimental configurations demonstrate that while module combinations can theoretically exceed skill limits, practical implementations require balancing essential systems like landing gear, fuel tanks, and grav drives. For optimal class selection to complement your crew strategy, explore our Class Guide for specialized role optimization.
Critical consideration: Higher-class reactors (B and C) often provide better crew capacity but demand corresponding investments in Piloting skill and Starship Design proficiency.
Action Checklist
No reproduction without permission:SeeYouSoon Game Club » Starfield – How To Increase Ship Crew Size Master Starfield's ship crew system with strategic skill investments and optimal module combinations for maximum efficiency