TL;DR
- Destroy any three of seven no dancing signs scattered across the Fortnite map
- Strategic route planning saves significant time compared to random searching
- Northern locations offer easier access while southern signs provide better loot opportunities
- Complete the challenge in 2-3 matches using proper landing strategies
- Combine with other weekly challenges for maximum efficiency
Fortnite’s Season 10 Boogie Down challenge presents players with a unique task that requires strategic navigation across the island. Unlike typical dance emotes that celebrate movement, this mission focuses on eliminating the very restrictions that prohibit such expressions.
As the season approaches its conclusion, completing Week 6 objectives becomes crucial for maximizing Battle Pass rewards. The no dancing sign destruction task stands out as particularly engaging due to its environmental storytelling elements and straightforward completion requirements.
Strategic planning significantly reduces completion time. While seven potential targets exist across diverse terrain, you only need to eliminate three to satisfy the challenge criteria. This allows for flexible approach strategies based on your current match situation and preferred playstyle.
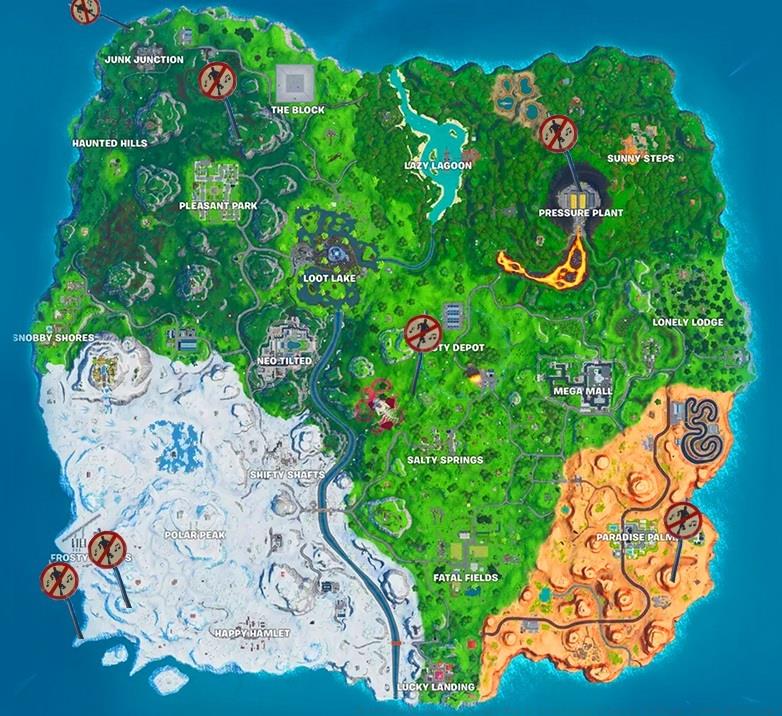
The northern sector offers three accessible locations ideal for quick challenge completion. Northwest of Junk Junction, you’ll find a sign positioned near the edge of the map, easily visible from multiple approaches. The mountain ridge separating The Block from Pleasant Park contains another target, often overlooked due to its elevated positioning.
Central map locations provide balanced risk-reward scenarios. Northwest of Salty Springs, positioned adjacent to the massive monster skeleton remains, offers both cover and landmark navigation. Pressure Plant’s top platform features a prominently placed sign that’s easily accessible during early game rotations.
Southern territories present higher-risk opportunities with potential loot advantages. The mountain southeast of Paradise Palms requires careful navigation but offers excellent sightlines. Southeast of Frosty Flights, another mountainous sign provides strategic high ground. The snow biome’s southwestern extremity completes the set with its remote positioning.
- Northwest of Junk Junction – Quick early game target
- Mountain between The Block and Pleasant Park – Elevated but visible
- Northwest of Salty Springs near skeleton – Landmark navigation aid
- Top platform at Pressure Plant – Central map accessibility
- Mountain southeast of Paradise Palms – Risk-reward balance
- Mountain southeast of Frosty Flights – Strategic high ground
- Southwestern snow biome tip – Remote but less contested
Optimizing your route selection can reduce completion time by 40-60%. Focus on clustered locations rather than traversing the entire map. The Junk Junction to Pleasant Park mountain route covers two signs efficiently, while the Pressure Plant to Salty Springs path provides central map coverage with minimal travel distance.
Avoid common mistakes like attempting to complete all seven signs in one match or neglecting situational awareness while destroying signs. Enemy players often monitor these locations anticipating challenge completion, so maintain constant environmental scanning during interaction animations.
Time management proves crucial – most players complete this challenge within 2-3 matches using proper landing strategies. Combine sign destruction with other weekly objectives like weapon challenges for maximum efficiency. The southern locations typically offer better loot opportunities but increased player traffic, requiring balanced decision-making.
Advanced players should consider weapon loadout selection when planning routes. Shotguns and SMGs work well for close-quarters defense while engaging with signs, while assault rifles provide better coverage for open-area locations. Understanding class-specific advantages can further optimize your approach strategy.
Action Checklist
- Select landing zone near 2-3 clustered sign locations
- Destroy signs using pickaxe for silent completion or weapons for faster destruction
- Rotate to additional locations while completing other objectives
- Verify challenge completion in menu before match conclusion
No reproduction without permission:SeeYouSoon Game Club » Fortnite No Dancing Signs Map & Locations (Season 10 Boogie Down Challenge) Complete guide to locating and destroying Fortnite's no dancing signs with strategic tips and efficiency methods