TL;DR
- Over 100 dungeons scattered across Sanctuary, each offering unique Legendary Aspects
- Class-specific rewards require strategic planning for optimal character progression
- Efficient routing and preparation significantly reduce farming time and resource waste
- Understanding aspect mechanics prevents common gearing mistakes and wasted effort
- Advanced strategies maximize legendary acquisition for endgame content preparation
Diablo 4 presents an expansive network of dungeons that serve as crucial progression hubs for character development. These underground complexes are strategically positioned throughout Sanctuary’s five major regions, offering both challenging combat encounters and valuable legendary rewards that directly impact your build effectiveness.
The game features more than 100 distinct dungeon locations, each meticulously designed with unique layouts, environmental hazards, and boss encounters. Every dungeon completion guarantees a specific Legendary Aspect reward that can be extracted and imprinted onto other gear pieces. These aspects are class-restricted, meaning you’ll need to carefully plan which dungeons to prioritize based on your current character selection and desired build path.
Legendary Aspects obtained from dungeons provide foundational power spikes that can dramatically alter gameplay mechanics. Unlike random legendary drops, these guaranteed rewards allow for targeted farming and systematic character progression. Understanding this system early prevents wasted time and ensures you’re collecting the right aspects for your preferred playstyle.
Navigating Diablo 4’s extensive dungeon network requires both geographical knowledge and tactical awareness. The dungeons are unevenly distributed across Fractured Peaks, Scosglen, Dry Steppes, Kehjistan, and Hawezar, with some regions offering denser concentrations than others. This distribution impacts travel time and efficiency when farming specific aspects.
Each dungeon features a unique combination of monster types, environmental mechanics, and objective structures. Some require clearing all enemies, while others involve collecting items, defending points, or defeating specific elite packs. Understanding these variations helps you prepare appropriate skills and consumables before entering, significantly reducing completion times and resource consumption.
Difficulty scaling presents both challenges and opportunities. While higher World Tiers increase monster health and damage, they also improve reward quality and experience gains. However, the legendary aspects themselves remain consistent across difficulties, allowing players to farm essential build components at whatever challenge level they can comfortably manage.
Optimizing your dungeon runs requires understanding aspect mechanics beyond surface-level descriptions. Many legendary effects have hidden synergies with specific skill combinations or gear attributes that aren’t immediately apparent. Testing these interactions in controlled environments before committing to full builds prevents costly respecs and gear reconfiguration.
Common mistakes include farming dungeons for aspects that don’t synergize with your current build, neglecting dungeon-specific mechanics that can be exploited for faster clears, and underestimating the importance of mobility skills for navigating complex layouts efficiently.
Endgame considerations should influence your early dungeon selection. While immediate power gains are tempting, prioritizing aspects that scale well into higher World Tiers and have applications across multiple builds provides long-term value. Some dungeon aspects become foundational components for meta builds, while others have limited applications beyond specific niche setups.
Diablo 4 Dungeon Mastery System
Before delving into the extensive dungeon network, understanding the reward acquisition framework is essential for efficient progression. The Codex of Power interface displays all obtainable Legendary Aspects from initial dungeon completions, categorized by class-specific or universal availability.
Critical insight: Not all powerful Legendary Aspects originate from dungeons. Many superior versions must be extracted from legendary items found during gameplay. For comprehensive mechanics breakdown, consult our Legendary Aspects/Codex of Power mechanics guide to avoid missing crucial upgrade opportunities.
Navigation strategy: Most dungeons appear on your world map as you explore territories and complete campaign objectives. However, strategic exceptions exist where conquering Stronghold locations reveals hidden dungeon entrances. Additionally, while overworld geography remains fixed, dungeon interiors utilize procedural generation, creating varied layouts while maintaining consistent reward locations.
Fractured Peaks Dungeon Network
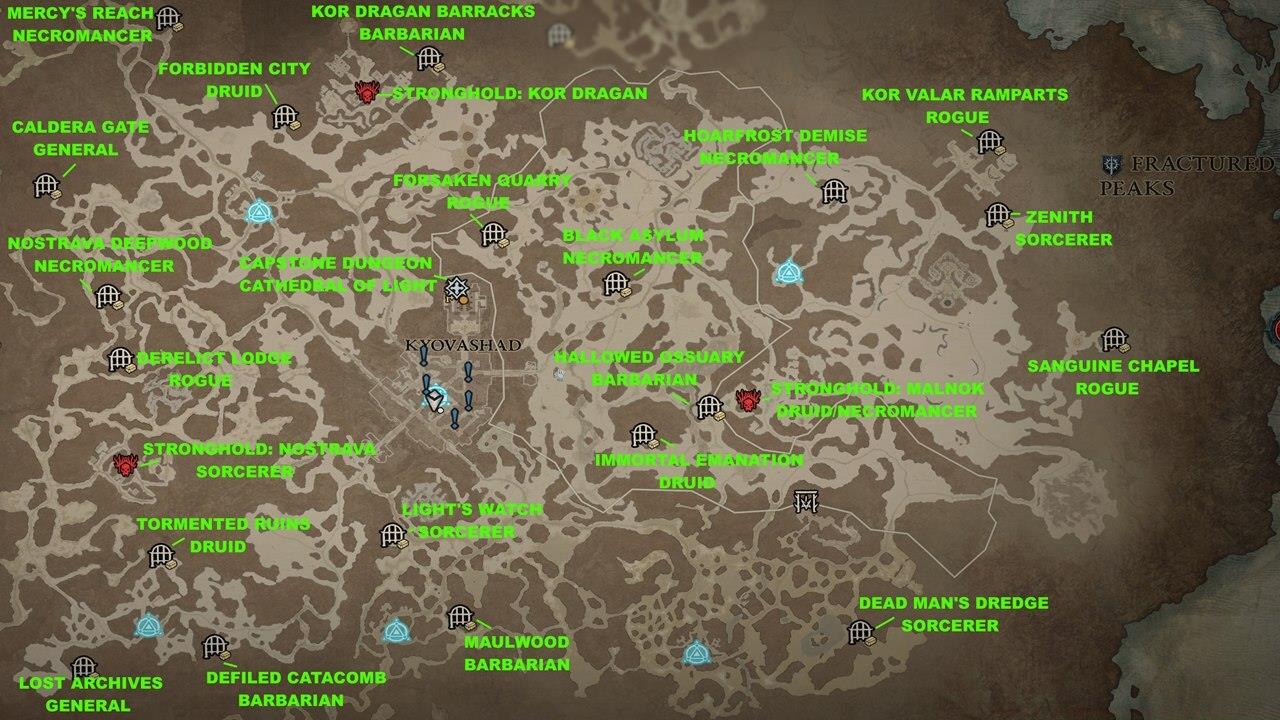
Fractured Peaks dungeons map
Kyovashad: Capstone Dungeon
- Cathedral of Light– This level 50+ endgame dungeon unlocks post-campaign completion. Successfully clearing it on World Tier 2 grants access to World Tier 3 difficulty with enhanced rewards.
Stronghold: Nostrava
- Cultist Refuge: Flamewalker’s Aspect (Sorcerer) – Contact with Firewall provides +15% movement speed boost for four seconds – ideal for kiting strategies.
Stronghold: Malnok
- Anica’s Claim: Stormclaw’s Aspect (Druid) – Shred critical strikes discharge +20% damage as lightning to primary target and adjacent enemies.
- Rimescar Cavern: Aspect of Plunging Darkness (Necromancer) – Bone Prison generates Blight pools dealing 50% bonus damage over six seconds.
Desolate Highlands
- Defiled Catacomb: Aspect of Tempering Blows (Barbarian) – Weapon swapping six times grants X Fortify for enhanced survivability.
- Tormented Ruins: Aspect of the Unsatiated (Druid) – Eliminating enemies with Shred empowers your next Werewolf ability with 20% spirit generation and damage increase.
- Lost Archives: Aspect of the Protector (General) – Damaging elite enemies creates protective Barriers absorbing X damage for 10 seconds; 30-second cooldown.
The Pallid Glade
- Derelict Lodge: Aspect of Explosive Verve (Rogue) – Grenade abilities classify as Traps; arming Traps or deploying Grenades increases movement speed for three seconds.
- Nostrava Deepwood: Flesh-Rending Aspect (Necromancer) – Decompose corpse generation refunds +10 essence for resource management.
- Caldera Gate: Eluding Aspect (General) – Taking damage while crowd-controlled provides unstoppable status for four seconds; 40-second cooldown.
Sarkova Pass
- Mercy’s Reach: Blood Seeker’s Aspect (Necromancer) – Blood Lance damage multiplies by x15% against primary targets per impaled enemy.
- Forbidden City: Nighthowler’s Aspect (Druid) – Blood Howl critical chance increases by +5%; benefits companions and allies within range for three seconds.
- Kor Dragan Barracks: Aspect of Anemia (Barbarian) – Lucky Hit; direct damage against bleeding foes has 20% stun chance for two seconds.
Dobrev Taiga
- Light’s Watch: Aspect of Conflagration (Sorcerer) – Incinerate channeling amplifies burning damage by +20%.
- Maulwood: Slaking Aspect (Barbarian) – Lucky Hit; +30% probability to gain 20 fury when Rend damages bleeding enemies.
Gale Valley
- Dead Man’s Dredge: Aspect of Piercing Cold (Sorcerer) – Ice Shards penetrate three times with 25% reduced damage per subsequent enemy.
Frigid Expanse
- Immortal Emanation: Mangled Aspect (Druid) -+20% chance to acquire +1 spirit when struck in Werebear form.
- Hallowed Ossuary: Aspect of Unrelenting Fury (Barbarian) – Core skill kills refund 10% base resource cost; single activation per cast.
- Black Asylum: Aspect of Torment (Necromancer) – Bone skill critical strikes boost energy regeneration by +20% for four seconds.
- Forsaken Quarry: Aspect of Encircling Blades (Rogue) – Flurry damage increases by +8% with circular area damage around your character.
Seat of the Heavens
- Hoarfrost Demise: Blood-Bathed Aspect (Necromancer) – Blood Surge nova repeats after brief delay inflicting 70% reduced damage.
- Zenith: Recharging Aspect (Sorcerer) – Chain Lightning ricochets grant +4 mana per bounce.
- Sanguine Chapel: Energizing Aspect (Rogue) – Basic skill damage against elite enemies regenerates +3 energy.
Kor Valar
- Kor Valar Ramparts: Blast-Trapper’s Aspect (Rogue) – Lucky Hit; direct damage to Trap-affected enemies has 30% vulnerability application chance.
Scosglen Dungeon Complexes
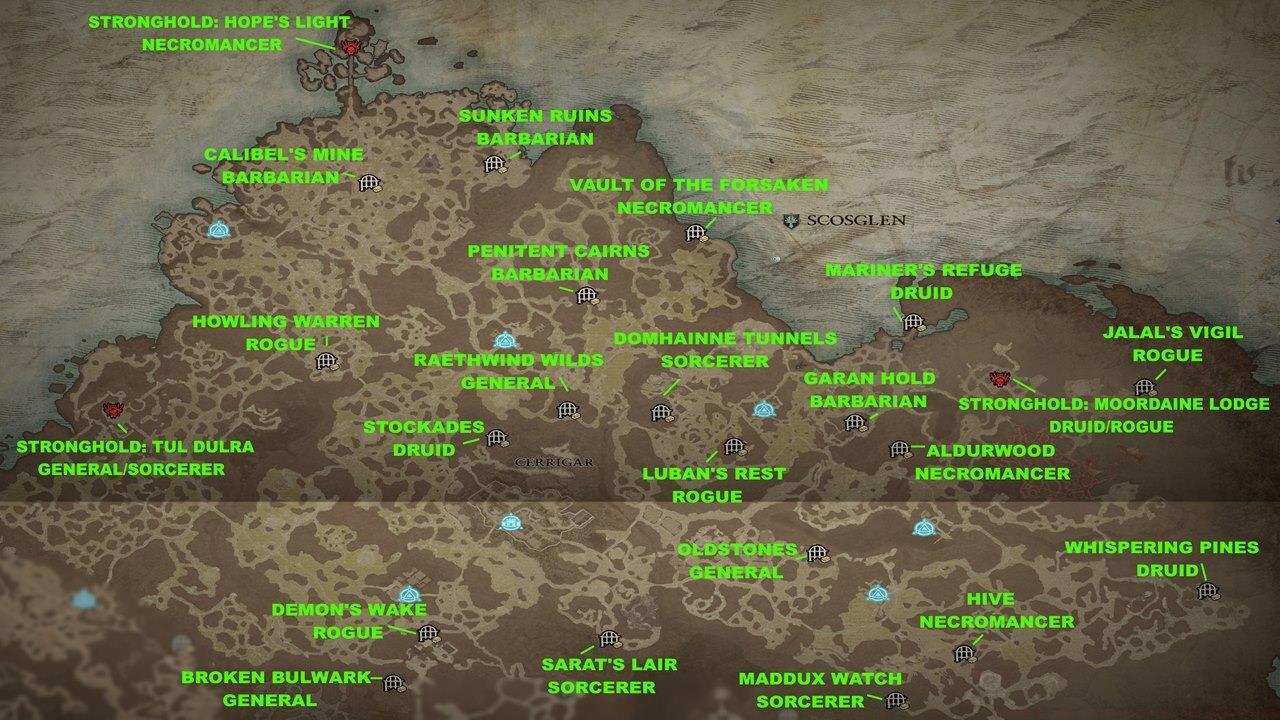
Scosglen dungeons map
Stronghold: Moordaine Lodge
- Ferals’ Den: Aspect of Quicksand (Druid) – Earth abilities apply 25% movement slow to struck enemies for five seconds.
- Twisted Hollow: Shadowslicer Aspect (Rogue) – Dash activation spawns Shadow Clone at origin point; duplicate performs Dash dealing 25% base damage.
Stronghold: Tur Dulra
- Underroot: Aspect of the Expectant (General) – Basic skill attacks against enemies progressively increase core skill damage by 5% per hit, maximum 30%.
- Wretched Delve: Aspect of Static Cling (Sorcerer) – Charged Bolts possess 15% attraction probability toward enemies; duration extends by 300%.
Stronghold: Hope’s Light
- Flooded Depths: Aspect of the Empowering Reaper (Necromancer) – Sever critical strikes have 10% chance to generate Blight pools dealing 20% bonus damage; three-second cooldown.
Northshore
- Calibel’s Mine: Aspect of the Relentless Armsmaster (Barbarian) – +20% fury generation while Walking Arsenal passive damage bonuses remain active.
- Sunken Ruins: Aspect of Ancestral Force (Barbarian) – Hammer of the Ancients generates seismic waves dealing percentage damage to surrounding foes.
- Howling Warren: Aspect of Arrow Storms (Rogue) – Lucky Hit; Marksman abilities have 10% maximum probability to create Arrow Storms at target locations inflicting X damage over three seconds; maximum five simultaneous storms.
Wailing Hills
- Vault of the Forsaken: Requiem Aspect (Necromancer) – Active minions provide +3 maximum essence capacity each.
- Penitent Cairn: Death Wish Aspect (Barbarian) – Berserking state grants X Thorns damage reflection.
- Raethwind Wilds: Aspect of Inner Calm (General) – Stationary positioning increases damage output by 5% per second, maximum 30%.
Strand
- Domhainne Tunnels: Aspect of Efficiency (Sorcerer) – Basic skill casting reduces subsequent core skill resource cost by 10%.
- Luban’s Rest: Cheat’s Aspect (Rogue) – Receive 15% reduced damage from crowd-controlled enemies; crowd-controlled enemy damage triggers +15% movement speed for two seconds.
- Garan Hold: Aspect of the Dire Whirlwind (Barbarian) – Whirlwind channeling duration increases critical chance by 5% per second, maximum 20%.
- Mariner’s Refuge: Overcharged Aspect (Druid) – Lucky Hit; lightning damage dealing has 10% maximum chance to overload targets for three seconds; your direct damage causes pulsating area effects hitting nearby enemies.
The Shrouded Moors
- Aldurwood: Aspect of Reanimation (Necromancer) – Skeleton minions gain progressive damage increase while remaining active, maximum 20% after 10 seconds.
- Jalal’s Vigil: Bladedancer’s Aspect (Rogue) – Returning Twisting Blades orbit briefly dealing 10% damage per rotation; distance-based scaling up to 20%.
The Downs
- Sarat’s Lair: Snowveiled Aspect (Sorcerer) – Ice Armor activation provides unstoppable status for two seconds.
- Oldstones: Edgemaster’s Aspect (General) – Ability damage scales with available primary resource at cast time; maximum 10% benefit at full resource.
Highland Wilds
- Maddux Watch: Charged Aspect (Sorcerer) – Collecting Crackling Energy boosts movement speed by +10% for four seconds.
- Hive: Aspect of Swelling Curse (Necromancer) – Bone Spirit damage amplification increases based on travel distance, maximum 15%.
- Whispering Pines: Ballistic Aspect (Druid) – Fortify status grants +2 ranks to Earth abilities.
The Emerald Chase
- Stockades: Crashstone Aspect (Druid) – Earth skills inflict +40% additional damage against crowd-controlled enemies.
Westering Lowlands
- Broken Bulwark: Ghostwalker Aspect (General) – Unstoppable status and subsequent four seconds provide +10% movement speed and phasing through enemies.
- Demon’s Wake: Aspect of Uncanny Treachery (Rogue) – Agility skill damage against dazed enemies grants Stealth for four seconds; breaking Stealth with attacks provides +15% control impaired duration reduction for four seconds.
Dry Steppes Dungeon Territories
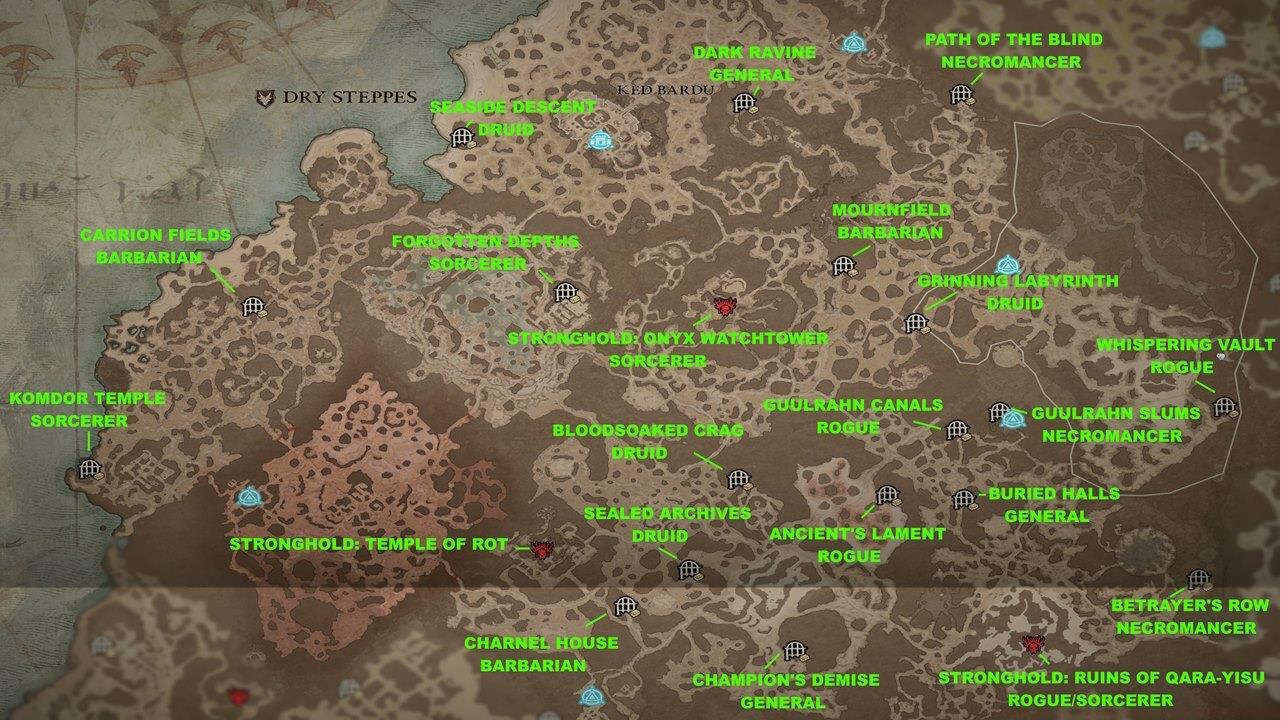
Dry Steppes dungeons map
Stronghold: The Ruins of Qara-Yisu
- Shifting City: Ravenous Aspect (Rogue) – Eliminating vulnerable enemies boosts energy regeneration by +50% for four seconds.
- Pallid Delve: Elementalist’s Aspect (Sorcerer) – Core or mastery skills cast above 100 mana threshold gain 20% critical strike probability.
Stronghold: The Onyx Watchtower
- The Onyx Hold: Storm Swell Aspect (Sorcerer) – Barrier protection increases damage against vulnerable targets by +11%.
Kotama Grasslands
- Seaside Descent: Aspect of Retaliation (Druid) – Core skill damage scales with Fortify amount, maximum 20% increase.
Tuusma Rift
- Dark Ravine: Aspect of Might (General) – Basic abilities provide 20% damage reduction for two seconds.
Khargai Crags
- Path of the Blind: Aspect of Bursting Bones (Necromancer) – Bone Prison segment destruction or expiration triggers area damage around itself.
- Mournfield: Aspect of Berserk Ripping (Barbarian) – Direct damage while Berserking applies 20% base damage as bleeding over five seconds.
- Grinning Labyrinth: Aspect of the Calm Breeze (Druid) – Lucky Hit; Wind Shear possesses 5% maximum chance to restore spirit resource.
Chambatar Ridge
- Whispering Vault: Aspect of Unstable Imbuements (Rogue) – Imbuement skill activation triggers imbued explosions around your character; applies Imbuement effects dealing X area damage.
Dindai Flats
- Forgotten Depths: Aspect of Biting Cold (Sorcerer) – Freezing enemies has 25% probability to apply vulnerability for three seconds.
The Scarred Coast
- Carrion Fields: Aspect of the Iron Warrior (Barbarian) – Iron Skin ability grants unstoppable status with 10% damage reduction.
- Komdor Temple: Aspect of the Bounding Conduit (Sorcerer) – Teleport casting increases movement speed by +20% for three seconds.
Untamed Scarps
- Bloodsoaked Crag: Shepherd’s Aspect (Druid) – Core skill damage increases by +6% per active companion.
- Sealed Archives: Aspect of Mending Stone (Druid) – Earthen Bulwark duration extends by +6 seconds; Earth skill kills replenish X Barrier amount from Earthen Bulwark.
- Charnel House: Aspect of Perpetual Stomping (Barbarian) – Kick or Ground Stomp damage against enemies resets Leap cooldown.
- Champion’s Demise: Aspect of the Umbral (General) – Crowd-controlling enemies restores +1 primary resource per application.
- Ancient’s Lament: Aspect of Volatile Shadows (Rogue) – Dark Shroud shadow removal triggers explosive Shadow damage around your position.
Jakha Basin
- Guulrahn Canals: Trickster’s Aspect (Rogue) – Caltrops deployment also launches Stun Grenade clusters dealing X physical damage with 0.5-second stun duration.
- Guulrahn Slums: Splintering Aspect (Necromancer) – Bone Spear primary strikes cause subsequent enemies to become vulnerable for 1.5 seconds; Bone Shards inflict 50% bonus damage to vulnerable targets with piercing capability.
- Buried Halls: Rapid Aspect (General) – Basic abilities gain +15% attack speed enhancement.
The Accursed Wastes
- Betrayer’s Row: Aspect of Potent Blood (Necromancer) – Full health status causes Blood Orbs to grant +10 essence.
Kehjistan Ancient Ruins
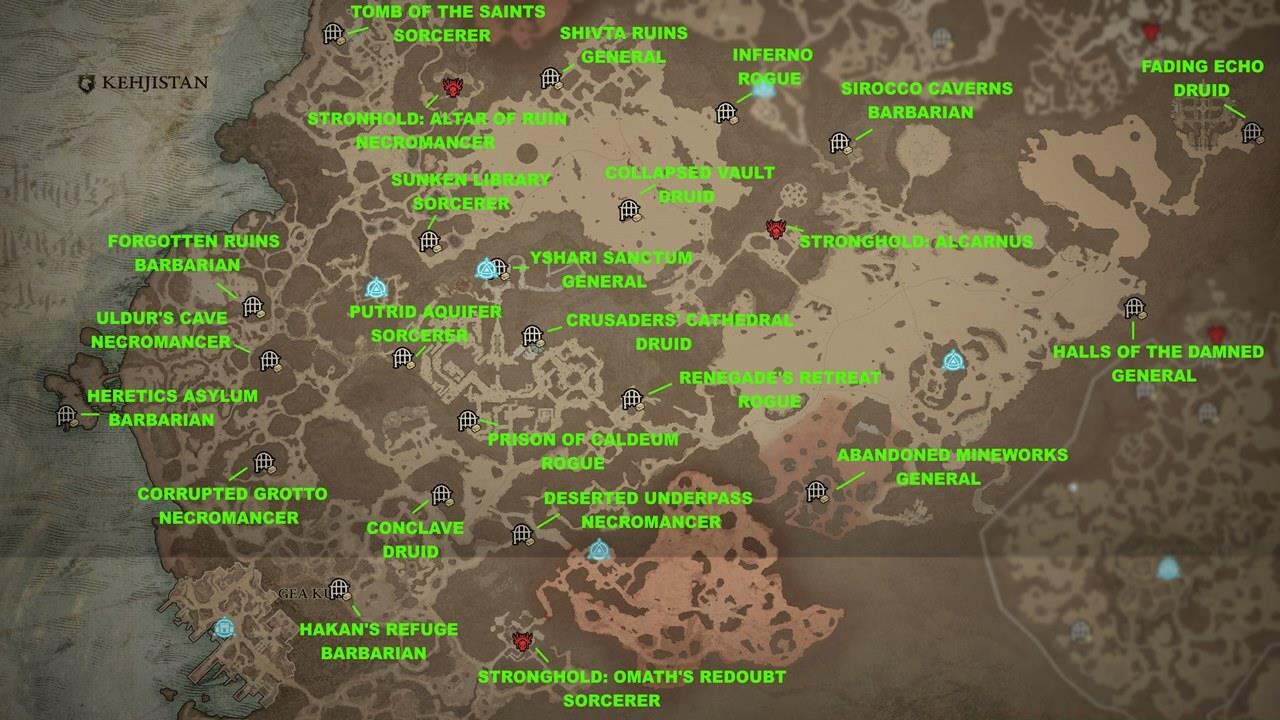
Kehjistan dungeons map
Stronghold: Altar of Ruin
- Sepulcher of the Forsworn: Hulking Aspect (Necromancer) – Golem normal attacks have 1% probability to reduce active cooldown by two seconds and spawn corpses.
Stronghold: Omath’s Redoubt
- Crumbling Hekma: Aspect of Splintering Energy (Sorcerer) – Lightning Spear casting has 11% chance to generate additional Lightning Spears.
Amber Sands
- Tomb of the Saints: Incendiary Aspect (Sorcerer) – Lucky Hit; Burning damage has 5% maximum chance to restore +10 mana.
- Sunken Library: Aspect of Control (Sorcerer) – Damage amplification increases by +30% against immobilized, stunned, or frozen enemies.
- Shivta Ruins: Wind Striker Aspect (General) – Critical strikes provide +8% movement speed for one second, maximum six seconds.
- Collapsed Vault: Aspect of Cyclonic Force (Druid) – Cyclone Armor provides physical damage reduction; effect applies to nearby allies.
- Inferno: Vengeful Aspect (Rogue) – Lucky Hit; vulnerability application has 30% maximum chance to increase critical hit rate by +3% for three seconds, maximum +9%.
Scouring Sands
- Sirocco Caverns: Aspect of Echoing Fury (Barbarian) – Active Shout skills generate +2 fury per second.
- Abandoned Mineworks: Aspect of Retribution (General) – Distant enemies hitting you have 8% stun chance for two seconds; deal 20% increased damage to stunned enemies.
- Halls of the Damned: Aspect of Disobedience (General) – Dealing any damage type increases armor by +0.25% for four seconds; maximum 25% stacking.
- Fading Echo: Skinwalker’s Aspect (Druid) – Shapeshifting skill usage grants X life; full health converts to equivalent Fortify amount.
Caldeum
- Yshari Sanctum: Needleflare Aspect (General) – Thorns damage has 20% probability to affect surrounding enemies.
- Crusaders’ Cathedral: Stormshifter’s Aspect (Druid) – Hurricane activation grants +2 ranks to Shapeshifting abilities.
- Prison of Caldeum: Opportunist’s Aspect (Rogue) – Stealth-breaking attacks deploy Stun Grenade clusters dealing X physical damage with 0.5-second stun.
- Renegade’s Retreat: Aspect of Corruption (Rogue) – Imbuement skill effectiveness increases by 20% against vulnerable targets.
- Deserted Underpass: Torturous Aspect (Necromancer) – Iron Maiden-afflicted enemies have 15% chance to become stunned for one second when dealing direct damage.
Ragged Coastline
- Putrid Aquifer: Aspect of the Unwavering (Sorcerer) – Taking direct damage has 2% probability to reset defensive skill cooldowns.
- Forgotten Ruins: Iron Blood Aspect (Barbarian) – Nearby bleeding enemies provide 2% damage reduction per enemy, maximum 10%.
- Uldur’s Cave: Aspect of the Damned (Necromancer) – Shadow damage increases by +30% against enemies affected by Decrepify and Iron Maiden.
- Corrupted Grotto: Aspect of Grasping Veins (Necromancer) – Corpse Tendrils casting increases critical strike chance by +10% for six seconds; deal +30% bonus damage to Corpse Tendrils-affected enemies.
- Heretics Asylum: Veteran Brawler’s Aspect (Barbarian) – Core skill direct damage against enemies progressively increases subsequent Charge or Leap damage by +15% per hit, maximum 225%.
Southern Expanse
- Conclave: Aspect of the Changeling’s Debt (Druid) – Werebear skill damage against poisoned enemies instantly deals 120% poisoning damage while consuming the effect.
- Hakan’s Refuge: Relentless Berserker’s Aspect (Barbarian) – Lucky Hit; core skill damage against enemies has 22% maximum chance to extend Berserking duration by one second; critical strikes double extension duration.
Hawezar Swamp and Marsh Dungeons
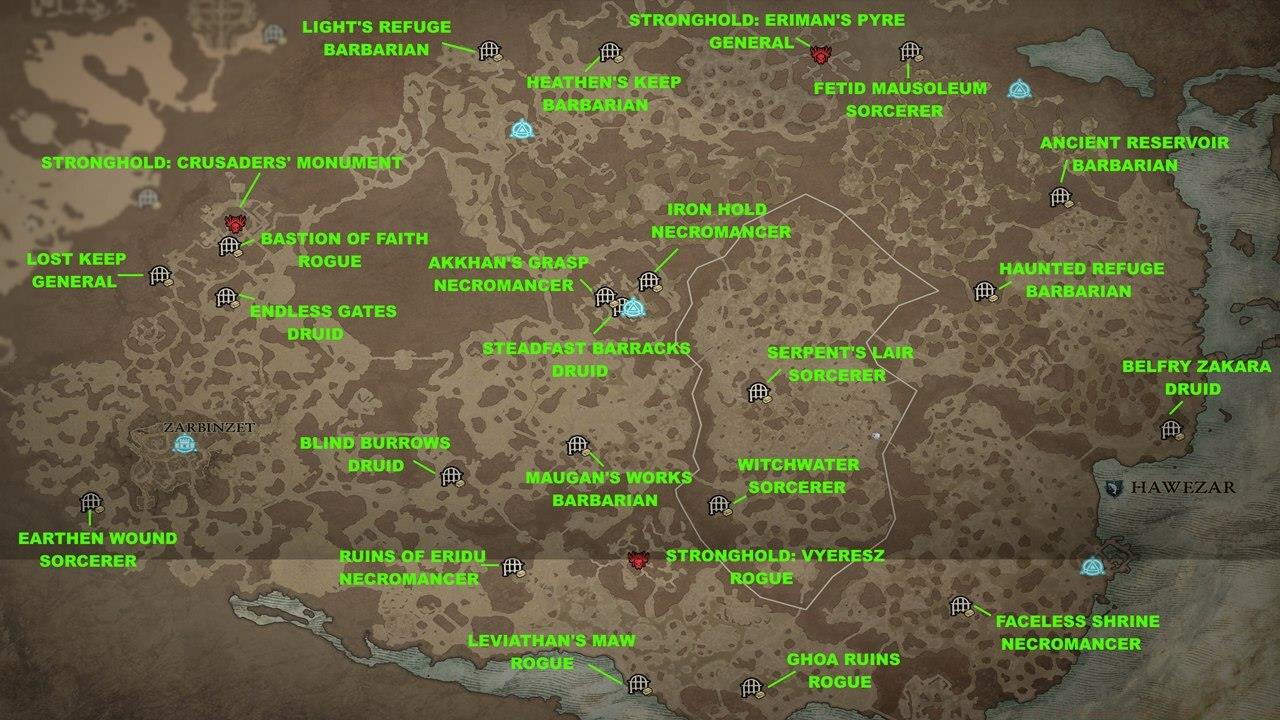
Hawezar dungeons map
Stronghold: Eriman’s Pyre
- Oblivion: Aspect of Shared Misery (Rogue) – Lucky Hit; striking crowd-controlled enemies has 30% maximum chance to spread crowd-control effects to unaffected hostiles.
Stronghold: Vyeresz
- Shadowed Plunge: Aspect of Branching Volleys (Rogue) – Barrage arrows have 15% probability to split into two additional arrows during ricochet.
Dismal Foothills
- Heathen’s Keep: Aspect of Numbing Wrath (Barbarian) – Fury generation while at maximum fury provides +3 Fortify per point.
- Light’s Refuge: Aspect of Bul-Kathos (Barbarian) – Leap activation generates Earthquakes dealing X physical damage over four seconds; standing in Earthquake zones provides +5% damage reduction.
The Writhing Mire
- Fetid Mausoleum: Snowguard’s Aspect (Sorcerer)– Positioning within your Blizzard area reduces incoming damage by 10%.
Umir Plateau
- Bastion of Faith: Trickshot Aspect (Rogue) – Penetrating Shot damage against enemies triggers two additional side-splitting arrows; these inflict 10% of Penetrating Shot’s damage without further splitting.
- Lost Keep: Aspect of the Deflecting Barrier (General) – Active Barrier protection provides 7% chance to ignore direct damage from distant enemies.
- Endless Gates: Aspect of the Rampaging Werebeast (Druid) – Grizzly Rage duration extends by X seconds; critical strikes during Grizzly Rage increase critical damage by 10% for duration.
- Earthen Wound: Aspect of Singed Extremities (Sorcerer) – Immobilization effect expiration applies 25% slow to enemies for four seconds.
Fethis Wetlands
- Blind Burrows: Aspect of the Tempest (Druid) – Hurricane damage increases by 7% per second while active.
- Maugan’s Works: Earthstriker’s Aspect (Barbarian) – Ten weapon swaps empower your next attack to Overpower dealing 30% increased Overpower damage.
Ruins of Rakhat Keep
- Iron Hold: Fastblood Aspect (Necromancer) – Blood Orb collection reduces ultimate skill cooldown by 0.5 seconds.
- Akkhan’s Grasp: Blighted Aspect (Necromancer) – Shadowblight key passive damaging enemies 10 times increases damage by 50% for six seconds.
- Steadfast Barracks: Vigorous Aspect (Druid) – Werewolf Shapeshifting provides 10% damage reduction.
Toxic Fens
- Ruins of Eridu: Sacrificial Aspect (Necromancer) – Sacrifice effect bonuses increase by 15%.
- Leviathan’s Maw: Aspect of Siphoned Victuals (Rogue) – Lucky Hit; core skill damage against vulnerable enemies has 10% maximum chance to drop Healing Potions.
- Ghoa Ruins: Enshrouding Aspect (Rogue) – Stationary positioning generates free Dark Shroud shadows every three seconds; each shadow provides +2% damage reduction.
Blightmarsh
- Witchwater: Prodigy’s Aspect (Sorcerer) – Cooldown usage restores 15 mana.
- Serpent’s Lair: Aspect of Three Curses (Sorcerer) – Meteor critical damage against healthy targets increases by +33%.
Forsaken Coast
- Faceless Shrine: Unyielding Commander’s Aspect (Necromancer) – Army of the Dead activation increases minion attack speed by +70% with 90% damage reduction.
Rotspill Delta
- Haunted Refuge: Brawler’s Aspect (Barbarian) – Kick or Charge-damaged enemies explode upon death within two seconds dealing X damage to surrounding hostiles.
- Belfry Zakara: Aspect of the Ursine Horror (Druid) – Pulverize transforms into Earth skill; post-casting generates tectonic spikes dealing X damage over two seconds.
- Ancient Reservoir: Aspect of Ancestral Echoes (Barbarian) – Lucky Hit; Leap, Upheaval, or Whirlwind damage against enemies has 40% maximum chance to summon Ancient duplicates performing identical skills; five-second cooldown.
Optimization Strategies for Maximum Efficiency
Advanced players should prioritize dungeon sequencing based on their current build requirements. Focus on acquiring general Aspects first, then target class-specific ones that synergize with your primary abilities. The Weapons Unlock guide offers complementary strategies for gear acquisition that pair well with dungeon farming.
Common Pitfalls to Avoid:
- Wasting time on dungeons that don’t provide Aspects relevant to your current specialization
- Overlooking Stronghold prerequisites that block access to valuable dungeon locations
- Failing to coordinate dungeon runs with world events for maximum resource yield
- Ignoring procedural layout patterns that can significantly reduce clear times
Time Management: Most dungeons take 10-15 minutes to complete initially. With optimized routes and knowledge of enemy spawn patterns, experienced players can reduce this to 5-8 minutes per run.
For comprehensive class optimization strategies that complement your dungeon farming, check our Class Guide for detailed build recommendations.
Welcome to the comprehensive guide for Battlefield 6‘s expansive global combat theaters. As a BF6 specialist with hundreds of hours across all regions, I’ve compiled essential intelligence to dominate every engagement zone. The game’s four primary theaters – European, British Isles, Middle Eastern, and Asian – each present unique environmental challenges that demand specialized tactical approaches.
The NATO versus Pax Armata conflict unfolds across diverse landscapes, from snow-capped mountains to arid deserts. Understanding terrain advantages, optimal loadout configurations, and region-specific mechanics will dramatically improve your combat effectiveness and mission completion rates.
- Fractured Peaks Dungeons
- Kyovashad: Capstone Dungeon – This high-altitude combat zone features extreme verticality and limited sightlines. Ideal for sniper specialists and aerial insertion tactics.
- Stronghold: Nostrava – Ancient fortress with multiple defensive layers requiring coordinated team assaults.
- Stronghold: Malnok – Mountain pass chokepoint perfect for ambush tactics and area denial strategies.
- Desolate Highlands – Open terrain with minimal cover, demanding superior positioning and long-range engagement skills.
- The Pallid Glade – Dense forest environment where sound propagation is reduced and close-quarters combat dominates.
- Sarkova Pass – Strategic mountain corridor controlling access between regions, vital for Conquest mode victory.
- Dobrev Taiga – Snow-covered boreal forest with dynamic weather effects that impact visibility and mobility.
- Gale Valley – High-wind environment affecting projectile trajectory and aircraft stability.
- Frigid Expanse – Vast icy plains where thermal optics provide significant tactical advantages.
- Seat of the Heavens – Peak location offering unparalleled vantage points but limited escape routes.
- Kor Valar – Coastal mountain stronghold combining naval and ground combat elements.
Common Mistake: Many players underestimate the mobility penalties in snow-covered areas, making them easy targets for mobile flanking units. Always equip cold-weather gear and consider snowmobile transport for rapid repositioning.
- Scosglen Dungeons
- Stronghold: Moordaine Lodge – Coastal defense position with artillery emplacements and underground tunnels.
- Stronghold: Tur Dulra – Highland fortress requiring air superiority for successful assaults.
- Stronghold: Hope’s Light – Lighthouse complex controlling naval approaches and coastal shipping lanes.
- Northshore – Beach landing zone with amphibious combat dynamics and tidal influences.
- Wailing Hills – Rolling countryside perfect for armored vehicle engagements and mobile warfare.
- Strand – Coastal village with tight urban corridors and multi-story defensive positions.
- The Shrouded Moors – Fog-covered wetlands where thermal imaging provides critical intelligence advantages.
- The Downs – Open farmland offering long sightlines but limited natural cover, demanding careful movement planning.
- Highland Wilds – Rugged terrain with elevation changes that create natural sniper nests and ambush points.
- The Emerald Chase – Forested valley with dense vegetation perfect for stealth operations and guerrilla tactics.
- Westering Lowlands – Floodplain environment where water levels dynamically change, affecting vehicle mobility and infantry routes.
Advanced Tip: The dynamic weather in Scosglen regions can be weaponized. Time your assaults during heavy fog or rain to reduce enemy detection capabilities and mask your approach vectors.
- Dry Steppes Dungeons
- Stronghold: The Ruins of Qara-Yisu – Ancient city ruins offering complex urban combat with vertical gameplay elements.
- Stronghold: The Onyx Watchtower – Desert fortress controlling oasis resources and caravan routes.
- Kotama Grasslands – Open plains ideal for helicopter gunship operations and rapid armored assaults.
- Tuusma Rift – Canyon network with narrow passages perfect for demolition charges and area denial strategies.
- Khargai Crags – Mountainous desert with rock formations providing natural cover and sniper positions.
- Chambatar Ridge – High ground position overlooking multiple approach routes, making it critical for Conquest map control.
- Dindai Flats – Salt flat environment with extreme visibility but minimal cover, demanding superior long-range marksmanship.
- The Scarred Coast – Coastal desert with shipwrecks and debris creating complex close-quarters combat environments.
- Untamed Scarps – Cliffside positions requiring rappelling equipment and specialized insertion tactics.
- Jakha Basin – Desert valley with sandstorm dynamics that periodically reduce visibility to near-zero conditions.
- The Accursed Wastes – Radioactive exclusion zone with environmental hazards that damage players over time, requiring protective gear.
Time Estimate: Completing all Dry Steppes Assignments typically requires 8-12 hours of focused gameplay, depending on squad coordination and individual skill level.
- Kehjistan Dungeons
- Stronghold: Altar of Ruin – Mountain temple complex with intricate tunnel networks and multiple elevation levels.
- Stronghold: Omath’s Redoubt – Desert fortress featuring automated defense systems and drone surveillance capabilities.
- Amber Sands – Dune sea environment with shifting terrain that can trap vehicles and obscure objectives.
- Scouring Sands – Wind-swept plateau with reduced visibility and increased weapon wear from abrasive conditions.
- Caldeum – Metropolitan urban environment with skyscraper combat and underground subway systems.
- Ragged Coastline – Rocky shore with tidal caves and coastal artillery positions controlling naval access.
- Southern Expanse – Vast desert requiring extended-range communication equipment and supply management strategies.
Optimization Strategy: In Kehjistan’s urban environments, mastering vertical movement through ziplines and elevator shafts provides decisive tactical advantages over ground-bound opponents.
Having mastered the individual combat zones, it’s crucial to understand cross-theater strategies. Your BF6 Assignments often require proficiency across multiple regions, demanding adaptable loadouts and flexible tactical thinking.
Class Selection Guide: Different theaters demand specialized class configurations. Assault specialists excel in European mountain combat, while Engineers dominate Middle Eastern armored engagements. Recon units control British Isles sightlines, and Support classes thrive in Asian urban environments. Consult our comprehensive Class Guide for detailed build recommendations.
Weapon Optimization: Each region’s environmental conditions significantly impact weapon performance. Cold weather reduces reliability in Fractured Peaks, while sand and dust degrade weapons faster in Dry Steppes. Regular maintenance and appropriate attachments are essential for sustained combat effectiveness. Explore our Weapons Unlock guide to ensure you’re equipped with the optimal tools for each theater.
Pro Tip: The most successful Battlefield 6 players maintain multiple loadout configurations specifically tuned for each combat environment.
Diablo 4 Dungeons Guide
Before diving into the comprehensive dungeon listings, it’s essential to grasp how Diablo 4’s dungeon system functions and what rewards await dedicated explorers. The Codex of Power serves as your permanent collection of Legendary Aspects, with each dungeon contributing specific enhancements to your arsenal upon initial completion.
It’s worth noting that dungeon rewards represent only one source of Legendary power. Many powerful Aspects can only be obtained through extraction from legendary items found during your adventures. For a deeper understanding of these mechanics, consult our Legendary Aspects/Codex of Power mechanics guide for comprehensive coverage.
Most dungeons appear visibly on your world map as you explore new territories. However, several remain hidden until you complete specific Stronghold objectives, adding layers of discovery to your progression. While the overworld maintains consistent geography, dungeon interiors utilize procedural generation to create fresh layouts each run while preserving reward structures.
Fractured Peaks Dungeons
Fractured Peaks dungeons map
Kyovashad: Capstone Dungeon
- Cathedral of Light– This level 50+ dungeon becomes accessible after completing the main campaign. Successfully clearing it on World Tier 2 unlocks access to World Tier 3 difficulty.
Stronghold: Nostrava
- Cultist Refuge: Flamewalker’s Aspect (Sorcerer) – Movement speed increases by 15% for four seconds when passing through your Firewall.
Stronghold: Malnok
- Anica’s Claim: Stormclaw’s Aspect (Druid) – Shred critical strikes deliver 20% additional lightning damage to the primary target and adjacent enemies.
- Rimescar Cavern: Aspect of Plunging Darkness (Necromancer) – Bone Prison generates Blight pools that inflict 50% bonus damage over six seconds.
Desolate Highlands
- Defiled Catacomb: Aspect of Tempering Blows (Barbarian) – Weapon swapping six times grants X Fortify.
- Tormented Ruins: Aspect of the Unsatiated (Druid) – Eliminating foes with Shred empowers your subsequent Werewolf ability with 20% enhanced spirit generation and damage output.
- Lost Archives: Aspect of the Protector (General) – Striking elite enemies creates protective Barriers absorbing X damage for 10 seconds; 30-second cooldown between activations.
The Pallid Glade
- Derelict Lodge: Aspect of Explosive Verve (Rogue) – Grenade abilities function as Trap skills; deploying Traps or Grenades boosts movement speed for three seconds.
- Nostrava Deepwood: Flesh-Rending Aspect (Necromancer) – Corpse generation through Decompose restores +10 essence.
- Caldera Gate: Eluding Aspect (General) – Sustaining injury while under crowd control effects grants four seconds of unstoppable status; 40-second cooldown.
Sarkova Pass
- Mercy’s Reach: Blood Seeker’s Aspect (Necromancer) – Blood Lance damage multiplies by x15% against primary targets for each additional enemy pierced.
- Forbidden City: Nighthowler’s Aspect (Druid) – Blood Howl critical chance increases by 5%, benefiting nearby allies and companions for three seconds.
- Kor Dragan Barracks: Aspect of Anemia (Barbarian) – Lucky Hit mechanics provide 20% probability to stun bleeding enemies for two seconds with direct attacks.
Dobrev Taiga
- Light’s Watch: Aspect of Conflagration (Sorcerer) – Incinerate channeling amplifies burning damage by 20%.
- Maulwood: Slaking Aspect (Barbarian) – Lucky Hit; Rend strikes against bleeding targets have 30% chance to generate 20 fury.
Gale Valley
- Dead Man’s Dredge: Aspect of Piercing Cold (Sorcerer) – Ice Shards penetrate through three enemies, with each subsequent target receiving 25% reduced damage.
Frigid Expanse
- Immortal Emanation: Mangled Aspect (Druid) – Werebear form strikes have 20% increased chance to restore +1 spirit.
- Hallowed Ossuary: Aspect of Unrelenting Fury (Barbarian) – Core skill kills refund 10% of base resource cost; single activation per cast.
- Black Asylum: Aspect of Torment (Necromancer) – Bone skill critical strikes accelerate energy regeneration by 20% for four seconds.
- Forsaken Quarry: Aspect of Encircling Blades (Rogue) – Flurry damage increases by 8% and affects all surrounding enemies.
Seat of the Heavens
- Hoarfrost Demise: Blood-Bathed Aspect (Necromancer) – Blood Surge novas replicate after brief delays, dealing 70% reduced damage.
- Zenith: Recharging Aspect (Sorcerer) – Chain Lightning bouncing off you restores +4 mana per ricochet.
- Sanguine Chapel: Energizing Aspect (Rogue) – Basic skills against elite enemies regenerate +3 energy.
Kor Valar
- Kor Valar Ramparts: Blast-Trapper’s Aspect (Rogue) – Lucky Hit; damaging trapped enemies directly has 30% maximum chance to apply vulnerability.
Scosglen Dungeons
Scosglen dungeons map
Stronghold: Moordaine Lodge
- Ferals’ Den: Aspect of Quicksand (Druid) – Earth abilities slow struck enemies by 25% for five seconds.
- Twisted Hollow: Shadowslicer Aspect (Rogue) – Dash casting summons Shadow Clones at your position; these duplicates perform their own Dash attacks at 25% base damage.
Stronghold: Tur Dulra
- Underroot: Aspect of the Expectant (General) – Basic skill attacks progressively enhance core skill damage by 5% per hit, maximum 30%.
- Wretched Delve: Aspect of Static Cling (Sorcerer) – Charged Bolts possess 15% chance to track enemies; duration extends by 300%.
Stronghold: Hope’s Light
- Flooded Depths: Aspect of the Empowering Reaper (Necromancer) – Sever critical strikes have 10% probability to generate Blight pools dealing 20% bonus damage; three-second cooldown between occurrences.
Northshore
- Calibel’s Mine: Aspect of the Relentless Armsmaster (Barbarian) – Walking Arsenal passive activation boosts fury generation by 20%.
- Sunken Ruins: Aspect of Ancestral Force (Barbarian) – Hammer of the Ancients generates seismic waves distributing percentage damage to surrounding foes.
- Howling Warren: Aspect of Arrow Storms (Rogue) – Lucky Hit; Marksman abilities have maximum 10% chance to summon Arrow Storms at target locations, inflicting X damage over three seconds; maximum five simultaneous storms.
Wailing Hills
- Vault of the Forsaken: Requiem Aspect (Necromancer) – Active minions increase maximum essence capacity by +3 per companion.
- Penitent Cairn: Death Wish Aspect (Barbarian) – Berserking state grants X Thorns damage.
- Raethwind Wilds: Aspect of Inner Calm (General) – Stationary positioning gradually amplifies damage by 5% per second, maximum 30%.
Strand
- Domhainne Tunnels: Aspect of Efficiency (Sorcerer) – Basic skill casting reduces subsequent core skill resource expenditure by 10%.
- Luban’s Rest: Cheat’s Aspect (Rogue) – Crowd-controlled enemies deal 15% reduced damage; taking direct damage from controlled foes boosts movement speed by 15% for two seconds.
- Garan Hold: Aspect of the Dire Whirlwind (Barbarian) – Whirlwind channeling duration progressively increases critical strike probability by 5% per second, maximum 20%.
- Mariner’s Refuge: Overcharged Aspect (Druid) – Lucky Hit; lightning damage has maximum 10% chance to overload targets for three seconds; your direct damage triggers pulsing area effects.
The Shrouded Moors
- Aldurwood: Aspect of Reanimation (Necromancer) – Skeleton minions progressively gain damage amplification while surviving; maximum 20% after 10 seconds.
- Jalal’s Vigil: Bladedancer’s Aspect (Rogue) – Returning Twisting Blades orbit briefly, striking for 10% damage per hit; distance traveled can increase effectiveness up to 20%.
The Downs
- Sarat’s Lair: Snowveiled Aspect (Sorcerer) – Ice Armor activation provides unstoppable status for two seconds.
- Oldstones: Edgemaster’s Aspect (General) – Skill damage scales with available primary resource at cast time; maximum 10% benefit at full resource capacity.
Highland Wilds
- Maddux Watch: Charged Aspect (Sorcerer) – Collecting Crackling Energy boosts movement speed by 10% for four seconds.
- Hive: Aspect of Swelling Curse (Necromancer) – Bone Spirit damage amplifies based on travel distance, maximum 15%.
- Whispering Pines: Ballistic Aspect (Druid) – Fortified status grants Earth skills +2 additional ranks.
The Emerald Chase
- Stockades: Crashstone Aspect (Druid) – Earth abilities inflict 40% increased damage against crowd-controlled targets.
Westering Lowlands
- Broken Bulwark: Ghostwalker Aspect (General) – Unstoppable status and subsequent four seconds provide 10% movement speed and phasing through enemies.
- Demon’s Wake: Aspect of Uncanny Treachery (Rogue) – Striking dazed enemies with Agility skills grants Stealth for four seconds; breaking Stealth with attacks enhances control impairment reduction by 15% for four seconds.
Dry Steppes Dungeons
Dry Steppes dungeons map
Stronghold: The Ruins of Qara-Yisu
- Shifting City: Ravenous Aspect (Rogue) – Eliminating vulnerable enemies accelerates energy regeneration by 50% for four seconds.
- Pallid Delve: Elementalist’s Aspect (Sorcerer) – Core or mastery skills cast above 100 mana gain 20% critical strike probability.
Stronghold: The Onyx Watchtower
- The Onyx Hold: Storm Swell Aspect (Sorcerer) – Barrier protection increases damage against vulnerable targets by 11%.
Kotama Grasslands
- Seaside Descent: Aspect of Retaliation (Druid) – Core skill damage scales proportionally with Fortify accumulation, maximum 20%.
Tuusma Rift
- Dark Ravine: Aspect of Might (General) – Basic abilities provide 20% damage mitigation for two seconds.
Khargai Crags
- Path of the Blind: Aspect of Bursting Bones (Necromancer) – Bone Prison segment destruction or expiration triggers area damage around affected locations.
- Mournfield: Aspect of Berserk Ripping (Barbarian) – Direct damage during Berserking inflicts 20% base damage as additional bleeding over five seconds.
- Grinning Labyrinth: Aspect of the Calm Breeze (Druid) – Lucky Hit; Wind Shear strikes have maximum 5% chance to restore spirit resources.
Chambatar Ridge
- Whispering Vault: Aspect of Unstable Imbuements (Rogue) – Imbuement skill activation triggers imbued explosions around your position; applies imbuement effects and deals X area damage.
Dindai Flats
- Forgotten Depths: Aspect of Biting Cold (Sorcerer) – Freezing enemies carries 25% probability to apply vulnerability for three seconds.
The Scarred Coast
- Carrion Fields: Aspect of the Iron Warrior (Barbarian) – Iron Skin ability grants unstoppable status and 10% damage reduction.
- Komdor Temple: Aspect of the Bounding Conduit (Sorcerer) – Teleport casting enhances movement speed by 20% for three seconds.
Untamed Scarps
- Bloodsoaked Crag: Shepherd’s Aspect (Druid) – Core skill damage increases by 6% for each active companion.
- Sealed Archives: Aspect of Mending Stone (Druid) – Earthen Bulwark duration extends by six seconds; Earth skill kills replenish X Barrier strength.
- Charnel House: Aspect of Perpetual Stomping (Barbarian) – Kick or Ground Stomp damage against enemies resets Leap cooldown timer.
- Champion’s Demise: Aspect of the Umbral (General) – Applying crowd control effects to enemies restores +1 primary resource per affected target.
- Ancient’s Lament: Aspect of Volatile Shadows (Rogue) – Dark Shroud shadow removal triggers explosive Shadow damage around your position.
Jakha Basin
- Guulrahn Canals: Trickster’s Aspect (Rogue) – Caltrops deployment simultaneously launches Stun Grenade clusters inflicting X physical damage and 0.5-second stuns.
- Guulrahn Slums: Splintering Aspect (Necromancer) – Bone Spear primary strikes apply vulnerability for 1.5 seconds to enemies beyond initial target; Bone Shards from Bone Spear deal 50% bonus damage to vulnerable targets and penetrate through them.
- Buried Halls: Rapid Aspect (General) – Basic skill attack speed increases by 15%.
The Accursed Wastes
- Betrayer’s Row: Aspect of Potent Blood (Necromancer) – Maximum health status enables Blood Orbs to restore +10 essence.
Kehjistan Dungeons
Kehjistan dungeons map
Stronghold: Altar of Ruin
- Sepulcher of the Forsworn: Hulking Aspect (Necromancer) – Golem companions possess 1% chance to reduce active cooldown by two seconds, and 1% probability to generate corpses with normal attack damage.
Stronghold: Omath’s Redoubt
- Crumbling Hekma: Aspect of Splintering Energy (Sorcerer) – Lightning Spear casting carries 11% chance to spawn additional Lightning Spears simultaneously.
Amber Sands
- Tomb of the Saints: Incendiary Aspect (Sorcerer) – Lucky Hit; Burning damage effects have maximum 5% probability to restore +10 mana.
- Sunken Library: Aspect of Control (Sorcerer) – Damage amplification against immobilized, stunned, or frozen enemies reaches 30%.
- Shivta Ruins: Wind Striker Aspect (General) – Critical strikes boost movement speed by 8% for one second, stacking duration up to six seconds.
- Collapsed Vault: Aspect of Cyclonic Force (Druid) – Cyclone Armor provides physical damage reduction; effect extends to nearby allies.
- Inferno: Vengeful Aspect (Rogue) – Lucky Hit; vulnerability application has maximum 30% chance to increase critical hit rate by 3% for three seconds, maximum 9%.
Scouring Sands
- Sirocco Caverns: Aspect of Echoing Fury (Barbarian) – Active Shout abilities generate +2 fury per second while maintained.
- Abandoned Mineworks: Aspect of Retribution (General) – Distant enemies striking you have 8% chance to suffer two-second stun; damage against stunned enemies increases by 20%.
- Halls of the Damned: Aspect of Disobedience (General) – Dealing any damage type increases armor rating by 0.25% for four seconds; maximum 25% stacking.
- Fading Echo: Skinwalker’s Aspect (Druid) – Shapeshifting skill usage restores X life; full health converts restoration to Fortify instead.
Caldeum
- Yshari Sanctum: Needleflare Aspect (General) – Thorns damage possesses 20% chance to affect all surrounding hostiles.
- Crusaders’ Cathedral: Stormshifter’s Aspect (Druid) – Hurricane activation increases Shapeshifting skill ranks by +2.
- Prison of Caldeum: Opportunist’s Aspect (Rogue) – Breaking Stealth with attacks deploys Stun Grenade clusters dealing X physical damage and 0.5-second stuns.
- Renegade’s Retreat: Aspect of Corruption (Rogue) – Imbuement skill effectiveness against vulnerable targets increases by 20%.
- Deserted Underpass: Torturous Aspect (Necromancer) – Iron Maiden-afflicted enemies have 15% chance to become stunned for one second when dealing direct damage.
Ragged Coastline
- Putrid Aquifer: Aspect of the Unwavering (Sorcerer) – Receiving direct damage carries 2% probability to reset defensive skill cooldowns.
- Forgotten Ruins: Iron Blood Aspect (Barbarian) – Nearby bleeding enemies reduce incoming damage by 2% per affected target, maximum 10%.
- Uldur’s Cave: Aspect of the Damned (Necromancer) – Shadow damage amplification against Decrepify and Iron Maiden-afflicted enemies reaches 30%.
- Corrupted Grotto: Aspect of Grasping Veins (Necromancer) – Corpse Tendrils casting increases critical strike chance by 10% for six seconds; damage against Corpse Tendrils-affected targets increases by 30%.
- Heretics Asylum: Veteran Brawler’s Aspect (Barbarian) – Core skill direct damage against enemies progressively enhances subsequent Charge or Leap damage by 15%, maximum 225%.
Southern Expanse
- Conclave: Aspect of the Changeling’s Debt (Druid) – Werebear skill damage against poisoned enemies instantly delivers 120% accumulated poison damage while consuming the effect.
- Hakan’s Refuge: Relentless Berserker’s Aspect (Barbarian) – Lucky Hit; core skill damage against enemies has maximum 22% chance to extend Berserking duration by one second; critical strikes with core skills double extension duration.
Hawezar Dungeons
Hawezar dungeons map
Stronghold: Eriman’s Pyre
- Oblivion: Aspect of Shared Misery (Rogue) – Lucky Hit; striking crowd-controlled enemies carries maximum 30% probability to spread control effects to unaffected hostiles.
Stronghold: Vyeresz
- Shadowed Plunge: Aspect of Branching Volleys (Rogue) – Barrage arrows possess 15% chance to split into two additional projectiles upon ricochet.
Dismal Foothills
- Heathen’s Keep: Aspect of Numbing Wrath (Barbarian) – Maximum fury generation grants +3 Fortify per point accumulated.
- Light’s Refuge: Aspect of Bul-Kathos (Barbarian) – Leap ability generates Earthquakes dealing X physical damage over four seconds; standing within Earthquake areas provides 5% damage reduction.
The Writhing Mire
- Fetid Mausoleum: Snowguard’s Aspect (Sorcerer)– Positioning within your Blizzard area reduces incoming damage by 10%.
Umir Plateau
- Bastion of Faith: Trickshot Aspect (Rogue) – Penetrating Shot damage against enemies triggers two additional arrows splitting to either side; these projectiles inflict 10% of Penetrating Shot’s damage without further splitting.
- Lost Keep: Aspect of the Deflecting Barrier (General) – Active Barrier protection provides 7% chance to negate direct damage from distant enemies.
- Endless Gates: Aspect of the Rampaging Werebeast (Druid) – Grizzly Rage duration extends by X seconds; critical strikes during Grizzly Rage progressively increase critical damage by 10% for the duration.
- Earthen Wound: Aspect of Singed Extremities (Sorcerer) – Immobilization effect expiration applies 25% slow to affected enemies for four seconds.
Fethis Wetlands
- Blind Burrows: Aspect of the Tempest (Druid) – Hurricane damage progressively increases by 7% per second while active.
- Maugan’s Works: Earthstriker’s Aspect (Barbarian) – Weapon swapping ten times empowers your next attack to Overpower while dealing 30% increased Overpower damage.
Ruins of Rakhat Keep
- Iron Hold: Fastblood Aspect (Necromancer) – Blood Orb collection reduces ultimate skill cooldown by 0.5 seconds per orb.
- Akkhan’s Grasp: Blighted Aspect (Necromancer) – Shadowblight key passive damaging enemies ten times amplifies subsequent damage by 50% for six seconds.
- Steadfast Barracks: Vigorous Aspect (Druid) – Werewolf Shapeshifting provides 10% damage reduction.
Toxic Fens
- Ruins of Eridu: Sacrificial Aspect (Necromancer) – Sacrifice bonus effects increase by 15%.
- Leviathan’s Maw: Aspect of Siphoned Victuals (Rogue) – Lucky Hit; core skill damage against vulnerable enemies has maximum 10% chance to generate Healing Potions.
- Ghoa Ruins: Enshrouding Aspect (Rogue) – Stationary positioning generates free Dark Shroud shadows every three seconds; each shadow increases damage reduction by 2%.
Blightmarsh
- Witchwater: Prodigy’s Aspect (Sorcerer) – Cooldown usage restores 15 mana.
- Serpent’s Lair: Aspect of Three Curses (Sorcerer) – Meteor critical damage against healthy targets increases by 33%.
Forsaken Coast
- Faceless Shrine: Unyielding Commander’s Aspect (Necromancer) – Army of the Dead activation increases minion attack speed by 70% while reducing their damage taken by 90%.
Rotspill Delta
- Haunted Refuge: Brawler’s Aspect (Barbarian) – Kick or Charge-damaged enemies explode upon death within two seconds, dealing X damage to surrounding hostiles.
- Belfry Zakara: Aspect of the Ursine Horror (Druid) – Pulverize transforms into Earth skill; post-casting generates tectonic spikes dealing X damage over two seconds.
- Ancient Reservoir: Aspect of Ancestral Echoes (Barbarian) – Lucky Hit; Leap, Upheaval, or Whirlwind damage against enemies carries maximum 40% chance to summon Ancients replicating the same ability; five-second cooldown between activations.
Diablo 4 offers extensive character customization through numerous classes, intricate mechanics, and diverse activities. For comprehensive game coverage, explore our D4 guides hub.
Maximizing Your Dungeon Efficiency
Successful dungeon farming requires more than just knowing locations. Prioritize dungeons that offer Aspects synergizing with your current build, and focus on completing objectives efficiently rather than clearing every enemy. Many experienced players recommend targeting dungeons with straightforward layouts and minimal backtracking requirements.
Common Pitfalls to Avoid: Many newcomers waste time by attempting to farm dungeons before understanding their mechanics. Remember that Legendary Aspects from the Codex of Power provide minimum roll values, making extracted Aspects from legendary items potentially more powerful for endgame optimization.
When planning your dungeon runs, consider these efficiency strategies: group dungeons by region to minimize travel time, prioritize Stronghold completion to unlock additional content, and always check your Codex to avoid redundant farming of already acquired Aspects.
For players seeking to optimize their class selection and understand how different builds interact with dungeon rewards, our comprehensive Class Guide provides detailed analysis of optimal farming routes for each character archetype.
Before diving into Diablo 4’s extensive dungeon roster, understanding the core reward systems and exploration mechanics is crucial for efficient progression. The Codex of Power interface serves as your central tracking system, displaying every Legendary Aspect obtainable from initial dungeon completions. These powerful modifiers are categorized as either class-exclusive bonuses or universal abilities usable by any character class.
It’s essential to recognize that dungeon clears aren’t the sole source of Legendary Aspects. Many potent modifiers can only be acquired through extracting affixes from randomly dropped legendary items. For comprehensive mechanics breakdown, consult our detailed Legendary Aspects/Codex of Power mechanics guide to avoid missing critical upgrade opportunities.
Most dungeon entrances are visibly marked on Sanctuary’s overworld map from the beginning. As you advance through the main storyline and explore new territories, previously hidden sub-regions will reveal additional dungeon locations. Certain dungeons remain inaccessible until you successfully conquer specific Stronghold locations, adding a layer of progression-based discovery. Additionally, while the overworld maintains fixed geography, dungeon interiors utilize procedural generation technology, ensuring each instance features unique layout variations that prevent memorization and maintain exploration excitement.
Fractured Peaks dungeons map
Understanding the distinction between dungeon-sourced and item-extracted Legendary Aspects is fundamental to efficient character building. Dungeon aspects provide guaranteed, known quantities that form the foundation of your build planning, while random item drops offer potentially more powerful but unpredictable modifiers. This dual acquisition system encourages both targeted farming and adaptive playstyles based on your current gear.
Class-specific aspects dramatically alter gameplay mechanics, offering specialized bonuses that synergize with particular skill trees and playstyles. General aspects provide flexibility across character builds, making them valuable early investments regardless of your class selection. Strategic players prioritize dungeons containing aspects that complement their intended endgame specifications.
Many newcomers mistakenly believe all legendary powers come from dungeon completion, leading to inefficient farming patterns. Always cross-reference your Codex of Power with current gear before dedicating time to specific dungeon runs. Our Complete Guide provides additional context on aspect prioritization and resource allocation strategies.
- Stronghold: Eriman’s Pyre – This location exemplifies the Stronghold-to-dungeon progression system, where conquering the fortified area unlocks subsequent dungeon access.
- Cathedral of Light – Accessible only after completing the main campaign at level 50+, this dungeon serves as your gateway to World Tier 3. Successful completion on World Tier 2 unlocks the next difficulty level, dramatically improving loot quality and enemy challenges.
- Cultist Refuge: Flamewalker’s Aspect (Sorcerer) – Contact with your Firewall spell grants a significant +15% movement speed boost lasting four seconds, creating exceptional kiting and positioning opportunities for fire-based builds.
- Anica’s Claim: Stormclaw’s Aspect (Druid) – Critical strikes using Shred now deal an additional 20% of the damage as lightning damage to both the primary target and surrounding enemies, substantially improving area clearing capability.
- Rimescar Cavern: Aspect of Plunging Darkness (Necromancer) – Bone Prison automatically spawns a Blight pool dealing 50% bonus damage over six seconds, effectively transforming defensive crowd control into offensive area denial.
- Defiled Catacomb: Aspect of Tempering Blows (Barbarian) – After executing six weapon swaps, you gain X amount of Fortify, providing damage reduction that synergizes perfectly with the Barbarian’s aggressive playstyle.
Each class-specific aspect dramatically alters how abilities function, often turning mediocre skills into cornerstone build components. Understanding these transformations is crucial for effective character development, as detailed in our comprehensive Class Guide for specialized build optimization.
Procedural generation ensures no two dungeon runs follow identical layouts, though certain room types and enemy placement patterns remain consistent. Learning to recognize these patterns can shave minutes off clear times. Efficient navigators watch for environmental cues like corridor density, lighting variations, and monster density indicators to anticipate objective locations.
Common exploration mistakes include overlooking secondary paths that often contain additional loot chests, failing to clear elite packs that guarantee better rewards, and misunderstanding dungeon-specific mechanics that trigger hidden events. Seasoned players recommend clearing dungeons in clusters based on geographical proximity rather than chasing single aspects across vast distances.
Time optimization involves grouping dungeons by region and difficulty tier. Average clear times range from 10-25 minutes depending on dungeon complexity, your build efficiency, and World Tier selection. Advanced players can reduce this to 5-15 minutes through optimized routing and combat techniques. For weapon-specific strategies that complement dungeon clearing, reference our Weapons Unlock guide to ensure your damage output matches the challenges ahead.
Strategic dungeon sequencing based on your current level and gear progression can save 3-5 hours of gameplay time during the leveling process. Always prioritize dungeons offering aspects that directly enhance your current build while noting locations of potentially valuable modifiers for future character specifications.
Legendary aspects represent foundational power upgrades in Diablo 4 that fundamentally alter how your abilities function. These game-changing modifiers are obtained by completing specific dungeons scattered throughout Sanctuary, then can be extracted and imprinted onto your gear to create customized builds. Understanding which aspects complement your chosen class and playstyle is crucial for maximizing your combat effectiveness.
Each aspect is tied to a particular dungeon location, meaning you’ll need to venture into dangerous territories to acquire these powerful enhancements. The strategic value of aspects extends beyond simple stat boosts—they can completely transform mediocre skills into devastating weapons when properly utilized.
Sorcerer Aspects
- Domhainne Tunnels: Aspect of Efficiency – Basic skill usage reduces your next core skill’s resource cost by 10%. This creates exceptional synergy between spamable abilities and your primary damage dealers, allowing more frequent casting of powerful spells.
- Sarat’s Lair: Snowveiled Aspect – Activating Ice Armor grants unstoppable status for two seconds, providing crucial crowd control immunity during dangerous encounters.
- Maddux Watch: Charged Aspect – Collecting Crackling Energy boosts movement speed by 10% for four seconds. This enhances mobility while positioning for optimal spellcasting.
Rogue Aspects
- Luban’s Rest: Cheat’s Aspect – Receive 15% reduced damage from crowd-controlled enemies and gain 15% movement speed for two seconds when they hit you. This defensive mobility combination is perfect for hit-and-run tactics.
- Jalal’s Vigil: Bladedancer’s Aspect – Returning Twisting Blades continue orbiting around you briefly, dealing 10-20% of their damage based on travel distance. Maximize this by positioning at maximum blade range.
Barbarian Aspects
- Garan Hold: Aspect of the Dire Whirlwind – Channeling Whirlwind increases its critical strike chance by 5% per second, capping at 20% after four seconds. This rewards sustained spinning in dense enemy groups.
Druid Aspects
- Mariner’s Refuge: Overcharged Aspect – Lucky Hit lightning damage has up to 10% chance to overload targets for three seconds, causing your direct damage to pulse to nearby enemies. This creates exceptional area-of-effect potential from single-target attacks.
Necromancer Aspects
- Aldurwood: Aspect of Reanimation – Your skeleton minions deal progressively more damage while they remain alive, reaching maximum 20% bonus after surviving ten seconds. This encourages strategic positioning to preserve your undead army.
- Hive: Aspect of Swelling Curse – Bone Spirit’s damage escalates based on travel distance, up to 15% maximum. Position yourself at optimal range for devastating spirit strikes.
Certain legendary aspects provide universal benefits that work across multiple character classes, offering flexible power options for diverse playstyles.
- Oldstones: Edgemaster’s Aspect – Your skills deal up to 10% increased damage scaling with your current primary resource pool, achieving maximum benefit at full resource. This creates compelling resource management gameplay where timing your big attacks matters significantly.
General aspects like Edgemaster’s encourage strategic ability sequencing rather than mindless button mashing. Learning to maximize these resource-based bonuses separates average players from masters.
Building Effective Synergies
The most powerful Diablo 4 builds combine multiple aspects that reinforce each other’s strengths. For example, Sorcerers can pair the Aspect of Efficiency with high-cost core skills to dramatically improve sustained damage output. Similarly, Necromancers using the Aspect of Reanimation should prioritize defensive measures to keep their skeletons alive longer.
Common Mistakes to Avoid
Many players waste aspects by imprinting them on low-level gear they’ll quickly replace. Instead, save your best aspects for ancestral and sacred items that will last through multiple character levels. Another frequent error is mismatching aspects with incompatible abilities—don’t use Whirlwind-enhancing aspects if you primarily use Hammer of the Ancients.
Endgame Optimization
At higher world tiers, aspect selection becomes increasingly critical. Focus on aspects that address your class’s specific weaknesses—Rogues might prioritize defensive aspects like Cheat’s to survive elite encounters, while Barbarians may favor damage amplification for clearing speed.
For comprehensive build guidance across all classes, check out our Class Guide that details optimal ability combinations.
Legendary Aspects represent foundational power modifiers in Diablo 4 that dramatically alter how your abilities function. These special modifiers can be extracted from legendary items at the Occultist and then imprinted onto rare or legendary gear, allowing for extensive build customization. Understanding aspect mechanics is crucial for maximizing your character’s potential throughout the leveling process and into endgame content.
When you first encounter a legendary item with a new aspect, it’s recommended to extract it immediately to add to your Codex of Power. This permanent collection ensures you’ll always have access to that aspect for future characters. However, be strategic about when you use your best extracted aspects – saving powerful versions for high-item level gear at maximum level often provides the best long-term value.
Collapsed Vault: Aspect of Cyclonic Force – This defensive powerhouse not only provides the standard damage reduction from non-physical sources but adds significant physical damage mitigation as well. The unique team utility comes from Cyclone Armor’s effect extending to nearby allies, making it invaluable for group play. Position yourself strategically to maximize coverage for your party members during intense combat situations.
Fading Echo: Skinwalker’s Aspect – Shapeshifting Druids gain tremendous sustainability through this aspect. When shifting between forms, you recover substantial health, and at full life, this converts to Fortify – providing damage reduction that stacks with other defensive layers. This aspect shines in builds that frequently alternate between human, bear, and wolf forms.
Crusaders’ Cathedral: Stormshifter’s Aspect – Hurricane becomes a cornerstone ability with this aspect, granting +2 ranks to all Shapeshifting skills while active. This creates powerful synergy with other shape-shifting aspects and abilities, effectively turning Hurricane into both an offensive and defensive tool simultaneously.
Inferno: Vengeful Aspect – This offensive modifier creates a powerful critical strike engine for vulnerability-focused Rogues. Each time you make an enemy vulnerable, there’s a chance to gain increasing critical hit chance, stacking up to three times. The Lucky Hit component means this works exceptionally well with rapid-attack builds that can frequently apply vulnerability.
Prison of Caldeum: Opportunist’s Aspect – Stealth gameplay receives a substantial boost with this aspect. Breaking stealth not only delivers your attack but also deploys Stun Grenades that control groups of enemies. The half-second stun provides crucial windows to reposition or unleash follow-up attacks on vulnerable targets.
Renegade’s Retreat: Aspect of Corruption – Imbuement specialists will find this aspect indispensable, as it increases the effectiveness of all imbuement effects against vulnerable enemies by 20%. This multiplier works exceptionally well with poison and shadow imbuements for massive damage amplification.
Sirocco Caverns: Aspect of Echoing Fury – Shout-focused Barbarians gain incredible resource generation from this aspect, receiving +2 fury per second for each active shout. With multiple shouts active simultaneously, this creates a sustainable fury engine that enables continuous skill usage without downtime.
Abandoned Mineworks: Aspect of Retribution – Ranged attackers will think twice about targeting you with this aspect, as distant enemies have a chance to be stunned when they hit you. The 20% damage bonus against stunned targets creates a punishing counter-attack playstyle that rewards proper positioning.
Halls of the Damned: Aspect of Disobedience – This stacking armor bonus provides escalating protection the longer you remain in combat. Dealing any damage triggers the effect, making it exceptionally reliable for maintaining high armor values during extended engagements.
Yshari Sanctum: Needleflare Aspect – Thorns builds transform from single-target punishment to area control with this aspect. The 20% chance to spread thorns damage to nearby enemies means you can effectively clear groups while being attacked, though the randomness requires building adequate survivability.
Mastering aspect usage involves understanding how different modifiers interact multiplicatively. For example, combining Aspect of Retribution’s stun chance with its damage bonus against stunned targets creates a self-sustaining damage loop. Similarly, pairing Disobedience’s stacking armor with damage reduction aspects creates nearly unkillable characters in high-level content.
A common mistake is imprinting powerful aspects too early on low-level gear. Since extraction destroys the item, you’ll lose that aspect until you find it again. Instead, use aspects from your Codex of Power for leveling gear, saving high-roll extracted aspects for your endgame equipment.
For maximum efficiency, plan your aspect usage around your target build. Some aspects work better on weapons for higher values, while defensive aspects often belong on armor pieces. Remember that once imprinted, aspects cannot be re-extracted, so choose your gear carefully before committing valuable aspects.
Legendary Aspects represent game-changing modifiers that fundamentally alter how your character’s abilities function. These powerful enhancements can be extracted from legendary items and imprinted onto other gear, allowing for extensive build customization. Understanding their mechanics is crucial for maximizing your class potential.
When first acquiring these aspects, pay close attention to their specific activation requirements and synergies with your existing skill tree. Many players underestimate the importance of proper aspect placement, which can make or break high-level builds.
The Earth skill conversion opens up new synergistic possibilities with other Druid nature magic and terrain manipulation abilities. The persistent damage effect creates area denial zones perfect for controlling enemy movement and dealing with swarming opponents.
Pro Tip: Combine this aspect with landslide and trample skills for devastating area control combos. The tectonic spikes continue damaging enemies even if you reposition, making them ideal for kiting strategies against elite packs.
Understanding Lucky Hit mechanics is essential for maximizing this aspect’s potential. Stack Lucky Hit chance on your gear and through paragon boards to significantly increase summon frequency. The summoned Ancients not only deal additional damage but also draw enemy aggro, providing tactical advantages.
Advanced Strategy: Time your skill rotations to work within the five-second cooldown window. Using multiple different eligible skills in sequence can potentially summon multiple Ancients simultaneously for burst damage scenarios.
Both aspects benefit tremendously from specific stat priorities and gear combinations. For Druids using Belfry Zakara, prioritize cooldown reduction and earth skill damage modifiers. Barbarians utilizing Ancient Reservoir should focus on Lucky Hit chance and core skill damage increases.
Common Pitfall: Many players waste these powerful aspects by imprinting them on low-level gear. Always save your best aspect rolls for ancestral items in the endgame.
Diablo 4 features extensive class systems, complex mechanics, and diverse activities. For comprehensive game knowledge, explore our D4 guides hub for detailed walkthroughs and advanced tactics.
Action Checklist
- Identify 3-5 core aspects for your build priority list
- Plot optimal travel routes between target dungeons using waypoints
- Prepare appropriate elixirs and repair materials for extended farming sessions
- Complete dungeon objectives systematically while clearing efficient paths
- Extract and store valuable aspects for future gear upgrades
- Complete campaign to unlock Cathedral of Light capstone dungeon and World Tier 3 access
- Conquer Strongholds in each region to reveal hidden dungeon locations
- Prioritize dungeons offering general Aspects for immediate power gains
- Target class-specific dungeons that synergize with your chosen specialization
- Optimize farming routes by learning procedural generation patterns
- Coordinate dungeon runs with world events and Helltide occurrences
- Complete basic training in European theater to master mountain combat fundamentals
- Specialize loadouts for each region – cold weather gear for Europe, desert camo for Middle East
- Master at least one Stronghold assault in each theater to understand key strategic mechanics
- Complete all region-specific Assignments to unlock exclusive NATO equipment
- Develop cross-theater strategies and loadout flexibility for maximum combat effectiveness
- Complete campaign to unlock Cathedral of Light capstone dungeon
- Conquer Strongholds in each region to reveal hidden dungeons
- Farm Fractured Peaks dungeons for foundational Legendary Aspects
- Prioritize dungeons offering Aspects for your current class build
- Consult Codex of Power before farming to avoid redundant effort
- Optimize World Tier progression through capstone completion
- Check Codex of Power for missing class-specific aspects and prioritize corresponding dungeons
- Complete Stronghold locations to unlock hidden dungeons in each region
- Group dungeon runs by geographical region to minimize travel time between locations
- Farm Cathedral of Light upon reaching level 50 to unlock World Tier 3 access
- Extract legendary affixes from dropped items before farming duplicate dungeon aspects
- Complete Domhainne Tunnels for Sorcerer resource efficiency aspect
- Extract aspects carefully—they’re destroyed in the process
- Imprint aspects only on high-level gear you’ll use long-term
- Test aspect combinations in safe areas before difficult content
- Consult our Complete Guide for advanced strategies
- Extract new aspects immediately to add to your Codex of Power
- Save high-roll extracted aspects for level 80+ ancestral gear
- Test aspect combinations in lower difficulty content before committing to endgame builds
- Plan aspect placement by slot – offensive on weapons, defensive on armor
- Coordinate group play aspects like Cyclonic Force for maximum team benefit
- Extract aspects from legendaries before salvaging items
- Test aspect combinations in low-tier content before committing to builds
- Optimize Lucky Hit chance to 25%+ for consistent Ancient summons
- Time skill rotations to work within five-second cooldown windows
No reproduction without permission:SeeYouSoon Game Club » Diablo 4 – All Dungeon Locations And Aspects Guide