TL;DR
- Complete Dares of Eternity to access Xur’s Treasure Hoard and acquire the quest
- Navigate to Shaw Han in Cosmodrome to unlock Grasp of Avarice dungeon access
- Successfully finish the dungeon to obtain your first Wolfpack Round component
- Farm seven additional rounds from Fallen enemies using optimal location strategies
- Return to NPCs and forge your Gjallarhorn at the Cosmodrome weapon smith
- Optimize your approach with class-specific strategies and team coordination
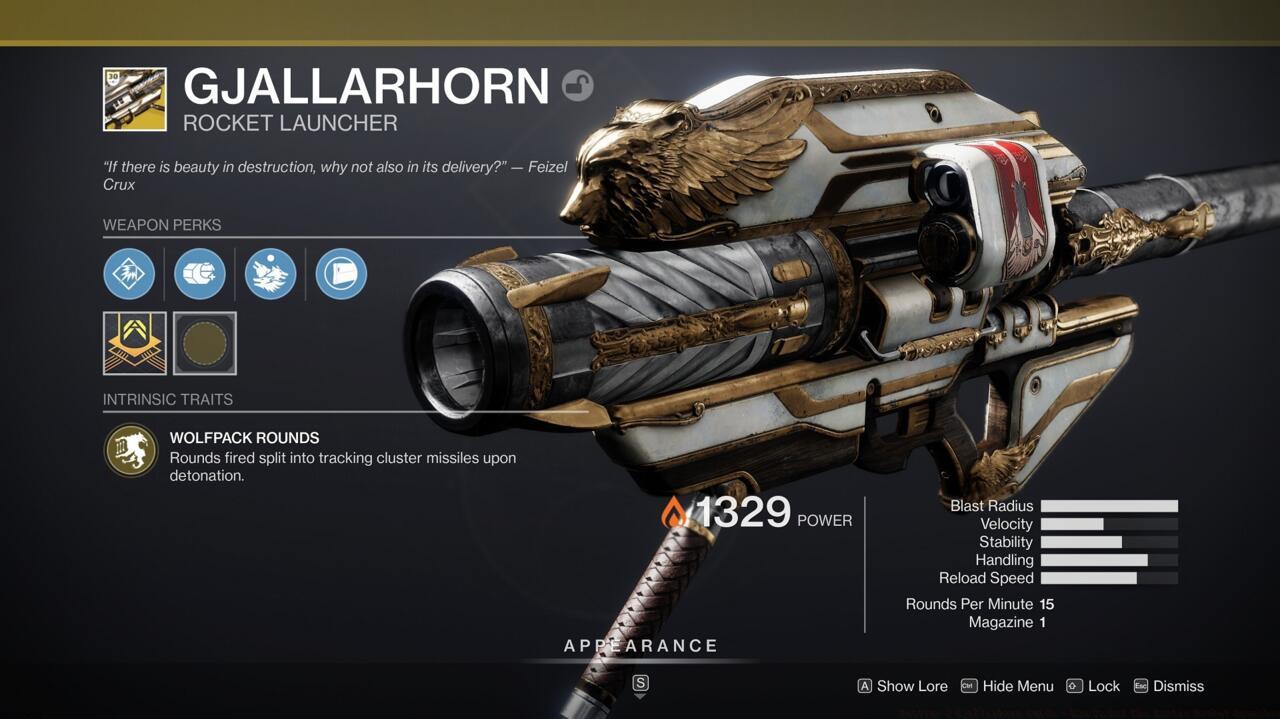
The legendary Gjallarhorn rocket launcher makes its spectacular return to Destiny 2 through the Bungie 30th Anniversary expansion. This iconic armament dominated the original game’s meta and now brings its devastating power to current guardians. Acquiring this weapon requires strategic progression through specific activities and locations.
Your initial objective involves completing the Dares of Eternity activity, a six-player matchmaking experience introduced with the anniversary content. Upon launching Destiny 2 after installing the update, you’ll automatically experience a unique introduction sequence where Xur transports you directly into this new gameplay mode. Successfully finishing one full run through Dares of Eternity grants access to Xur’s Treasure Hoard, an exclusive social space containing vital resources.

Grasp of Avarice provides both challenge and reward for dedicated guardians seeking powerful gear.
Within Xur’s Treasure Hoard, you’ll discover two primary vendors: Xur himself and the enigmatic Starhorse. Both offer specialized bounties and unique rewards for continued Dares participation. Crucially, Xur provides the “And Out Fly The Wolves” exotic quest, which initiates your official Gjallarhorn acquisition journey. Additionally, he offers “Magnum Opus” for obtaining the Halo-inspired Forerunner sidearm.
Pro Tip: Before starting Dares of Eternity, ensure your power level meets the recommended threshold and coordinate with teammates for optimal loadout synergy. Many players underestimate the importance of proper preparation for this activity.
After securing the quest from Xur, your next destination becomes the Cosmodrome where you’ll meet Shaw Han, the Vanguard’s designated mentor for new guardians. He provides critical guidance about accessing the legendary Loot Cave location, an infamous spot from Destiny’s early history that now serves as the entrance to the Grasp of Avarice dungeon.
Shaw Han directs you toward the specific cave entrance that contains the dungeon access point. You can reach this content directly through the Cosmodrome director map once Shaw completes his briefing. This streamlined access eliminates unnecessary travel time between objectives.
Strategic Insight: The Cosmodrome contains multiple fast travel points that can significantly reduce navigation time. Position yourself strategically before engaging with Shaw to minimize backtracking during subsequent quest phases.
Many guardians overlook the importance of familiarizing themselves with Cosmodrome geography before beginning this quest chain. Understanding spawn patterns and efficient routing through this area can save 15-20 minutes throughout the entire process.
For comprehensive guidance on character optimization, consult our Class Guide for specialized build recommendations that complement dungeon gameplay.
The Grasp of Avarice dungeon represents the centerpiece challenge in your Gjallarhorn acquisition journey. This three-player activity introduces innovative mechanics, engaging combat encounters, and memorable moments best experienced without extensive spoilers.
While optional guides exist for those struggling with specific sections, the dungeon’s design encourages organic discovery and problem-solving. The experience balances difficulty with rewarding gameplay that respects player intelligence.
Gjallarhorn’s Pack Hunter perk creates devastating team synergy when coordinated properly.
Upon successfully navigating the dungeon’s challenges and defeating the final boss, you’ll discover a Wolfpack Round—the essential component that makes Gjallarhorn’s signature tracking projectiles so formidable. This initial round serves as proof of concept and triggers the next phase of your quest.
Advanced Strategy: Coordinate with your fireteam to assign specific roles for each encounter. Designate one player for add-clear, another for mechanics, and a third for major enemy focus. This specialization dramatically improves completion efficiency.
Common mistakes include inadequate champion mod preparation, insufficient ammunition management, and poor communication during puzzle sequences. Addressing these issues beforehand can reduce dungeon completion time by 30-40%.
Shaw Han analyzes the recovered Wolfpack Round and deduces that additional components must exist within the Cosmodrome area. He instructs you to eliminate Fallen combatants to locate these missing pieces.
The collection process requires obtaining seven total Wolfpack Rounds from Fallen enemies. Specifically, orange-bar (major) and yellow-bar (ultra) Fallen have the highest drop probability, though standard enemies can occasionally yield them as well.
Optimal Farming Route: Exodus Garden 2A Lost Sector provides the most efficient collection location due to its proximity to Shaw Han’s position and high enemy density. The entrance path sits directly behind your spawn point after conversing with Shaw, making it exceptionally convenient for repeated runs.
Alternative farming methods include participating in Public Events when available or patrolling high-traffic Fallen areas. However, the Lost Sector approach typically proves 50-60% faster due to controlled enemy spawns and predictable patterns.
For weapon acquisition strategies across different game modes, explore our Weapons Unlock guide for comprehensive equipment strategies.
Time Management: Most players complete Wolfpack Round collection within 25-40 minutes using optimized routes. Inefficient approaches can extend this phase to over 90 minutes, highlighting the importance of proper planning.
After gathering all seven Wolfpack Rounds, return to Shaw Han for final analysis. He then directs you to visit Banshee-44, the Tower’s resident gunsmith, who provides the final component needed for Gjallarhorn assembly.
The culminating stage involves traveling to the Cosmodrome’s weapon forge to combine your collected components into the completed exotic rocket launcher.
Crafting Process: The forging sequence represents a ceremonial moment where you witness Gjallarhorn’s reconstruction using Golden Age technology recovered from the dungeon.
Once crafted, Gjallarhorn becomes available across all characters on your account. The weapon features its signature Wolfpack Rounds alongside new perks including Pack Hunter, which enhances nearby allies’ rocket launchers when you wield this exotic.
Post-Acquisition Optimization: After obtaining Gjallarhorn, focus on acquiring its exotic catalyst through additional dungeon completions. This upgrade significantly enhances the weapon’s capabilities and should be prioritized for maximum effectiveness.
For comprehensive gameplay guidance beyond weapon acquisition, reference our Complete Guide for comprehensive strategic overviews.
The entire quest chain typically requires 2-4 hours depending on fireteam coordination, individual skill level, and preparation. Well-prepared groups often complete the entire process in under two hours using optimized strategies.
Action Checklist
- Complete Dares of Eternity and visit Xur’s Treasure Hoard to acquire “And Out Fly The Wolves” quest
- Travel to Cosmodrome, meet Shaw Han, and unlock Grasp of Avarice dungeon access
- Complete Grasp of Avarice dungeon with coordinated fireteam roles
- Collect seven Wolfpack Rounds from Fallen enemies using Exodus Garden 2A Lost Sector farming route
- Return to Shaw Han, visit Banshee-44, and forge your Gjallarhorn at the Cosmodrome weapon forge
- Acquire Gjallarhorn exotic catalyst through additional dungeon completions
No reproduction without permission:SeeYouSoon Game Club » Destiny 2 Gjallarhorn Guide – How To Get The Exotic Rocket Launcher Complete guide to obtaining Gjallarhorn in Destiny 2 with expert strategies and time-saving tips