TL;DR
- Each position requires specific attribute prioritization for optimal performance
- Point guards should focus on playmaking and three-point shooting for spacing
- Defensive attributes vary significantly by position and intended role
- Height and weight decisions impact speed, defense, and finishing abilities
- Build customization allows for personal playstyle adaptation within proven frameworks
GameSpot may receive revenue from affiliate and advertising partnerships for sharing this content and from purchases through links.
Crafting exceptional MyPlayer builds in NBA 2K26 represents a foundational skill that directly influences your success across multiple game modes. Your customized athlete serves as the primary vehicle for experiencing the majority of 2K26’s content offerings, from MyCareer narratives to competitive online matchups. When initiating the creation process, you’ll define core physical characteristics including position assignment, height measurements, weight distribution, and most critically, attribute allocations. These statistical ratings, when combined with your selected position, generate specialized builds that fundamentally shape your basketball approach throughout the 2K26 ecosystem.
However, distributing points across the extensive attribute categories and identifying which ratings synergize effectively with your chosen role can present a daunting challenge for both newcomers and series veterans. To streamline this process, we’ve compiled optimized builds for each primary position in our comprehensive guide below. We’ll detail the recommended physical specifications for each archetype, alongside precise attribute ratings you should target. While you can implement these builds exactly as presented, we encourage adjusting certain attributes to better align with your individual preferences and gameplay tendencies.
Understanding build fundamentals begins with recognizing that attribute points operate within a constrained budget system. Each position has access to varying maximum potential in different categories, creating natural archetypes that excel in specific roles. The most common mistake players make is attempting to create “do-it-all” builds that end up mediocre across multiple domains rather than exceptional in key areas.
Initiating our position analysis with the point guard role, we acknowledge this as one of the most complex builds to optimize in the 2K series, given the multiple viable development paths available. You can construct a pure distribution specialist focused solely on playmaking, develop a long-range shooting threat, or even engineer a taller ball-handler capable of attacking the rim and triggering contact dunk animations.
For our recommended build, we’ve selected a pass-first floor general who maintains reliable three-point shooting capability. We’re also maintaining a moderately conservative height specification, preserving your accessibility to contact dunk packages if desired.

- Position: Point Guard
- Finishing
- Close Shot: 74
- Driving Layup: 78
- Driving Dunk: 92
- Standing Dunk: 37
- Post Control: 36
- Shooting
- Mid-Range Shot: 85
- Three-Point Shot: 93
- Free Throw: 81
- Playmaking
- Pass Accuracy: 92
- Ball Handle: 92
- Speed With Ball: 86
- Defense
- Interior Defense: 36
- Perimeter Defense: 75
- Steal: 70
- Block: 45
This point guard configuration emphasizes elite playmaking capabilities while maintaining exceptional outside shooting, creating a defensive dilemma for opponents who must respect both your distribution skills and scoring threat. The 92 driving dunk rating enables explosive rim attacks when defenses overplay the perimeter, while the 86 speed with ball ensures you can navigate defensive pressure effectively. For advanced execution, focus on utilizing pick-and-roll situations to maximize your dual-threat capabilities, forcing defenders to make difficult choices between containing your drive or respecting your passing lanes.
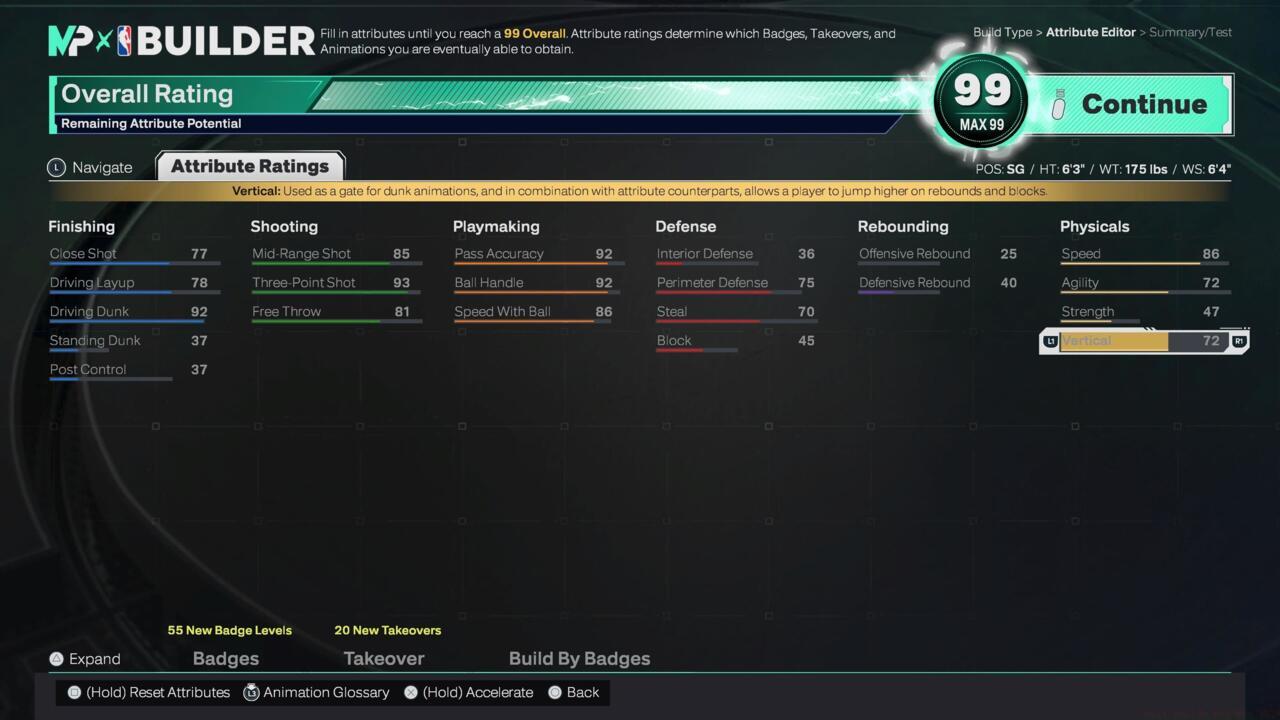
The shooting guard position demands scoring versatility across all three levels of the court: at the rim, from mid-range, and beyond the arc. Our optimized build creates a offensive weapon capable of generating points in multiple ways while maintaining sufficient defensive presence to not become a liability.
- Position: Shooting Guard
- Finishing
- Close Shot: 82
- Driving Layup: 85
- Driving Dunk: 75
- Standing Dunk: 45
- Post Control: 40
- Shooting
- Mid-Range Shot: 88
- Three-Point Shot: 90
- Free Throw: 85
- Playmaking
- Pass Accuracy: 75
- Ball Handle: 85
- Speed With Ball: 80
- Defense
- Interior Defense: 45
- Perimeter Defense: 82
- Steal: 78
- Block: 50
This shooting guard archetype thrives in off-ball movement scenarios, using screens effectively to create separation for catch-and-shoot opportunities. The balanced attribute distribution allows you to attack closeouts effectively, either pulling up for mid-range jumpers or driving to the basket. Defensively, the 82 perimeter defense enables you to contain opposing guards, while the 78 steal rating creates turnover opportunities in passing lanes.
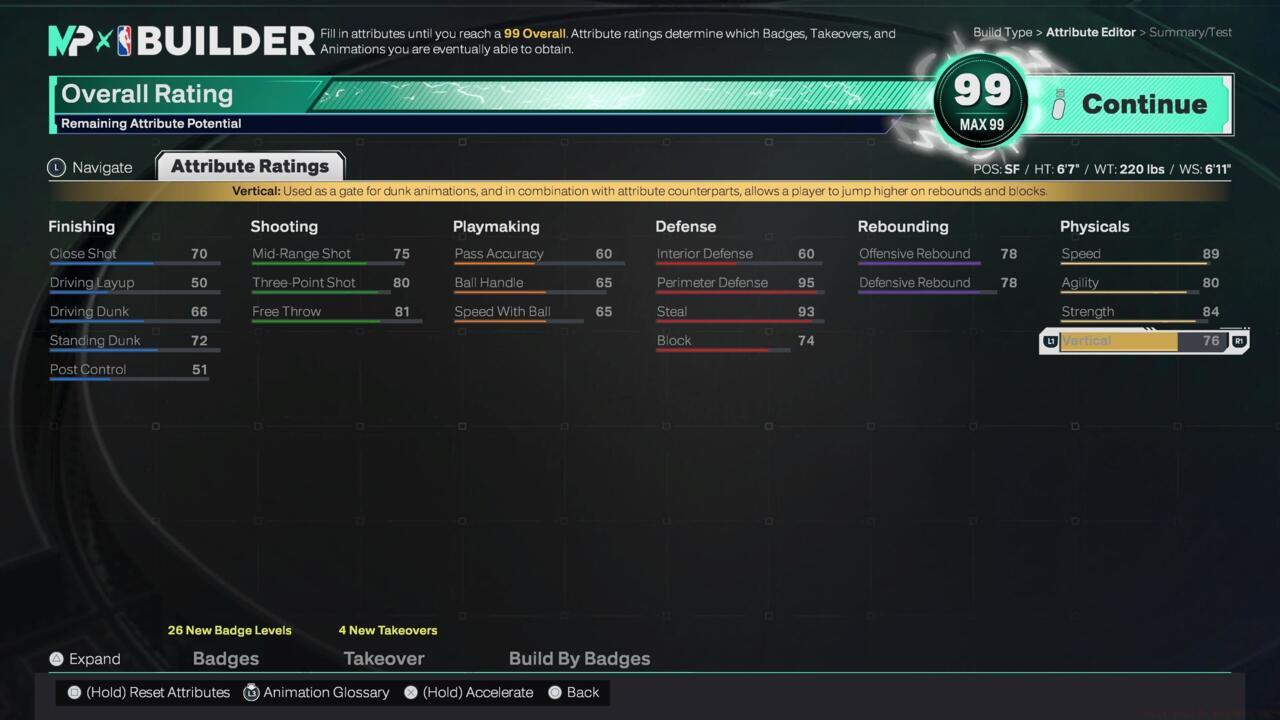
The small forward position in NBA 2K26 demands exceptional versatility, capable of impacting the game on both offensive and defensive ends. Our two-way wing build creates a player who can defend multiple positions while contributing offensively through various means.
- Position: Small Forward
- Finishing
- Close Shot: 78
- Driving Layup: 82
- Driving Dunk: 80
- Standing Dunk: 50
- Post Control: 55
- Shooting
- Mid-Range Shot: 82
- Three-Point Shot: 85
- Free Throw: 78
- Playmaking
- Pass Accuracy: 70
- Ball Handle: 80
- Speed With Ball: 75
- Defense
- Interior Defense: 65
- Perimeter Defense: 85
- Steal: 75
- Block: 70
This small forward configuration excels as a defensive stopper who can switch onto multiple positions while providing reliable scoring. The balanced attribute distribution allows you to exploit mismatches effectively, whether posting up smaller defenders or driving past slower forwards. Defensively, the 85 perimeter defense and 70 block rating make you a formidable presence against both perimeter players and driving opponents.
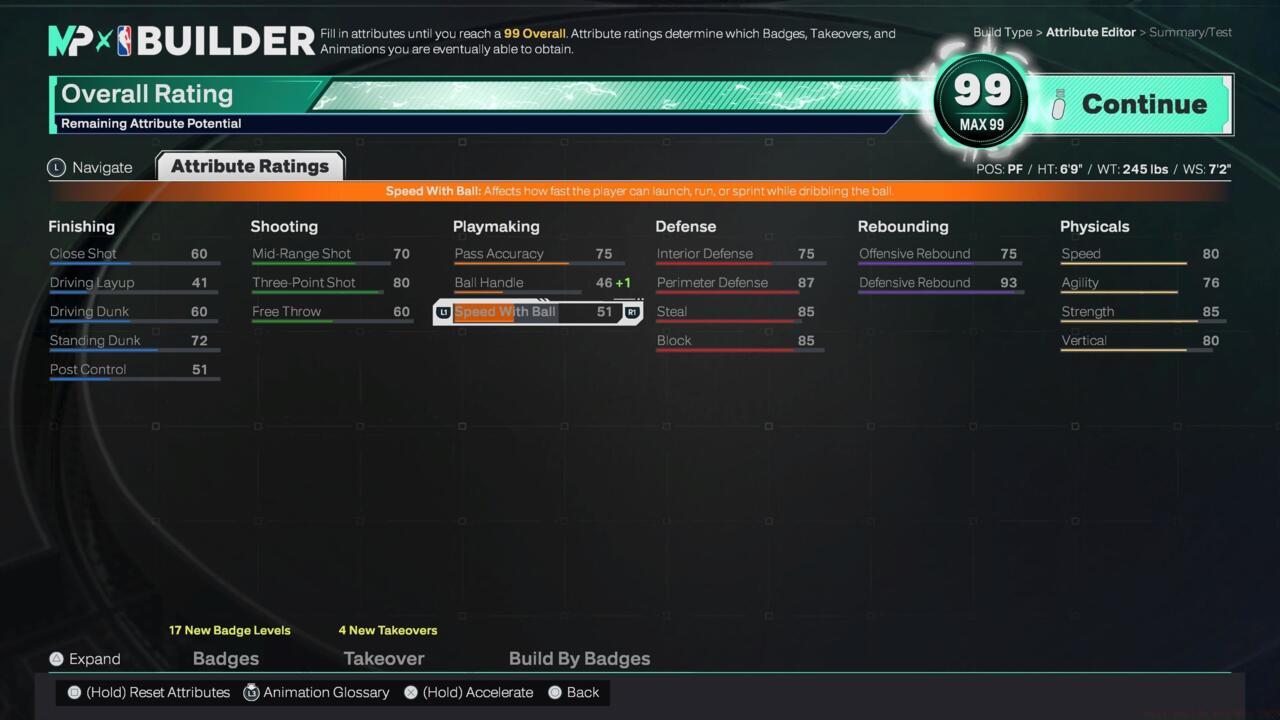
The modern power forward in NBA 2K26 increasingly demands floor-spacing capability combined with traditional big man skills. Our stretch big build creates a player who can punish defenses from beyond the arc while maintaining enough interior presence to contribute in the paint.
- Position: Power Forward
- Finishing
- Close Shot: 75
- Driving Layup: 70
- Driving Dunk: 65
- Standing Dunk: 75
- Post Control: 70
- Shooting
- Mid-Range Shot: 80
- Three-Point Shot: 85
- Free Throw: 75
- Playmaking
- Pass Accuracy: 65
- Ball Handle: 70
- Speed With Ball: 60
- Defense
- Interior Defense: 75
- Perimeter Defense: 70
- Steal: 60
- Block: 75
This power forward archetype revolutionizes floor spacing by forcing opposing big men to defend beyond the three-point line, creating driving lanes for teammates. The 85 three-point rating ensures defenders must closely contest your shots, while the 75 standing dunk and block ratings maintain your paint presence. For optimal performance, focus on pick-and-pop situations where you can either roll to the basket or spot up for three-point attempts.
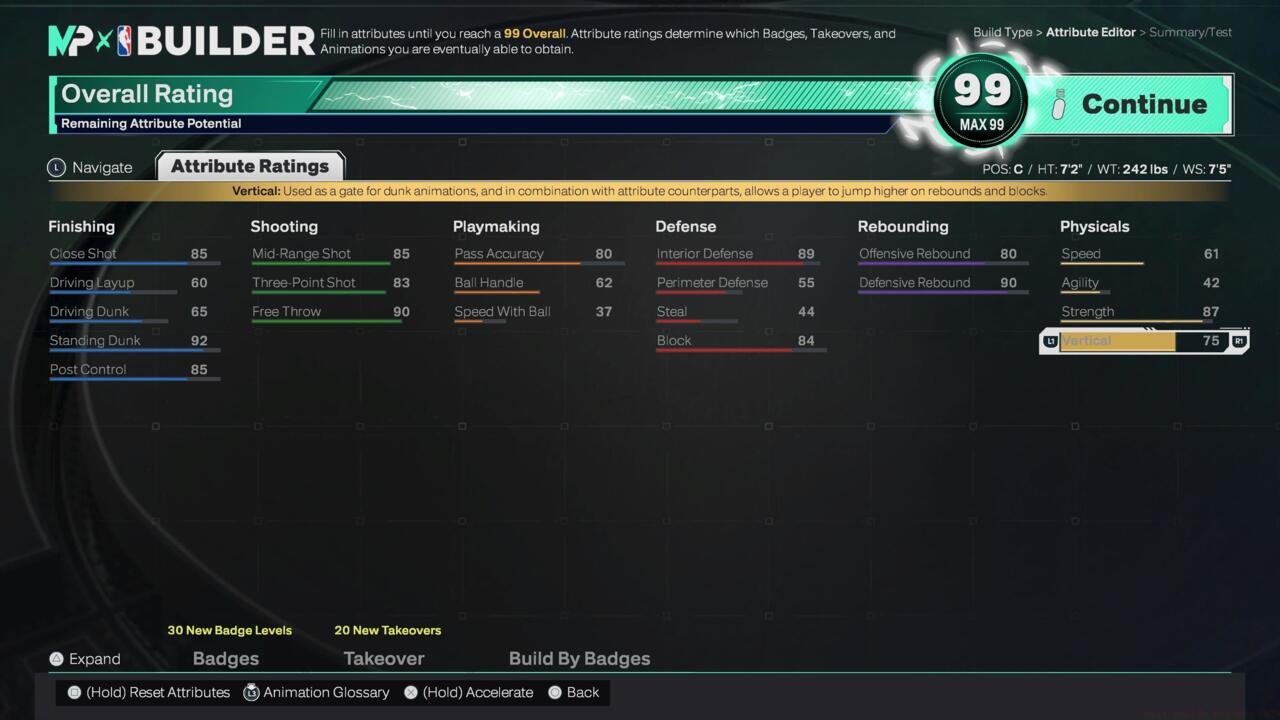
The center position in NBA 2K26 remains the defensive anchor of any team, requiring dominant interior presence while providing efficient scoring near the basket. Our paint dominator build creates a traditional big man who controls the restricted area on both ends of the court.
- Position: Center
- Finishing
- Close Shot: 85
- Driving Layup: 70
- Driving Dunk: 75
- Standing Dunk: 90
- Post Control: 80
- Shooting
- Mid-Range Shot: 70
- Three-Point Shot: 60
- Free Throw: 75
- Playmaking
- Pass Accuracy: 65
- Ball Handle: 60
- Speed With Ball: 55
- Defense
- Interior Defense: 90
- Perimeter Defense: 60
- Steal: 55
- Block: 85
This center configuration dominates the painted area through exceptional interior defense and efficient low-post scoring. The 90 standing dunk rating ensures powerful finishes near the basket, while the 85 close shot provides reliable scoring in traffic. Defensively, the 90 interior defense and 85 block rating make you a formidable rim protector who can alter opponents’ shot selection.
Beyond the foundational attribute allocations, several advanced considerations significantly impact your MyPlayer’s effectiveness. Badge selection represents a critical component that synergizes with your attribute investments, amplifying specific skills beyond their numerical ratings. For our point guard build, prioritize Playmaking badges like Floor General and Dimer to enhance teammates, combined with Shooting badges such as Catch and Shoot and Deadeye for off-ball effectiveness.
Takeover selection should align with your primary playstyle – for the dual-threat point guard, the Playmaking Takeover provides the most value by enhancing your distribution capabilities while maintaining scoring threat. The most common optimization mistake involves spreading badge points too thinly across multiple categories rather than maximizing key badges that complement your build’s strengths.
Long-term development planning is essential, as certain attributes become more expensive to upgrade at higher ratings. Focus on reaching important thresholds first – for example, ensuring your ball handle reaches 92 to unlock elite dribble animations, or hitting the 86 driving dunk requirement for contact dunk packages.
Physical specifications including height and wingspan decisions create trade-offs that significantly impact attribute caps and defensive capabilities. A taller point guard sacrifices speed and ball handling for improved defense and finishing, while a shorter build maximizes agility and shooting potential. Understanding these relationships allows for more informed build customization.
Action Checklist
- Select your primary position and determine your height/weight specifications based on intended playstyle
- Allocate attribute points following position-specific guidelines, focusing on key thresholds
- Select complementary badges that amplify your primary attributes and playstyle
- Test your build in preliminary games and adjust attributes based on performance feedback
- Refine your takeover selection and practice executing your build’s primary strategies
No reproduction without permission:SeeYouSoon Game Club » Best Builds For NBA 2K26 Master NBA 2K26 MyPlayer builds with expert-optimized attributes for every position and playstyle