TL;DR
- Complete Wyll’s companion quest by saving Tieflings, Mizora, and Duke Ravengard across all three acts
- Activate dragon head lanterns simultaneously with lightning spells to reveal the hidden Wyrmway entrance
- Master four distinct trial chambers using specific spell solutions and combat tactics
- Use Globe of Invulnerability to counter Ansur’s devastating lightning nova attack
- Earn two legendary items and complete Wyll’s character arc with major story implications
Successfully navigating the Legend of Ansur storyline requires careful attention to Wyll’s companion quest progression throughout your campaign. The Blade of Frontiers narrative arc must reach its conclusion in Act 3, which demands specific story decisions from earlier chapters.
The Baldur’s Gate 3 Legend of Ansur and Wyrmway Puzzles represent the climactic resolution of Wyll’s personal journey. Here are the critical milestones you must achieve:
- During Act 1, ensure you protect the Tiefling refugees at the Druid Grove. Choosing to align with Minthara and the Goblin forces will permanently remove Wyll from your party.
- In Act 2, you must successfully extract Zariel’s Asset (Mizora) from the Mind Flayer Colony. If she perishes, Wyll faces eternal damnation in Avernus.
- When reaching Act 3, carefully evaluate Mizora’s proposition and proceed to liberate Duke Ravengard from the Iron Throne underwater prison facility.
Ultimately, both Wyll and Mizora must survive your campaign, and rescuing Wyll’s father becomes non-negotiable. Duke Ravengard provides the crucial exposition about the ancient dragon Ansur and delivers the essential book containing the entrance riddle.
Upon examining the Baldur’s Gate 3 Legend of Ansur tome, you’ll discover the Wyrmway access point lies concealed within Wyrm’s Rock Prison. The poetic clue states: “With a lightning shock, a true hero’s spark flickers. The torches alight! And wyrm’s eyes shall awake aglitter!”
With Gortash now alerted to your intentions, numerous Flaming Fist troops will be stationed throughout the fortress complex. Navigate to the prison area via the expansive chamber containing the fast travel waypoint. Descend the staircase leading to the lower detention level.
Proceed leftward until encountering a seemingly impassable wall section featuring two intricately carved dragon head lanterns. Simultaneously strike both fixtures with lightning-based incantations, ensuring both emit blue-hued flames concurrently. This synchronized activation will unveil a previously hidden corridor.


Cast a lightning spell to hit the dragon head lanterns.
Having penetrated the Baldur’s Gate 3 Wyrmway dungeon, you’ll encounter four distinct trials demanding specialized approaches. We’ve systematically arranged them from the left-side chamber progressing rightward. Be advised that incorrect puzzle resolution triggers combat encounters against multiple undead adversaries.
Chamber of Justice
Observe the spectral figure positioned centrally, surrounded by wall-mounted paintings depicting a narrative about an individual apprehended for pilfering an apple. Your objective involves delivering a punishment that appropriately matches the transgression.
Solution: Apply Remove Curse to the shadow-obscured artworks, then select “The Cell” option. Physically relocate this item to your inventory storage. Subsequently, position it within the vacant pedestal receptacle.
Chamber of Insight
Three advisor apparitions occupy the space, accompanied by three levitating tomes circulating overhead. Identify and eliminate the counselor whose guidance would ultimately cause the city’s destruction.
Solution: Activate the hourglass icon on your command interface to engage turn-based combat sequencing. Then, cast Hold Monster (or comparable immobilization magic) targeting the airborne volumes (turn-based mode significantly simplifies targeting precision). The books will descend to the floor, enabling you to peruse their contents. One advisor consistently advocates more aggressive and destructive policies toward conquered territories. In our playthrough, we needed to dispatch Suelto (the left-positioned shade), though your specific target may vary.


Left: Chamber of Justice; Right: Chamber of Insight.
Chamber of Strategy
This represents the Baldur’s Gate 3 chess conundrum, which initially appears complex. The challenge requires achieving victory (destroying the black monarch piece) within merely three moves. During our earnest attempts, we repeatedly failed due to inability to properly arrange our chess formations. Admittedly, we neglected testing whether turn-based sequencing would function effectively.
Solution: The most expedient method involves directly casting a lightning-based spell upon the black king chess piece. This immediately obliterates the target, permitting trial completion.
Chamber of Courage
This chamber constitutes less a puzzle and more a survival combat scenario. Simply endure four successive assault waves comprising elemental creatures and myrmidon warriors. Consider employing Thunderwave or analogous area-effect abilities since adversaries remain susceptible to environmental displacement from the platform edges.


Left: Chamber of Strategy; Right: Chamber of Courage.
Following successful completion of all four Wyrmway challenges in Baldur’s Gate 3, advance toward the central sanctum. There, you’ll confront the decaying remains of the dragon Ansur. Cinematic sequences will initiate both preceding and succeeding this confrontation, though we refrain from additional details to preserve narrative surprises.
Nevertheless, here are essential combat insights for overcoming the Baldur’s Gate 3 Ansur dragon encounter:
- Separate and individually reposition party members before engagement. Failure to do so results in Ansur’s sweeping melee assault striking multiple characters post-cutscene. Additionally, Ansur’s retaliatory strikes provoked by opportunity attacks frequently knock characters prone.
- Myrmidon reinforcements materialize, employing magical attacks to harm your units.
- Ansur possesses the Hoarding Energy characteristic, accumulating electrical energy before discharging a catastrophic explosion enveloping the entire battlefield.
- This area-of-effect detonation activates on the subsequent turn, potentially inflicting nearly 100 lightning damage (though partially reducible). Consequently, securing protective measures against this overwhelming magical assault becomes absolutely critical.
The optimal strategy for neutralizing Ansur’s magical eruption involves including Gale or any character equipped with the Globe of Invulnerability incantation. Deploy the protective sphere and consolidate your team inside the barrier to withstand the detonation. Ranged combatants can maintain offensive operations against Ansur while sheltered within the dome.
Regarding the crystalline pillars, merely taking cover behind them provides zero protection from the blast wave. To utilize the pillars effectively, you must shatter them using your attacks or spells, thereby acquiring the Crystal Skin enhancement (providing resistance to all elemental damage types). At maximum effectiveness, this reduces the nova damage by approximately fifty percent. However, if Ansur’s explosion destroys the crystals, you won’t obtain the buff rapidly enough to lessen the impact. Therefore, we strongly advocate Globe of Invulnerability as the most reliable and complication-free protection method.
Regardless, once Ansur concludes its casting sequence, resume aggressive offensive maneuvers. Remain vigilant for azure circles materializing on the terrain since lightning discharges will target these zones. Finally, should you successfully eliminate Ansur during its aerial phase, you’ll unlock the “Crash Landing” accomplishment.
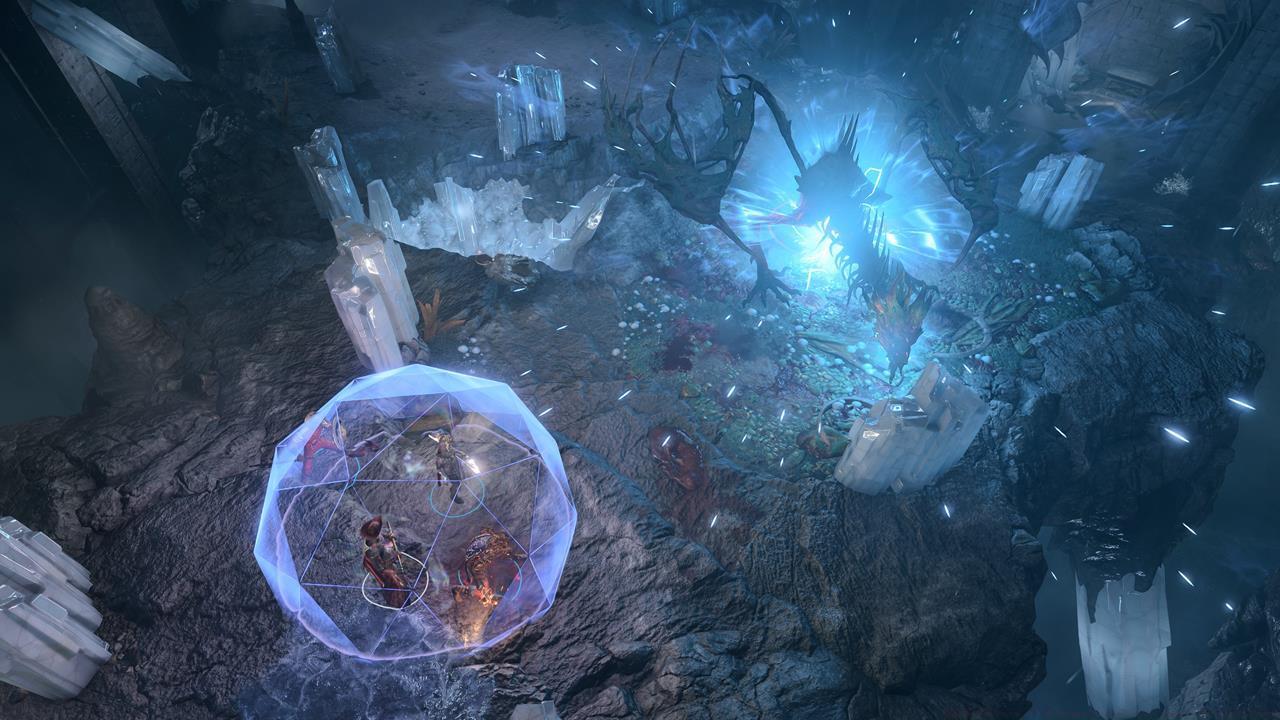
Stay inside the Globe of Invulnerability to negate the ridiculous damage from Ansur’s magical blast.
Upon vanquishing Ansur and acquiring additional narrative context through cinematic exposition, you’ll finalize the Baldur’s Gate 3 Wyrmway and Legend of Ansur objectives. You’ll obtain several legendary-tier equipment pieces to significantly strengthen your character roster.
Balduran’s Giantslayer – 6-19 slashing damage; upon successful strikes, doubles the damage bonus from your Strength attribute; confers advantage on attack rolls versus large, huge, and gargantuan entities; +3 weapon enchantment level.
Helm of Balduran – Restores +2 HP at the commencement of each turn; +1 bonus to Armor Class and saving throws; wearer becomes immune to stunning effects; opponents cannot score critical hits against the equipped character.
With these exceptional acquisitions, proceed to conquer the remaining third-act challenges. Furthermore, this sequence concludes Wyll’s Blade of Frontiers companion narrative. You determine whether he ascends as Baldur’s Gate’s new Grand Duke or pursues an alternative destiny.
Baldur’s Gate 3 contains overwhelming quantities of activities and concealed content. You’ll undoubtedly participate in an adventure demanding innumerable hours for comprehensive exploration. For additional strategic advice, consult our comprehensive BG3 guides repository.
Action Checklist
- Complete Wyll’s companion quest by saving Tieflings, Mizora, and Duke Ravengard
- Solve the book riddle and activate dragon head lanterns with simultaneous lightning spells
- Complete all four Wyrmway trials using specific spell solutions
- Prepare Globe of Invulnerability and position party members before Ansur battle
- Defeat Ansur using protective strategies and claim legendary rewards
No reproduction without permission:SeeYouSoon Game Club » Baldur’s Gate 3 – Wyrmway Puzzles And Legend Of Ansur Guide Master the Wyrmway trials and defeat Ansur with expert strategies and legendary rewards in Baldur's Gate 3