TL;DR
- Mind Flayer Parasite Specimens unlock powerful Illithid abilities when consumed
- Specimens are found across all three acts from specific enemies and hidden locations
- Strategic use of Illithid Wisdom can bypass combat for easier collection
- Multiple specimens can be missed permanently due to story progression
- Advanced tactics include elevation positioning and single-turn eliminations
Mind Flayer Parasite Specimens serve as crucial upgrade currency for your character’s Illithid Powers in Baldur’s Gate 3. These distinctive orange and green containers contain preserved Illithid tadpoles that, when absorbed, grant points toward unlocking devastating psychic abilities. Understanding their collection mechanics early significantly enhances your combat effectiveness throughout the campaign.
The collection system ties directly into the Illithid Wisdom/True Soul mechanic, leveraging your psychic connection with various enemies to either bypass combat or secure additional specimens. Each specimen represents a permanent power boost, making systematic collection essential for maximizing your character’s potential against increasingly formidable foes.
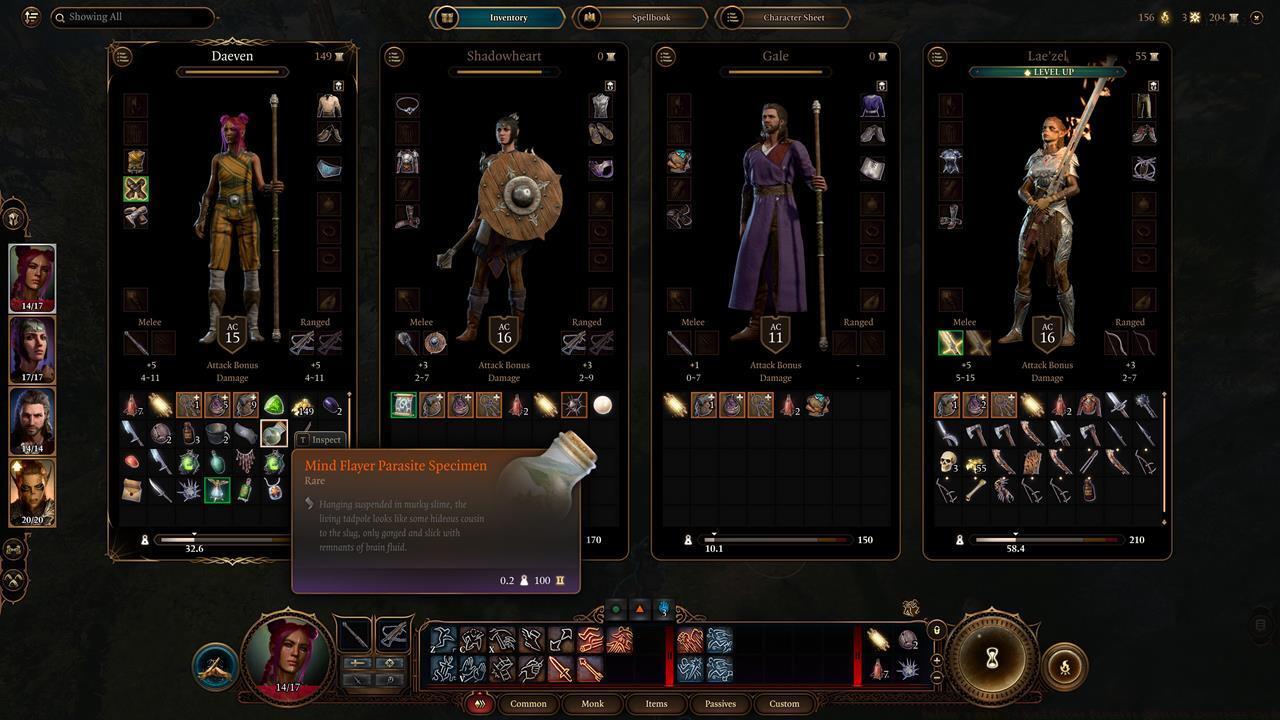
These jars contain the key to unlocking your true psychic potential.
Strategic Importance of Specimen Collection
Prioritizing specimen collection early provides compounding benefits as you progress. The Illithid Powers tree includes abilities that can completely reshape combat encounters, from area control to devastating single-target attacks. Many players underestimate how these abilities scale into later game content.
Druid Grove/Wilderness – Brynna and Co.
West of the Druid Grove entrance, you’ll encounter novice Brynna alongside companions near a deceased individual. Employing Illithid Wisdom during dialogue allows you to circumvent combat entirely. Subsequently looting the corpse enables tadpole absorption and specimen acquisition without engaging hostile forces.
Risen Road – Flint the Gnoll Warlord
Engage the rabid gnoll pack from elevated terrain positions whenever possible. Rock formations provide ideal vantage points for shove attacks or telekinesis spells that instantly eliminate enemies. Alternatively, approach the Gnoll Warlord closely to utilize Illithid Wisdom, turning it against its allies before securing the specimen from its remains.
Left: Brynna’s deceased companion; Right: Strategic positioning against Flint’s gnoll pack.
Goblin Camp/Shattered Sanctum – Leadership Trio
Three goblin leaders hold specimens as part of main storyline progression:
- High Priestess Gut: Convince her to relocate to a secluded chamber where you can eliminate her in one combat round before she summons reinforcements
- Dror Ragzlin: Position ranged specialists on overhead wooden beams to avoid melee combat while carefully navigating psychic interrogation to maintain cover
- Minthara: While romanceable as a potential companion, siding with her necessitates slaughtering innocent Tieflings, permanently losing Wyll and Karlach from your party

Strategic questioning during Dror Ragzlin’s psychic interrogation prevents combat escalation.
Grymforge – True Soul Nere
Accessible through either Shattered Sanctum puzzles or Auntie Ethel’s lair via the Underdark. The Grymforge serves as operational base for Duergar slavers where you face the decision to ally with or eliminate True Soul Nere. Choosing combat rewards another specimen for your collection.
Alignment choices with Nere significantly impact later narrative developments and available resources.
Last Light Inn – Flaming Fist Marcus
Upon reaching the Last Light Inn during Act 2, you’ll encounter Jaheira who introduces Isobel, the cleric maintaining the protective ward against the shadow curse. During the Absolute’s assault attempting to eliminate Isobel, defeat Flaming Fist Marcus to claim his specimen.
Critical Note: Isobel’s survival proves essential for multiple storyline outcomes. Decisions involving the Dark Urge and Nightsong create drastically different narrative paths affecting numerous characters.
Marcus represents both a specimen opportunity and critical narrative checkpoint requiring careful tactical approach.
Moonrise Towers – Docked Ship
Investigate the dockyards behind Moonrise Towers to locate a loading vessel. Utilize Illithid Wisdom or persuasion skills to bypass the patrolling guard. Examine the barrels being loaded to discover two specimen containers inside.
Progression Warning: The ship departs permanently after advancing further in Act 2. However, missed specimens become recoverable later at the smuggler’s docks during Act 3 progression.
Navigate to the northwestern map edge from Rivington waypoint (coordinates X: -216; Y: 137) where regional gang conflicts occur. The specimens remain accessible within the ship’s storage regardless of combat engagement decisions.
Multiple recovery opportunities exist for ship-based specimens, reducing permanent miss anxiety for completionist players.
Moonrise Towers – Disciple Z’rell and Linsella
During the assault on Moonrise Tower targeting Kethelric Thorm, two lieutenants enter combat: Disciple Z’rell wields the devastating Black Hole spell that groups and slows multiple targets. Linsella typically arrives later in the engagement, allowing prioritized target elimination before securing her specimen.
Z’rell’s area control abilities necessitate either rapid elimination or strategic positioning to minimize party vulnerability.
Mind Flayer Colony – Brine Pool
After defeating Ketheric Thorm, pursuit through the Mind Flayer Colony leads to a chamber containing Zariel’s Asset. Nearby, interact with the brine pool where successful Perception checking by at least one party member yields an additional specimen.
Critical Mechanics: This section prevents fast travel and party member swapping. Entire party Perception check failure permanently locks this specimen without previous save reloading.
Specimen acquisition here depends entirely on successful skill checks rather than combat performance, requiring different preparation approaches.
Lower City: Bloomridge Park – Manip Edenosa
While exploring Bloomridge Park in the Lower City, Bhaal cultists may ambush your party. After neutralizing them, Flaming Fist soldier Manip Edenosa approaches, clearly under Absolute control. Brief dialogue concludes with her instantaneous demise, allowing specimen collection from her remains.
Manip Edenosa’s appearance triggers automatically post-ambush, providing straightforward specimen acquisition without complex combat scenarios.
Lower City: The Blushing Mermaid
During the Save Vanra quest, you discover Auntie Ethel consumed a child, continuing her villainous arc from Act 1. Within the Blushing Mermaid’s cellars, navigate caverns containing mind-controlled adversaries.
After enemy elimination, traverse mushroom platforms to reach an elevated wooden structure. The specimen container rests adjacent to twisted branch formations.
Platform navigation skills prove essential for accessing this specimen location efficiently.
Lower City: Steel Watch Foundry
Investigating the Steel Watch Foundry becomes crucial for defeating Lord Gortash in Act 3, since the facility controls all mechanical constructs. Examine the chamber rear preceding the control room to find experimental remains and a specimen positioned on a workstation.
The Steel Watch Foundry specimen represents one of the final acquisitions before endgame sequences.
Missed Opportunity Recovery
Several specimens become permanently inaccessible due to narrative progression triggers. The docked ship at Moonrise Towers represents the most commonly missed opportunity, though it reappears in Act 3. The brine pool specimen requires immediate Perception success or becomes lost without save scumming. Strategic planning around key story moments prevents irreversible specimen loss.
Party Optimization Tips
Characters with high Perception, Investigation, and Persuasion skills significantly enhance collection efficiency. Consider respeccing party members temporarily when approaching known specimen locations requiring specific skill checks.
Pro Tip: Maintain multiple save files before major narrative decisions or entering areas with known specimen opportunities. This simple practice prevents dozens of hours of replay for completionist goals.
For comprehensive gameplay strategies, consult our Complete Guide covering broader strategic elements.
Understanding Weapons Unlock systems and Class Guide optimizations can further enhance your specimen collection efficiency throughout the campaign.
Action Checklist
- Use Illithid Wisdom dialogue options whenever available to bypass combat encounters
- Prioritize elevation positioning against gnoll packs for environmental elimination
- Create save backups before major narrative decisions involving specimen-bearing characters
- Coordinate single-turn eliminations for leaders like High Priestess Gut
- Systematically check all Act 3 recovery locations for missed specimens
No reproduction without permission:SeeYouSoon Game Club » Baldur’s Gate 3 – Mind Flayer Parasite Specimen Locations Guide Complete guide to finding all Mind Flayer Parasite Specimen locations in Baldur's Gate 3 for enhanced Illithid Powers