TL;DR
- The valve is located immediately inside the northeastern tunnel entrance near collapsed concrete
- Multiple tunnel access points exist, but the Launch Towers hole provides fastest completion
- No extraction required – use free loadouts to minimize risk on this dangerous map
- Complete the quest in under 5 minutes with proper navigation and enemy awareness
- Valve interaction is instant – no additional items or combat required
Mastering the Switching the Supply mission requires understanding both the environmental challenges and optimal preparation strategies. This guide provides comprehensive navigation details to efficiently complete this water purification objective.
Arc Raiders presents players with contaminated water systems that demand immediate attention. The Switching the Supply quest directs operators to locate underground tunnels beneath the Spaceport facility and manipulate a specific valve mechanism to redirect clean water flow. While the core objective appears simple, the hazardous environment and precise location requirements create significant challenges for unprepared players.
Strategic loadout selection proves crucial for mission success. Since extraction isn’t mandatory for quest completion, consider utilizing free equipment packages to conserve valuable resources. The Spaceport region contains active combat zones with roaming enemy patrols, making tactical awareness essential for survival. For broader strategic context, consult our Complete Guide to understand similar environmental objectives.
Proper preparation separates successful operators from those requiring multiple attempts. This walkthrough eliminates guesswork and provides precise navigation coordinates.
Your primary mission objective involves locating the extensive tunnel system beneath the Spaceport’s main structures. Multiple access points dot the central map region, but efficiency demands using the optimal entrance.
The most strategically advantageous tunnel entrance sits directly before the Spaceport Launch Towers, marked by a substantial ground rupture. This prominent geological feature becomes easily identifiable once you understand its visual characteristics. The collapsed cement structures provide natural ramps into the subterranean passageways.
Navigation efficiency depends on recognizing environmental landmarks. The Launch Towers serve as reliable reference points for orientation. From this position, descend through the fractured terrain using the unstable cement pathways. Advanced operators should note that alternative tunnel entries exist along the central corridor, though they typically require longer travel distances and increased enemy exposure. For weapon selection that complements this stealth approach, explore our Weapons Unlock recommendations for suppressed options.


Upon descending into the tunnel network, immediate spatial awareness becomes critical. Contrary to intuitive exploration patterns, the target valve resides remarkably close to your entry point, eliminating extensive underground navigation.
The critical water control mechanism sits concealed behind northeastern collapsed concrete structures. Navigate around these debris formations and scan the right-side wall for the distinctive red valve assembly mounted on industrial piping. The proximity to your descent point makes this objective surprisingly accessible once you understand the precise positioning.
Interaction with the valve mechanism produces instantaneous quest completion. The simple interface activation triggers mission success without additional requirements. This efficient design allows operators to rapidly conclude the objective and transition to other activities. Understanding class capabilities that support quick infiltration can enhance performance; learn more in our Class Guide for specialized loadouts.
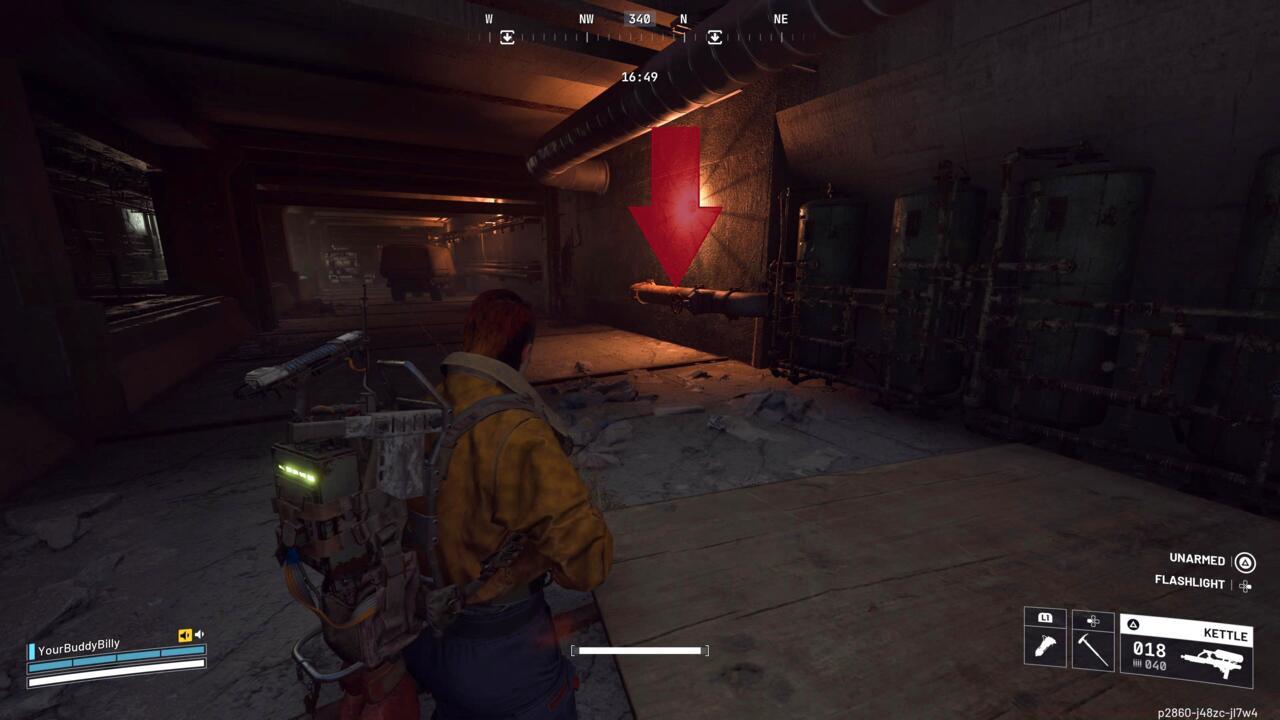
Interact with this valve.
Successful valve operation concludes the Switching the Supply quest immediately. No further extraction or additional objectives are necessary, making this one of Arc Raiders’ most time-efficient missions.
Seasoned operators can optimize their approach through several advanced techniques. The entire quest typically requires 3-5 minutes when following optimal routing, compared to 8-12 minutes for exploratory approaches.
Avoid the common mistake of over-exploring the tunnel network. The valve’s proximity to the entrance means extensive navigation wastes time and increases enemy encounter probability. Instead, execute precise movements directly to the objective location.
Enemy patrol patterns follow predictable routes through the Spaceport exterior. Time your descent during patrol gaps to minimize combat interruptions. The tunnel interior generally remains secure from hostiles, allowing focused objective completion.
While extraction isn’t mandatory, consider completing additional nearby objectives before departing if you’ve brought valuable equipment. The efficient quest completion provides opportunity for secondary objective pursuit without additional travel time.
Action Checklist
- Deploy with free loadout to conserve resources since extraction isn’t required
- Navigate to Spaceport Launch Towers and locate the ground rupture entrance
- Descend through collapsed cement into tunnel network
- Immediately circle behind northeastern concrete debris to find red valve
- Interact with valve to complete quest – no extraction needed
No reproduction without permission:SeeYouSoon Game Club » Arc Raiders Switching The Supply Quest Guide Complete guide to locating Spaceport tunnels and switching water supply valve in Arc Raiders