TL;DR
- Jiosin Shrine introduces shape rotation puzzles using Ultrahand mechanics
- The first chamber requires rotating an X-shaped object through matching wall openings
- Use Ascend ability strategically to reach the optional treasure chest
- Proper block positioning eliminates unnecessary climbing and backtracking
- Mastering these techniques prepares you for more complex shrine challenges
Conquer this early-game shrine to secure one of your initial Lights of Blessing during your Tears of the Kingdom journey. This puzzle serves as a fundamental introduction to the game’s spatial reasoning challenges.
Among the first shrines encountered after departing Great Sky Island, the Jiosin Shrine focuses entirely on its designated theme: “Shape Rotation.” While subsequent shrine puzzles will present significantly greater difficulty, there’s absolutely no disadvantage in seeking guidance during these formative stages. This comprehensive walkthrough will help you complete the shrine efficiently and claim what might be your inaugural Light of Blessing on the surface world.
As the feature name indicates, Jiosin Shrine centers around manipulating geometric forms through rotation. If you recall childhood toys requiring toddlers to match shapes with corresponding slots, this shrine operates on identical principles. You’ll employ Ultrahand extensively throughout, with strategic application of Ascend providing valuable shortcuts.
Begin by entering the initial chamber and utilizing Ultrahand to grasp the elongated, irregularly shaped plank. Carefully rotate it to align with the wall aperture, then release it and collect it from the opposite side. Proper alignment is crucial here – ensure the object’s orientation matches the opening perfectly before proceeding.
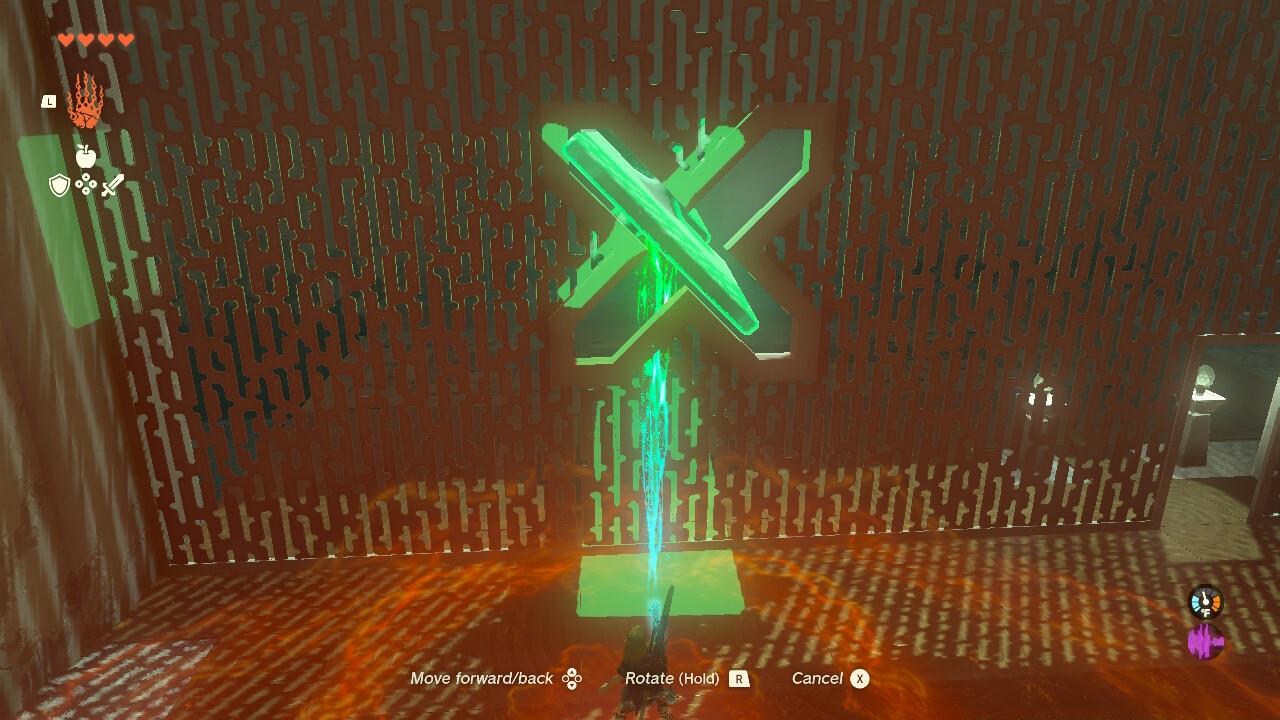
Precisely maneuver the X-shaped component through the corresponding X-shaped wall opening.
Subsequently, position the object horizontally to create a spanning structure across the substantial chasm. This transforms the obstacle into a passable route forward.
Carefully cross the improvised bridge to advance to the next section.
Pro Tip: When rotating the X-shaped object, utilize the ZL and ZR triggers for precise incremental adjustments rather than relying solely on analog stick movements.
Upon reaching the subsequent area, you’ll encounter two separate chambers alongside the optional chest containing valuable rewards. Initially, access the right-side room and secure the substantial block using Ultrahand, then guide it outward following the same methodology as the previous component. Once positioned in the central area, refrain from immediately passing it through the opposite opening.
Transport the subsequent large block through the wall partition using this approach.
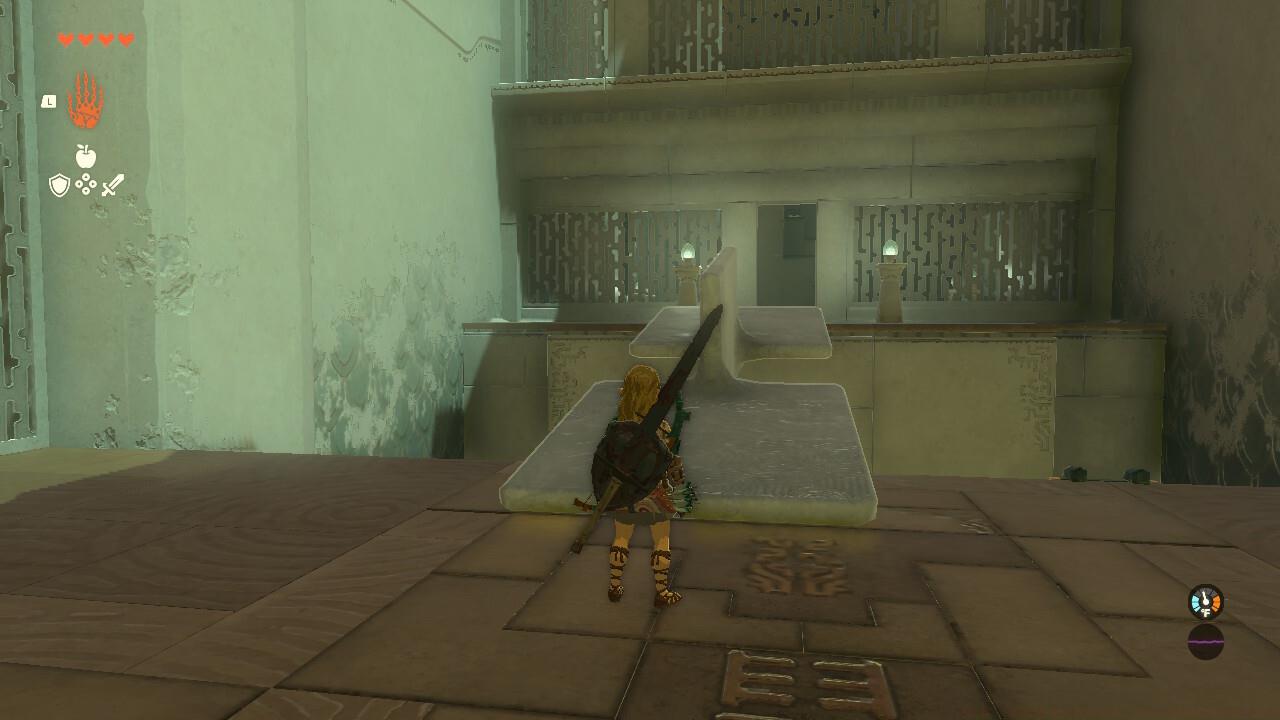
Relocate the block adjacent to the wall supporting the chest platform. Position the block vertically as demonstrated in our reference image, then activate Ascend to elevate to the object’s summit. From this vantage point, you can easily access the chest, claim your supplementary rewards, then descend and continue through the shrine.
Employ Ascend ability to penetrate through the block structure and reach the optional treasure container.
Common Mistake: Many players attempt to climb the block manually, which consumes significantly more time and stamina. The Ascend ability provides a far more efficient solution.
From the central chamber, guide the block through this partition visualizing it as two interlinked diamond formations.
Ascend functionality occasionally feels like exploiting game mechanics, but strategic advantage-taking is completely acceptable in Zelda’s puzzle design.
Time Optimization: Experienced players can complete Jiosin Shrine in approximately 3-4 minutes using optimized movement patterns and precise object manipulation. Beginners should anticipate 6-8 minutes for their initial attempt.
Skill Transfer: The spatial reasoning and object rotation techniques mastered here directly apply to numerous subsequent shrines, particularly those involving construction and physics-based puzzles throughout Hyrule.
Advanced Strategy: For speedrunners, it’s possible to bypass certain conventional steps by creatively combining Ultrahand positioning with well-timed jumps, though this requires advanced movement proficiency.
Action Checklist
- Use Ultrahand to rotate and pass the X-shaped object through the wall
- Position the object as a bridge and cross the gap
- Retrieve the large block from the right chamber
- Use Ascend through the positioned block to reach the optional chest
- Claim chest rewards and proceed to shrine completion
No reproduction without permission:SeeYouSoon Game Club » Zelda: Tears Of The Kingdom – Jiosin Shrine Puzzle Guide Master the Jiosin Shrine's shape rotation puzzles with expert strategies and time-saving techniques