TL;DR
- Complete Phantom Ganon at Hyrule Castle to trigger the Fifth Sage quest initiation
- Locate the final stone tablet in Kakariko’s Ring Ruins using Ascend ability
- Navigate the serpent-shaped river in Faron to collect Charged armor set pieces
- Survive Thunderhead Isles lightning storms with proper equipment and puzzle solutions
- Defeat the Seized Construct boss early to avoid challenging late-game encounter
Discovering the Fifth Sage represents one of the most rewarding yet challenging main quests in Tears of the Kingdom. Many players struggle with the intentionally vague clue about finding ‘ruins from the age of legends,’ leading to extensive exploration without clear direction. This comprehensive walkthrough provides the precise location details and strategic approaches needed to successfully complete this essential storyline.
Critical Spoiler Alert: This guide contains detailed narrative revelations about the Fifth Sage’s identity and late-game story developments that significantly impact your gameplay experience.
Your journey to locate the Fifth Sage begins after successfully defeating Phantom Ganon within Hyrule Castle’s chambers. During the subsequent story discussion, Purah reveals the potential existence of an additional sage, providing only the cryptic instruction to ‘find the ruins from the age of legends.’ This deliberately ambiguous clue often sends players investigating numerous ancient sites across Hyrule.
The actual solution lies within Kakariko Village’s Ring Ruins, specifically the fifth and final stone tablet that becomes accessible after completing the ‘A Trip Through History’ side quest. Experienced players recommend finishing this optional mission beforehand, as it provides crucial context about the ruins’ significance and may be required to advance the main objective.
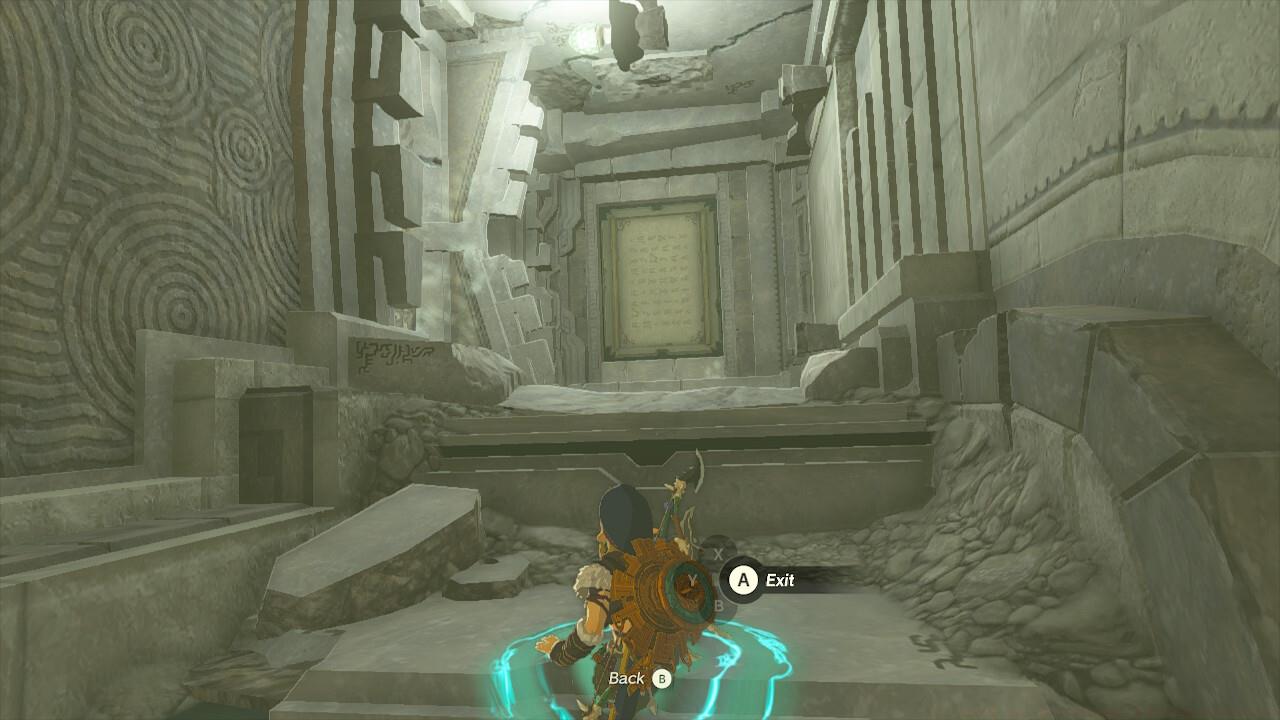
There’s one last stone slab in Kakariko’s Ring Ruins.
To access the central chamber that was previously restricted by Calip’s warnings, employ your Ascend ability from beneath the structure. Once inside, utilize the Purah Pad’s camera function to document the discovery, then share your findings with Paya and Tauro waiting below.
Pro Tip: If you encounter difficulty reaching the central platform, consider using nearby elevated terrain for better positioning or creating temporary structures with Ultrahand for additional elevation options.
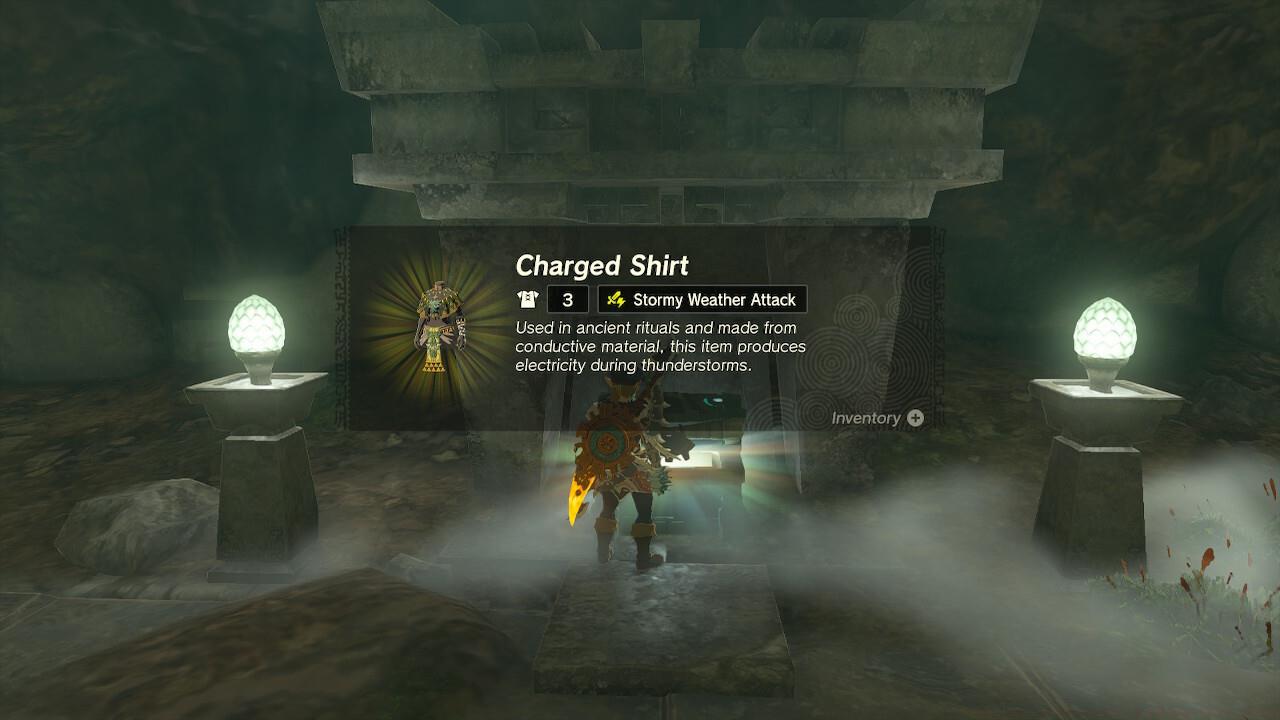
The subsequent phase of the Fifth Sage investigation transforms into an extensive overland expedition through Faron’s diverse landscapes. Begin your journey at the Popla Foothills Skyview Tower, then proceed southward to Dracozu Lake where you’ll reunite with Tauro. Open the nearby chest to obtain the Charged Shirt, initiating your collection of the complete Charged armor set.
Your primary objective involves following the winding river system while systematically checking each small chamber along the banks. These hidden compartments contain the remaining Charged armor components, essential for surviving the upcoming environmental challenges.
Collect Charged Set armor pieces while navigating the winding serpent river.
The river basin’s distinctive serpent-like configuration requires careful navigation to reach the southwestern tail section. There, you’ll discover another ceremonial chamber where presenting a Zonai Charge on the altar triggers a cinematic sequence revealing the Thunderhead Isles floating high above.
Common Mistake: Many players overlook the chests hidden in less obvious chambers along the river’s curves, resulting in incomplete armor sets that severely disadvantage them in subsequent areas.
Thunderhead Isles comprises multiple aerial landmasses suspended in the sky domain. While the tasks themselves remain relatively straightforward, the persistent thunderstorm conditions create substantial hazards. Lightning strikes automatically target any metallic equipment, necessitating strategic gear selection and combat preparation.
Equip exclusively cloth-based attire and wooden weaponry throughout this segment. When utilizing the Fuse ability, restrict combinations to monster-derived materials like skeletal remains or creature claws to maintain electrical safety.
Throughout the exploration, you’ll encounter electrical push blocks requiring power activation. Nearby metallic rods periodically attract lightning strikes that can be harnessed for puzzle solutions. Alternatively, employ Shock Fruit projectiles or activate Riju’s lightning-based abilities for more controlled electrical distribution.
Don’t equip a single metallic item unless you want this thing here to blast Link in the face.
Advanced Strategy: Experienced players recommend carrying multiple wooden shields for emergency protection and collecting excess Shock Fruit from surface areas before ascending to the islands.
Upon completing the Thunderhead Isles segment, you’ll access a concealed facility deep within the Depths. There, a carved outline of an unusually large Construct awaits, distinct from the serpentine automatons encountered previously.
This entity represents Mineru, sister to Rauru and the actual Sage of Spirit. Your mission now focuses on gathering four specialized robot components from the surrounding manufacturing facilities positioned around the central assembly forge.
Complete Mineru’s robot body so she can have a physical form.
After successful assembly, Mineru gains a tangible physical presence. This new sage companion functions as a customizable vehicle platform that you can mount and operate. Attach various Zonai Devices and objects to enable melee combat capabilities, energy beam projection, ranged attack options, and temporary velocity enhancements.
Customization Tip: Strategic attachment placement significantly impacts combat effectiveness – position beam emitters high for better firing arcs and attach rockets strategically for combat mobility advantages.
The concluding challenge involves confronting the Seized Construct boss enemy. Successfully defeating this adversary during the Fifth Sage quest prevents its reappearance in later campaign segments, significantly reducing end-game difficulty.
However, postponing this confrontation until the late game forces you to battle the Seized Construct without your mechanized companion’s assistance. One documented encounter required nearly twenty minutes of continuous combat due to the construct’s exceptionally fortified defensive capabilities.
The Legend of Real Steel-da.
Combat Recommendation: Stockpile high-damage weapons and healing items before initiating this confrontation, as the battle tests both your combat skills and resource management capabilities extensively.
The Legend of Zelda: Tears of the Kingdom contains numerous intricate mechanics and gameplay systems to master. For additional guidance, explore our comprehensive Complete Guide covering all aspects of the gaming experience.
Action Checklist
- Defeat Phantom Ganon at Hyrule Castle to activate the quest
- Complete ‘A Trip Through History’ side quest in Kakariko Village
- Use Ascend ability to access central Ring Ruins chamber
- Document the stone tablet with Purah Pad and report to Paya/Tauro
- Navigate Faron region to collect complete Charged armor set
- Survive Thunderhead Isles lightning storms with proper equipment
- Assemble Mineru’s construct body with four robot components
- Defeat Seized Construct boss to prevent late-game reappearance
No reproduction without permission:SeeYouSoon Game Club » Zelda: Tears Of The Kingdom – Fifth Sage Location Guide Complete guide to locating the Fifth Sage with detailed strategies for Thunderhead Isles and Seized Construct boss