TL;DR
- Comprehensive shrine location maps for all surface regions with detailed navigation
- Strategic approaches for combat trials, puzzle chambers, and blessing shrines
- Regional breakdown covering Hebra, Tabantha, Hyrule, Eldin, Akkala, and more
- Essential rewards including Light Blessings, Sage’s Wills, and unique equipment
- Advanced optimization techniques for efficient shrine completion and progression
Discovering and conquering Shrines in The Legend of Zelda: Tears of the Kingdom represents a crucial progression system that significantly enhances your adventuring capabilities. These sacred structures serve multiple purposes beyond simple waypoints, each offering distinct challenges and valuable rewards that directly impact your journey through Hyrule.
Shrines are categorized into three primary types, each requiring different strategic approaches. Combat Trials test your weapon proficiency and tactical thinking against formidable constructs. Puzzle Chambers demand creative problem-solving using Ultrahand abilities and environmental manipulation. Blessing Shrines provide immediate rewards but often require overcoming substantial environmental challenges to reach them.
The reward system within Shrines follows a consistent pattern that makes exploration highly rewarding. Each completed Shrine grants a Light Blessing, with four of these enabling you to either increase your heart containers for survivability or expand your stamina wheel for enhanced mobility. Additionally, certain Shrines contain Sage’s Wills, which are essential for upgrading your Sage companions’ abilities and unlocking their full combat potential.
Strategic shrine completion should align with your current gameplay needs. If you’re struggling with boss encounters, prioritize heart container upgrades. For extensive exploration needs, stamina enhancements prove more valuable. Some Shrines also contain unique equipment pieces or valuable materials that can’t be obtained elsewhere, making thorough exploration essential.
The Surface World of Hyrule contains the majority of Shrines, strategically distributed across diverse biomes and regions. Understanding the geographical distribution patterns helps streamline your exploration efforts and prevents unnecessary backtracking.
Northern Surface World Shrines are concentrated in colder climates, primarily throughout the Hebra and Tabantha regions. These areas often require cold resistance equipment or food buffs to navigate safely. Key Northern Shrines include those hidden within mountain caves, behind ice formations, and atop high peaks that demand creative climbing or flying approaches.
Southern Surface World Shrines span warmer territories including the Gerudo Desert, Faron grasslands, and Necluda regions. Desert Shrines frequently employ sand-based puzzles and heat management challenges, while forest and grassland Shrines emphasize vertical exploration and natural environment navigation.
Regional shrine density varies significantly, with Central Hyrule Field containing the highest concentration due to its narrative importance. Meanwhile, border regions like Akkala and Lanayru feature more spaced-out Shrines that often guard valuable secrets or serve as gateways to underground exploration.
Navigation tips for efficient shrine hunting include utilizing Skyview Towers for aerial reconnaissance, marking suspected shrine locations with pins, and paying attention to environmental anomalies that often indicate hidden entrances.
Hyrule’s diverse regions each present unique shrine discovery challenges that require adapted exploration strategies. The Great Hyrule Forest area contains Shrines deeply integrated with the Lost Woods mechanics, demanding careful pathfinding and environmental awareness to locate.
Hebra Region Shrines are predominantly ice and snow-themed, with many requiring the melting of ice barriers or navigation of slippery slopes. The mountainous terrain makes paraglider approaches highly effective, though weather conditions can complicate aerial navigation.
Eldin’s volcanic landscape hosts Shrines that incorporate heat mechanics and lava navigation puzzles. Fireproof equipment becomes essential for exploring this region thoroughly, with several Shrines positioned near active volcanic vents or within lava-filled caverns.
Gerudo Desert Shrines often employ sandstorm navigation challenges and underground exploration beneath the shifting dunes. Many require solving environmental puzzles related to desert wildlife, ancient structures, or utilizing the unique sand seal transportation method.
Surface Labyrinth Shrines represent some of the most complex challenges, featuring multi-layered puzzle structures that test both navigation skills and problem-solving abilities. These typically reward powerful equipment and multiple Light Blessings upon completion.
Advanced optimization strategies include completing Shrines in geographical clusters to minimize travel time, prioritizing Shrines that align with your current quest objectives, and utilizing the interactive map features to track your progression systematically.
In The Legend of Zelda: Tears of the Kingdom, shrines serve as crucial waypoints and progression markers throughout your adventure. These ancient structures function identically to their Breath of the Wild counterparts, offering both transportation convenience and character enhancement opportunities. Understanding shrine mechanics early will significantly accelerate your journey through Hyrule’s vast landscapes.
Each completed shrine challenge rewards you with a Blessing of Light. Accumulate four of these glowing orbs to visit any Goddess Statue and exchange them for either a permanent heart container increase or additional stamina wheel segment. This choice becomes particularly important as you balance combat survivability with exploration capabilities.
Shrine categories include:
- Puzzle Shrines – The most common type, requiring creative use of Zonai Devices and Link’s core abilities to reach the altar.
- Combat Training – These function as interactive tutorials for core combat mechanics, though the open-world design means you might encounter them out of sequence.
- Proving Grounds – Link enters these challenges stripped of all equipment, forcing reliance on environmental tools and strategic thinking to overcome Construct guardians.
- Rauru’s Blessing – The simplest shrines where you merely open the chest to claim your reward.
- Shrine Quests – Special shrines that only appear after completing specific overworld objectives.
Essential preparation tip: Always ensure you have adequate healing items, durable weapons, and understanding of relevant abilities before attempting any shrine.
One critical mapping relationship exists between surface and depths regions. The Depths World contains no actual shrines, but every surface shrine location corresponds directly to a Lightroot in the underground, and vice versa. Examine your map closely – if you discover “Mayachin” shrine on the surface, you’ll find “Nihcayam Lightroot” directly beneath it in the Depths. This connection provides invaluable navigation assistance when exploring both realms.
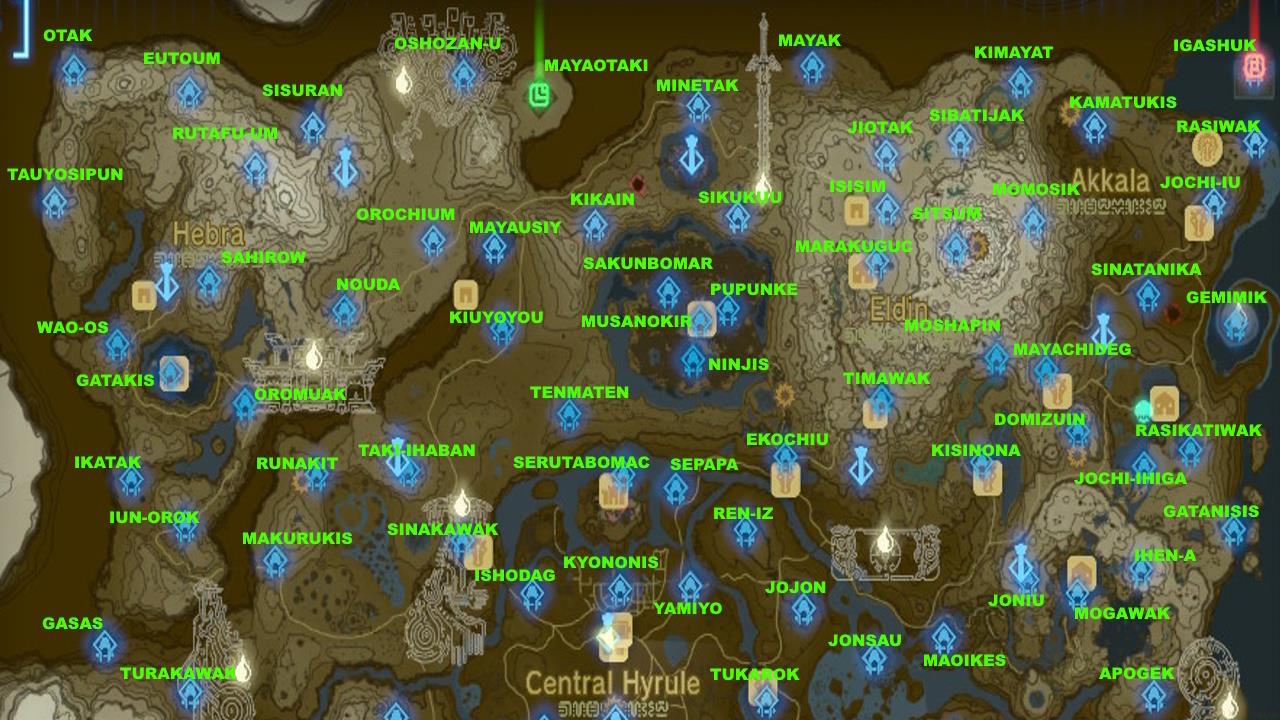
Shrine map: North Surface World.
Southern Surface World Shrine Map
These southern region shrines offer unique environmental puzzles and combat scenarios.
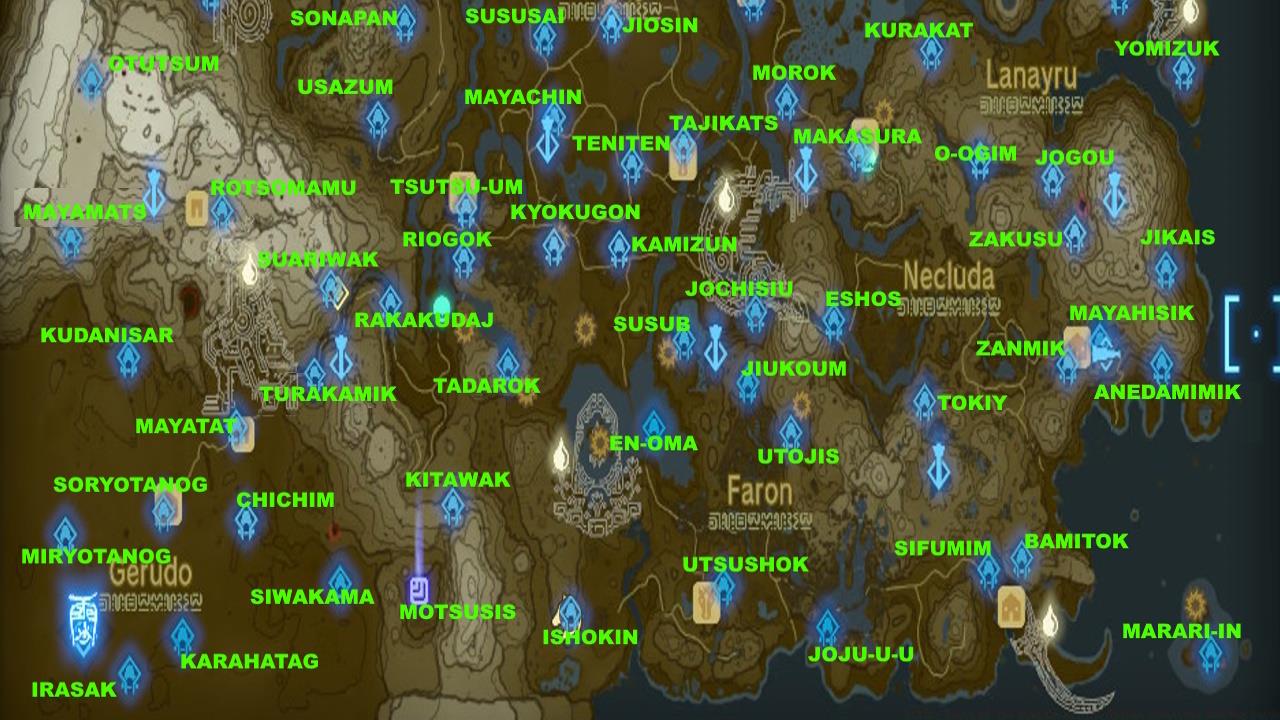
Shrine map: South Surface World.
Hebra Region Shrines
Eutoum Shrine
- Location: Gollam’s Secret Hot Springs in Hebra North Crest
- Objective: Proving Grounds (Infiltration) – Stealth elimination of Constructs is possible but not mandatory.
- Pro tip: Use snow-covered terrain for stealth approaches and environmental advantages against mechanical foes.
Gatakis Shrine
- Location: Main shrine in Rito Village
- Objective: Master wind current manipulation using updrafts and Zonai Fans for traversal.
Orochium Shrine
- Location: Central snowfield area
- Objective: Strategic use of Ascend ability after controlled drops through multi-level structures.
Common mistake: Attempting to climb frozen surfaces without proper cold resistance or alternative ascent methods.
Oromuwak Shrine
- Location: Near Fortress Geoglyph, surrounded by burnable thorny vines
- Objective: Attach Zonai Rockets to overcome vertical challenges and access previously unreachable areas.
Oshozan-u Shrine
- Location: Along top-right section of Headdress Geoglyph
- Objective: Strategic attachment of Rockets and other objects to redirect light beams toward targets.
Otak Shrine
- Location: Northwestern map extremity – descend snowfield past mountains, use Fire Fruits or Flame Emitter for ice melting progression
- Objective: Proving Grounds (Traps) – Environmental hazards including explosive barrels, flammable rope lanterns, and weapon-fusable boulders for environmental puzzle solving.
Rutafu-um Shrine
- Location: Northwestern Hebra Mountains cave with underground pond
- Objective: Rauru’s Blessing – Quick completion for immediate reward acquisition.
Sahirow Shrine
- Location: Just east of Rospro Pass Skyview Tower
- Objective: Precision movement through laser fields using crouch-jump combinations and Ascend timing.
Sisuran Shrine
- Location: Lower north-central ridge with pedestal and crystal
- Objective: Rauru’s Blessing after defeating the emerging Frost Talus using thermal attacks and climbing strategies.
Tauyosipun Shrine
- Location: Western Hebra snowfields
- Objective: Master Recall ability application to reverse ball trajectory and solve momentum-based puzzles.
Wao-Os Shrine Quest: White Bird’s Guidance
- Location: From Rito Village’s highest rock formation, look northwest to spot the white bird mountain carving and locate the entrance cave.
- Objective: Physics-based puzzle solving using block placement and catapult mechanics to launch spheres toward targets.
The celestial realm above Hyrule contains numerous shrines accessible through skyisland exploration and specialized puzzle solving. We’ve categorized these aerial challenges into logical groupings based on thematic elements and progression requirements.
Northern Sky World Shrine Map
These elevated shrines present unique challenges requiring mastery of aerial movement and specialized ability applications.

Shrine map: North Sky World.
Southern Sky World Shrine Map
These southern sky shrines, including the Great Sky Island starting area, provide foundational ability training and advanced aerial challenges.
Shrine map: South Sky World.
Great Sky Island Shrines
Four essential shrines await discovery in the Great Sky Island starting area. Each provides critical ability training essential for your entire journey through Hyrule.
Ukouh Shrine
- Location: Northern portion of Great Sky Island
- Objective: Learn and master the Grab/Attach command for Ultrahand ability applications.
In-Isa Shrine
- Location: Western section of Great Sky Island
- Objective: Acquire foundational knowledge of object manipulation and environmental interaction mechanics.
Gutanbac Shrine
- Location: Northern Great Sky Island area
- Objective: Develop proficiency with Fuse ability for weapon enhancement and creative problem-solving approaches.
Nachoyah Shrine
- Location: Southern Great Sky Island, directly above initial spawn location
- Objective: Practice and master Ascend ability for vertical traversal and structural navigation challenges.
Wingsuit-Related Shrines
Three specialized shrines unlock through successful completion of skydiving time trial challenges for the specialized aerial mobility gear.
Taunhiy Shrine
- Location: Courage Island – Tabantha Sky Archipelago
- Objective: Combat Training – Develop mid-air archery skills and time-slowing targeting techniques during aerial descent sequences.
Simosiwak Shrine
- Location: Bravery Island – North Hyrule Sky Archipelago
- Objective: Proving Grounds (Lights Out) – Tactical combat against Construct enemies in low-visibility conditions requiring strategic use of available light sources for tactical advantages.
Sihajog Shrine
- Location: Valor Island – South Lanaryu Sky Archipelago
- Objective: Rauru’s Blessing – Immediate reward acquisition without additional puzzle solving requirements.
Sky Crystal Beam-Related Shrines
These specialized shrines materialize only after successfully transporting the distinctive green crystals across significant distances. The persistent light beam indicates general destination direction, though creative transportation methods are often necessary for successful completion.
Ganos Shrine
- Location: Tabantha Sky Crystal area – extract crystal from Flux Construct guardian
- Objective: Rauru’s Blessing – Quick completion for efficient progression pacing.
Gikaku Shrine
- Location: Northeastern map region accessible via Natak Shrine
- Objective: Strategic deployment of devices and vehicles to access elevated crystal locations, then implement controlled descent strategies for safe delivery to target pedestals.
Jinodok Shrine
- Location: South Hyrule Sky Archipelago – manipulate control mechanisms to form inter-island bridges for crystal transportation logistics.
Josiu Shrine
- Location: North Necluda Sky Crystal – bridge construction across significant aerial gaps using connected board assemblies or rocket-assisted platforms for enhanced mobility capabilities.
Kumamayn Shrine
- Location: East Necluda Sky Archipelago – utilize spring-based contraptions on adjacent islands for crystal trajectory redirection toward destination markers.
Mayam Shrine
- Location: North Hyrule Sky Crystal – extract from Flux Construct guardian
- Objective: Rauru’s Blessing – Simplified completion process for rapid reward acquisition.
Mayanas Shrine
- Location: South Lanayru Sky Crystal – elevated floating island crystal retrieval requiring Ascend ability or Zonai Device assistance for vertical access challenges.
Natak Shrine
- Location: Sokkala Sky Archipelago – interior crystal location requiring mechanical rotation alignment for successful extraction and delivery procedures.
Mastering shrine completion requires both strategic planning and technical execution. These advanced techniques will significantly enhance your efficiency and success rate across all shrine categories and difficulty levels.
Efficiency route planning: Begin with all four Great Sky Island shrines to acquire essential abilities, then prioritize Rauru’s Blessing shrines for rapid character progression before tackling complex puzzle and combat challenges.
Common mistakes to avoid:
- Attempting Proving Grounds without understanding environmental tool applications
- Neglecting to upgrade the Purah Pad Sensor for automated shrine detection capabilities
- Underestimating the importance of proper gear and consumable preparation before shrine attempts
- Failing to recognize surface-depths connections for comprehensive map completion tracking
Pro tips for advanced players:
- Always carry multiple types of elemental fruits for environmental puzzle solving
- Develop proficiency with all core abilities before attempting advanced shrine challenges
- Utilize the connection between our Complete Guide to weapon combinations and Zonai Device applications for creative problem-solving approaches
Time estimates for shrine completion:
- Rauru’s Blessing shrines: 2-3 minutes
- Standard puzzle shrines: 5-10 minutes depending on complexity
- Proving Grounds challenges: 8-15 minutes based on enemy density and puzzle complexity factors
In-depth game mechanics analysis: Understanding shrine spawn mechanics reveals that certain shrines only appear after completing specific overworld objectives or quest sequences.
For comprehensive weapon strategies and class selection guidance, explore our detailed Weapons Unlock guide and Class Guide for specialized combat approaches against shrine guardians and environmental challenges.
There are certainly more shrines to discover and complete throughout your journey across Hyrule. We’ll continue updating this comprehensive guide with additional strategies, locations, and optimization techniques as new discoveries emerge.
The vast world of The Legend of Zelda: Tears of the Kingdom offers numerous mechanics and exploration opportunities. Visit our guides hub for additional strategic resources and advanced gameplay techniques.
For veterans of Breath of the Wild, the Shrine system in Tears of the Kingdom will feel comfortably familiar yet expanded. These ancient structures are strategically positioned across Hyrule’s diverse landscapes, offering both navigation assistance and character progression opportunities. Each completed shrine provides access to fast travel, significantly reducing backtracking time during exploration missions.
Upon successfully overcoming a shrine’s challenge, you’ll receive a Blessing of Light. This valuable resource accumulates in your inventory, and once you gather four of these luminous orbs, you can visit any Goddess Statue to exchange them for permanent character enhancements. The critical decision at this juncture involves choosing between increasing your maximum health with an additional heart container or boosting your stamina wheel with an extra segment.
Shrine encounters are systematically categorized to help players anticipate challenge types:
The aerial realms of Hyrule introduce several specialized shrine classifications that require unique approaches. Understanding these categories will significantly improve your exploration efficiency and success rates.
Maximizing your shrine completion efficiency requires more than basic puzzle-solving skills. The Purah Pad Sensor becomes an indispensable tool once activated, providing auditory and visual cues when shrines are within detection range. This feature alone can reduce exploration time by approximately 40% compared to visual scanning methods.
For puzzle-focused shrines, develop the habit of thoroughly scanning each chamber before engaging with devices. Many solutions require observing environmental clues, understanding Zonai Device interactions, and sometimes combining multiple abilities in unexpected ways. Common mistakes include rushing through chambers without proper assessment and overlooking subtle visual indicators that hint at solutions.
Advanced optimization involves strategic preparation before shrine attempts. Ensure you have adequate healing items, appropriate armor upgrades, and a diverse inventory of Zonai Devices. Time estimates for shrine completion vary significantly: basic blessing shrines may take 2-5 minutes, while complex puzzle shrines can require 15-30 minutes for first-time completions. Experienced players can reduce these times by 50-70% through pattern recognition and efficient movement.
When choosing between heart containers and stamina segments, consider your current progression stage and playstyle preferences. Early game typically benefits more from additional hearts for survivability, while mid-to-late game players often prioritize stamina for enhanced exploration capabilities and special move execution.
Navigating to shrine locations requires careful observation of environmental landmarks and strategic movement planning. Each shrine presents unique access challenges that demand different approaches.
Rito Village Approach: Begin your ascent from the peak of the massive rock formation dominating Rito Village. Scan the northwestern horizon to identify the distinctive white avian silhouette etched into the mountainside. This geological artwork serves as your directional marker – glide directly toward this emblem to discover the concealed cavern entrance.
Tabantha Region Access: Positioned along the southwestern perimeter of the Tabantha territory, this shrine sits adjacent to the Gerudo borderlands. The transitional terrain creates distinctive navigation challenges requiring precise directional awareness.
Gisa Crater Exploration: Descend into Gisa Crater’s basin to retrieve the essential crystal. The environment offers multiple tool options, with the Autobuild function providing instant Hot Air Balloon deployment for efficient vertical transport.
Tanagar Canyon Challenges: Travel southeast from Ikatak Shrine and Gisa Crater to locate Tanagar Canyon West Cave. This hazardous zone contains numerous obstructions that necessitate specific companion abilities for efficient clearance.
Forgotten Temple Discovery: This sacred site becomes accessible during your progression through the Geoglyphs/Dragon’s Tears main quest narrative. The temple’s integration with core storyline elements makes timing your visit crucial.
Shrine puzzles test your understanding of game physics and creative problem-solving capabilities. Mastering these mechanics transforms challenging obstacles into manageable tasks.
Catapult Physics: This engineering challenge involves strategically positioning blocks along the platform’s perimeter to create launching mechanisms. The objective centers on calculating trajectory angles and release points to propel the sphere accurately toward its destination target.
Recall Mechanics: Execute this technique by first drawing the ropes toward your position, then releasing tension. Activate the Recall ability immediately and employ your bow to strike the rope at the optimal moment for maximum effect.
Autobuild Strategies: Leverage the Autobuild functionality to construct pre-designed contraptions that bypass conventional puzzle solutions. This approach often provides significant time savings.
Companion Utilization: Deploy Yunobo and Riju specifically for their specialized boulder-demolition capabilities. Attempting these shrines without their assistance will force excessive consumption of Bomb Flowers or require substantial durability expenditure on blunt-force weaponry.
Spatial Reasoning: The rotating block puzzles demand three-dimensional thinking to align disorganized stone segments into coherent patterns. Visualize the completed configuration before initiating rotational adjustments.
Sphere Combination Challenges: These puzzles require merging multiple spheres to create directional rolling mechanisms. Alternatively, construct overhead suspension devices that can be dropped directly onto targets for instant completion.
Seasoned adventurers can dramatically improve their shrine completion efficiency through strategic planning and mechanical mastery. These advanced approaches separate novice players from gaming veterans.
Resource Management: Conserving Bomb Flowers and weapon durability represents a critical economic consideration. Each destroyed boulder without companion assistance costs approximately 1-2 Bomb Flowers or significant weapon degradation. Strategic companion deployment preserves resources worth hundreds of rupees per shrine.
Time Efficiency: Optimal shrine routing reduces backtracking and unnecessary travel. The Rito Village shrine typically requires 3-5 minutes for navigation and completion, while Tanagar Canyon challenges may demand 8-12 minutes without proper preparation.
Alternative Solutions: Creative problem-solving often reveals unexpected pathways to success. The sphere combination shrine, for instance, can be completed in under 60 seconds by constructing simple overhead dropping mechanisms rather than complex rolling contraptions.
Common Pitfalls: Many players waste resources attempting brute-force solutions to companion-required challenges. Others overlook the trajectory physics in catapult puzzles, repeatedly missing targets despite correct block placement.
Pro Tips: Always survey the entire puzzle area before engaging mechanics. Test partial solutions with Recall to identify flaws without commitment. For crystal transport challenges, consider constructing multi-purpose vehicles that serve both transportation and protection functions.
For comprehensive gameplay strategies, consult our Complete Guide to master fundamental mechanics. Weapon selection significantly impacts puzzle efficiency – explore our Weapons Unlock guide for optimal tool acquisition. Additionally, proper Class Guide ensures you maximize companion capabilities throughout your journey.
The Akkala region presents some of the most creatively designed shrines in the game, each requiring distinct approaches to environmental manipulation and timing-based mechanics. This guide provides comprehensive strategies for efficiently navigating these challenges while maximizing your rewards.
Jochi-Ihiga: Rock For Sale (Shrine Quest)
Movement Optimization: Master the shield surf technique before attempting Akkala shrines, as it provides crucial mobility advantages across uneven terrain. The region’s elevation changes make this especially valuable.
Combat Preparation: While shrines themselves typically don’t contain combat, the routes to them often do. Equip durable weapons and ensure you have adequate healing items—the BF6 Weapons Unlock Guide provides excellent equipment recommendations.
Resource Management: Akkala’s remote location means limited resource replenishment opportunities. Consult the Battlefield 6 Complete Guide for comprehensive resource planning strategies that apply to shrine navigation.
Shrine exploration in Tears of the Kingdom represents a core progression system that rewards players with essential upgrades and abilities. Understanding shrine types and preparation strategies significantly impacts your efficiency in locating and completing these challenges. Whether you’re seeking combat training, puzzle solutions, or blessed rewards, strategic approach matters.
Proper preparation includes stocking essential items like Bomb Flowers for environmental obstacles and ensuring you have adequate equipment for various challenge types. Many shrines integrate with broader questlines, making systematic exploration highly beneficial for overall game progression.
Location Navigation: Starting from Hateno Village or Robbie’s Laboratory, travel directly eastward until you encounter Deepback Bay. The shrine entrance resides within a partially submerged cave system requiring underwater navigation. Use Bomb Fruit strategically to clear obstructing rock formations blocking access to the inner chamber.
Puzzle Solution Steps: This challenge centers on advanced Recall application mechanics. You must activate the ability to reverse a sphere’s trajectory back to its origin point. Critical success requires simultaneous switch activation to enable target mobility during the recall sequence.
Common Pitfalls: Many players fail by activating Recall before ensuring the target mechanism is operational. The optimal strategy involves flipping the switch first, then immediately casting Recall while monitoring the sphere’s path. Timing misalignment represents the most frequent failure point.
Quest Integration: This shrine naturally integrates with the Lurelin Village quest chain progression. As you advance through these side missions, your Purah Pad detection system will alert you to nearby shrine energy signatures. Follow the auditory cues systematically.
Sensor Utilization: The Purah Pad sensor provides directional feedback through increasingly frequent pinging as you approach the correct location. Mount Dunsel Cave’s entrance may be obscured by foliage, requiring careful environmental inspection in the indicated area.
Reward Analysis: Upon reaching the deepest chamber, you’ll discover this constitutes a Rauru’s Blessing shrine type, meaning no puzzle solving is required once accessed. The reward includes a Light of Blessing for spirit orb conversion.
Shield Mechanics: Located along the mountainous cliffs separating Necluda and Lanayru regions, this shrine focuses exclusively on defensive combat proficiency. Mastery requires understanding shield durability mechanics and perfect parry timing windows.
Perfect Parry Timing: The core objective involves deflecting projectiles back toward their sources through precisely timed blocks. Practice the parry animation timing against stationary targets first before attempting moving projectiles.
Elemental Defense: Strategic shield selection proves crucial here. Employ Wooden Shields against electrical attacks since they provide insulation, while Rusty Shields offer superior fire resistance for deflecting flame-based projectiles.
Advanced Techniques: For experienced players, try combining parries with dodges to create openings for counterattacks. The training area allows unlimited attempts, making it ideal for mastering these essential combat skills.
Movement Options: Situated southeast of Popla Foothills Skyview Tower, this shrine challenges your traversal creativity. Primary navigation involves riding stone boards along rail systems, with Shield Surfing providing accelerated movement alternatives.
Advanced Techniques: The third section introduces complexity through collapsing platforms. Strategic placement of additional movable board-carts before your primary transport disintegrates becomes essential for progression.
Alternative Solutions: Shield Surfing presents control challenges on steeper inclines due to physics mechanics. Many players successfully bypass entire sections by constructing custom structures that enable Ascend ability usage, effectively skipping challenging platforming segments.
Time Optimization: Speedrunners typically employ the Ascend method, completing this shrine in under 90 seconds versus the 3-4 minutes required for conventional approaches.
Ice Plate Mechanics: Located near the dragon-shaped geoglyph’s mouth region, this shrine features a friendly Construct companion. The puzzle revolves around placing specially crafted ice formations into designated sockets throughout the chamber.
Size Manipulation: Unique to this challenge, ice plates can be resized through controlled fire application. Smaller flames create slight reductions, while intense heat sources produce dramatic size changes.
Construct Interaction: The resident Construct provides helpful hints about optimal plate sizes for specific sockets. Pay attention to its dialogue for clues about required dimensions.
Environmental Interaction: The chamber contains multiple heat sources at varying intensities for precision size adjustment. Strategic positioning allows creating multiple plates simultaneously for efficiency.
Mastering shrine puzzles requires understanding core game mechanics and applying them creatively. The Recall ability serves as more than just a time-reversal tool – it becomes your primary method for ascending to otherwise unreachable areas when combined with strategically attached objects.
Environmental manipulation plays crucial roles in shrine discovery. Using Fans to disperse sand reveals hidden chests and interactive elements that are essential for progression. This technique proves particularly valuable in desert regions where buried treasures and shrine entrances await discovery beneath the dunes.
Electrical conduction systems demand precise fixture placement. You’ll need to attach conductive elements to create continuous circuits, ensuring power flows from source to destination. The same principle applies to upper levels where connecting fixtures to metal bars completes the electrical pathway.
Gerudo Town’s main shrine serves as the central spiritual hub for the region, offering both narrative significance and practical gameplay benefits. Its strategic positioning makes it easily accessible once you’ve navigated the surrounding desert terrain.
Secret shrines require specific quest completion before becoming available. The Yiga Clan Exam side quest must be fully completed to unlock one particularly well-hidden shrine location, testing both your combat skills and puzzle-solving abilities.
Southwestern regions near the Gerudo Canyon Skyview Tower contain multiple shrine opportunities. This area’s proximity to fast travel points makes it efficient for completionists working through multiple objectives in single sessions.
Lake Hylia’s giant whirlpool presents unique access challenges. Getting sucked into this natural phenomenon transports you to submerged shrine areas where activation pedestals await, though their energy beams often target distant upper platforms.
Rauru’s Blessing shrines provide immediate rewards without complex puzzle solving, serving as excellent opportunities for gear upgrades and resource gathering when you need quick progression boosts.
Crystal transportation via the Popla Foothills Skyview Tower requires precise execution. Launch from this tower to reach the floating island containing the essential crystal, then locate the strategic floor opening that allows direct delivery to the whirlpool destination below.
Whirlpool mechanics enable rapid descent and item transfer. After dropping the crystal through the floor opening, dive back down to retrieve it from the whirlpool’s exit point, then complete the final placement on the destination pedestal.
Ishokin: Ride the Giant Horse (Shrine Quest) represents one of the more memorable side adventures, combining mount taming with shrine discovery in a unique gameplay experience that rewards both patience and skill.
Exploring the breathtaking Sky World in Zelda: Tears of the Kingdom reveals numerous shrines that challenge your puzzle-solving abilities and environmental navigation skills. These celestial sanctuaries fall into two primary categories: crystal retrieval challenges and light beam puzzles, each requiring distinct approaches and mastery of different game mechanics. Successfully completing these shrines grants you Rauru’s Blessing, providing essential spirit orbs for character progression.
Sokkala Sky Archipelago: Death Star Crystal Retrieval
Located within the distinctive spherical structure players affectionately call the ‘Death Star,’ this shrine requires precise mechanical manipulation. After entering the orb, locate the machine controls that enable rotation of the internal mechanism. Carefully align the opening to face directly toward the destination pedestal. The Spring contraption serves as your primary tool here – position it strategically to launch the crystal through the aligned opening. Pro tip: Use Ultrahand to stabilize the crystal during rotation to prevent accidental drops.
West Necluda Sky Archipelago: Ascend Strategy
This challenge leverages the Ascend ability creatively. Activate the push-booster mechanism near the pedestal to reach the floating island’s underside. From this unique vantage point, utilize Ascend to phase through the terrain directly into the crystal chamber. Constructing a makeshift aircraft using available Zonai devices becomes crucial for transporting the crystal back efficiently. Advanced players recommend creating a balanced flying machine with multiple fans for better control during transport.
Lightcast Island Beam Mechanics
Positioned in the Tabantha Sky Archipelago, Lightcast Island presents a sophisticated light redirection challenge. The objective involves guiding the beam emitted from the central tower completely through the underground cavern system. This requires strategic placement of Zonai Mirrors to create a continuous path. Common mistake: Players often misjudge angles – remember that beams reflect at equal angles, so calculate your mirror placements accordingly.
Starview Island Death Star Approach
Another spherical structure challenge in the North Gerudo Sky Archipelago, Starview Island demands precise internal beam manipulation. Once inside the massive orb, you’ll need to redirect the light source to strike the designated target. Optimization tip: Use multiple mirrors in sequence to navigate around obstacles and create the perfect trajectory. The beam must maintain uninterrupted connection from source to destination.
While many Sky World shrines are immediately accessible, several require substantial campaign progression through regional main quests. These story-gated locations become available only after completing specific narrative milestones. Time estimate: Budget 15-25 minutes per crystal shrine and 20-30 minutes for light puzzles, accounting for trial and error. Always check your quest log before attempting to reach distant sky islands to avoid unnecessary travel.
For comprehensive strategies on character development to tackle these challenges, consult our Class Guide for optimal loadout recommendations. Understanding your equipment options through our Weapons Unlock guide can significantly improve your shrine completion efficiency.
Action Checklist
- Activate all Skyview Towers to reveal regional maps and shrine locations
- Prioritize shrine clusters in Central Hyrule for efficient heart/stamina upgrades
- Acquire region-appropriate gear (cold/heat resistance) before exploring extreme climates
- Complete at least one labyrinth shrine to obtain powerful unique equipment
- Systematically clear regions using geographical grouping to minimize travel time
- Complete all four Great Sky Island shrines first to master essential abilities
- Upgrade Purah Pad Sensor immediately for automated shrine detection
- Prioritize Rauru’s Blessing shrines for rapid character upgrades
- Use surface-depths name mirroring for efficient Lightroot location tracking
- Always prepare with proper gear, healing items, and ability knowledge before attempting any shrine challenge
- Activate Purah Pad Sensor at the first opportunity to streamline shrine discovery
- Systematically explore sky regions starting with Great Sky Island for foundational shrine experience
- Master wingsuit controls in designated shrines before attempting complex aerial navigation challenges
- Develop systematic puzzle-solving approach: observe environment first, then experiment with Zonai Devices
- Implement strategic reward selection based on current progression needs and playstyle preferences
- Scan northwestern horizon from Rito Village peak for white bird carving
- Construct Hot Air Balloon via Autobuild for Gisa Crater crystal retrieval
- Deploy Yunobo and Riju for boulder clearance in Tanagar Canyon
- Practice Recall timing with bow shots for rope-based puzzles
- Build overhead dropping mechanisms for sphere puzzles as time-saving alternative
- Gather 15+ wood bundles and basic building materials before attempting bridge construction shrines
- Prepare healing items and defensive gear for Gloom enemy encounters
- Practice weapon throwing in safe areas to conserve resources and improve accuracy
- Test hovercraft designs in calm waters before shrine navigation attempts
- Experiment with stake placement angles using small test rolls before full puzzle execution
- Acquire the Paraglider and shield surfing capability
- Stock up on weapons and healing items using our Class Guide
- Complete Sho Dantu Shrine using sequential hydrant activation
- Solve Zuna Kai’s rotating cube with strategic 180-degree rotations
- Master Katosa Aug’s Recall timing at peak descent points
- Optimize Jitan Sa’mi’s flame emitter positioning
- Construct Jochi-Ihiga hovercraft with diagonal rocket assistance
- Stock 10+ Bomb Flowers for cave entry obstacles
- Practice perfect parry timing at combat shrines for 15 minutes
- Complete Lurelin Village quests to unlock sensor-detected shrines
- Master Ascend construction for rail shrine shortcuts
- Experiment with fire intensity for ice plate size precision
- Practice Recall mechanics on floating spheres for vertical navigation mastery
- Complete Yiga Clan Exam side quest to unlock secret shrine access
- Master electricity conduction by experimenting with different fixture placements
- Utilize Popla Foothills Skyview Tower for efficient crystal transportation
- Optimize whirlpool navigation for rapid shrine completion sequences
- Scan sky islands for shrine locations using your Purah Pad sensor
- For crystal shrines: Master Ascend ability and Zonai device construction
- For light puzzles: Practice beam reflection angles and mirror sequencing
- Verify campaign progression requirements before attempting story-gated shrines
- Consult our Complete Guide for advanced strategies
No reproduction without permission:SeeYouSoon Game Club » Zelda: Tears Of The Kingdom All 152 Shrine Locations And Map Guide