Complete guide to Jinming Pool Campaign with advanced strategies and boss tactics in Where Winds Meet
Quest Overview and Preparation
The Jinming Pool Campaign represents a pivotal story mission within Where Winds Meet, serving both as a significant Kaifeng location and an elaborate infiltration operation. This extensive questline immerses players in Jianghu’s intricate politics through secret meetings with influential figures, culminating in intelligence gathering deep within enemy territory. Successful completion unlocks substantial progression rewards and introduces a formidable new Campaign boss encounter.
Your mission initiates when Murong Yuan tasks you with extending invitations to three distinguished banquet guests. Utilize the navigation markers displayed on your map interface to pinpoint each individual’s location efficiently. After securing their attendance through dialogue interactions, you’ll automatically transport back to the main hall for the crucial gathering.
Infiltration and Waterway Navigation
Concluding the meeting requires interaction with both Murong Yuan and Lord Zhao, triggering cinematic sequences that transition you to the infiltration phase at Jinming Pool. Following the cutscene, immediately pivot leftward and execute consecutive leaps to the flagpost and adjacent rooftop before descending into the water below. Activate the dive function positioned on your screen’s right interface to submerge and access the concealed waterway passage.
Also read: Where Winds Meet walkthrough: How to complete The Hidden Ugliness
Navigate the underwater tunnel’s entirety to overhear critical intelligence from the envoy. Emerge from the passage’s opposite terminus and ascend to the rooftop structures. Maintain discreet surveillance of the envoy while evading guard detection until he embarks onto the awaiting vessel.
Ship Boarding and Token Acquisition
Once the envoy establishes presence aboard the ship, you must accomplish three timed objectives consecutively:
Pursue the quest indicators to locate and defeat both primary targets, securing their respective tokens. Position the complete Tally on the designated apparatus to summon the boarding elevator. Important technical note: A known gameplay anomaly may cause the platform to depart prematurely. Counter this by positioning yourself in the elevator’s corner and maintaining forward movement input throughout the ascent to ensure successful ship boarding.
Also read: Where Winds Meet trophy list: All achievements and how to unlock
Penetrate the ship’s interior, progressing through the Living Cabin area where you’ll encounter opposition forces and locate the elevator accessing the upper deck. Follow navigation markers to the commander’s quarters and engage with the Wine Cup on the central table, initiating another narrative sequence.
Statue Puzzle Solution
The subsequent challenge involves locating four ceremonial statues and positioning them correctly before corresponding paintings. Here’s the comprehensive solution:
Access the restricted room by striking the bell with your Bow projectile, then applying Meridian Touch to the Shattered Jade artifact. Retrieve the final statue and position it in the remaining vacancy. Correct placement confirmation manifests through the ceremonial pillar elevating beneath each statue.
Successful puzzle resolution unseals two doorways. The right passage conceals a treasure chest, while the left staircase advances primary quest progression.
Also read: How to unlock Yaksha Rush in Where Winds Meet
Ship Exploration and Water Level Puzzles
Interact with all illuminated points to collect the key, navigational chart, and vessel schematic. Completion triggers another cinematic, after which you must utilize floor panels to descend to lower decks. Progress downward through enemy engagements, consistently seeking additional panels to reach the warship’s foundation. Continue through subsequent objectives until accessing the flooded chamber.
Ascend the central platform within the aquatic cabin and activate the control lever. Navigate northwest to discover a compact room, then observe leftward. Employ your Bow to strike the bell and apply Meridian Touch to the jade ring, unsealing the gateway before pulling the adjacent lever.
Proceed northeast to enter another confined space and repeat the bell-striking procedure. Utilize staircases to reach the opposite side for gate deactivation, then manipulate the final lever to elevate water levels further.
After engaging the third lever, exit the compartment and turn left to locate climbable chains. Ascend to access the mobile platform. Upon reaching the opposite side, once again employ your Bow on the bell and use Meridian Touch on the Shattered Jade. Traverse the opened gateway and activate the right-side lever to normalize water levels before cabin departure.
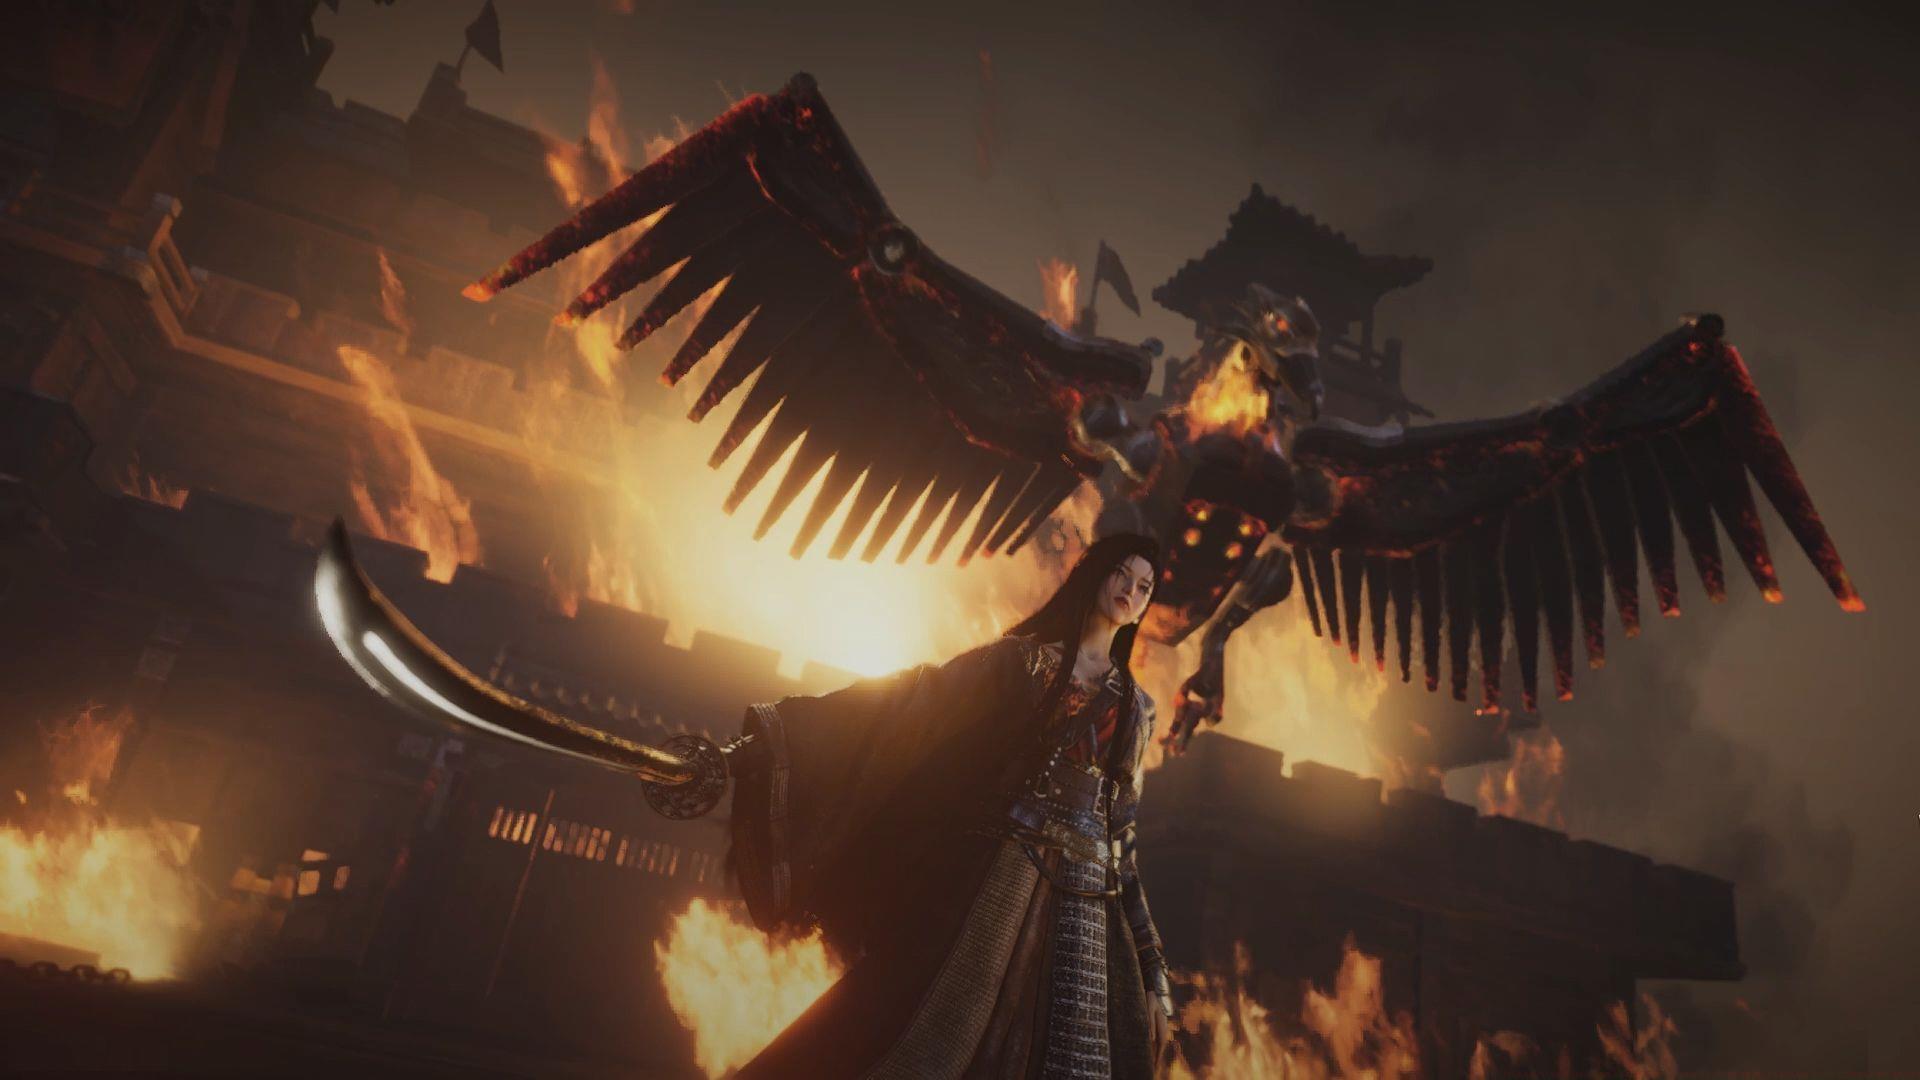
Boss Battle Strategy
Following the aquatic puzzles, prepare for consecutive enemy engagements while advancing toward the boss arena. The culminating confrontation features two distinct combat phases. Initially, you duel Murong Yuan individually, but the second phase introduces her mechanized wooden eagle as an aerial combatant. Prioritize damaging the primary antagonist while evading the avian construct’s assault patterns. Conserve your Meridian Touch ability specifically to interrupt the boss’s signature attacks, as timely disruption proves crucial for survival. Upon achieving victory, you’ll automatically relocate to the Bian River Gate.
Submerge into the river current and interact with the scattered fragments to conclude the Jinming Pool Campaign, simultaneously unlocking a new boss encounter within Where Winds Meet’s broader narrative.
Completion rewards include:
Additionally, you’ll receive character experience points contributing to your progression.
Check out our other Where Winds Meet guides:
No reproduction without permission:SeeYouSoon Game Club » Where Winds Meet walkthrough: How to complete Jinming Pool Campaign quest Complete guide to Jinming Pool Campaign with advanced strategies and boss tactics in Where Winds Meet