TL;DR
- Delivery booth codes are randomized per save file – you must find your unique code
- The code location is always in Fristad Rock at noon, inside a bunker behind enemy lines
- Use stealth and tactical approaches to bypass Eternalists and turret defenses
- Once obtained, your code works permanently across all four delivery booth locations
- Strategic item transfers can significantly enhance your loop-breaking efficiency
Deathloop’s delivery booth network represents one of the game’s most valuable logistical systems, allowing players to transfer weapons, trinkets, and equipment between the four main districts of Blackreef. These strategically placed booths function as cross-temporal mail services that maintain item persistence across repeated loops.
You’ll encounter these distinctive booths scattered throughout Updaam, The Complex, Fristad Rock, and Karl’s Bay. Initially, they appear inaccessible, secured by encrypted passcode panels. The crucial insight is that discovering a single authentication code grants you permanent access to every delivery terminal across the entire game world. This universal access code remains consistent throughout your playthrough, providing reliable item transfer capabilities once unlocked.
Here’s the critical detail many players overlook: Deathloop implements save file-specific code randomization. While your discovered delivery code will persist unchanged across all temporal loops within your specific game instance, it differs completely from codes generated for other players’ save files. This design choice ensures each player must personally navigate the discovery process rather than simply looking up a universal solution online.
Strategic item delivery can turn defensive turrets into offensive weapons across different districts.
To locate your personalized delivery booth authentication code, you must venture to Fristad Rock during the noon time period. This specific temporal window provides optimal conditions for the infiltration required to access the code location. Upon emerging into the district, you’ll need to navigate past the initial Eternalist patrols using either stealth or combat approaches based on your preferred playstyle.
Progress past the vibrantly colored booth structure to your right, then carefully traverse the rocky pathway while maintaining awareness of concealed landmines. These explosive traps can be avoided entirely by sticking to the left side of the path or carefully disarmed if you possess the appropriate slab ability or gear. Proceeding left toward the circular stone Transmission Post introduces additional Eternalist resistance that requires strategic handling.
After neutralizing or bypassing this secondary enemy group, you’ll encounter an automated turret emplacement guarding the entrance to your objective. This defensive system presents a significant obstacle that can be overcome through multiple approaches: disabling it with hacking skills, destroying it with heavy weapons, or using the environment to sneak past its firing arcs.
The target bunker lies directly behind this turret position. Upon entry, immediately direct your attention to the right side where you’ll observe windows revealing an inoperative delivery booth alongside a whiteboard displaying your unique passcode. This discovered authentication sequence will remain permanently valid for your entire playthrough.


Once you’ve secured your delivery booth authentication code, you gain permanent access to all four terminal locations distributed throughout Blackreef. Each booth occupies a strategic position near primary emergence tunnels, facilitating efficient item transfers between districts. Understanding each location’s exact positioning enables optimized logistical planning for your loop-breaking strategies.
The delivery network includes these key locations:
Strategic utilization of this system dramatically enhances your operational capabilities. Consider transferring powerful weapons discovered in later-game areas to earlier time periods, or moving specialized trinkets to districts where they provide maximum tactical advantage. Advanced players often use delivery booths to preposition equipment for complex multi-district assassination sequences.
A common optimization technique involves sending auto-turrets to districts where you anticipate heavy resistance. These automated defense systems can secure areas before your arrival or create diversions that enable safer approaches to visionary targets.
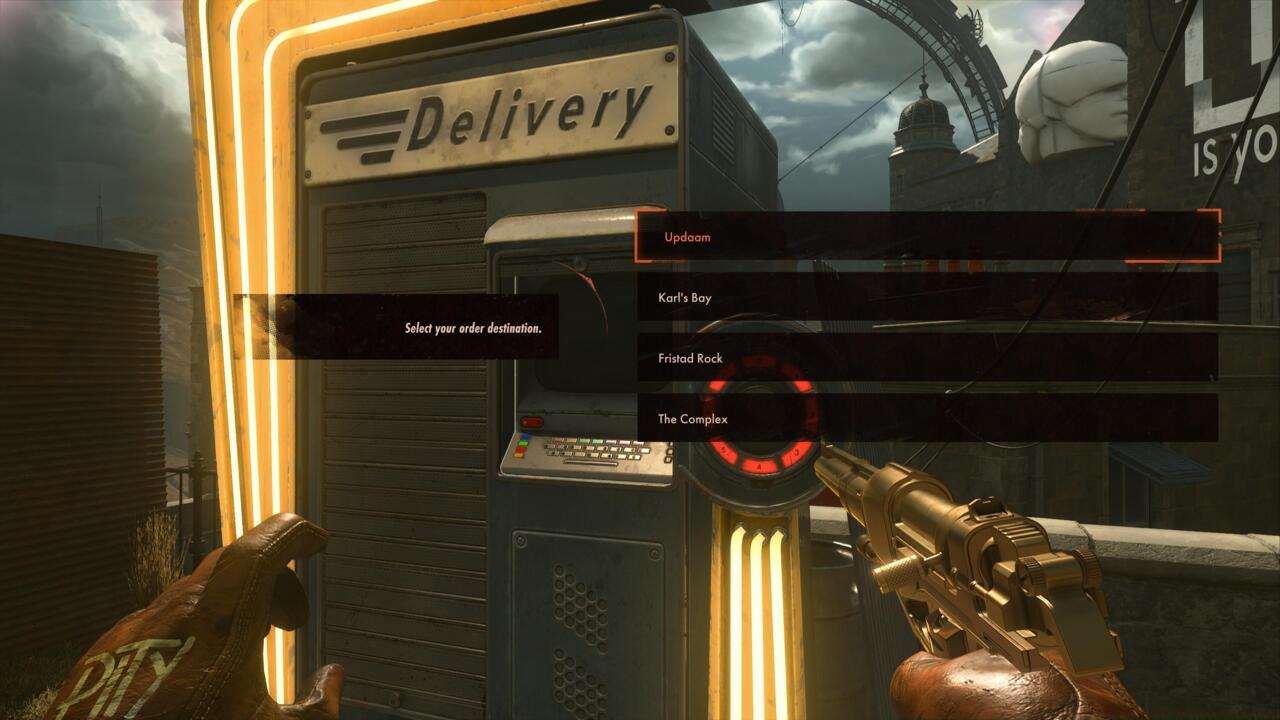
The delivery interface simplifies cross-temporal logistics – select items, choose destinations, and execute transfers with single interactions.
Pro tip: Always document your code immediately upon discovery. While it remains consistent throughout your playthrough, forgetting this sequence forces repeating the entire Fristad Rock infiltration process. Many players photograph the whiteboard using the game’s screenshot functionality for permanent reference.
Action Checklist
- Travel to Fristad Rock at noon and navigate past initial Eternalist patrols
- Carefully traverse the rocky path while avoiding or disarming landmines
- Bypass or neutralize the turret guarding the bunker entrance
- Enter the bunker and locate the whiteboard code through the right-side windows
- Document your unique code for permanent reference throughout your playthrough
- Utilize any delivery booth across Blackreef to transfer weapons and equipment
No reproduction without permission:SeeYouSoon Game Club » Where To Find Deathloop Delivery Booth Code – All Delivery Locations Master Deathloop's delivery system with location guides, strategic tips, and time-saving techniques