TL;DR
- Visit Fristad Rock at noon when Fia is present and doors are accessible
- Use Aether and Shift Slabs to bypass battery collection entirely
- Follow randomized wire-cutting sequence using on-site blueprint instructions
- Hack security cameras and navigate tripwire defenses strategically
- Charge battery in train car station before accessing reactor control room
Triggering alarms while Fia’s reactor remains active creates immediate catastrophic consequences. The facility’s self-destruct protocol activates automatically, resulting in explosive elimination of all personnel within the bunker perimeter.
Within Deathloop’s intricate gameplay systems, Fia’s underground complex presents multiple learning opportunities, but aggressive approaches trigger her panic response mechanism. This initiates a chain reaction that vaporizes the entire area. Successful completion requires covert reactor neutralization—a deliberately complex procedure matching Deathloop’s design philosophy. The following methodology details systematic disarming on Fristad Rock.
Initiate your operation by arriving at Fristad Rock precisely at midday. Fia’s presence during this timeframe ensures main entry points remain unsecured for infiltration. Be aware that Eternalist patrol density peaks during these hours, demanding extreme situational awareness. Direct confrontation proves counterproductive since specialized equipment becomes necessary—though possessing the Aether Slab combined with either Shift Slab capabilities or double-jump Trinket functionality allows complete bypass of subsequent battery retrieval steps. These mobility tools provide alternative access routes.
Pro Tip: The noon timeframe provides approximately 45 minutes of operational window before patrol patterns shift. Advanced players should consider bringing Nexus for crowd control or Havoc for sustained combat if detected.
Should battery procurement become necessary, exit tunnel systems and proceed beneath the illuminated, collapsed digital display to your right. Advance carefully along the route while systematically neutralizing or circumventing deployed security measures, including ground mines and laser tripwires. Ascend leftward up the slope toward the Transmission Post—the distinctive circular stone structure. Evade interior sentries and carefully descend the cliff face, either avoiding or eliminating additional Eternalist forces positioned near the bunker’s secondary entrance. This location also contains delivery booth access codes for future reference.
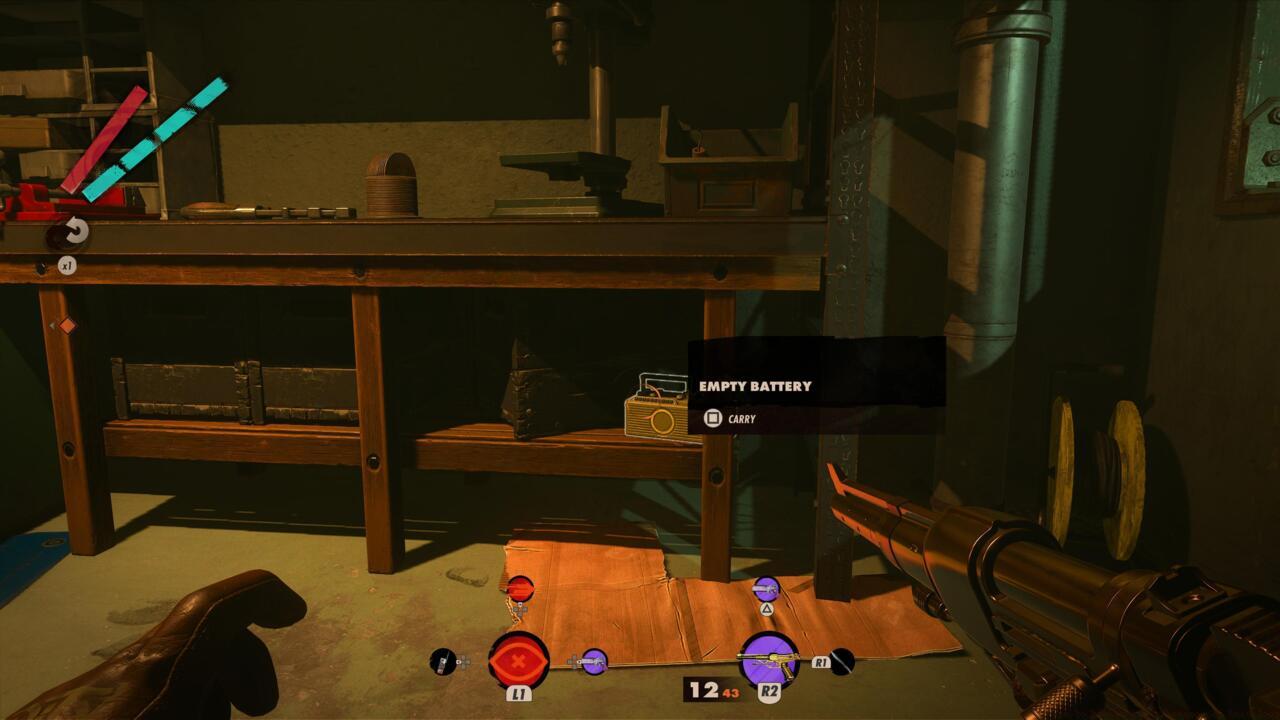
Enter the bunker complex and breach the window panels immediately to your right. This deposits you in a chamber containing a non-operational delivery terminal. Located on shelving adjacent to the broken window, you’ll discover a battery unit. Although depleted of energy, retrieve it regardless for subsequent activation.
Strategic loadout selection can eliminate entire gameplay segments—plan your approach using our Class Guide for optimal character configuration.
Next, energize the acquired battery unit. Return exterior and navigate back to the Transmission Post location. Access the rail yard area and board the train carriage closest to the left-side bunker entrance. Interior examination reveals a dedicated power charging station. Connect the battery apparatus and allow complete energy replenishment. Retrieve the now-activated power cell once charging concludes. This completes battery procurement procedures; players who skipped this segment should recommence reading at this juncture.
Common Mistake: Many players attempt to rush the charging process, resulting in incomplete power levels that fail to operate security doors later.
Procedural randomization ensures each playthrough presents unique challenges—similar to weapon progression in our Weapons Unlock guide systems.
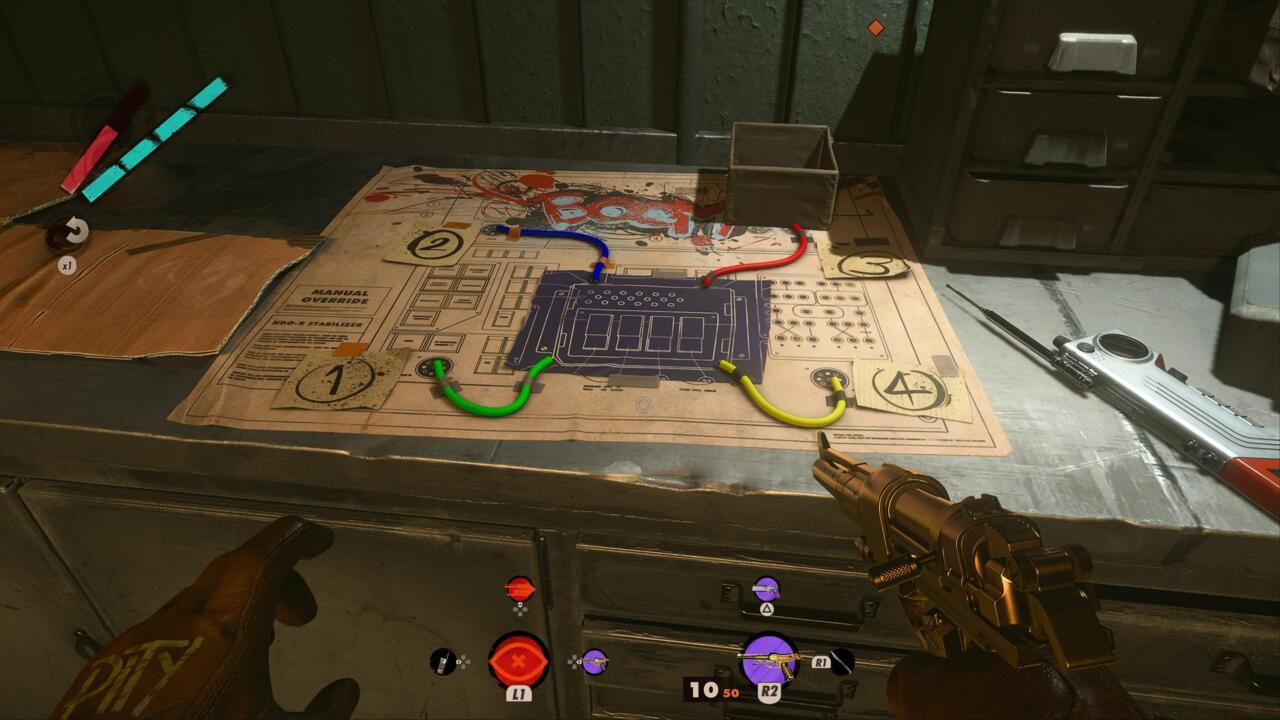
Positioned before the rail yard bunker access points, unlock the doorway and advance into the adjacent garage-style chamber. Another sealed door requires opening, and upon activation, the entry behind automatically secures. Immediately to your right appears a surveillance camera requiring hacking to establish friendly status, then descend into the sub-camera room. On the rear work surface rests a detailed schematic of Fia’s reactor assembly, containing explicitly illustrated sequential instructions for safe deactivation. Interface with the blueprint documentation to archive this intelligence within your mission leads interface.
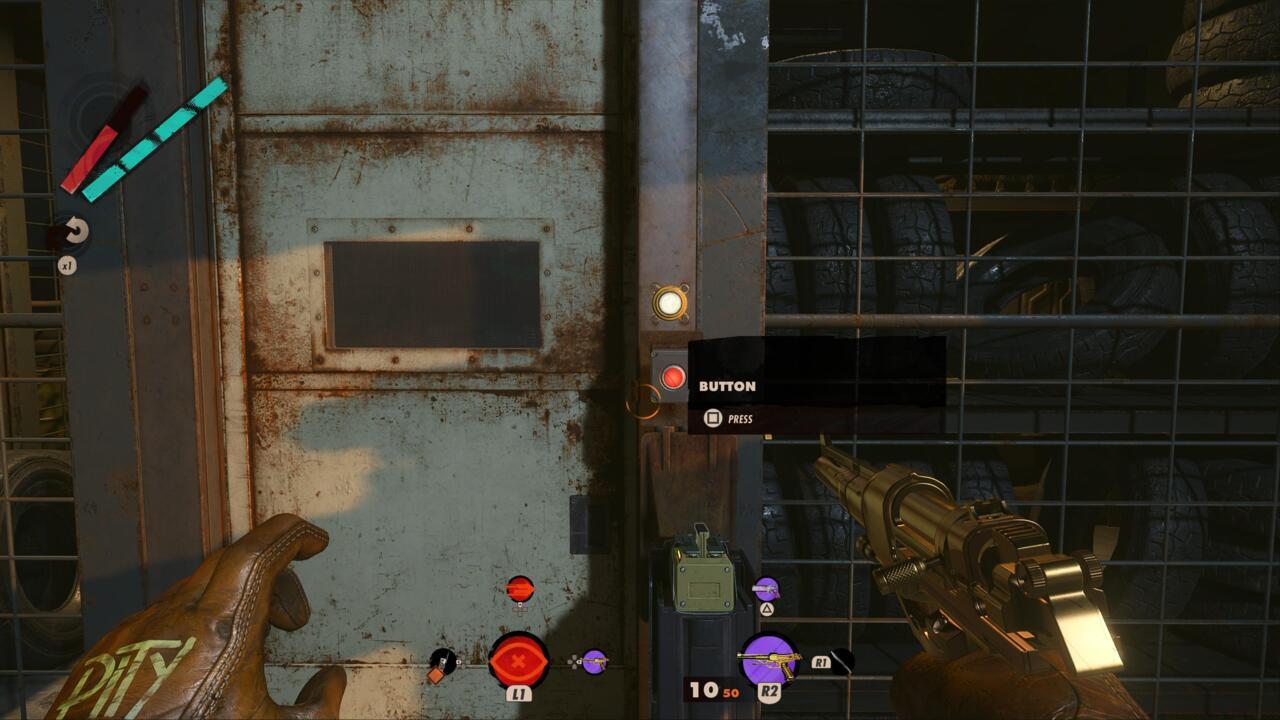
Successful disarming requires severing four distinctly colored wiring conduits, though sequencing often undergoes randomization, therefore avoid relying exclusively on visual references. Utilize immediate environmental observations exclusively for safety assurance. With deactivation protocols memorized, exit via your entry doorway. Opposite positioning reveals a compact secured room featuring battery-powered access control and tripwire arrays deployed across chainlink barrier tops where accessible gaps would otherwise exist.
Vertical mobility options create alternative pathways—master movement mechanics through our Complete Guide to tactical positioning.

Advanced Strategy: Veteran players can complete the entire sequence in under 12 minutes using optimized routes. The wire-cutting randomization uses 8 possible color combinations, ensuring replayability. For maximum efficiency, combine Aether’s invisibility with Shift’s teleportation to create nearly undetectable infiltration opportunities.
Action Checklist
- Arrive at Fristad Rock at noon for optimal access conditions
- Acquire battery from bunker storage room (skip if using Aether+Shift)
- Charge battery in train car power station
- Hack surveillance camera and obtain reactor blueprint
- Cut four colored wires in randomized sequence per blueprint
No reproduction without permission:SeeYouSoon Game Club » How To Disarm Fia’s Reactor In Deathloop Master Fia's bunker reactor disarmament with stealth strategies and alternative routes