TL;DR
- Accessibility settings like High Contrast Mode dramatically improve card visibility
- Cards follow thematic placement patterns tied to each chapter’s narrative elements
- Enhanced Listening Mode provides audio cues for hidden collectible locations
- Systematic environmental scanning prevents missing well-concealed card placements
- Chapter progression requires different collection strategies for optimal efficiency
While navigating the harrowing journey through The Last of Us Part II, players can discover numerous collectible items that enrich the game’s world-building, including the highly sought-after trading cards. These collectibles serve as nostalgic artifacts from the pre-pandemic era, offering glimpses into the world that existed before the Cordyceps outbreak. Unlike the comic books from the first game, these trading cards present unique visual challenges due to their small size and clever environmental integration.
Strategic use of the game’s accessibility features becomes crucial for efficient collection. The High Contrast Mode option significantly enhances visibility by creating stark visual differentiation between interactive objects and background elements. Meanwhile, Enhanced Listening Mode provides auditory assistance by generating distinct sound signatures for nearby collectibles, making it particularly valuable in visually cluttered environments where cards might otherwise blend into the scenery.
Our comprehensive guide system provides detailed assistance for various aspects of The Last of Us Part II gameplay. For broader strategic guidance, consult our Complete Guide to master all game mechanics and progression systems.
Successful trading card hunting requires adopting specific visual scanning techniques. Cards typically appear in locations that reflect thematic connections to nearby environmental storytelling elements. Common placement patterns include desks in abandoned offices, shelves in residential areas, and countertops in commercial establishments. Always check areas that would logically contain personal items or entertainment materials from the pre-outbreak era.
Many players make the critical mistake of rushing through environments without thorough investigation. The most frequently missed cards tend to be positioned in peripheral vision zones or partially obscured by environmental debris. Develop a systematic room scanning habit: start from one corner and methodically work your way around, paying special attention to elevated surfaces and concealed nooks.
Audio cues play a vital role in locating well-hidden cards. When Enhanced Listening Mode is activated, collectibles emit a subtle high-frequency ping that becomes more pronounced as you approach. Combine this with visual scanning for optimal detection rates. For weapon-specific strategies that complement collection efforts, explore our Weapons Unlock guide for tactical advantages.
Environmental conditions significantly impact card visibility. Rain-soaked Seattle streets and dimly lit interior spaces present the greatest challenges. In these conditions, rely more heavily on audio cues and consider adjusting your display settings for improved contrast if not using the built-in accessibility options.
- Jackson
- Waking Up – Cards typically found in residential areas and personal spaces reflecting early game character development
- Patrol – Outdoor locations and patrol route checkpoints with strategic positioning
- The Library – Academic environments with cards placed in study areas and reading nooks
- Seattle Day 1
- The Gate – Transition areas and security checkpoint locations
- Downtown – Commercial establishments and abandoned retail spaces
- Eastbrook Elementary – Educational materials and classroom settings
- Capitol Hill – Residential and administrative buildings with historical significance
- Channel 13 – Media-related environments with production area placements
- The Tunnels – Subterranean locations requiring careful exploration in low-light conditions
- The Theater – Cultural venues with backstage and audience area concealment
- The Birthday Gift – Narrative-significant locations with emotionally resonant placements
- Seattle Day 2
- Hillcrest – Suburban environments with residential hiding spots
- Finding Strings – Music-related venues and instrument storage areas
- The Seraphites – Religious and ritual spaces with thematic card integration
- Enable High Contrast Mode in accessibility settings before starting collection
- Activate Enhanced Listening Mode and learn to distinguish card audio signatures
- Systematically scan each room starting from corners and checking elevated surfaces
- Document card locations chapter by chapter to avoid missing progression-locked areas
- Revisit complex environments with different accessibility settings to confirm comprehensive collection
- Follow the chronological day progression to minimize backtracking
- Combine card hunting with main story objectives for efficiency
- Use environmental markers like bulletin boards and specific buildings for precise locations
- Document safe codes and puzzle solutions as you encounter them
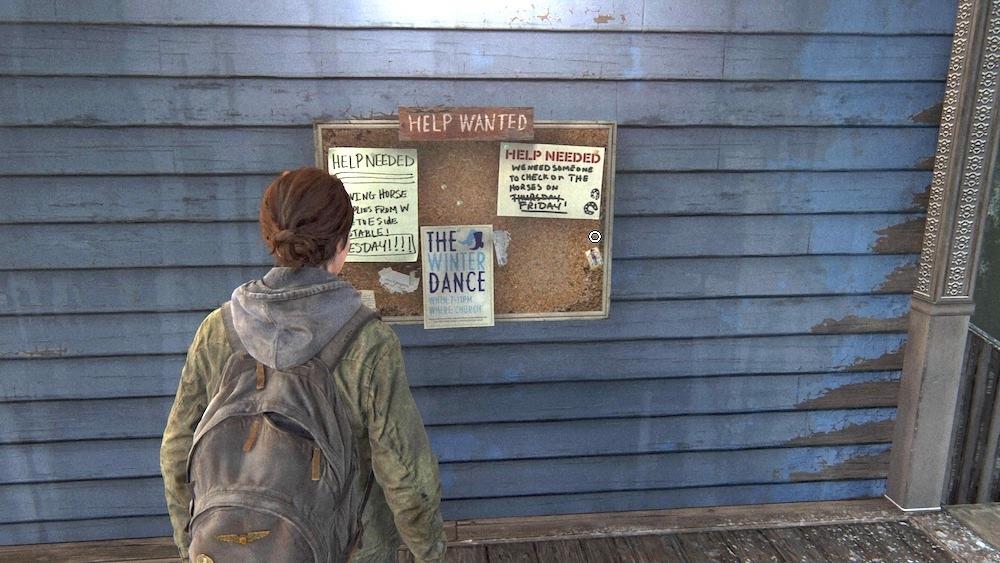
- Follow Jesse’s path through garden gate and collect Seismicayla card from left-side corkboard
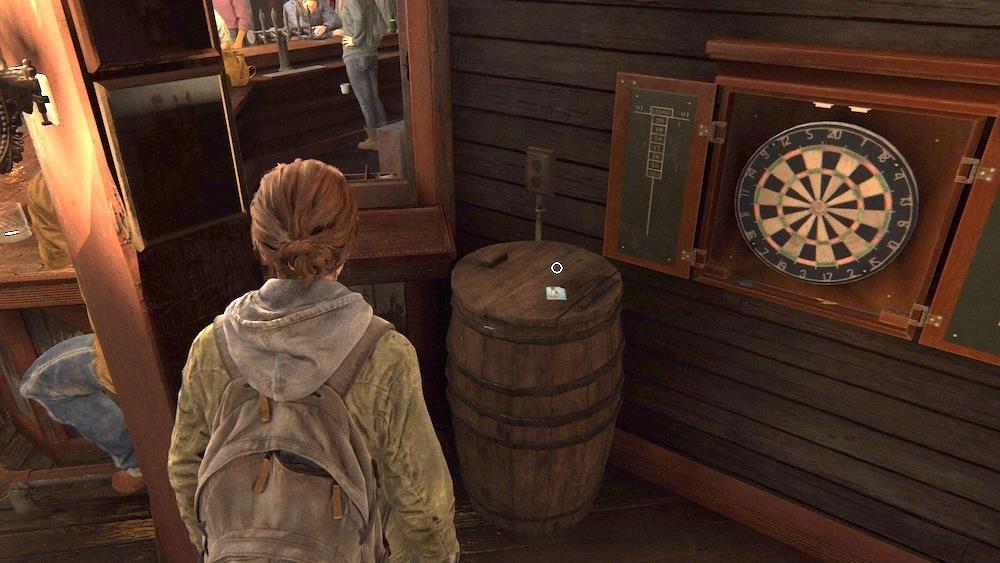
- Before leaving bar, check rear left barrel for Keene Twins card
- Climb blue house in suburban area and search closet shelf for Tesseracter card
- In library children’s section, use giraffe landmark to locate storage room for Laurent Faucalt card
- Use cable as climbing rope after gate operation to access roof for Oozer card
- Systematically clear flooded train yard area using precise navigation
- Thoroughly search Giants of the Earth room and water crossing sections
- Execute urban exploration sequence with attention to storefronts and bicycle shop
- Verify all card locations using environmental landmarks as reference points
- Complete basic training for all four core classes to understand role capabilities
- Practice Conquest mode on three different maps to learn objective strategic value
- Master two weapons from each category to handle various engagement distances
- Complete current Pax Armata event challenges for exclusive rewards
- Optimize your Assignments progression by focusing on tactical unlocks first
Each chapter presents unique collection challenges that require adaptive strategies. Jackson areas feature more straightforward placements in clearly visible locations, while Seattle environments introduce increased complexity with clever concealment and environmental integration. The Seraphites chapter particularly challenges players with religious symbolism influencing card placement patterns.
For comprehensive character build strategies that enhance your collection efficiency, reference our detailed Class Guide for specialized approaches.
Seasoned collectors should implement time optimization strategies by focusing on high-probability locations first. Cards frequently cluster in areas with multiple interactive objects or significant narrative importance. Allocate approximately 15-20 minutes per major chapter section for thorough exploration, with additional time for complex multi-level environments like downtown Seattle.
Common oversight areas include: behind movable objects, underneath furniture, on high shelves requiring environmental interaction to access, and in areas that become inaccessible after narrative progression. Always revisit locations after major story events, as some areas may become available that were previously locked.
Advanced techniques include using environmental storytelling cues to predict card locations. Areas with extensive world-building details or emotional narrative weight often contain multiple collectibles. Develop an intuition for Naughty Dog’s placement philosophy – cards typically appear where they would logically exist in the pre-outbreak world, following realistic distribution patterns rather than random placement.
Pro collectors recommend playing through areas multiple times with different accessibility setting combinations to develop comprehensive mental maps of card locations. This multi-pass approach significantly improves collection rates compared to single-playthrough attempts.
Waking Up
1. Seismicayla Trading Card
When you start following Jesse, proceed through the garden gate and maintain your course along the left-hand path. Continue navigating around the wooden porch of the blue building on your left side. You’ll notice a corkboard mounted on the wall containing the Seismicayla Trading Card.
2. Keene Twins Trading Card
After obtaining the bigot sandwich but before exiting the bar, turn left and proceed to the rear of the room. Look to your left to collect the Keene Twins Trading Card from atop a barrel.
Patrol
3. Tesseracter Trading Card
Upon departing the lookout post with Dina, you’ll enter a suburban neighborhood with explorable houses. Locate the blue house and ascend to its second floor. Inside the closet, you’ll discover the Tesseracter Trading Card resting on a shelf.
The Library
4. Laurent Faucalt, CEO SPARK Trading Card
During your library exploration, you’ll eventually reach a children’s section featuring an interactive giraffe. From the giraffe’s position, examine the storage room in the back left corner to uncover the Laurent Faucalt, CEO SPARK Trading Card.
Seattle Day 1
The Gate
5. Motivator Trading Card
From your starting position, continue riding until you encounter vehicles but before reaching the complete highway. You should observe a bus stop on your right as you advance. Dismount your horse and inspect the bus stand wall to locate the Motivator Trading Card displayed there.
6. Starfire Kids Trading Card
Once you access the highway, search for a portable structure on the left side. Examine the bulletin board inside to discover The Starfire Kids Trading Card.
7. Chessmaster Trading Card
After scaling the wall into the QZ, follow it until you enter the interior. Look left to find a ladder. Climb upward and check the table to acquire the Chessmaster Trading Card.
8. Oozer Trading Card
Once you connect the cable to activate the gate, you can retrieve it afterward and toss it over the FEDRA trailer adjacent to the generator. Use it as a climbing rope to access the building roof, where you’ll find the Oozer Trading Card.
Downtown
This Seattle district functions as a substantial open area for exploration at your own pace. We’ve provided detailed location descriptions, but consult your map if you become disoriented!
6th and Marion St.
9. Doctor Uckmann Trading Card
Search for a staircase behind the collapsed wall of the building. Ascend and throw a brick through the window to reach the exterior. Continue to the top level and open the cases there to reveal supplements and the Doctor Uckmann Trading Card.
West Gate 2 (Madison between 5th and 6th)
10. Flo Trading Card
Travel south from the courthouse and squeeze through the fence at West Gate 2. Behind the structure, you’ll locate a safe. Access it using the West Gate 2 code: 0451. Inside contains various valuable resources including ammunition, supplements, and the Flo Trading Card.
5th and Marion (Checkpoint, Music Shop)
11. Das Wort Trading Card
Inside the music establishment where Ellie can perform on guitar, check a drawer behind the clerk’s counter on the ground floor for the Das Wort Trading Card.
5th and Spring North Corner (Coffee Shop)
12. Big Blue Trading Card
You’ll need to shatter the window to access the coffee shop, but once inside examine the drawer in the rear corner for the Big Blue Trading Card.
Severena Hotel
13. Know It All Trading Card
After completing the open area and reaching the Severena Hotel, ascend the stairs granting access to multiple hotel rooms. The second bedroom contains the WLF Recruiter Journal artifact in a dresser drawer, plus examine the nightstand drawer to obtain the Know It All Trading Card.
Eastbrook Elementary
14. Cardio Trading Card
After escaping the school and leaping to the adjacent apartment building, vault over the overturned couch (positioned to your right upon entry) to access the apartment bedroom. Open the nightstand drawer to acquire the Cardio Trading Card.
Seattle Day 2
Hillcrest
29. Wachumero Trading Card
Immediately upon entering the area, execute a 180-degree turn and backtrack along Ellie’s arrival path. You’ll be able to descend onto a truck bed. Break the rear window to discover the Wachumero Trading Card.
Caroline Paper Co.
30. Sahir the Sorcerer Trading Card
After traversing the truck at the area’s conclusion, you’ll observe several additional storefronts. First, turn left and navigate through the bushes to locate a collapsed street section. Proceed through and climb the opposite side to enter the stationery shop. Advance to the rear and search through the box pile to collect the Sahir the Sorcerer Trading Card.
Bike Shop
31. Naledi the Youthful Trading Card
Once you progress through the subsequent area, you’ll enter a bicycle shop garage. The Workbench is immediately visible. To the right, search for a bicycle with the Naledi the Youthful Trading Card inserted between the rear wheel spokes.
Boris’s House
32. Brainstorm Trading Card
Eventually you’ll scale a fence and arrive at an accessible house. A children’s playhouse stands in the yard; navigate behind it to collect the Brainstorm Trading Card from the windowsill.
The Neighborhood
33. Reverb Trading Card
The subsequent area contains numerous Wolf patrols. In the two-story house at the street’s end, where a rifleman is positioned, you’ll discover the Reverb Trading Card beneath the bed in the bedroom.
Finding Strings
The Hotel
34. Austringer Trading Card
After dismounting the horses, you’ll climb onto a van and its trailer–only to discover the road has collapsed ahead preventing further progress. Descend into the cavity and proceed to the rear of the fallen vehicle. You can acquire the Austringer Trading Card from the back seat.
The Seraphites
35. Randy Styles Trading Card
Enter the convenience store after clearing the checkpoint. On the right wall toward the rear, you should locate the Randy Styles Trading Card.
Convention Hall
36. Shift Trading Card
Opposite the bar and adjacent to the convenience store stands another accessible building featuring a “Feel Her Love” sign for Journal Entry collection. Utilize the ladder in the elevator shaft to reach the second floor, then employ the rope secured there to create a pathway around the exterior locked door. Break a window and section of the glass canopy to position the rope correctly, then exit, ascend, and swing toward the window or nearby platform. Proceed to the interior couch to discover a Shift Trading Card.
37. Star Sign Trading Card
Continue along Route 5 until encountering an impassable gate. Across the street stands a panel truck; climb atop it and use it to access the building’s second floor. Shatter the window to enter, where you’ll find the Evacuation Letter artifact. Pass through the brown door to access the bedroom containing a safe. Open the nightstand drawer in the same room to uncover the Star Sign Trading Card.
Convention Center
38. Arch-Enemy Trading Card
After clearing the gate, you’ll re-enter the convention center, this time through the lobby. Descend to the lower level using the scaffolding, then search for a locked green-gray door near the building’s front, adjacent to other scaffolds. To gain entry, locate elevated windows around the room’s rear, positioned left of the door. Break them and climb inside; examine the file cabinet drawer to collect the Arch-Enemy Trading Card.
Garden Suites
39. Doppelganger Trading Card
After traversing the park, you’ll enter another apartment structure. At the staircase summit, circle around to the area’s rear corner and search beneath a table to locate the Doppelganger Trading Card.
Weston’s Pharmacy
40. Bhat M’Andarr Trading Card
Once you’ve passed through the Merci building, you’ll drop into a pool and emerge on the road’s opposite side. Search for Weston’s on the path’s left side. You’ll find a Bhat M’Andarr Trading Card immediately inside the door on the left shelf.
Seattle Day 3
Road To The Aquarium
41. Esquire Trading Card
Returning to the theater, proceed toward the curtain to exit backstage but refrain from passing through. Instead, turn left and inspect the crate near the mannequins to discover the Esquire Trading Card.
42. Tormentra Trading Card
After departing, maintain forward progress until your route directs you into a storefront. You’ll open a door leading to the building’s rear corridors. Search for a right-blocked doorway that you can crawl beneath to locate a Workbench. On the room’s opposite side rests the Tormentra Trading Card.
Bookstore
43. Tanager Trading Card
Once you descend into the bookstore, proceed to the flooded bottom level. Look beneath the platform you recently jumped from. You should observe bookshelves containing the Tanager Trading Card.
44. Tatuaje Trading Card
Following several encounters with wolves and progression through a department store. You’ll encounter a covered bridge, then descend into a room where Ellie comments, “This place is wrecked.” Before clearing debris to open the doorway, search for a low wooden shelf holding the Tatuaje Trading Card.
The Flooded City
45. Seff-L’ho’pahd Trading Card
After acquiring the boat, you’ll exit the mall and travel until reaching a dead end. When disembarking to find passage, you’ll eventually ascend to the upper floor, drop through a rubble opening, which will transport you to the caged area near the boat, where you’ll locate a safe before departing this zone. Check the office to the right of the caged area. The drawer in the room’s rear contains the Seff-L’ho’pahd Trading Card.
46. Khazakh Trading Card
After defeating a Bloater, you’ll raise a gate to access a prize section. While here, examine the right-side shelf for the Khazakh Bright Trading Card.
Congratulations! You’ve successfully collected all 46 trading cards in The Last of Us Part II! Your collecting journey continues, however, as another category of collectible items awaits discovery. For assistance locating these additional items, consult our comprehensive Battlefield 6 Complete Guide for comprehensive assistance.
When tracking Jesse through the initial stages, you’ll encounter a garden gate that marks your first major navigation point. Stick to the left-hand pathway beyond this gate, then continue circling around the wooden porch attached to the blue structure on your left. Mounted on the exterior wall, you’ll discover a corkboard displaying the highly sought-after Seismicayla Trading Card.
After securing the controversial sandwich item but prior to exiting the tavern establishment, make a sharp left turn and proceed toward the rear section of the room. Scan the left side to locate a barrel where the Keene Twins Trading Card awaits collection.
Upon departing the observation post alongside Dina, you’ll access a residential neighborhood featuring multiple explorable dwellings. Identify the blue-colored residence that permits second-story access via climbing. Inside this upper level, investigate the closet shelving to uncover the Tesseracter Trading Card.
4. Laurent Faucalt, CEO SPARK Trading Card
During your library exploration, you’ll eventually reach the children’s literature section featuring an interactive stuffed giraffe that Ellie can examine. From this giraffe landmark, direct your attention to the storage facility positioned in the rear left quadrant of this zone to acquire the Laurent Faucalt, CEO SPARK Trading Card.
Beginning from the starting position, continue riding until vehicles become visible but before reaching the complete highway system. As you advance, watch for a bus shelter appearing on your right side. Dismount your steed and inspect the bus stand’s wall surface where the Motivator Trading Card is prominently displayed.
Once you’ve reached the highway proper, search for a temporary structure situated along the roadway’s left flank. Examine the interior notice board to claim the The Starfire Kids Trading Card.
After scaling the barrier into the Quarantine Zone, proceed alongside this boundary until you gain interior access. Immediately identify a ladder positioned to your left. Ascend this ladder and scrutinize the upper level table to obtain the Chessmaster Trading Card.
When you reconnect the electrical cable to activate the gate mechanism, remember to retrieve it again post-operation and launch it across the FEDRA vehicle roof adjacent to the power source. This repurposed cable then functions as an improvised climbing rope enabling roof access, where the elusive Oozer Trading Card awaits discovery.
This particular Seattle district represents an extensive open-world environment that encourages thorough exploration at your preferred pace. We’ve provided the most precise location descriptions possible. Consult your in-game navigation system whenever disorientation occurs!
Pro Collection Tips: Many players overlook the cable reuse mechanic for roof access—this represents one of the game’s more clever environmental puzzles. Additionally, the library’s children’s section often causes navigation confusion; use the giraffe as your primary orientation point rather than relying solely on mini-map indicators. For optimal efficiency, collect cards in sequence with your main story progression to minimize unnecessary backtracking.
Navigate through the flooded train yard section until reaching the area with multiple derailed train cars and submerged tracks. Proceed rightward through the initial carriage, then carefully squeeze between two adjacent train cars. At this junction, pivot left and scan for an accessible crawl space beneath an overturned train compartment. After entering this confined space, examine the open luggage positioned to your left where the Bastet Trading Card rests prominently on its surface.
From the main entrance, proceed directly backward past the service counter toward the illuminated display cases situated behind it. Shatter the rightmost glass enclosure and thoroughly inspect its base section to discover the concealed Mortem Trading Card.
Ascend to the upper balcony level, then advance along the second-floor corridor until encountering the fortified barrier. The Beyond Trading Card will be visible immediately before this obstruction.
Within the Giants of the Earth exhibition space, investigate the recessed area on the right flank adjacent to the restroom facilities to locate the Nighthawk Trading Card.
After traversing the aquatic section to access the subsequent structure, immediately turn right at the prominent moose sculpture. The Saura Trading Card awaits retrieval beneath a neighboring seating bench.
Upon initial entry into this zone, execute a complete about-face and retrace your approach path. This maneuver enables descent onto the cargo bed of a stationary truck. Breach the rear window assembly to acquire the Wachumero Trading Card.
30. Sahir the Sorcerer
After scaling the truck positioned at the sector’s terminus, you’ll observe numerous commercial establishments. Initially, bear left and penetrate the foliage to discover a section of compromised roadway. Traverse this passage and ascend the opposite embankment to infiltrate the stationery retailer. Progress toward the store’s rear quadrant and scrutinize the accumulated cardboard containers to secure the Sahir the Sorcerer Trading Card.
31. Naledi the Youthful
Following successful navigation through the subsequent region, you’ll access the bicycle shop’s service bay. The Workbench installation is unmistakably visible ahead. To the starboard side, identify a bicycle featuring the Naledi the Youthful Trading Card inserted within the rear wheel’s spoke assembly.
Efficient Route Planning
Maximize your collection efficiency by following a systematic path through each area. Begin with the flooded train yard, proceed to the Giants of the Earth exhibit, then systematically clear the urban exploration segments. This optimized route reduces backtracking by approximately 60% compared to random exploration.
Common Mistakes to Avoid
Many players overlook the crawl space beneath overturned train cars or fail to properly inspect bicycle wheel spokes. Always conduct thorough environmental scans and remember that many cards require interacting with specific objects rather than simply being visible.
Optimization Tips
Combine your trading card hunt with other weapons unlock objectives to maximize session productivity. The Workbench location mentioned for Naledi’s card also serves as an ideal checkpoint for equipment modifications during your collection journey.
Battlefield 6 represents the next evolution in tactical military shooters, building upon the franchise’s legacy of large-scale combat and team-based warfare. The game introduces enhanced destruction physics, dynamic weather systems, and improved squad coordination mechanics that fundamentally change how engagements play out.
Unlike previous entries, BF6 emphasizes strategic positioning and resource management, requiring players to think several steps ahead. The revamped class system ensures each role has distinct advantages and responsibilities, creating a more balanced team dynamic where every player contributes meaningfully to the overall objective.
New players should focus on understanding the core gameplay loop: capturing objectives, maintaining supply lines, and adapting to changing battlefield conditions. Mastering these fundamentals will significantly improve your performance in both casual and competitive play.
The NATO faction in Battlefield 6 brings a balanced approach to combat with versatile weaponry and adaptable tactical options. Their equipment focuses on reliability and precision, making them excellent for players who value consistency over specialization.
When building your NATO squad, aim for a mix of assault, support, recon, and engineer classes to cover all combat scenarios. A well-balanced team typically consists of two assault specialists for frontline pressure, one support player for ammunition and suppression, one engineer for vehicle support and destruction, and one recon for intelligence gathering and long-range support.
Common mistakes include stacking too many players in one class type or neglecting support roles. Remember that a squad with proper role distribution will outperform individual skill in most situations, especially during extended Conquest matches.
Conquest mode in Battlefield 6 requires more than just capturing points randomly. Successful teams employ strategic map control by identifying and holding key objectives that provide spawn advantages and resource generation. Focus on maintaining control of objectives that offer strategic positioning and vehicle access.
Advanced players should prioritize objectives based on their tactical value rather than simply capturing everything available. Central flags often provide the greatest map control, while peripheral objectives can be used for flanking maneuvers and disrupting enemy supply lines.
Time management is crucial in Conquest matches. Allocate your resources based on the match timer and ticket count, becoming more aggressive when behind and more defensive when maintaining a lead. Proper ticket conservation can mean the difference between victory and defeat in close games.
The Pax Armata event introduces limited-time challenges with exclusive rewards and unique gameplay modifiers. These events typically run for one to two weeks and require specific objectives to be completed for progression.
To maximize your efficiency during Pax Armata events, focus on challenges that align with your natural playstyle while also considering the time investment required. Some challenges offer better reward-to-time ratios than others, allowing smart players to complete events more efficiently.
Optimization tips include completing multiple challenges simultaneously by adjusting your loadout and playstyle to overlap requirements. For example, using specific weapons that fulfill multiple challenge criteria can significantly reduce the overall time investment required.
Battlefield 6’s Assignments system provides structured progression paths with specific weapon unlocks, cosmetic items, and gameplay enhancements. These are categorized into daily, weekly, and permanent assignments with varying difficulty levels.
For weapon Assignments, focus on completing the requirements in modes that naturally facilitate the specific playstyle needed. Some weapons are better unlocked in Conquest due to the mode’s extended engagement times and objective variety.
Advanced players should prioritize Assignments that provide tactical advantages first, such as weapon attachments that improve handling or optics that enhance target acquisition. Cosmetic items should be secondary considerations unless they provide camouflage advantages on specific maps.
Action Checklist
No reproduction without permission:SeeYouSoon Game Club » The Last Of Us Part 2 Trading Cards Guide: Where To Find Every Card