TL;DR
- Two missing Lithographic Stones are located near the puzzle door and Merchant area
- Each stone has two sides but only one matches the door’s color and border patterns
- The puzzle requires precise image matching with no duplicate solutions
- Complete the puzzle in under 3 minutes with optimal routing
- Understanding the color-coding system prevents common placement errors
Mastering the Lithographic Stone puzzle in Resident Evil 4 Separate Ways requires strategic navigation and pattern recognition skills. This comprehensive guide provides detailed solutions for locating the missing stones and efficiently solving the challenging door mechanism.
Resident Evil 4 Separate Ways delivers an enhanced remake of Ada Wong’s standalone campaign, focusing on her mission to secure the mysterious Amber while evading Las Plagas-infected enemies. This downloadable content maintains the series’ signature survival horror elements, including intricate environmental puzzles that test both problem-solving abilities and resource management. The Chapter 4 lithographic door puzzle represents one of the more complex navigation challenges that temporarily blocks progression until solved correctly.
Approximately midway through Chapter 4, the narrative separates Ada from Luis Serra, assigning her the critical task of gathering medical ingredients to combat the parasitic infection. After exiting the Fortified Tower using the grappling hook, you’ll encounter a branching path: a main corridor ahead and a smaller staircase to the right guarded by two hostile entities. Descending these stairs leads to the puzzle chamber containing the Lithographic Stone Door, which demands precise arrangement of four carved stones to restore the damaged imagery. While two stones remain positioned within the door mechanism, the remaining two require retrieval from the immediate environment.
The initial missing stone rests conveniently on a wooden bench directly facing the puzzle interface, making it the most accessible component. This proximity allows for quick retrieval but careful observation is necessary to identify the correct orientation during placement.
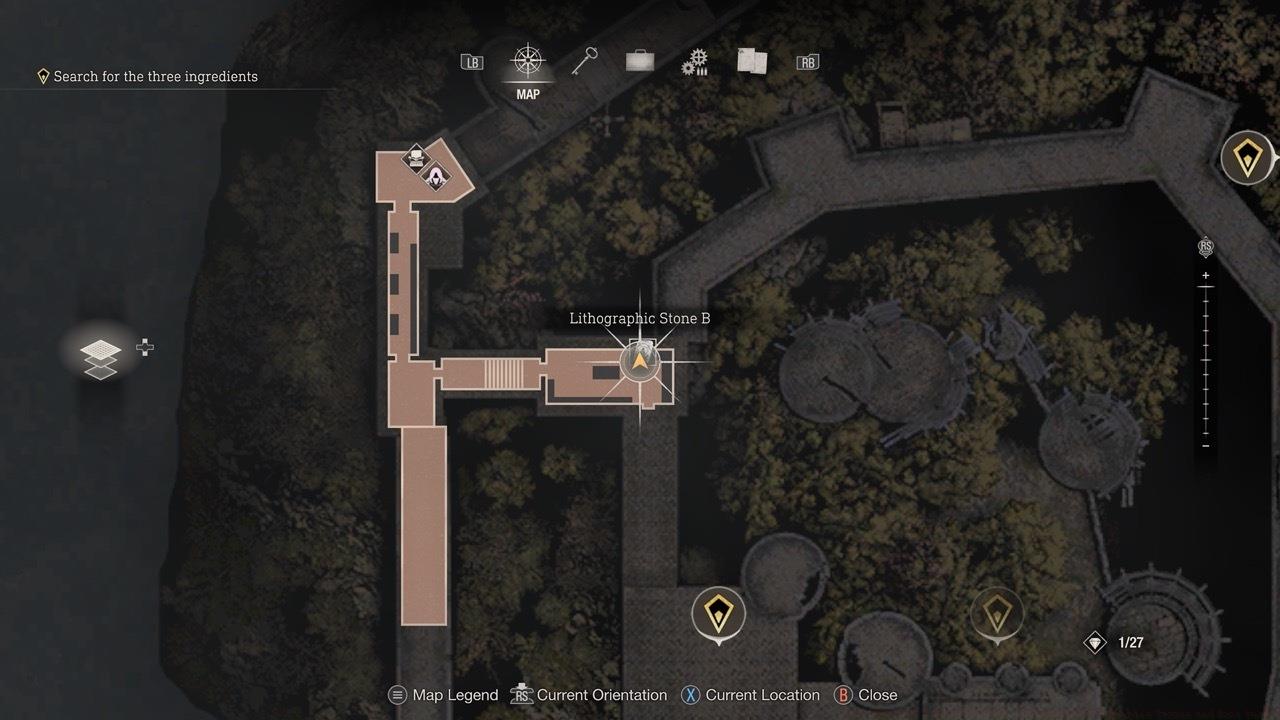
The primary lithographic stone awaits on the bench opposite the puzzle door, easily visible upon entering the chamber.
Locating the second stone necessitates backtracking to the previously blocked corridor and displacing the obstructing bookcase. Proceed to the hallway’s terminus to encounter the Merchant, with the crucial stone positioned in the opposite corner of this room. This detour typically adds 2-3 minutes to the puzzle completion time but provides opportunities for resource replenishment.
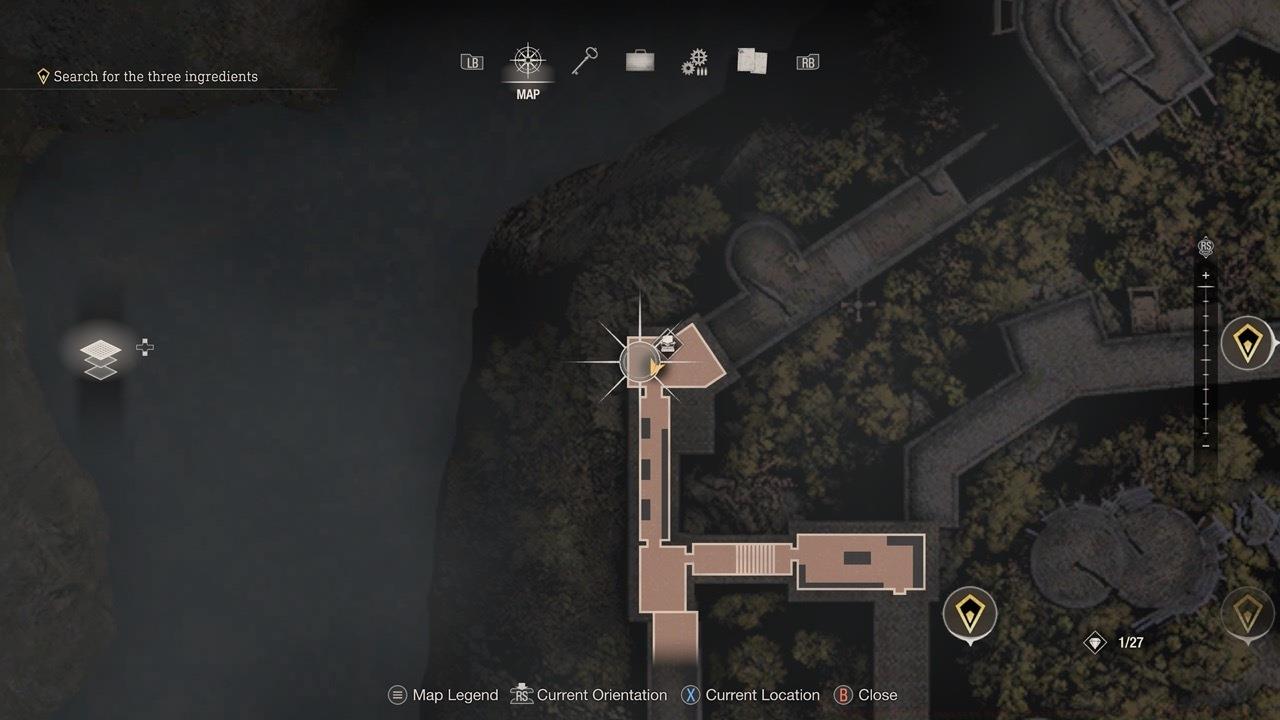
The secondary stone resides in the Merchant’s chamber, requiring brief navigation through the previously inaccessible hallway.
With both retrieved stones in possession, return to the puzzle door and insert the missing components into their designated slots. The solution demands careful observation rather than trial-and-error approaches, as each stone block features two distinct sides but only one orientation aligns correctly with the door’s imagery.
The most reliable method for determining proper placement involves scrutinizing the color schemes and border patterns of each image segment. When the hue and outline configuration harmonizes with one of the four door positions, you’ve identified the correct alignment. Mismatched colors or borders indicate the need to rotate the block 180 degrees to test the alternative face. The puzzle design ensures no duplicate images exist across the four required positions, eliminating potential confusion about which stone belongs where.
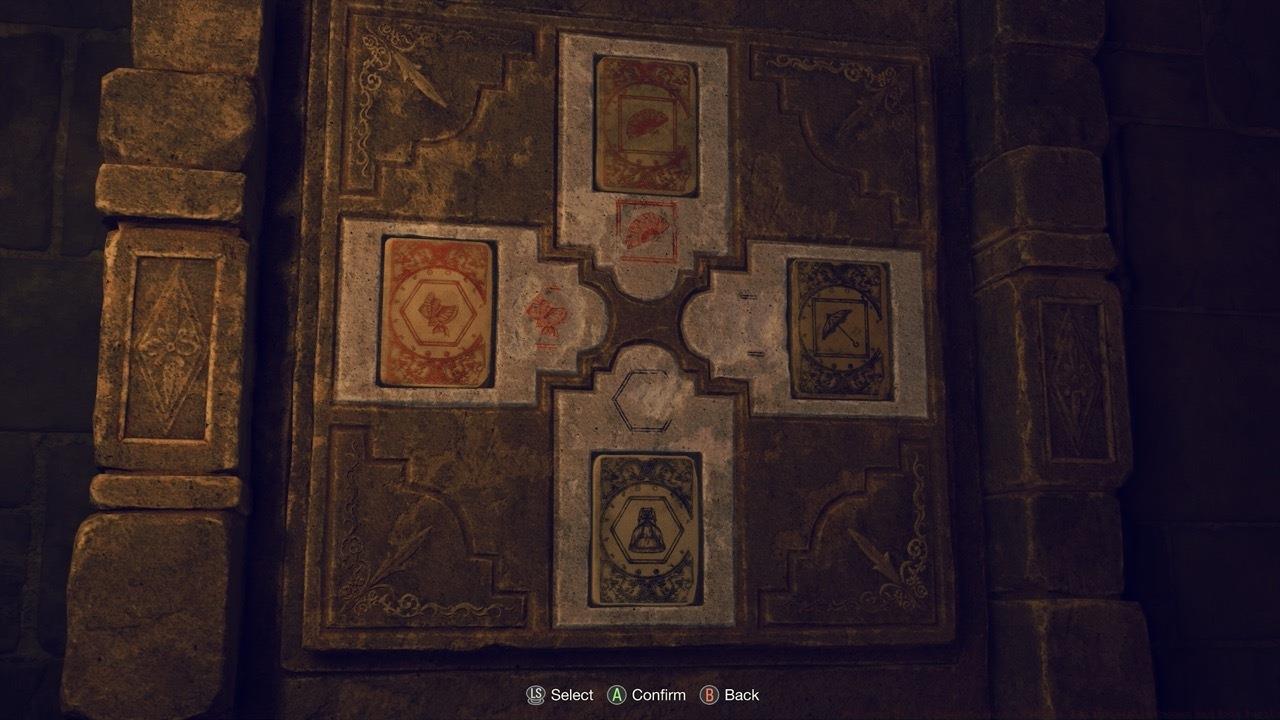
Reference this visual solution to verify correct stone placement and orientation, ensuring efficient puzzle completion.
Common errors include neglecting to rotate stones after insertion or misinterpreting the color matching system. The puzzle typically consumes 3-5 minutes for first-time solvers but can be completed in under 90 seconds with practiced efficiency. Successful resolution grants access to critical progression areas containing valuable resources and narrative advancement.
Seasoned players can optimize their approach through strategic route planning and enemy avoidance techniques. Begin by clearing the staircase area of threats before descending to the puzzle room, then retrieve the first stone immediately. When backtracking for the second stone, utilize stealth movement to bypass regenerating enemies in the hallway. For those interested in our Weapons Unlock guide, similar strategic planning applies to weapon acquisition challenges.
Speedrunners should prioritize the grappling hook exit sequence to minimize time loss during transitions. The Merchant visit provides an opportunity to upgrade weapons if resources permit, which aligns with principles discussed in our Complete Guide to resource management. Mastering the color recognition system reduces placement errors significantly – note that warmer tones (reds, oranges) typically align with organic imagery while cooler hues (blues, greens) correspond to geometric patterns.
Advanced puzzle solvers complete the entire sequence in 2-3 minutes by combining efficient navigation with quick pattern recognition. Understanding these mechanics provides transferable skills for other complex challenges, similar to strategic concepts in our Class Guide that emphasizes role-specific problem-solving approaches.
Action Checklist
- Clear staircase enemies before approaching puzzle room
- Collect first stone from bench opposite door
- Backtrack to blocked hallway, move bookcase, retrieve second stone near Merchant
- Return to door and insert stones, matching color and border patterns
- Rotate stones as needed until all four images align correctly
No reproduction without permission:SeeYouSoon Game Club » Resident Evil 4 Separate Ways – Chapter 4 Lithographic Stones And Door Puzzle Complete guide to finding Lithographic Stones and solving the Chapter 4 door puzzle in Resident Evil 4 Separate Ways