TL;DR
- Three distinct paths yield unique rewards: Broken Heart relic (kill), Gift of the Unbound amulet (spare), or Jewel of the Beholden ring (direct fight)
- Each decision significantly impacts your build optimization and combat effectiveness throughout the DLC
- Strategic backup saves enable testing all outcomes without permanent commitment to a single path
- The Gift of the Unbound amulet provides exceptional value for Burden Ring users by removing negative effects
- Direct confrontation offers the most straightforward path with solid mod damage enhancement
In Remnant 2: The Awakened King, your encounter with the goddess Nimue presents one of the DLC’s most consequential moral and strategic decisions. This choice doesn’t merely affect the narrative—it directly determines which powerful equipment you’ll acquire and how your character build will develop.
The world of Remnant 2 is filled with pivotal moments where player agency shapes both story outcomes and gameplay advantages. Understanding the full implications of sparing or eliminating Nimue requires analyzing how each reward complements different playstyles and build specializations.
Critical Note: This analysis contains complete spoilers for The Awakened King DLC’s central storyline. We utilized backup save techniques to comprehensively test all branching outcomes, providing you with verified strategic intelligence.
Your fateful meeting occurs in the Chamber of the Faithless, an ominous location connected to the Palace of the One True King. This encounter establishes the foundation for your subsequent decision regarding Nimue’s fate.
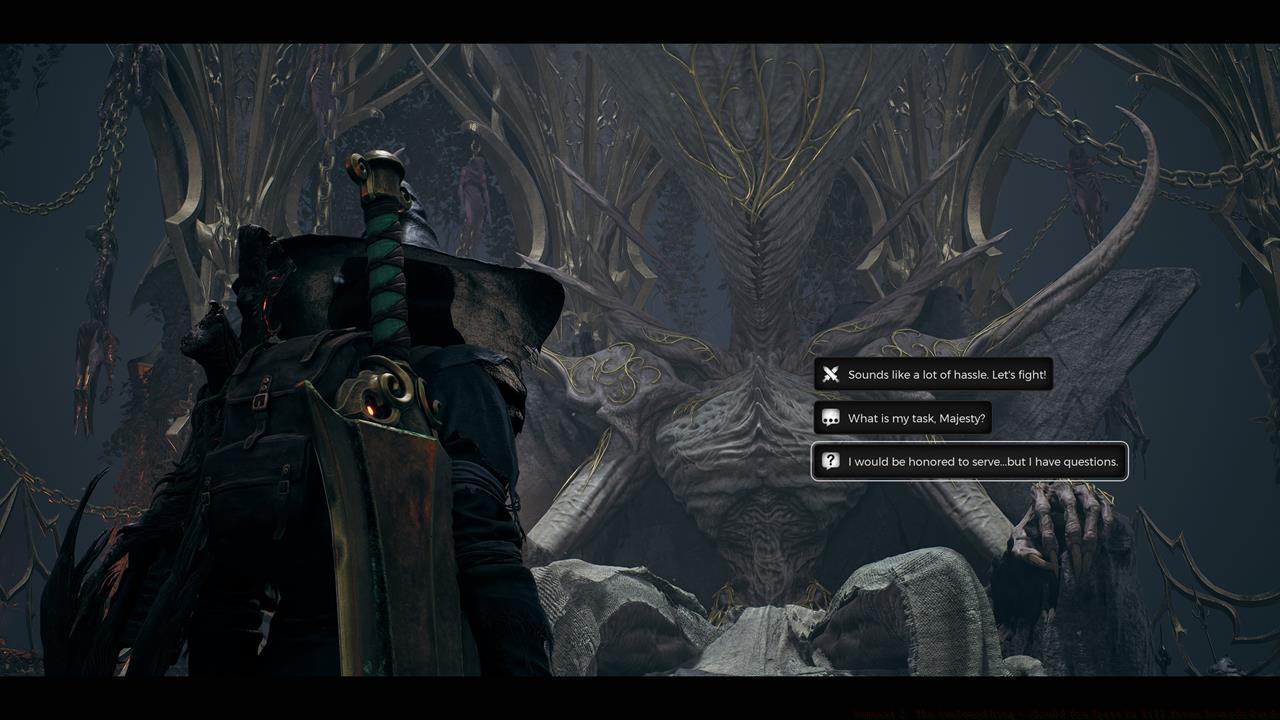
The dialogue interface presents multiple response options, each triggering dramatically different narrative branches:
- Aggressive Responses (marked with crossed swords icon): Selecting “Sounds like a lot of hassle, let’s fight,” or “You call that an answer?” immediately initiates combat with the One True King, bypassing the Nimue decision entirely.
- Cooperative Approach: Choosing “What is my task, majesty?” or “All right, then, what is my task?” unlocks the assassination questline targeting Nimue.
Strategic Insight: The aggressive path provides the most straightforward progression but forfeits access to the specialized rewards tied to the Nimue decision tree.
If you opt for the cooperative dialogue path, the monarch provides you with the Rod of Retribution—a unique quest item specifically designed for executing divine beings.
The One True King presents the pivotal choice that will shape your DLC experience.
Common Pitfall: Many players mistakenly believe cooperating with the One True King allows them to avoid his boss fight entirely. Regardless of your choice regarding Nimue, you must eventually confront this powerful adversary.
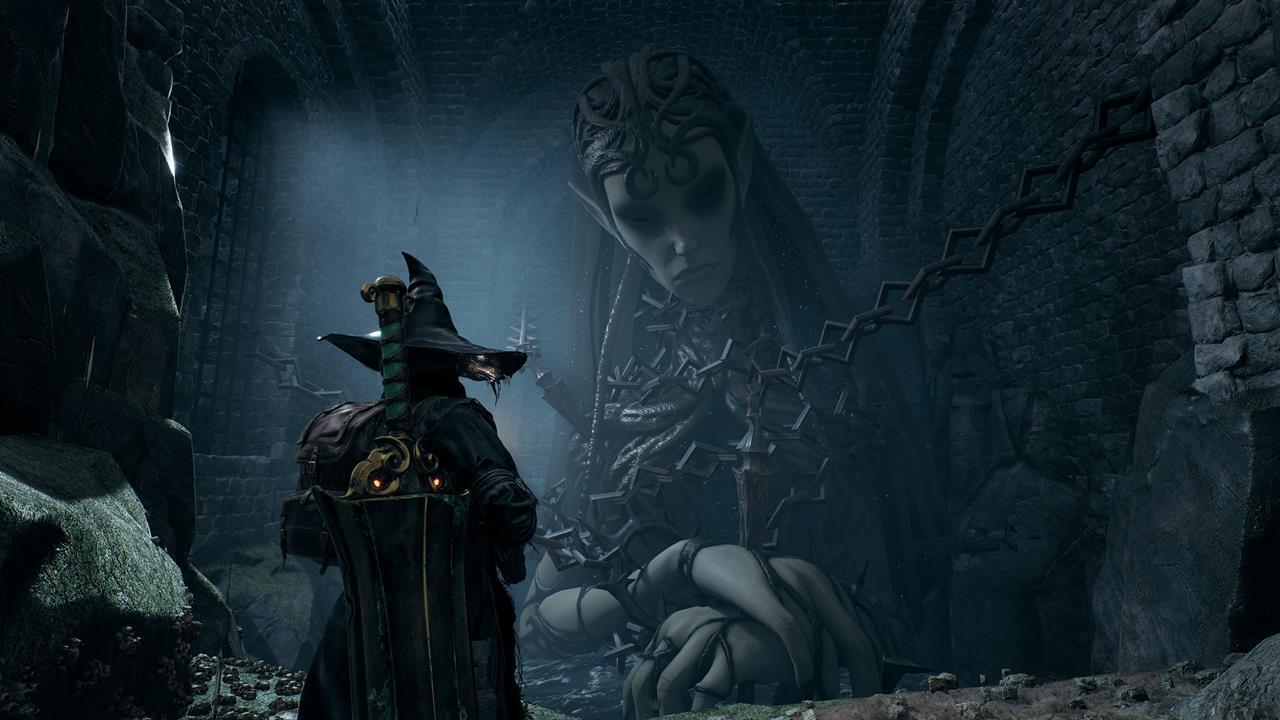
Finding Nimue requires returning to the Palace of the One True King area and locating a concealed access point that many players overlook during their initial exploration.
Navigation Strategy: Look for a small chamber populated by Fae Archers. By vaulting over the railing in this area, you’ll discover a descending staircase that leads to previously inaccessible territory.
The exit pathway emerges in the rear section of the Forlorn Coast, where a solitary tower stands as your destination. You must defeat the guarding miniboss (commonly the Mangled Atoner) before gaining entry to Nimue’s sanctum.
Pro Tip: The chamber door can be permanently unlocked, creating a direct route from the initial Forlorn Coast World Crystal. This allows efficient return trips once you’ve established the initial access route.
The railing descent in the palace (left) reveals the hidden path to Nimue’s isolated tower (right).
Advanced Technique: Speedrunners often bypass the miniboss encounter using precise platforming maneuvers, though this requires exceptional movement skill and familiarity with the terrain.
When you confront Nimue, she immediately perceives the darkness within your heart. The decisive moment arrives when you select “[Kill Nimue] It’s time to die, lady!” triggering an execution cinematic where your character drives the Rod of Retribution into her divine essence.
The Broken Heart relic provides unique tactical advantages with its distinctive mechanics:
- Innate +50% use speed bonus dramatically reduces animation time for relic activation.
- Health manipulation: Upon activation, instantly sets your current health to 50% of maximum health over 0.25 seconds.
Strategic Application: This relic excels in high-risk builds where rapid health adjustment provides tactical advantages. The near-instantaneous health adjustment enables precise health management during intense combat situations.
Post-execution Consequences: Returning to the One True King after completing the assassination triggers his paranoia—despite your compliance, he perceives you as a threat and combat becomes unavoidable.
Executing Nimue yields the Broken Heart relic, but the One True King’s subsequent betrayal makes the boss fight inevitable.
Build Synergy Warning: The Broken Heart relic functions poorly with glass cannon builds that rely on maintaining full health for damage bonuses.
Choosing to spare Nimue represents the more complex but potentially rewarding narrative path. Continue your dialogue with her as she reveals her strategic counter-proposal to the One True King’s tyranny.
The sparing sequence requires selecting “[Spare Nimue] You win, I hope I don’t regret this.” initiating an alternative questline with multiple stages.
Quest Progression:
- Receive Nimue’s Vow quest item
- Confront and defeat the One True King in combat
- The item transforms into Nimue’s Blood-Marred Vow
- Return to Nimue with the transformed item
- Acquire the Gift of the Unbound amulet
The Gift of the Unbound provides exceptional utility for specialized builds:
- Primary Effect: Completely disables the negative effects of all Burden Rings
- Trade-off Mechanism: Reduces maximum health by 20% for each disabled Burden Ring effect
Burden Ring Optimization Examples:
- Burden of the Gambler: Normally provides +10% crit chance and +20% crit damage while disabling weak spot targeting. With the amulet, you retain all positive effects while regaining weak spot capability.
- Burden of the Rebel: Typically reduces mod power generation. The amulet removes this penalty while preserving benefits.
Nimue provides her vow (left), which transforms after your victory into the powerful Gift of the Unbound amulet (right).
Advanced Build Strategy: Combine multiple Burden Rings with the amulet to create specialized character builds that would otherwise be impractical due to cumulative negative effects.
The most direct approach involves immediately challenging the One True King upon your initial meeting, completely bypassing the Nimue decision tree.
To initiate this path, consistently select dialogue options marked with the crossed swords icon throughout your conversation. This demonstrates your refusal to participate in his political machinations.
Strategic Advantage: This method provides the fastest progression to the DLC’s conclusion while still yielding a valuable reward.
After defeating the monarch, proceed directly to Nimue’s chamber in the Forlorn Coast. Informing her of your victory grants you the Jewel of the Beholden ring with its specialized mod enhancement capabilities:
- Activation Trigger: Upon relic use
- Effect: Increases mod damage by +15% for 10 seconds
Mod-Centric Build Value: This ring provides exceptional value for builds that prioritize mod usage over traditional weapon damage.
Eliminating the One True King without entertaining his proposal earns you Nimue’s gratitude in the form of the Jewel of the Beholden ring.
Time Efficiency Analysis: This path typically reduces completion time by 15-20 minutes compared to the full Nimue decision tree exploration.
New Player Recommendation: The direct confrontation approach provides the most straightforward experience for players unfamiliar with the DLC’s complex narrative branches.
Each decision path offers distinct advantages tailored to different character builds and player preferences:
- Broken Heart Relic: Optimal for aggressive playstyles and builds utilizing health manipulation mechanics.
- Gift of the Unbound Amulet: Exceptional value for advanced players utilizing multiple Burden Rings in specialized builds.
- Jewel of the Beholden Ring: Ideal for mod-focused builds and players prioritizing efficiency.
Strategic Flexibility: Utilizing backup saves before critical decisions enables comprehensive testing of all reward options without permanent commitment.
For players seeking to master Remnant 2’s complex systems, our Class Guide provides deeper insights into how these rewards integrate with specific archetypes.
The Awakened King DLC expands the Losomn region with numerous secrets beyond the central narrative, including the powerful Complete Guide to the Ritualist class and other hidden content.
Additional strategic resources for optimizing your gameplay experience can be found in our comprehensive Weapons Unlock guide, which details acquisition methods for all DLC equipment.
Action Checklist
- Create backup save before Chamber of the Faithless encounter to enable testing all reward paths
- Navigate to Nimue’s tower via palace railing descent and Forlorn Coast path
- Defeat the guarding miniboss to access Nimue’s chamber
- Test all three decision paths using backup saves to determine optimal reward for your build
- Permanently unlock Nimue’s chamber door for efficient return access
- Integrate acquired reward into your character build strategy
No reproduction without permission:SeeYouSoon Game Club » Remnant 2: The Awakened King – Should You Spare Or Kill Nimue Rewards Guide Strategic guide for Nimue's fate in Remnant 2 DLC: rewards analysis and optimal decision-making paths