TL;DR
- Golf Course offers intense early combat but requires immediate weapon acquisition
- Chemical Storage provides balanced player density with reliable loot spawns
- Area 22B enables strategic rotations to high-traffic zones after safe looting
- Proper landing timing can mean 30-45 seconds of uncontested looting advantage
- Vehicle availability at landing zones dramatically impacts mid-game mobility
GameSpot may receive revenue from affiliate and advertising partnerships for sharing this content and from purchases through links.
Every Battlefield 6 match initiates with your squad deploying from an aircraft over Fort Lyndon, presenting the critical decision of where to land that will shape your entire match outcome. Selecting high-traffic points of interest positions you for immediate engagements and potential early eliminations before the firestorm encroaches, while remote landing zones grant extended looting periods to prepare for end-game scenarios.
Regardless of whether you prefer aggressive combat or strategic positioning, Fort Lyndon contains optimal drop locations tailored to every playstyle. This guide examines three premier landing zones that provide distinct tactical advantages for both solo players and coordinated squads.
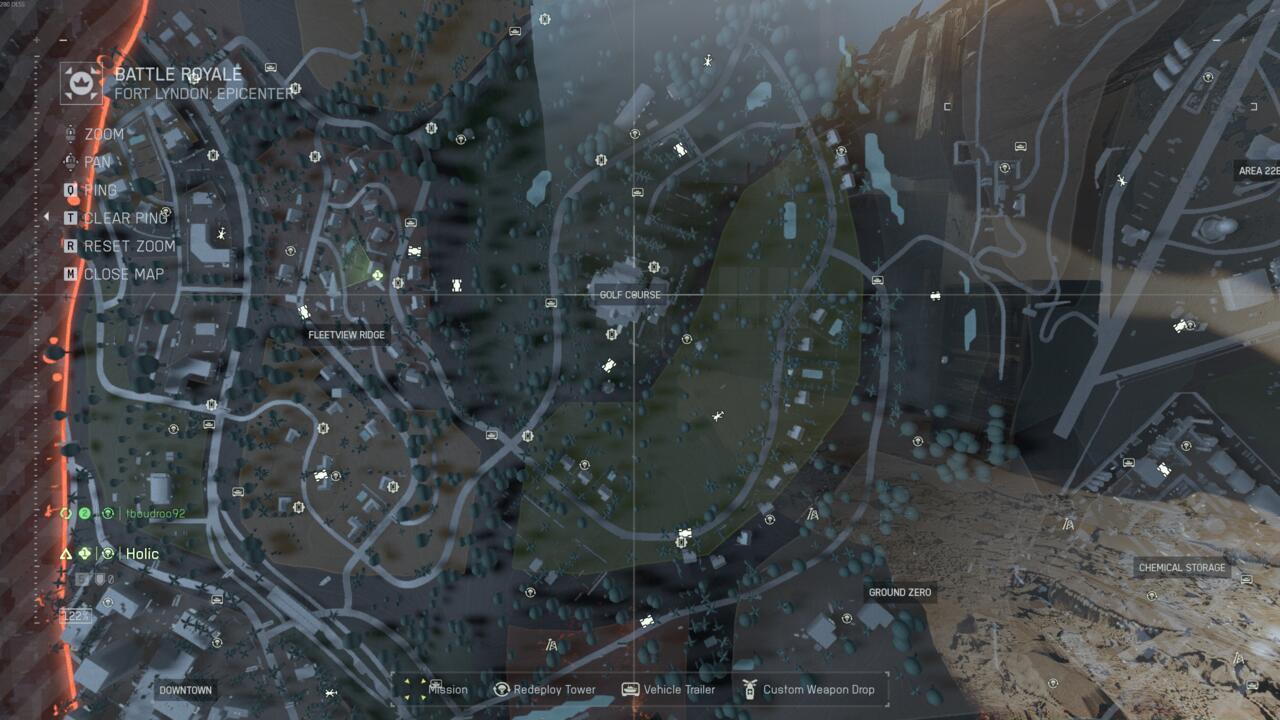
Since Battlefield 6’s launch, Golf Course has maintained its reputation as the premier hot drop destination, positioned on Fort Lyndon’s northern sector directly beneath typical aircraft flight paths. As one of the map’s most extensive locations, it consistently attracts between five to twelve squads at match commencement, necessitating immediate weapon readiness upon parachute deployment.
The concentrated player influx creates significant loot scarcity, requiring strategic building selection either in the central compound or peripheral structures to secure initial armaments. A crucial survival tactic involves utilizing the abundant golf cart vehicles scattered throughout the area for rapid evacuation when weapon acquisition fails, enabling relocation to better-equipped zones.
Pro Tip: Experienced players recommend landing on the clubhouse roof for weapon priority, then descending to clear interior levels systematically. Avoid the common mistake of landing directly in open fairways where you become an exposed target.
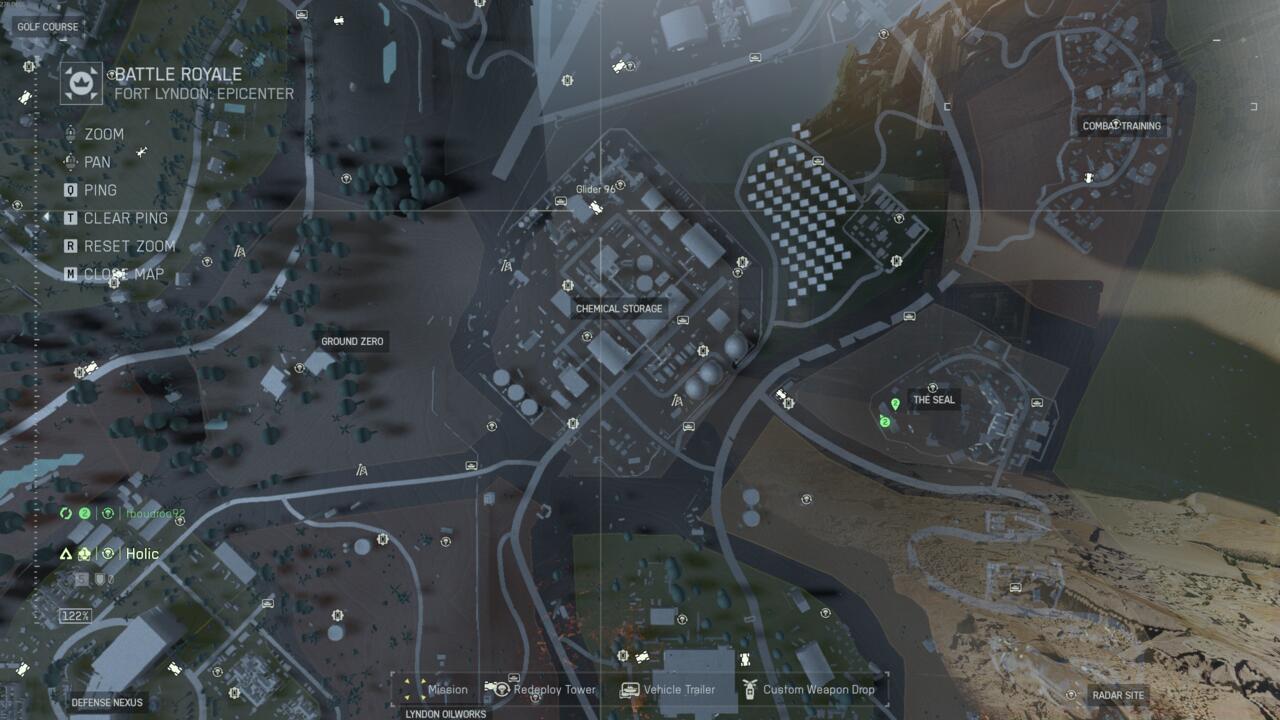
Chemical Storage represents a substantial central point of interest in Battlefield 6 that typically hosts three to six squads depending on aircraft trajectory. The complex’s extensive layout permits squads to secure isolated sectors for approximately 60-90 seconds of uncontested looting before engagements commence.
This location excels in loot distribution with multiple structures, vehicle cargo beds, and industrial areas generating equipment spawns. The potential for vehicle appearances provides exceptional match initiation opportunities if your squad successfully neutralizes competing teams in the vicinity.
For players seeking heated combat without overwhelming opposition while maintaining reliable loot access, Chemical Storage consistently delivers as a premier landing selection. The compound’s vertical elements and interconnected buildings create dynamic combat environments ideal for practicing class-specific tactics in controlled engagements.
Advanced Technique: Prioritize the control room building for weapon spawns, then use the elevated walkways for tactical positioning against ground-level opponents.
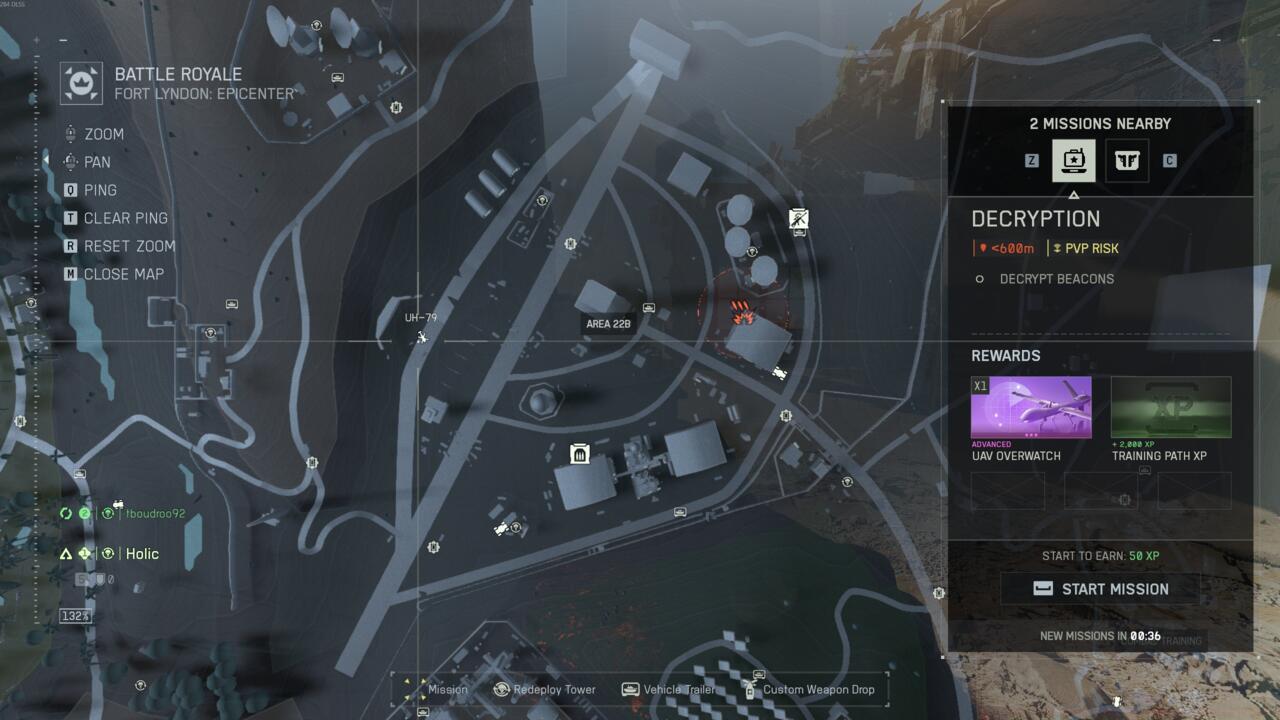
Map rotation strategy constitutes one of the most undervalued aspects of battle royale gameplay in Battlefield 6. Your initial landing decision represents merely the opening phase, as subsequent movement from that position critically influences match success. Area 22B excels as a rotational nexus, positioned north of both Chemical Storage and Golf Course—two of Fort Lyndon’s most contested drop zones.
The location’s peripheral placement ensures minimal squad concentration during initial deployment, creating optimal conditions for uncontested equipment gathering before engaging threats. This provides the perfect scenario to acquire two quality firearms, armor plating, and supplementary gear before advancing to eliminate residual teams at adjacent hot drops.
Tactical Advantage: Area 22B’s vehicle spawns enable rapid transitions to either Chemical Storage or Golf Course, allowing your squad to catch remaining opponents during vulnerable looting phases.
Understanding these rotation pathways is essential for mastering Battlefield 6’s advanced gameplay mechanics and achieving consistent victory placements.

Mastering Battlefield 6 landing strategies requires understanding several advanced techniques that separate elite players from average competitors. Squad coordination begins during the aircraft approach phase, with designated landing zones and immediate objectives established before deployment.
Drop Timing Optimization: Deploying approximately 400-500 meters from your target location provides optimal descent speed while maintaining directional control. Delaying your jump until the last possible moment typically grants 30-45 seconds of uncontested looting before the firestorm initiates contraction.
Avoid these common landing errors: scattering squad members across multiple buildings (prevents mutual support), landing directly on rooftops without escape routes, and prioritizing cosmetic locations over tactical advantages.
Vehicle acquisition within the first two minutes dramatically enhances your squad’s mobility for both offensive engagements and storm avoidance. Complement your landing strategy with effective weapon selection based on your preferred engagement distances and playstyle preferences.
Progression Tip: Consistent landing at specific zones accelerates your familiarity with loot spawn patterns and optimal positioning, directly improving your overall gameplay performance and match success rates over multiple gaming sessions.
Action Checklist
- Coordinate squad landing zones during aircraft approach phase
- Deploy 400-500 meters from target for optimal descent control
- Secure initial weapon within 15 seconds of landing
- Identify and utilize available vehicles within landing zone
- Establish rotation path to adjacent high-value zones
- Practice specific zone landings to master loot patterns and positioning
No reproduction without permission:SeeYouSoon Game Club » Best Landing Spots In Battlefield Redsec Season 1 Master strategic landing spots in Battlefield 6 to dominate Fort Lyndon matches with tactical advantages