TL;DR
- The Fishing Shrine requires lighting four torches in the exact sequence shown by candle heights on the shrine
- Each candle’s vertical position corresponds to a specific torch location around the area
- Failure to follow the precise order or missing environmental cues will prevent shrine activation
- This puzzle teaches essential observation skills needed for later game challenges
- Completing this shrine is mandatory for progressing through the Forgotten Woods storyline
When navigating the Forgotten Woods in Kena: Bridge of Spirits, many players encounter significant difficulty with the Fishing Shrine puzzle, which serves as the game’s first major test of environmental observation skills. Unlike combat encounters that test reflexes, this challenge demands careful attention to visual details and pattern recognition.
Kena: Bridge of Spirits expertly blends demanding combat scenarios with intricate puzzle-solving, creating a balanced gameplay experience that appeals to both action and cerebral preferences. The Fishing Shrine represents a critical learning moment that establishes the game’s expectation for player awareness.
Early in your adventure, after conversing with Rusu at his woodland home, you’ll embark on a mission to assist the spirit Taru by retrieving three significant artifacts connected to his emotional wounds. One essential item remains secured behind a magically sealed door that requires activating multiple shrines throughout the region.
Essential Kena: Bridge Of Spirits Companion Guides:
The sealed barrier demands activation of four distinct shrines scattered across the landscape. While most shrine challenges incorporate combat elements or combine platforming with puzzle mechanics, the Fishing Shrine stands apart as a pure logic test. Its solution isn’t immediately apparent, forcing players to carefully examine their surroundings for subtle clues—this intentional design choice marks the game’s first compulsory puzzle that trains players to observe environmental storytelling.
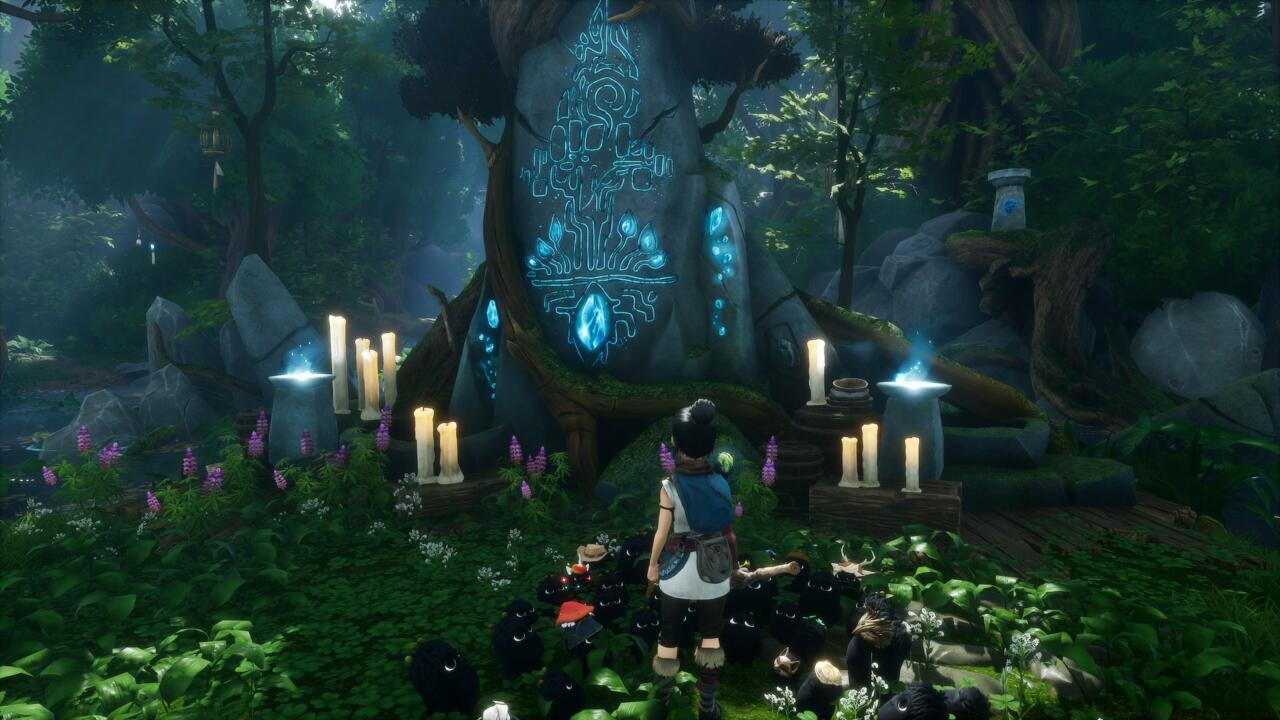
The shrine’s candle arrangement provides the complete solution—each candle’s height corresponds directly to a specific torch’s activation sequence.
The visual clue system employed in the Fishing Shrine represents one of Kena’s most elegant puzzle designs. Four candles of varying heights sit prominently on the shrine structure, with each vertical position indicating both the order and corresponding torch location you must activate. The tallest candle signifies the first torch, while the shortest indicates the final one in the sequence.
Success requires methodical environmental scanning to identify all four torch positions before attempting the solution. The torches are strategically placed around the shrine area at different elevations and distances, requiring careful aiming with Kena’s bow. Many players fail because they don’t realize the candles represent both sequence AND specific torch identification.
Professional gaming analysis reveals that this puzzle teaches spatial reasoning and pattern decoding—skills that become increasingly important as you progress toward mastering complex game mechanics found in titles like Battlefield 6. The deliberate placement encourages players to survey the entire area systematically rather than focusing on obvious elements.
Begin by positioning yourself directly in front of the Fishing Shrine to clearly observe the candle arrangement. Take mental note of each candle’s relative height and imagine drawing invisible lines from them to corresponding torch positions in the environment.
The activation sequence proceeds as follows: First, target the torch positioned on the elevated rock formation to your right—this corresponds to the tallest candle. Second, aim for the torch located on the wooden platform across the small pond. Third, activate the torch situated on the lower rock ledge near the water’s edge. Finally, complete the sequence with the torch placed on the tree stump closest to the shrine itself.
After correctly lighting all four torches in the proper order, return to the shrine to witness its activation. The stone structure will emit a distinctive glow and sound effect confirming successful completion. If the shrine doesn’t activate, you’ve likely either missed the precise sequence or targeted incorrect torch locations.
This methodical approach to puzzle-solving translates well to other gaming contexts, such as understanding progressive weapon systems where sequence and timing determine success. The puzzle reinforces that careful observation precedes action—a principle that applies equally to strategic combat and environmental navigation.
Seasoned players can optimize their approach by using the Rot companions to highlight torch positions—their glow makes distant torches easier to identify in the dense woodland environment. This advanced technique shaves valuable minutes off completion time.
The most frequent error involves misinterpreting the candle sequence as relating only to timing rather than specific torch identification. Players often attempt to light the nearest torches in height order rather than matching each candle to its corresponding environmental torch.
Another common mistake stems from failing to identify all four torch locations before beginning the sequence. Missing just one torch position guarantees failure and requires restarting the entire puzzle.
If you make an error in the sequence, you must extinguish all torches by waiting briefly or leaving the area, then beginning anew. There’s no partial credit—the sequence must be perfect on a single attempt.
This puzzle’s emphasis on precision and observation aligns with the strategic thinking required for mastering specialized class roles in team-based games. Both demand recognizing subtle environmental cues and executing actions in deliberate sequences rather than relying on reaction speed alone.
Completion typically requires 5-8 minutes for first-time solvers, but can be reduced to under 2 minutes with practice and proper technique. The puzzle serves as excellent training for more complex multi-step challenges encountered later in the game.
Action Checklist
- Position yourself facing the shrine and study the four candles’ height variations
- Identify all four torch locations by scanning the entire area systematically
- Match each candle height to its corresponding torch position
- Activate torches in sequence: tallest candle first, shortest last
- Verify shrine activation by observing visual and audio confirmation cues
No reproduction without permission:SeeYouSoon Game Club » How To Solve Kena: Bridge Of Spirits’ Fishing Shrine Puzzle Master the Fishing Shrine puzzle with expert strategies, common mistakes to avoid, and time-saving solutions