TL;DR
- Craft armor stands using six sticks and one smooth stone slab in specific crafting table arrangement
- Display multiple armor sets to showcase your progression and achievements throughout gameplay
- Utilize advanced positioning and redstone mechanisms for interactive armor exhibitions
- Avoid common mistakes like improper material placement and insufficient resource gathering
- Transform your base with organized armor displays that serve both decorative and functional purposes
Showcasing your hard-earned armor collection represents a significant milestone in your Minecraft progression journey. Rather than concealing these achievements within storage containers, armor stands allow you to proudly exhibit your accomplishments throughout your base or fortress.
Throughout your Minecraft adventures, you’ll naturally accumulate numerous armor sets ranging from basic leather to enchanted netherite. While storing excess gear in chests provides practical organization, displaying your collection transforms functional items into decorative statements that narrate your gameplay evolution.
Armor stands serve multiple purposes beyond mere decoration—they function as visual progress trackers, organizational tools for quick gear access, and creative centerpieces for your builds. Many experienced players utilize them to create armor galleries, trophy rooms, or even functional dressing areas near their enchanting stations.
The armor stand recipe demands just two fundamental components, making it accessible even for intermediate players. You’ll need six sticks and one smooth stone slab arranged in a specific pattern at your crafting table.
Crafting Table Arrangement:
- Position the smooth stone slab in the bottom-center slot of the 3×3 grid
- Place three sticks horizontally across the entire top row
- Add one stick in the center-middle position
- Complete the structure with two sticks flanking the slab on both sides
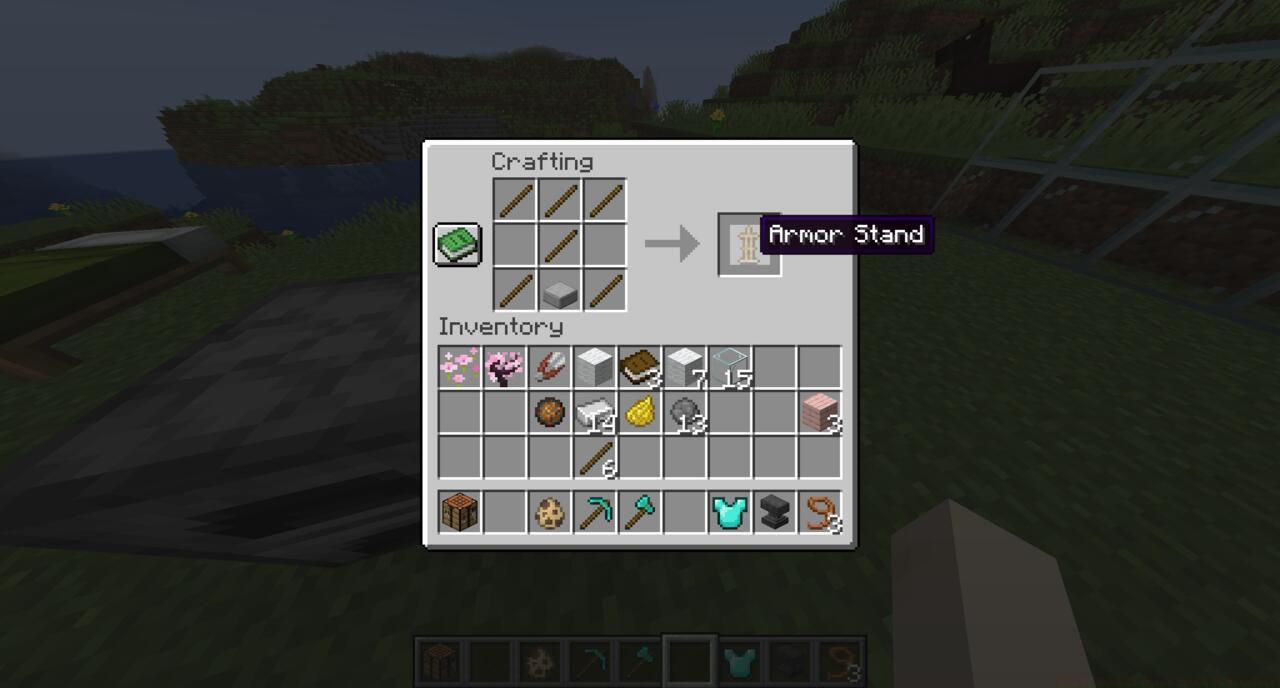
The recipe for an Armor Stand in Minecraft
Material Acquisition Strategies:
Sticks represent one of Minecraft’s most fundamental resources. Create them by vertically stacking two wooden planks of any variety at a crafting station, which generates four sticks per craft. For the required six sticks, you’ll need approximately four planks total, though crafting extra provides insurance against mistakes.
Smooth stone slabs require slightly more processing. First, mine regular stone blocks with a pickaxe, then smelt them into smooth stone in a furnace. Finally, place three smooth stone blocks horizontally across the bottom row of your crafting table to yield six slabs.
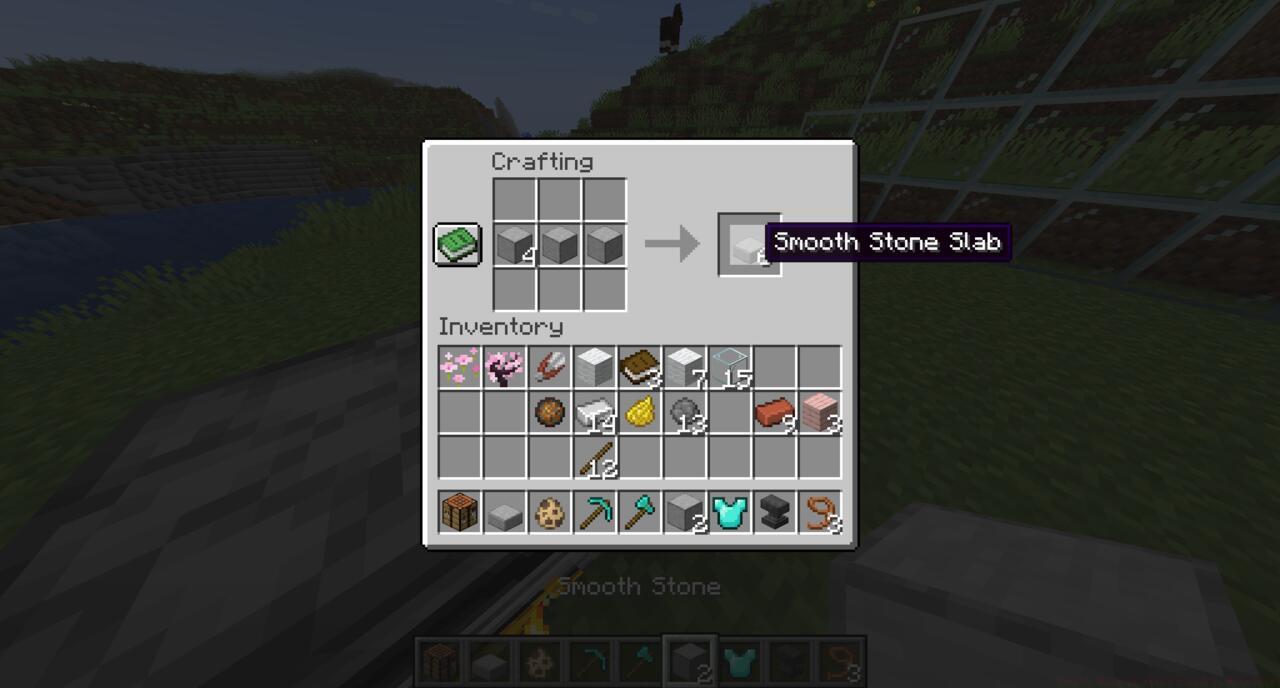
The recipe for a Smooth Stone Slab in Minecraft
Common Crafting Mistakes to Avoid:
- Don’t confuse smooth stone slabs with other slab variants—only the smooth stone variety works
- Avoid placing materials in incorrect grid positions; the pattern is specific
- Ensure you have adequate workspace lighting to see the crafting grid clearly
- Double-check that you’re using a crafting table rather than your personal 2×2 grid
Once mastered, basic armor stand creation opens numerous possibilities for sophisticated displays and functional implementations throughout your Minecraft world.
Creative Placement and Arrangement:
Consider creating thematic armor galleries that tell stories—arrange stands chronologically to display your progression from leather to diamond, or organize by function with combat, exploration, and specialized sets grouped together. For castle builds, flank entrances with armored sentries, or create dressing rooms adjacent to your sleeping quarters.
Interactive Displays with Redstone:
Advanced players can integrate redstone mechanisms to create rotating displays, hidden armor rooms, or even automated dressing systems that equip specific sets with the flip of a lever.
Multi-Stand Installations:
Don’t limit yourself to single stands. Create impressive collections by grouping multiple stands together, perhaps displaying every armor type in the game or creating a “hall of heroes” with stands representing different playstyles. This approach not only showcases your collection but also helps you quickly identify and access specific gear sets when needed.
Understanding these advanced techniques can enhance both the aesthetic appeal and functionality of your Minecraft base. For more comprehensive building strategies, check out our Complete Guide to strategic base design.
More Minecraft Guides:
- How To Make A Lead In Minecraft
- How To Make Bricks In Minecraft
Action Checklist
- Gather 4 wooden planks and convert them into 8 sticks at crafting table
- Mine 3 stone blocks, smelt into smooth stone, then craft into slabs
- Arrange materials in precise crafting table pattern
- Plan display location considering both aesthetics and accessibility
- Experiment with advanced placements and redstone integrations
No reproduction without permission:SeeYouSoon Game Club » How To Make An Armor Stand In Minecraft Complete guide to crafting and using armor stands for displaying your Minecraft achievements