TL;DR
- Shields provide crucial protection against arrows and melee attacks in combat situations
- Crafting requires only iron ingots and wooden planks arranged in specific patterns
- Customization through colored banners allows for personal style expression
- Proper timing and positioning maximize defensive effectiveness during battles
- Resource management ensures shield availability throughout your Minecraft journey
Mastering shield usage represents one of the most effective defensive strategies available to Minecraft adventurers. While standard armor provides baseline protection, shields offer specialized defense capabilities that can dramatically improve your survival odds in dangerous encounters.
Shields excel at intercepting projectile attacks from skeletons and blocking close-quarters strikes from zombies or other hostile mobs. Their unique blocking mechanics allow players to absorb damage that would otherwise deplete health points rapidly. Understanding when to deploy your shield versus relying on armor alone can determine success in challenging combat scenarios.
The essential crafting pattern for creating a protective shield
Acquiring the necessary components for shield construction involves straightforward resource collection processes. You’ll need to gather two primary materials: wooden planks and iron ingots, both readily available throughout most Minecraft biomes.
Wood plank production begins with harvesting any tree type using your hands or an axe. Place collected logs into any crafting grid slot to convert them into planks—each log generates four planks, providing ample material for multiple shields. For iron ingots, locate iron ore deposits typically found between bedrock and sea level in stone formations. Mining iron ore requires at minimum a stone pickaxe; wooden tools will destroy the ore without yielding resources.
Smelting raw iron ore in a furnace produces usable ingots. Fuel sources like coal, charcoal, or wooden planks power the smelting process. Each iron ore block yields one iron ingot when processed correctly. Strategic mining sessions in cave systems or mountain ranges often provide sufficient iron for several shields and other essential tools.
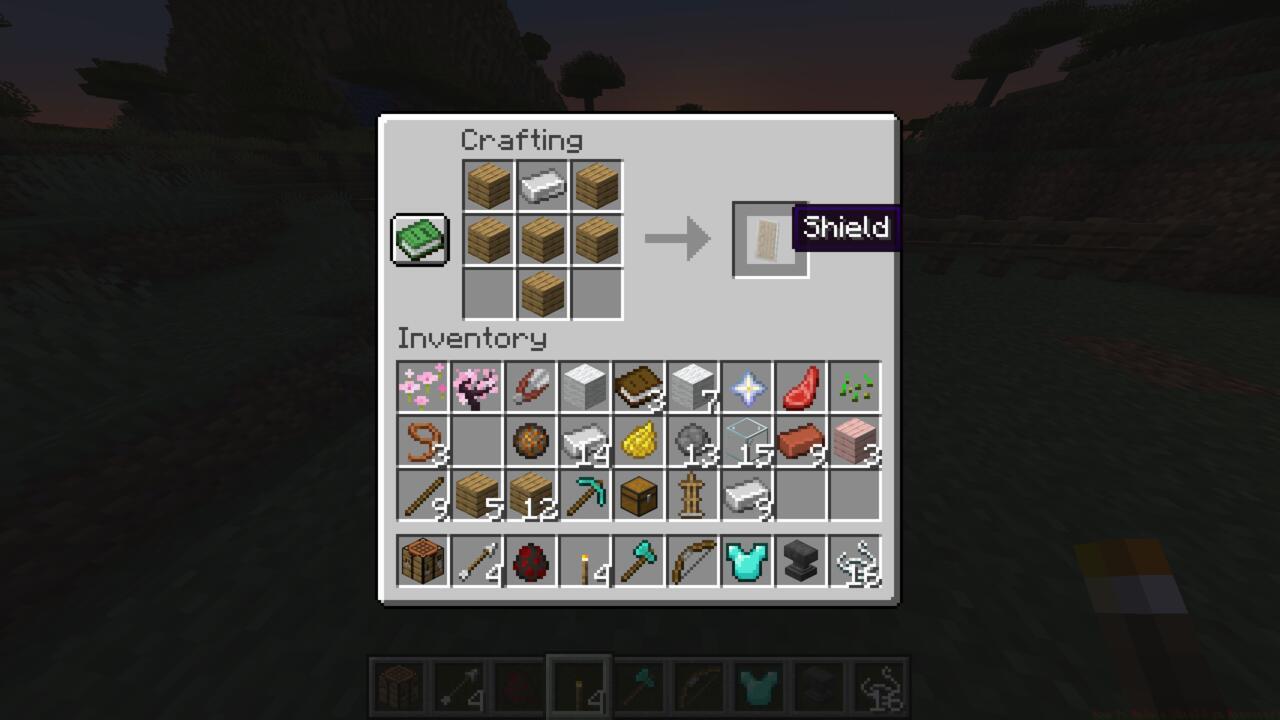
The shield crafting arrangement follows a distinctive pattern that may seem unconventional to new crafters. This specific configuration ensures structural integrity for maximum defensive capability when facing enemies.
Begin by accessing a crafting table to utilize the full 3×3 grid. Position a single iron ingot in the center slot of the top row—this forms the shield’s protective core and handle. Surround this central component with six wooden planks arranged in an inverted U-shape pattern.
Place two planks horizontally adjacent to the iron ingot in the top row, completely filling that tier. The middle row requires three consecutive planks across all slots, creating the shield’s main body. Finally, position the sixth plank directly beneath the iron ingot in the bottom row’s center position.
Common mistakes include misplacing the iron ingot or using insufficient planks. Double-check your pattern matches the visual guide before completing the craft. Once properly arranged, the shield icon will appear in the result box—simply drag it to your inventory to complete the process.
Personalizing your shield’s appearance adds both aesthetic appeal and potential tactical advantages. Custom-colored shields can help coordinate with team members during multiplayer sessions or simply express your personal building style.
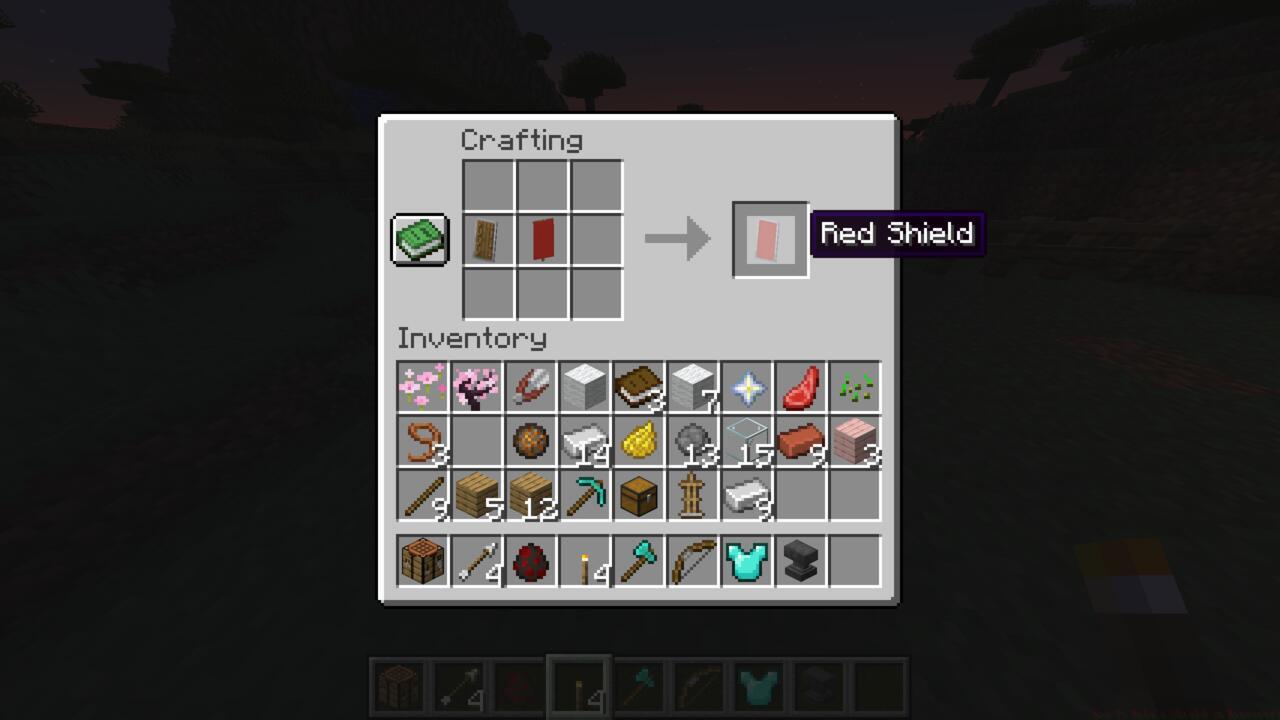
Banner creation precedes shield decoration. Craft colored banners using six wool blocks of any hue arranged across the top two rows of the crafting grid, with a single stick placed in the bottom center slot. Wool colors determine your banner’s primary shade, which will transfer to the shield during customization.
To apply your custom design, place both the plain shield and colored banner into the crafting grid in any arrangement. The resulting item combines the banner’s pattern with the shield’s defensive properties, creating a unique protective item.
Transforming standard shields into personalized defensive gear
Advanced customization involves creating complex banner patterns using multiple colored wool layers. These intricate designs require additional crafting steps but result in truly distinctive shields that stand out during gameplay. Remember that customization doesn’t affect defensive capabilities—only visual appearance.
Experienced Minecraft players develop sophisticated shield techniques that maximize defensive potential. Mastering the timing of shield deployment proves crucial—raising your shield moments before impact conserves durability while providing full protection.
During combat, alternate between blocking and attacking rather than maintaining constant defense. Shields have limited durability and will eventually break if subjected to continuous assault. Monitor your shield’s condition in the inventory screen and craft replacements before critical failure occurs.
Positioning matters significantly when using shields against multiple opponents. Angle yourself to force enemies into single-file approaches where your shield can effectively neutralize their attacks. Against skeleton archers, advance while blocking arrow volleys, then quickly switch to weapons for counterattacks during reload periods.
Shield management becomes particularly important when exploring dangerous territories like the Nether or battling the Ender Dragon. Always carry backup shields during extended expeditions, as unexpected encounters can rapidly degrade your primary defense. For comprehensive combat preparation, consult our BF6 Weapons Unlock Guide to understand how defensive and offensive gear complement each other in survival scenarios.
Understanding shield mechanics within Minecraft’s broader combat system enhances overall gameplay effectiveness. As you master these techniques, consider exploring our Battlefield 6 Complete Guide for additional strategic insights that translate well across different gaming environments.
Action Checklist
- Gather 6 wooden planks from any tree type
- Mine iron ore using stone pickaxe and smelt into ingots
- Arrange materials in crafting table using specific pattern
- Practice shield timing against skeleton arrows
- Create colored banner and customize shield appearance
No reproduction without permission:SeeYouSoon Game Club » How To Make A Shield In Minecraft Master Minecraft shield crafting with expert tips for protection and customization