TL;DR
- Compasses point toward your original spawn point, not your bed
- Requires 4 iron ingots and 1 redstone dust in specific crafting pattern
- Iron ore requires stone pickaxe, redstone needs iron pickaxe minimum
- Compass functionality changes in Nether and End dimensions
- Combine with maps for comprehensive navigation system
Navigating Minecraft’s vast landscapes becomes significantly easier when you master directional tools. A compass provides constant orientation by pointing toward your world spawn point, the location where you first entered the game world. This differs from bed respawn points, making compasses particularly valuable for players who establish multiple bases or explore extensively.
Getting disoriented ranks among the most frustrating experiences for Minecraft adventurers. Whether you’ve ventured too far while resource gathering or need to return to specific biomes for rare materials, maintaining spatial awareness proves crucial. While maps offer localized terrain details, compasses provide persistent global orientation that works across all loaded chunks.
Understanding compass mechanics early enhances your survival gameplay significantly. Unlike many advanced tools, compass crafting requires relatively accessible materials, positioning it as one of your first essential utility items. The psychological security of knowing your cardinal directions cannot be overstated when exploring unfamiliar territories.
The compass recipe demands strategic material placement on your crafting grid. You’ll need precisely four iron ingots arranged in a cross pattern around a central redstone dust component. This configuration creates the magnetic alignment necessary for the compass to function properly within Minecraft’s physics.
Required Crafting Components:
- 4 Iron Ingots positioned in the north, south, east, and west slots
- 1 Redstone Dust placed in the exact center grid space
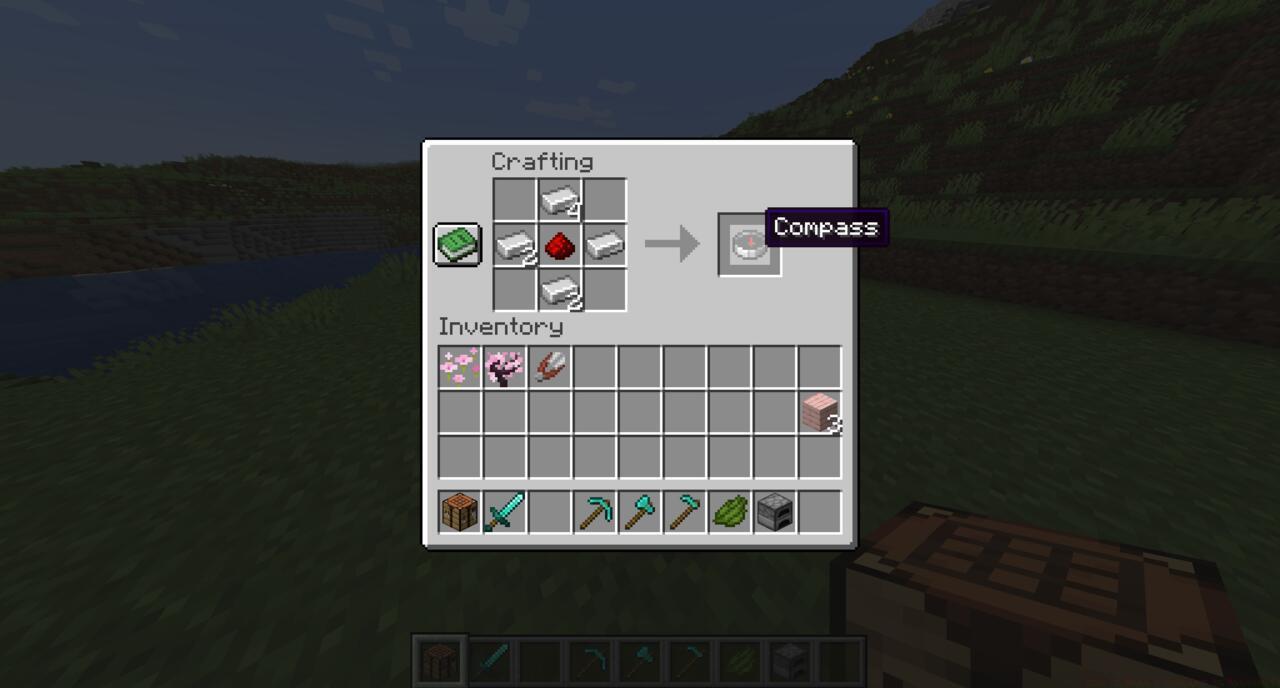
The recipe for a Compass
Iron acquisition begins with stone-tier tools, making it achievable within your initial gameplay hours. The real challenge often lies in locating sufficient iron ore deposits, which vary significantly by biome generation. Mountainous regions and cave systems typically offer richer iron concentrations, while flat plains may require deeper mining operations.
Redstone collection demands upgraded equipment – specifically an iron pickaxe or better. This mineral appears most abundantly between Y-levels 5 and 12, frequently near lava lakes and extensive cave networks. Each redstone ore block yields 4-5 dust when mined with appropriate tools.
Begin your compass creation journey by establishing basic infrastructure. You’ll need a crafting table and furnace as foundational workstations. The production pipeline flows from raw material gathering through processing to final assembly.
Iron Production Sequence:
First, craft a stone pickaxe using three cobblestone and two sticks. This enables iron ore mining, which appears as speckled grey blocks with peach-colored spots. Mine at least four iron ore blocks to meet recipe requirements.
Next, construct a furnace from eight cobblestone blocks arranged in a square pattern. Fuel it with coal or charcoal, then smelt your iron ore into purified ingots. Each ore block transforms into one iron ingot after approximately ten seconds of smelting.
Redstone Acquisition Protocol:
With iron ingots available, craft an iron pickaxe – the minimum tool tier capable of harvesting redstone ore. Descend to lower cave levels where redstone generates abundantly. The distinctive red-speckled blocks glow faintly, making them easier to spot in dark environments.
Final assembly occurs on the 3×3 crafting grid. Position one iron ingot in each of the four cardinal direction slots (top, bottom, left, right). Place the redstone dust precisely in the center grid position. This arrangement creates the magnetic alignment mechanism that powers the compass’s navigation capabilities.
Understanding compass limitations proves as important as mastering its creation. Compasses point exclusively toward your original world spawn point, not toward beds or other respawn locations. This becomes particularly relevant when establishing remote bases far from your initial starting area.
Dimensional Behavior:
In the Overworld, compasses function normally. However, when entering the Nether or End dimensions, compass needles spin randomly due to altered magnetic fields. This intentional game mechanic encourages players to develop alternative navigation methods for extra-dimensional exploration.
Seasoned players often combine compasses with maps for comprehensive orientation. Place a compass in the center of eight paper pieces to create an empty map, which then fills with terrain data as you explore. This combination provides both local detail and global direction simultaneously.
Pro Navigation Techniques:
- Establish waypoint towers with distinctive markers at important locations
- Use coordinates (F3 screen) for precise location tracking when compasses prove insufficient
- Create trail markers using torches, blocks, or signs when exploring unfamiliar terrain
- Combine compass direction with sun/moon movement patterns for backup orientation
Common mistakes include assuming compasses point toward beds and attempting to use them in other dimensions. Always verify your spawn point location before relying heavily on compass navigation for critical journeys.
More Minecraft Guides:
-
How To Make Concrete In Minecraft
Action Checklist
- Craft stone pickaxe (3 cobblestone + 2 sticks)
- Mine 4+ iron ore blocks at mountain or cave locations
- Build furnace and smelt iron ore into ingots
- Craft iron pickaxe, mine redstone ore at Y-levels 5-12
- Arrange 4 iron ingots in cross pattern with redstone center
No reproduction without permission:SeeYouSoon Game Club » How To Make A Compass In Minecraft Master Minecraft navigation with essential compass crafting techniques and advanced directional strategies