TL;DR
- Acquire Factory ID card from B4 door area by shooting a crate behind gates
- Memorize three chemical symbols from upper floor terminal in Chemical Engineering
- Reset water pressure using red button and match numbers to tank symbols
- Access Industry top floor armory case using terminal file percentages
- Permanently unlock Redacted blueprint for DG-56 assault rifle
Mastering the initial step of obtaining the Factory ID card requires strategic landing and precise execution. This crucial item serves as your gateway to accessing restricted areas throughout Rebirth Island’s industrial complex.
Season 3’s revival of Rebirth Island introduces complex Easter egg challenges that demand both navigation skills and puzzle-solving abilities. The Factory POI contains the essential identification card needed to progress through subsequent stages of this multi-step quest.
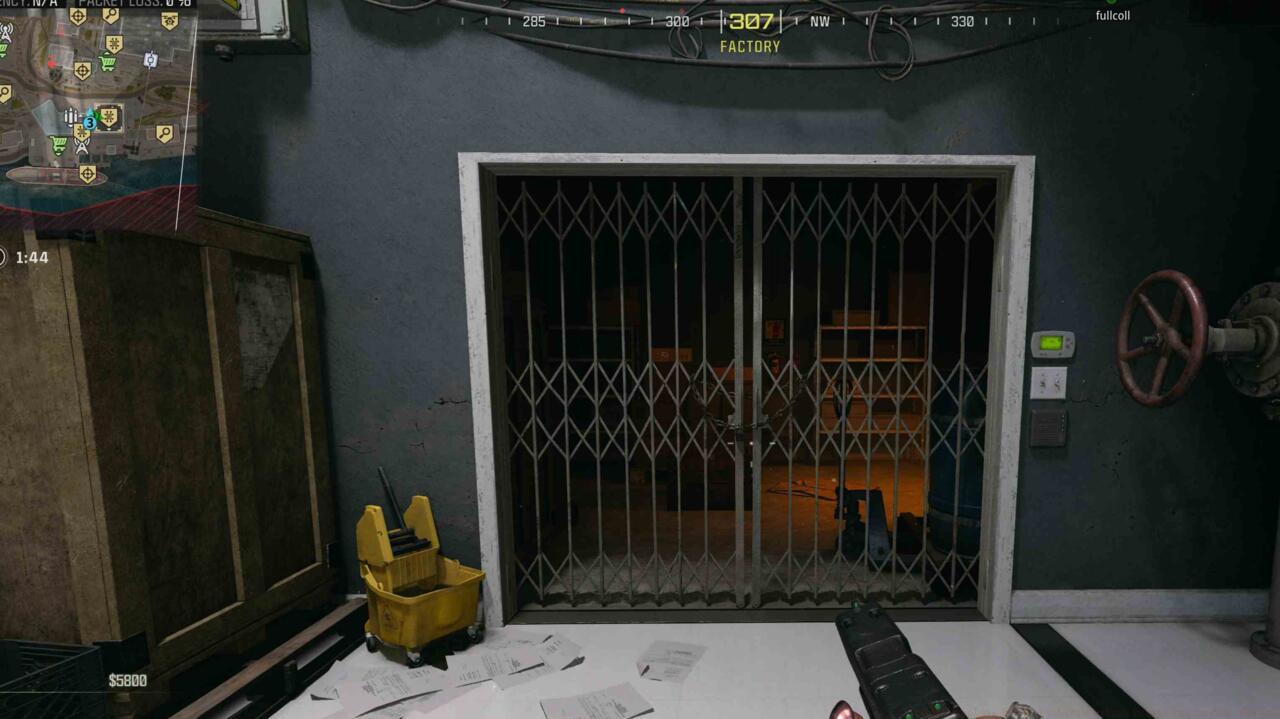
Factory ID card location – Note the gated room positioning relative to B4 entrance
Begin your approach by targeting the lower balcony section of Factory, then proceed through the clearly marked B4 doorway. Experienced players recommend landing during quieter match moments to avoid early combat interference with the puzzle sequence.
Position yourself near the staircase area where you’ll encounter a secured room with visible barriers. Though the gate remains impassable, the contained crate is vulnerable to ballistic damage. Carefully aim your shots to destroy this container, revealing the essential ID Card item that must be collected to advance.
Pro Tip: Use suppressed weapons when shooting the crate to maintain stealth and avoid alerting nearby squads to your location and objective progress.
After securing the Factory ID card, your next destination is Chemical Engineering’s upper levels where critical symbol information awaits. This stage demands both observation skills and memory retention for successful completion.
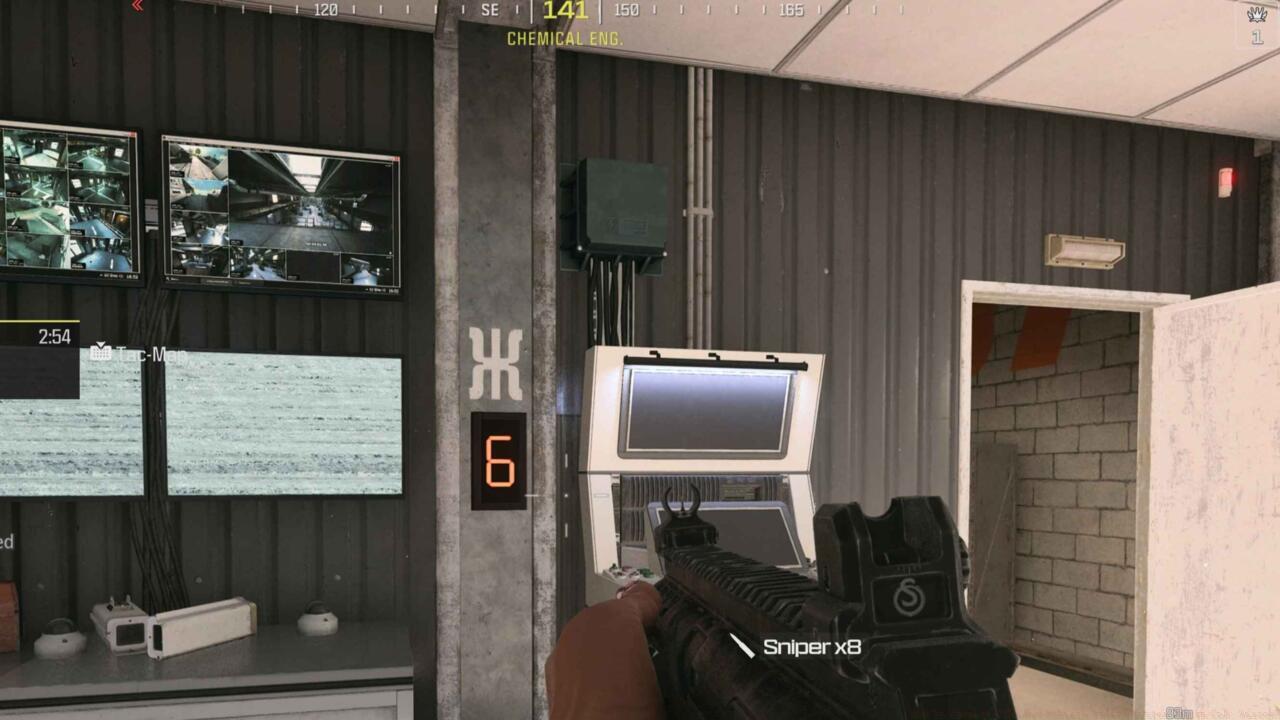
Chemical Engineering upper floor PC terminal – Interface displaying the three essential symbols
The computer terminal located on Chemical Engineering’s upper floor displays three distinct symbols that must be memorized precisely. Common errors include confusing similar-looking icons or failing to note the exact sequence, which will cause failures in subsequent steps.
Mid-level Chemical Engineering symbol – Secondary verification point for symbol accuracy
Advanced players suggest using the screenshot function or mobile device camera to capture the symbol sequence, though this must be done quickly as the terminal area often attracts enemy attention.
Critical Insight: The symbols represent chemical compounds related to the facility’s purpose, and understanding this context can help distinguish between visually similar patterns when memory becomes uncertain during pressure situations.
Navigation through Chemical Engineering requires understanding the facility’s vertical layout. The terminal is typically accessed via central staircases or exterior ziplines, depending on your approach strategy and current circle positioning.
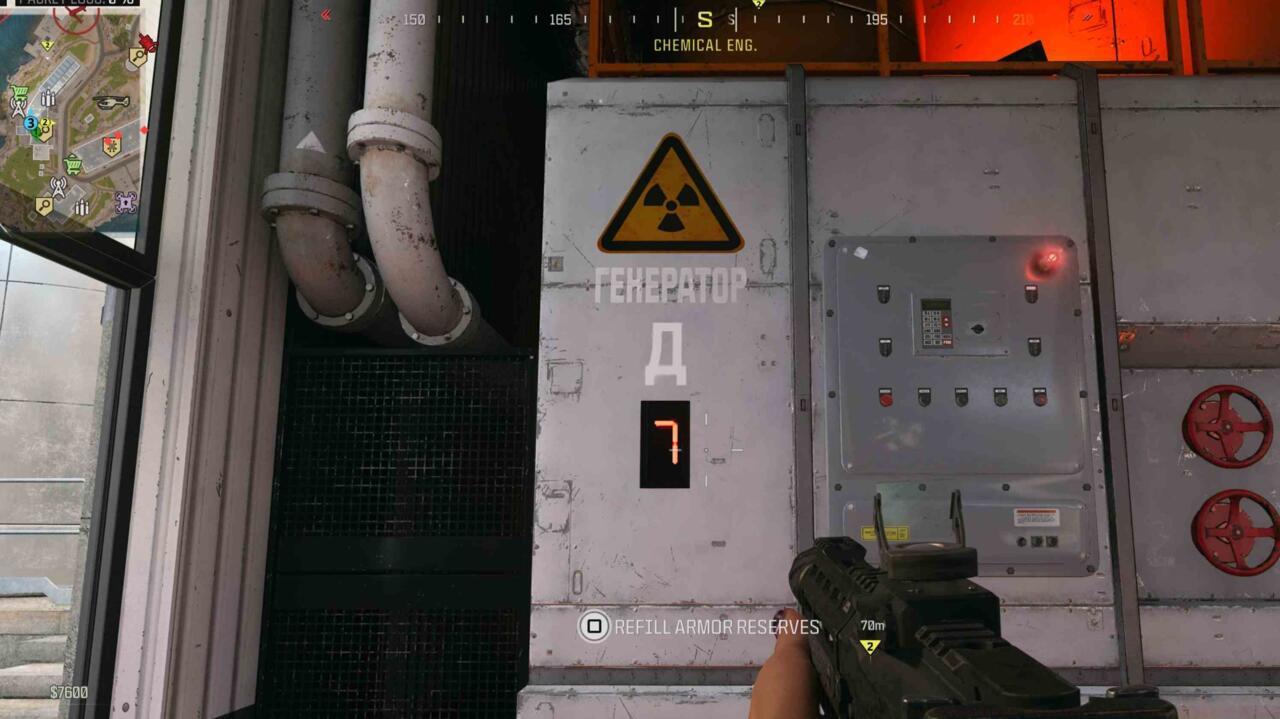
The water pressure regulation phase presents both mechanical and memorization challenges. This step requires coordinating information from the previous terminal with physical interaction points throughout the facility.

Chemical Engineering’s water pressure red button is on the left – Strategic positioning for quick access and cover
Locate the prominent red button positioned conspicuously within the tank control room. This activation point initiates the pressure reset sequence but must be timed carefully to avoid interruption from enemy patrols or circle movements.
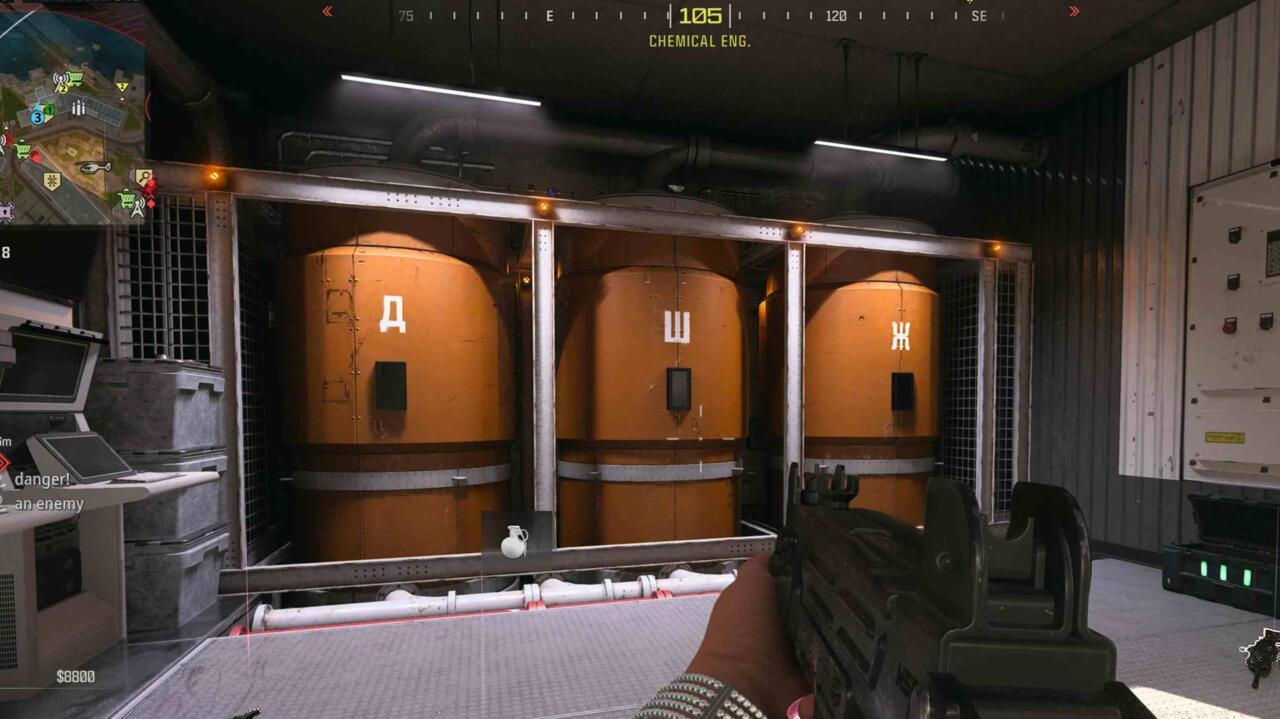
Match the numbers to the symbols on these three tanks – Numerical indicators correspond to memorized symbols
Three distinct orange tanks feature numerical indicators that must be matched to the symbols memorized from the computer terminal. Incorrect matching will require resetting the entire sequence, wasting valuable match time and potentially exposing your position.
Optimization Strategy: Assign team members to cover strategic angles while one player executes the pressure reset, creating a protective perimeter during this vulnerable interaction period.
Pressure regulation follows a specific sequence: activate red button, approach tanks systematically, input symbol-number correlations, then verify system acknowledgement through audio/visual cues.
With the water pressure system properly calibrated, proceed to Industry building’s top level where the prized armory case awaits. This final puzzle combines previous steps into a cohesive unlocking mechanism.

Industry building armory case – Final objective containing blueprint and valuable equipment
The secured armory container houses not only the exclusive weapon blueprint but also practical combat assets including multiple armor vest types and tactical killstreak rewards.
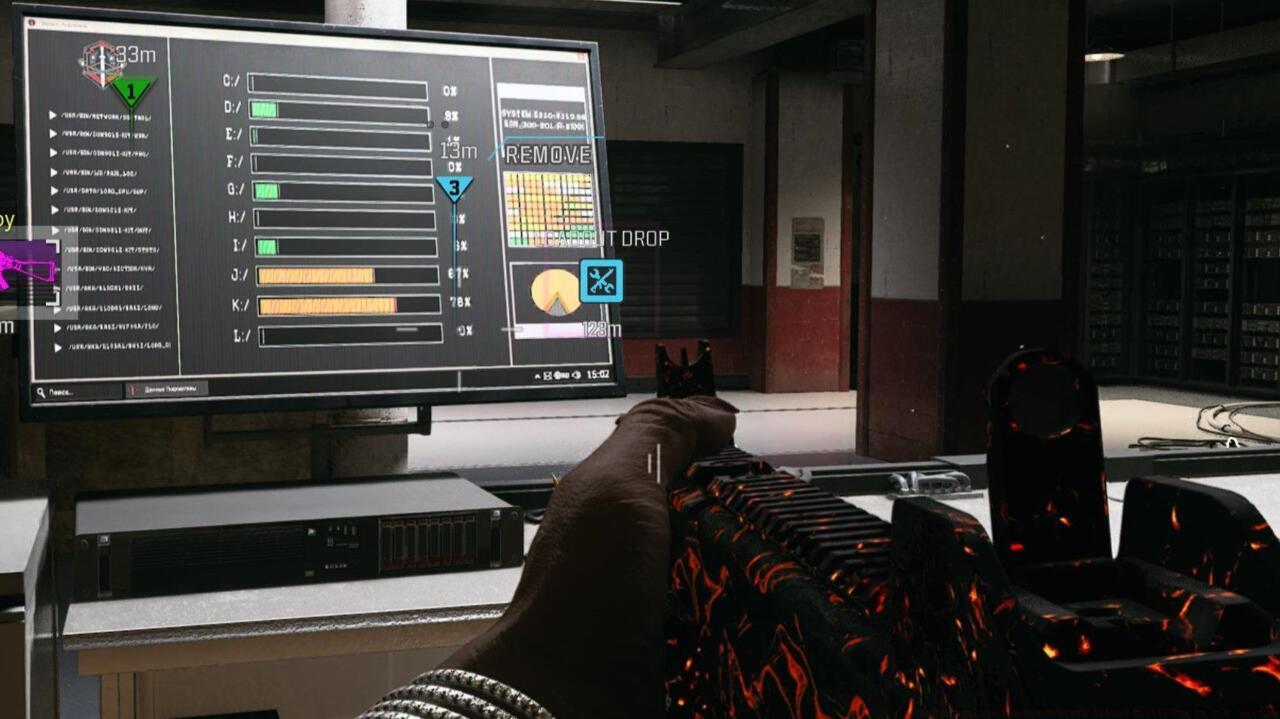
PC file percentages – Interface displaying completion metrics for puzzle verification
Access the computer terminal adjacent to the armory case, which will display file transfer percentages corresponding to your completed objectives. These metrics serve as verification that all prerequisite steps were executed correctly.
Security Bypass: The terminal requires no additional input beyond accessing the interface, as system verification occurs automatically based on your previous actions throughout the match.
Successfully completed percentages will trigger the armory case unlocking mechanism, granting permanent access to its contents for that match and beyond through blueprint acquisition.
For comprehensive loadout strategies and weapon optimization, consult our BF6 Weapons Unlock Guide to maximize your new DG-56’s combat effectiveness across various engagement scenarios.
The culmination of your efforts rewards you with the exclusive “Redacted” weapon blueprint for the DG-56 assault rifle. This visually distinctive variant features unique cosmetic elements and comes pre-configured with optimized attachments.
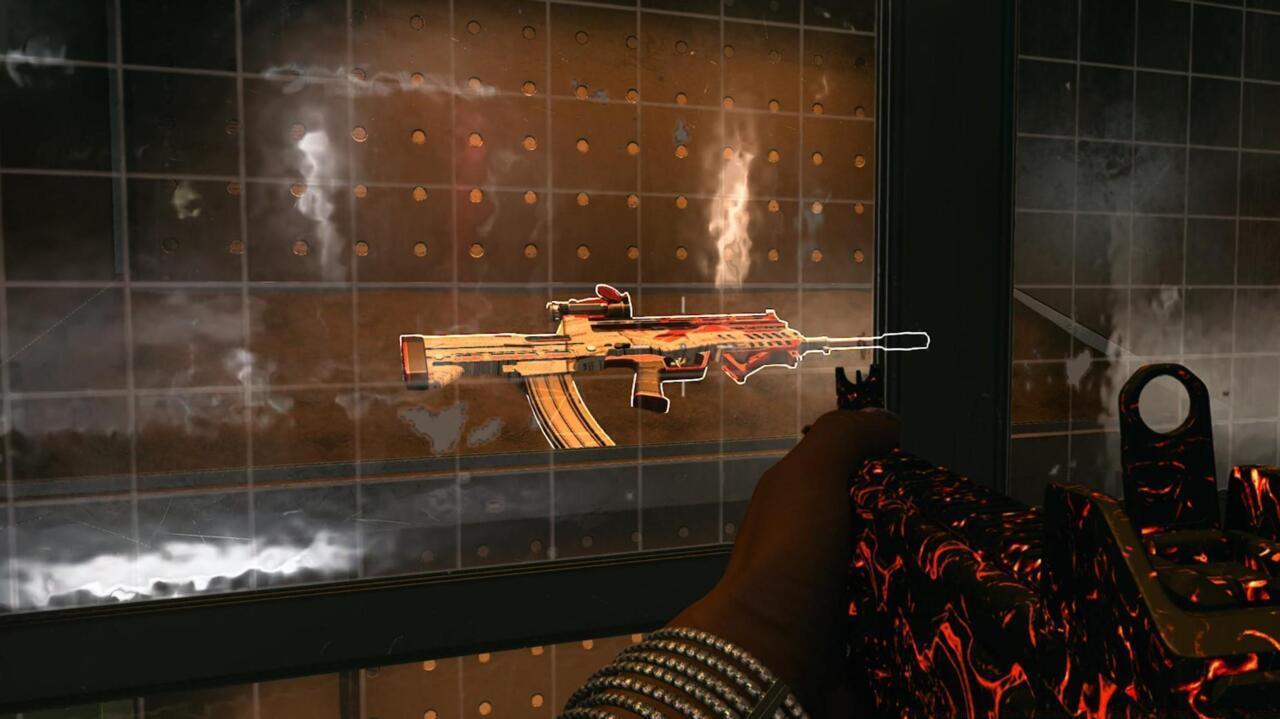
Redacted weapon blueprint for the DG-56 assault rifle – Custom appearance and performance enhancements
Upon successful armory case access, the blueprint immediately integrates into your permanent armory, available for customization and deployment in all subsequent matches.
The DG-56 represents a balanced assault rifle platform suitable for medium-range engagements, and the Redacted blueprint enhances its capabilities through specialized attachment combinations.
Weapon Specifications: The blueprint typically includes optics, underbarrel, muzzle, magazine, and rear grip modifications that synergize for improved accuracy, control, and target acquisition.
To further expand your tactical options and understand how this weapon fits into broader combat roles, explore our Class Selection Guide for specialized loadout configurations.
Blueprint acquisition occurs once per account, making subsequent discoveries in future matches valuable for squadmates but redundant for your personal progression.
For those seeking to master all aspects of modern warfare gameplay, our Complete Guide offers comprehensive strategies beyond weapon unlocks.
Action Checklist
- Land at Factory B4 door, shoot crate for ID card
- Memorize three symbols from Chemical Engineering terminal
- Activate red button and match numbers to tank symbols
- Access Industry top floor terminal to verify percentages
- Collect Redacted blueprint from unlocked armory case
No reproduction without permission:SeeYouSoon Game Club » How To Complete The New Rebirth Island Easter Egg In CoD: Warzone Complete guide to unlock the DG-56 assault rifle blueprint in Warzone's Rebirth Island Industry building