TL;DR
- Target glowing weak points on all four limbs using the Shock Rifle for maximum damage
- Utilize indestructible pillars as cover between attack phases to avoid the devastating Sentinel Beam
- Monitor enemy positioning via mini-map and strafe strategically around cover points
- In later encounters, grapple to distant pillars when environmental hazards activate
- Complete the limb destruction cycle methodically while managing shield regeneration timing
Engaging this advanced Sentinel construct presents a formidable electrical challenge that tests both your aim and tactical awareness.
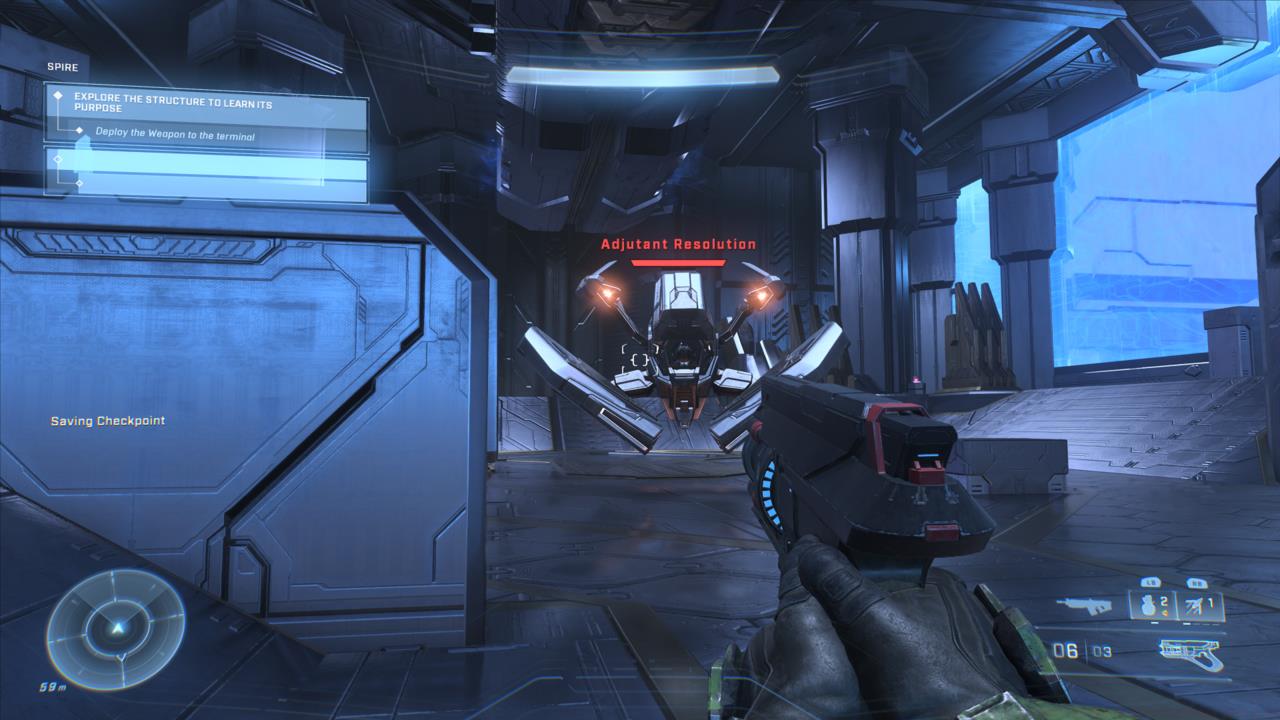
As you progress several hours into Halo Infinite’s campaign narrative, you’ll encounter structured combat scenarios requiring you to overcome powerful adversaries in dedicated boss battle environments. The initial synthetic entity blocking your advancement is the Sentinel designated Adjutant Resolution, whose concentrated hardlight emitter can rapidly deplete your energy shielding if you fail to employ proper defensive measures. This comprehensive guide details the systematic approach needed to successfully neutralize Adjutant Resolution during your Halo Infinite playthrough.
Your confrontation with this aerial artificial intelligence unit occurs in an elevated tower chamber featuring robust structural columns and scattered armament reserves. You’ll immediately observe that Resolution approaches with its quadruple-appendage configuration, each extremity culminating in luminous golden nodes. For experienced gamers, this visual design clearly indicates priority targets: Focus fire on these illuminated vulnerability zones.
Strategic cover usage becomes essential against this particular Sentinel, despite Halo’s typical run-and-gun combat philosophy.
However, the engagement proves more complex than simple target practice. Resolution won’t passively accept your assault. It maintains a potent Sentinel Beam emitter that projects a continuous stream of hardlight particles toward your position, quickly eroding your protective barriers if you remain exposed. The fundamental combat approach therefore involves two critical components: Strike Resolution’s vulnerability points using appropriate weaponry like the Shock Rifle available in nearby weapon caches, then immediately seek protective cover.
The Shock Rifle efficiently disrupts the robotic adversary’s systems—effectively overloading its circuitry—causing its appendages to retract temporarily. During this brief vulnerability window, you can deliver additional damage to its central core (technically its primary optical sensor), but execute these attacks while positioned near protective columns. When Resolution reactivates its offensive protocols, it will aggressively attempt to strike you with an intensified burst from its Sentinel Beam, and your only reliable evasion method involves taking shelter behind these structural pillars.
These architectural supports remain impervious to damage, enabling you to reference your motion tracker display to anticipate the Sentinel’s approach vector and strategically circle to the opposite side of the pillar until the boss requires an energy recharge cycle. During these precious moments, reiterate the destruction process systematically, focusing on one limb segment at a time until you’ve completely exhausted the automaton’s power reserves. Upon successful completion, you’ll advance to the subsequent story segment.
Common tactical errors include remaining exposed too long after damaging weak points and failing to use the mini-map for positional awareness. Advanced players can optimize their approach by timing shield regeneration cycles between attack phases.
For optimal performance, prioritize the following combat sequence: first, position yourself near cover before engaging; second, target one limb completely before transitioning to the next; third, always maintain awareness of at least two potential cover locations; fourth, conserve grapple shot charges for emergency repositioning; fifth, monitor your shield status before initiating each attack phase.
Be aware that you’ll encounter a similar mechanized opponent later in the campaign narrative, situated within a more expansive combat arena. While you can generally implement comparable tactics, during this subsequent engagement, the pillars that form your primary defensive network will periodically retract into the flooring, unexpectedly exposing your position.
In these situations, the crucial additional maneuver you’ll need to incorporate into your strategy involves utilizing your grappling hook to reach more distant pillars that haven’t undergone this treacherous transformation. This technique provides both increased separation distance and, more importantly, positions you behind alternative cover just as the seeking hardlight energy discharge targets Master Chief’s armor.
Pro players should master the timing between pillar retraction sequences, typically occurring every 15-20 seconds. The entire encounter usually resolves within 3-4 minutes for skilled operators, while newcomers might require 6-8 minutes to achieve victory. Understanding the boss’s attack pattern cycles is crucial—it typically fires its beam for 5-7 seconds before requiring a 3-4 second recharge period.
For those seeking to optimize their Class Guide approach to tactical encounters, this boss fight exemplifies the importance of environmental awareness and systematic target prioritization that translates well to other strategic combat scenarios.
Action Checklist
- Acquire Shock Rifle from nearby weapon cache before engaging
- Position yourself near an indestructible pillar with clear sightlines to weak points
- Systematically destroy each glowing limb, one at a time
- Immediately take cover behind pillars when Resolution activates its Sentinel Beam
- Use mini-map to track enemy movement and strafe around pillars accordingly
- In later encounters, utilize grapple to distant pillars when environmental hazards activate
No reproduction without permission:SeeYouSoon Game Club » Halo Infinite Boss Battle: How To Defeat Adjutant Resolution Master the Adjutant Resolution boss fight with expert strategies, common pitfalls to avoid, and advanced combat techniques