TL;DR
- Act 2 introduces advanced combat mechanics requiring strategic stance switching and ghost weapon mastery
- Yarikawa missions demand careful stealth approaches and environmental awareness for optimal completion
- Resource management becomes critical with expanded upgrade options and new enemy types
- Mission pacing requires balancing main objectives with essential side content for character progression
- Advanced parrying techniques and resolve management separate successful players from those struggling
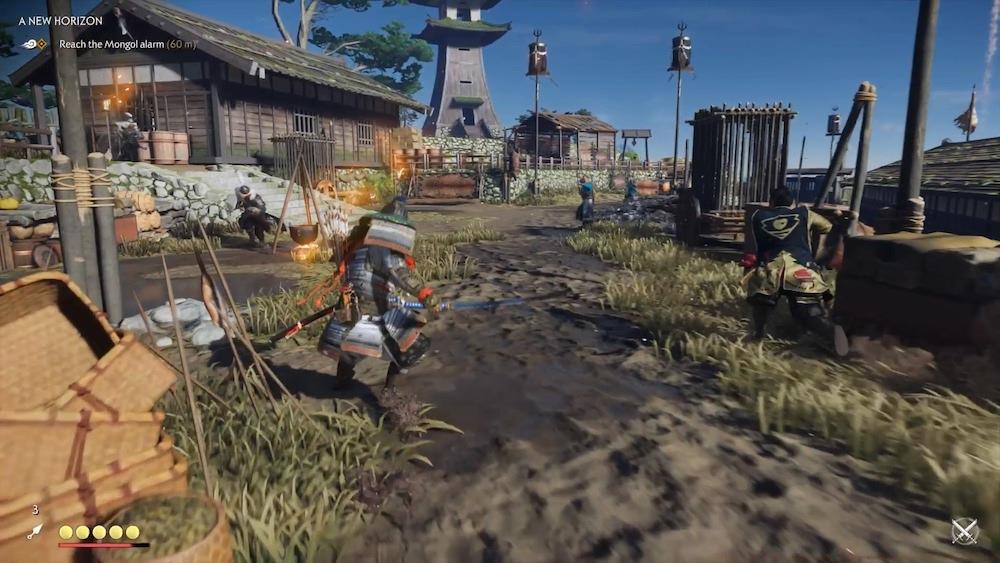
Embarking on Ghost of Tsushima’s second act presents players with significantly heightened challenges that demand refined combat skills and strategic thinking. The game world expands dramatically, introducing new enemy archetypes and complex mission structures that test your mastery of the core mechanics.
Content Advisory: Our guidance maintains minimal narrative reveals to preserve your discovery experience while providing essential tactical support. Should you prefer complete narrative immersion without any preparatory knowledge, we recommend bookmarking this resource for future reference during challenging segments.
Ghost of Tsushima’s middle chapter substantially escalates both the emotional stakes and mechanical complexity. While exploration and personal discovery remain central to the experience, understanding advanced combat systems and mission-specific strategies can dramatically improve your survival odds against increasingly formidable Mongol forces. This comprehensive, spoiler-conscious guide delivers targeted assistance to navigate the most demanding sections of your transformation into Tsushima’s legendary protector.
The following sections provide complete tactical analysis for Act 2’s primary missions (locate Act 1 guidance through our Complete Guide). Explore our additional Ghost of Tsushima resources for detailed coverage of Character Tales, Mythic Tales, and secondary objectives—plus exhaustive guides for acquiring all collectibles and character enhancements.
Before undertaking Act 2’s demanding missions, strategic preparation separates successful players from those who repeatedly face defeat. Your approach to gear selection, ability prioritization, and resource allocation will directly impact mission outcomes and overall progression efficiency.
Combat preparation should focus on mastering at least two primary stances to counter different enemy types effectively. The Stone stance remains essential against swordsmen, while Water stance breakthrough against shield-bearing opponents becomes increasingly valuable. Consider investing in Weapons Unlock strategies to maximize your combat versatility.
Resource management evolves significantly in Act 2, requiring careful planning for upgrade materials. Prioritize obtaining Supplies, Leather, and Steel through systematic exploration rather than random collection. Strategic liberation of Mongol territories not only progresses the narrative but provides substantial resource rewards that accelerate your character development.
Stealth approaches gain importance with the introduction of more perceptive enemies and complex patrol patterns. Upgrade your blowgun and smoke bomb capacities while mastering the chain assassination technique to efficiently neutralize grouped enemies without triggering alarms.
Act 2’s mission structure introduces complex multi-stage objectives that demand adaptive strategies and situational awareness. Each primary quest presents unique challenges that test different aspects of your combat proficiency and strategic thinking.
- A Message In The Fire – This intelligence-gathering mission requires meticulous stealth execution. Utilize tall grass and rooftop pathways to bypass patrols, and time your movements with environmental distractions like wind gusts. Common mistakes include rushing the investigation points and failing to properly survey areas before advancing.
- The Walls of Yarikawa – Fortress assaults demand careful approach planning and enemy prioritization. Identify archer positions first, use ghost weapons to create diversions, and master the timing for breaking through defensive formations. Advanced players should focus on perfecting parry timing against brute enemies who appear more frequently.
- The Coward of Yarikawa – Character-driven missions emphasize dialogue choices and moral decisions that impact narrative outcomes. Strategic positioning during escort segments prevents unnecessary combat encounters and preserves resources.
- The Ghost of Yarikawa – The climactic battle requires mastery of all combat systems. Prepare by ensuring your resolve is maximized, ghost weapons are fully stocked, and appropriate armor is equipped for your preferred combat style. Refer to our Class Guide for principles on role specialization that apply to armor selection.
Mastering Act 2’s expanded gameplay systems requires understanding several advanced mechanics that dramatically improve combat effectiveness and mission efficiency. These techniques often separate experienced players from those struggling with the increased difficulty curve.
Ghost weapon optimization becomes essential with the introduction of new tools like the sticky bomb and hallucination darts. Strategic deployment of these weapons can turn overwhelming encounters into manageable situations by creating distractions and eliminating key targets efficiently.
Stance mastery evolves beyond basic understanding to include fluid transitions during combat. Advanced players learn to switch stances mid-combo to exploit enemy weaknesses, significantly reducing encounter times and preserving health resources.
Environmental combat advantages provide tactical opportunities that many players overlook. Utilizing fire, explosive barrels, and terrain elevation can neutralize multiple enemies simultaneously while minimizing direct engagement risks.
Resolve management takes on critical importance with more demanding healing requirements and expensive legendary techniques. Learning to build resolve efficiently through perfect parries and timely kills ensures you maintain combat sustainability during extended engagements.
Begin by conversing with Lord Shimura, then navigate around the keep’s right side to locate your companions. You’ll find Yuna positioned near the stables before embarking on your mounted journey alongside the jito. This mission serves as an intense combat tutorial where survival and tactical support of allies becomes paramount throughout multiple engagements.
Your initial encounter involves neutralizing a Mongol cavalry patrol. Employ your longbow to eliminate several riders from a distance, significantly reducing their numbers before transitioning to close-quarters combat.
The primary objective shifts to storming Fort Ito. While Shimura proves a formidable combat partner, the sheer volume of defenders demands systematic elimination. Exercise extreme caution around the Mongol Commander within the fortress interior. Pay special attention to Brute Mongols distinguished by their yellow attire and explosive clubs—these enemies ignite their weapons to discharge devastating short-range blasts resembling shotgun fire. When you observe the ignition sequence, execute lateral dodges to evade the blast radius. Strategic positioning can lure opposing forces into the explosion path, effectively turning Mongol artillery against their own ranks.
The mission’s concluding phase involves intercepting reinforcement columns attempting to relieve the besieged fortress. These mounted units arrive pulling explosive-laden carts—any well-placed arrow striking these wagons triggers catastrophic detonations, dismounting riders and initiating conventional combat scenarios.
From this stage forward, Mongol forces increasingly incorporate incendiary tactics into their combat doctrine. Expect encounters with sword-wielding troops using flaming blades and archers employing fire arrows. If ignited, utilize the combat roll maneuver to extinguish flames and mitigate damage. While prioritizing archer elimination remains standard procedure, rapidly dispatching shield-bearing enemies with ignited weapons becomes equally critical—employ Water Stance to efficiently stagger these opponents for increased damage output.
Upon achieving total Mongol elimination, accompany Lord Shimura to the coastal lighthouse to conclude the narrative segment through cinematic sequences. You’ll now face multiple new objectives that can be approached in any sequence—consult our specialized guides for optimal mission sequencing. We strongly recommend pursuing Mythic Tales and Character Tales concurrently, as these supplementary missions provide substantial character enhancement and narrative cohesion when completed near their initial availability windows. For comprehensive Character Tale guidance, reference our exhaustive Tales of Tsushima side-quest compendium.
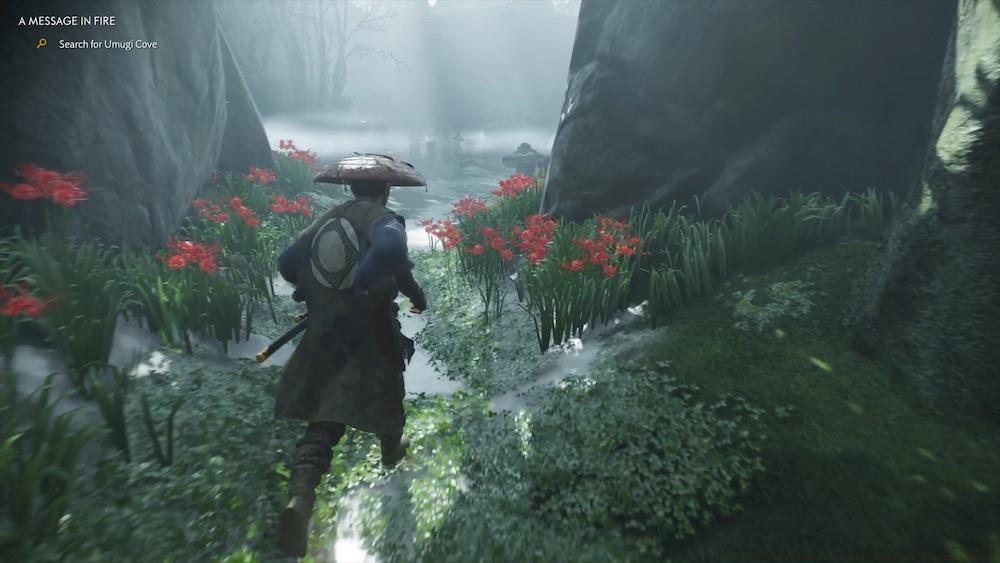
Initiate this mission by locating Goro in Umugi Cove. Proceed to the designated area in western Umugi Prefecture, adjacent to Lady Sanjo’s Bridge. Identify the settlement by following crimson floral markers along the stone pathway. Should these blossoms form transverse barriers, you’ve deviated from the correct route—proper navigation features blossoms flanking the path edges. Successful navigation rewards you with the Umugi Trophy upon entry.
Upon town discovery, a courier escorts you to settlement leader Lady Sanjo, who directs you to Goro’s subterranean location. After conversing with him and proceeding to his residence, confront the approaching Straw Hat ronin before journeying eastward to locate Lord Shimura at Firefly Marsh. Following dialogue completion, trail Shimura to Fort Mitodake.
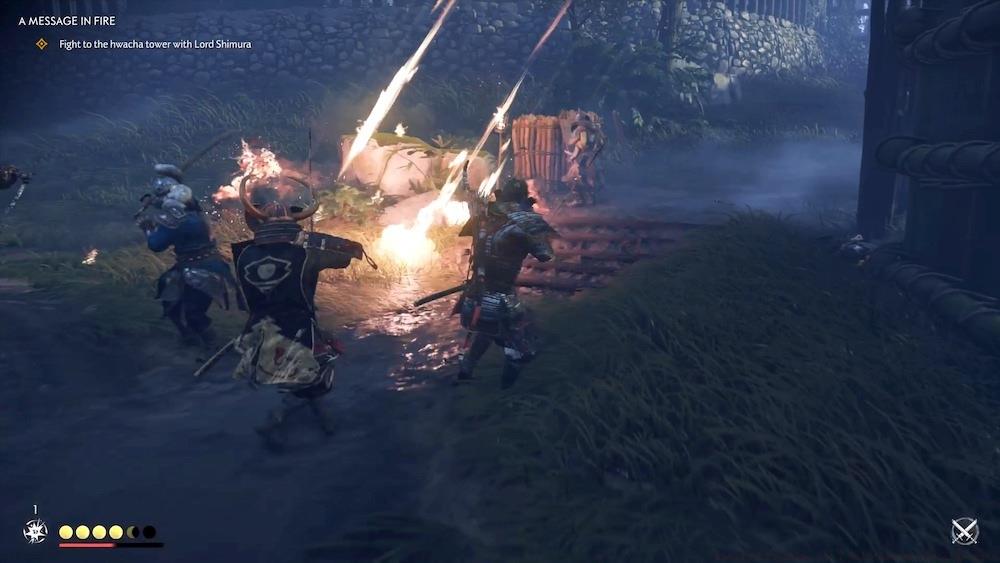
You and Lord Shimura execute a direct assault on the fortress, necessitating Samurai Clan armor optimization. Employ archery to neutralize distant threats, particularly Mongol archers, to facilitate safer approach vectors. Midway through the fortress penetration, Mongols deploy a hwacha siege engine—a devastating weapon unleashing volleys of incendiary arrows. While the fundamental combat dynamics remain consistent, you must vigilantly avoid the white targeting circles periodically materializing on the terrain—these indicate impending hwacha strike zones. Note that strategic positioning can manipulate enemies into these target areas, allowing allied artillery to eliminate them for you.
Advance systematically toward the hwacha tower. You’ll eventually confront a Mongol Commander, though Shimura’s support renders this engagement manageable. As proximity to the siege weapon decreases, hwacha fire intensity escalates—execute sprint maneuvers for the final approach to the ladder. Upon arrival, rapidly eliminate defending archers before commandeering the hwacha to target Mongol naval assets in the adjacent bay.
This segment involves straightforward naval target elimination using captured hwacha artillery. Account for projectile travel time by leading moving targets appropriately. After destroying initial landing craft, shift focus to shoreline archers and offshore warships. Target crimson explosive barrels visible on all vessels to achieve rapid target neutralization and mission completion.
The Walls of Yarikawa: Stealth Infiltration
Your next objective involves penetrating the besieged Yarikawa Stronghold. Journey to the Ruins of Old Yarikawa Survivor Camp to rendezvous with Yuna, then follow her toward the settlement to commence the narrative arc.
Gaining entry to Yarikawa employs straightforward stealth mechanics. While leading Yuna and Taka into the fortress, detection results in mission failure—however, combat engagement remains unnecessary. Attempting assassinations often triggers unwanted attention, making complete avoidance the optimal strategy. Equip Ronin attire to reduce enemy detection rates, then descend the ridge path toward enemy positions. Approximately midway, drop into a tall grass concealment area. An enemy patrols near a cart in this zone, though elimination proves optional—your primary goal involves sequential grass patch navigation across the camp’s central area.
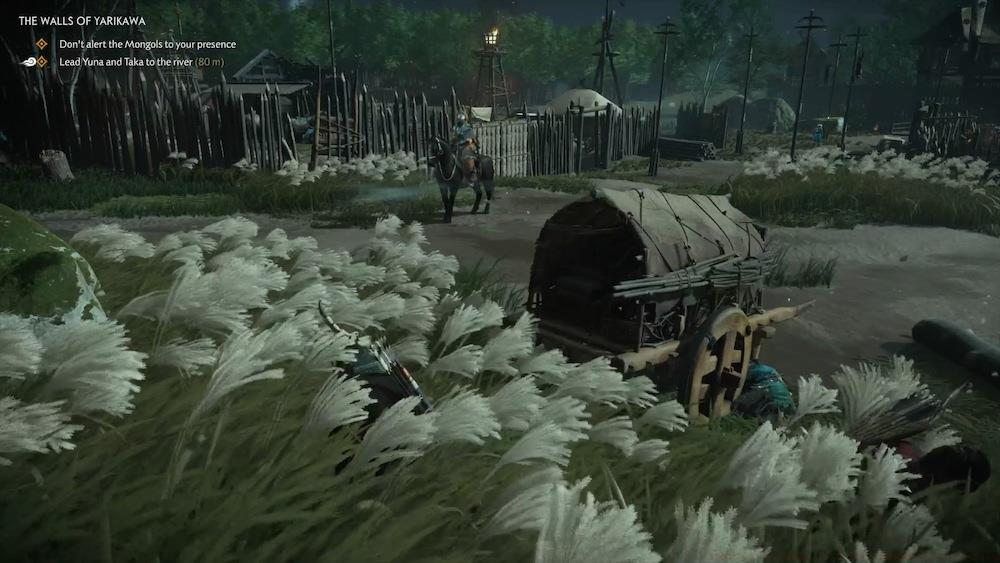
Despite substantial enemy presence, patrol patterns conveniently create avoidance opportunities, including a mounted Mongol circulating the central roadway. Cross to the opposing grass patch and locate a fence aperture. From this position, await a passing patrol, eliminate him discreetly, then advance toward the river and subsequent grass coverage.
Upon reaching the stream, utilize the waterway for concealed movement. Remain within tall grass vegetation while progressing toward the waypoint marker in the larger water body ahead. Mounted enemies near the water’s edge will depart as you approach. Infiltrate through the waterfall-adjacent opening to access Yarikawa Stronghold. Post-dialogue sequences conclude this mission segment and initiate subsequent Yarikawa narrative developments.
The Coward of Yarikawa: Ambush Preparation
Return to Old Yarikawa’s survivor camp vicinity and re-engage Yuna. To earn Yarikawa’s allegiance, locate their missing archer contingent. Search for investigative clues facilitating tracker—you’ll discover them preparing an offensive operation against Mongol forces.
Following coordination with the archers, prepare an ambush position. Before Mongol arrival, identify environmental assets including explosive barrels and wasp nests flanking the roadway. You’ll encounter three assault waves, so allow the initial group full penetration into the engagement zone before initiating hostilities. Optimal elimination methodology involves detonating the large explosive wagon positioned near the architectural archway.
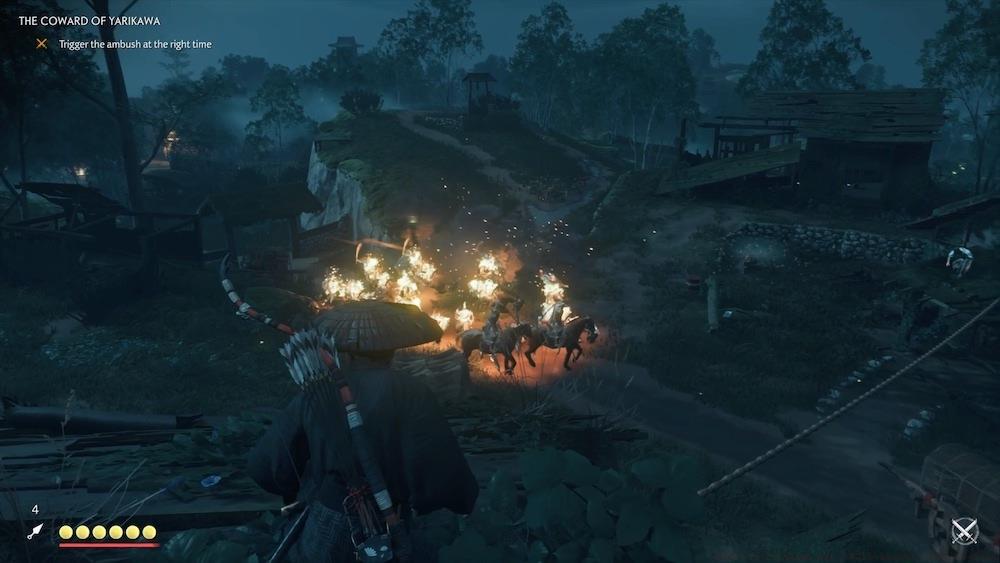
The secondary wave originates from your position’s left flank, comprising primarily archers—activating the adjacent wasp nest effectively disrupts their formation. The concluding wave incorporates multiple Mongol Brutes resistant to conventional archery—descend and eliminate them with bladed combat. A Mongol Commander accompanies this group, though remaining environmental distractions provide tactical advantages. Throughout the engagement, ensure Taka’s survival—his death triggers mission failure and checkpoint restart. Upon total Mongol neutralization, cinematic sequences conclude this mission chapter.
The Ghost of Yarikawa: Final Duel Strategy
Return to Yarikawa Stronghold for the decisive confrontation against Mongol forces. Consult Taka upon arrival, then proceed to the central keep for dialogue with Yuna. Following cutscene completion, the Mongol assault commences with defensive combat as your primary objective.
Strategic complexity remains limited here. Proceed to the designated gateway where Mongols breach defenses. Ensure appropriate armor configuration—Samurai Clan Armor typically excels, though Ronin attire provides beneficial Resolve enhancements. Employ varied combat stances combined with archery and Ghost weaponry for crowd management and force reduction.
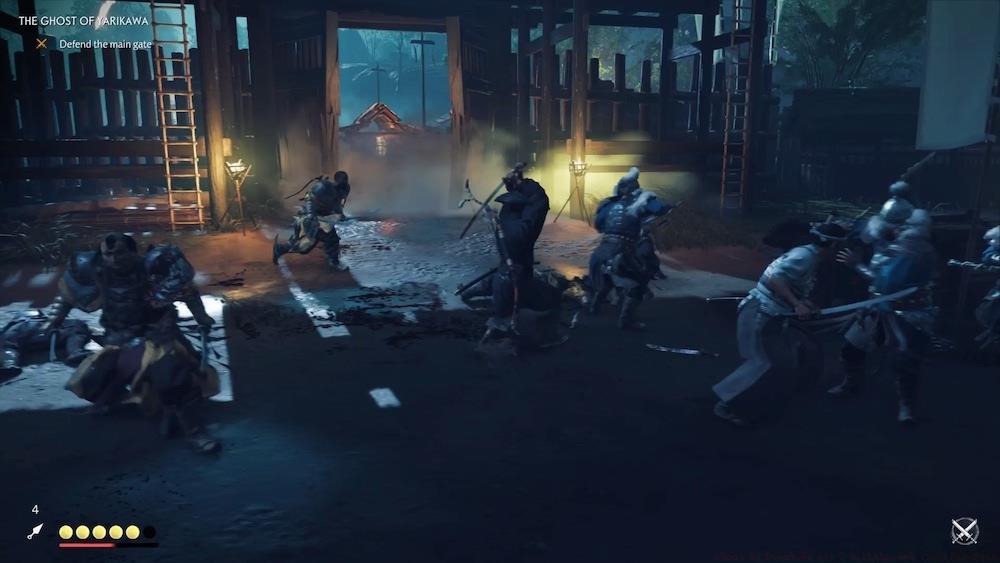
After eliminating all combatants at the primary entrance, Mongols penetrate the northern gateway. Follow the rightward path to engage that combat zone. The tactical situation mirrors previous engagements—repel all infiltrating forces. When Yuna announces additional enemies assaulting the bridge, utilize your bow for suppression—explosive arrows prove particularly effective in this scenario.
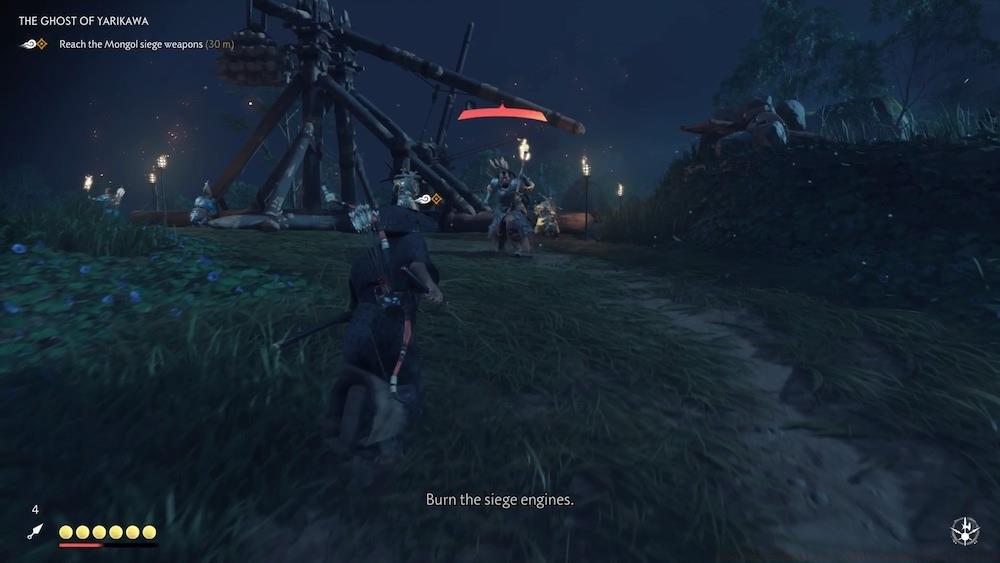
Neutralize all northern gate defenders, prompting Mongol deployment of siege artillery against the settlement. Your new objective involves covertly exiting through the enemy encampment to disable siege weapons, though “covert” remains relative terminology and minor engagements won’t critically impede progress. Maintain tall grass concealment whenever possible, though any combat encounters should remain limited in scale, provided you avoid rapid engagement with multiple enemy clusters.
Advance uphill systematically. You’ll encounter various enemies during ascent, including archers and a Brute, with additional defenders guarding the siege engines at the summit. Destroying one engine triggers reinforcement spawns to protect the remaining unit—prioritize archer elimination, as their incendiary arrows can ignite you, creating additional combat complications.
Following siege engine destruction, return downhill toward Yarikawa Stronghold. Utilize the grappling hook for descent. The favorable tactical development involves most Mongols now facing the settlement rather than your approach vector, enabling stealth approaches and assassination opportunities during return to the fortress walls. Despite Jin’s narrative commentary regarding return difficulty, navigation proves straightforward. Penetrate the interior and navigate through Mongol forces to reach the central keep.
The culminating engagement features a duel against General Temuge. This commander favors ignited sword techniques combined with unblockable assaults, frequently following with shield-based unblockable strikes. This creates two-to-three attack combinations requiring evasion—either execute complete backward rolls or prepare for sequential sidesteps to create flank attack opportunities. The most effective damage methodology against Temuge involves Wind Stance flurry attacks.
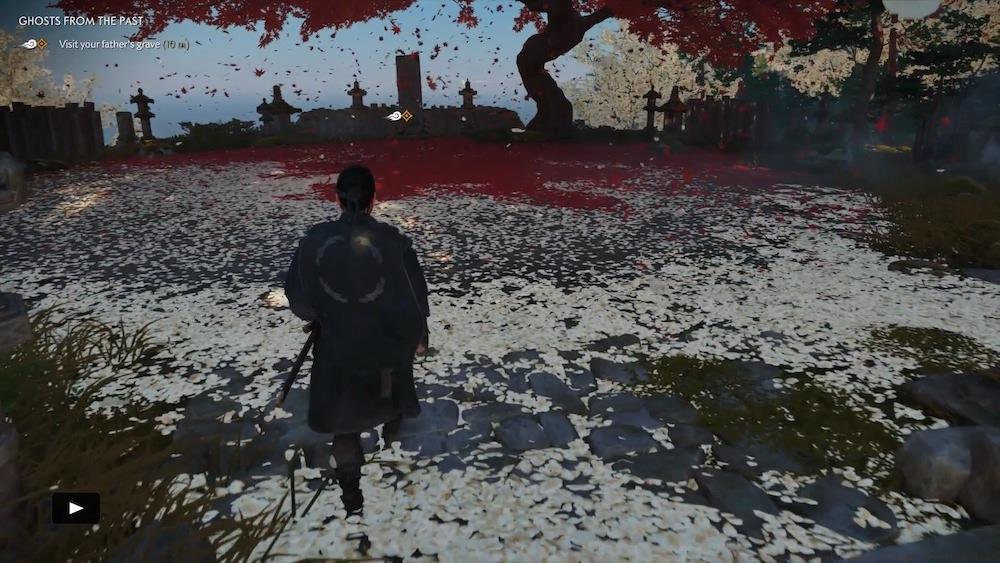
Ghosts From the Past: Sakai Clan Armor Recovery
Your subsequent objective involves retrieving the ancestral Sakai Clan armor from Jin’s childhood estate. Proceed to Sakai Manor near Omi Village and meet Yuriko to initiate this narrative segment. She guides you to the family cemetery, where you can compose commemorative poetry honoring Jin’s father.
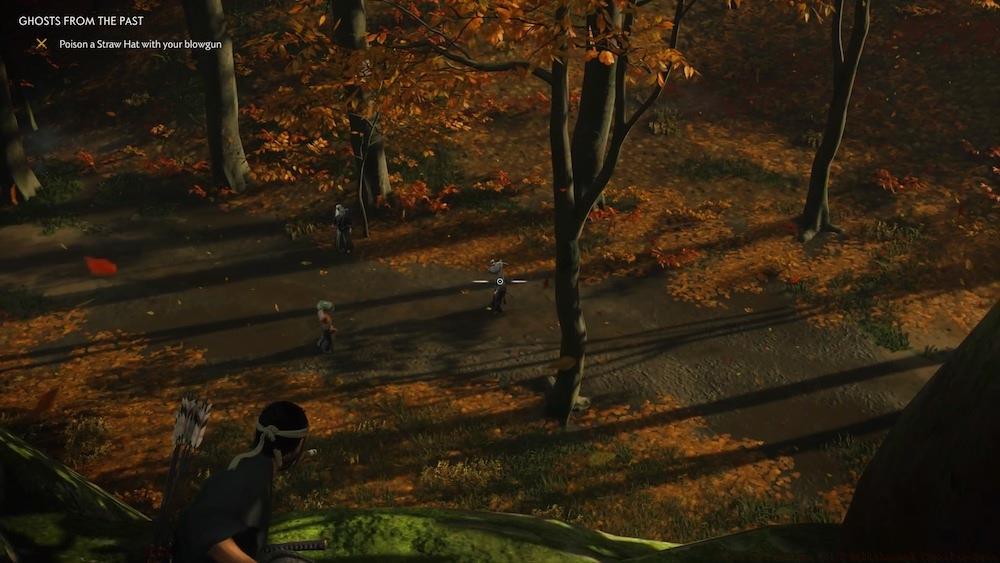
Complete your dialogue with Yuriko before departing to locate blowgun construction materials. The necessary reeds reside beneath Kishibe Village’s stone bridge—acquisition typically requires either stealthy Mongol avoidance or outpost liberation. The stealth approach proves manageable (particularly via aquatic infiltration), though settlement liberation may become necessary eventually regardless. While village reclamation presents combat challenges, the resultant rewards justify the effort.
Return to Yuriko for poison dart acquisition. Test these projectiles against the arriving Straw Hat ronin. Following final conversation with Yuriko, mission completion rewards you with the blowgun weapon system and additional Yuriko character missions that unlock supplementary dart types upon completion.
Your newly acquired armor provides substantial combat benefits. The Sakai Clan Armor delivers battle enhancements for damage output and health comparable to Samurai Clan Armor, while additionally enabling Standoff chain extension to five successive victories with full upgrades.
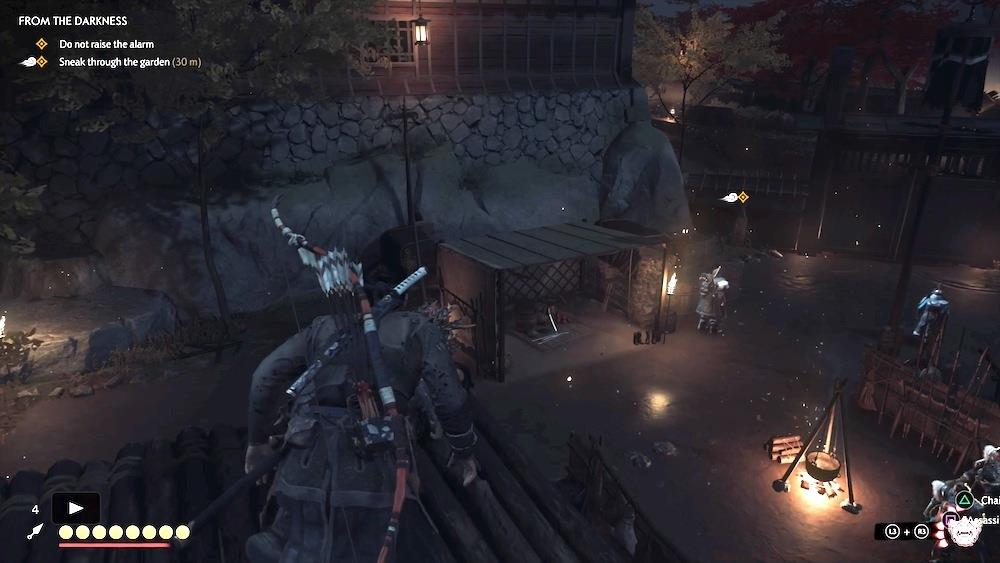
From the Darkness: Ghost Armor Acquisition
The subsequent narrative chapter continues directly from the preceding mission. Dedicate several minutes to weapon and armor enhancement acquisition, plus consultation with all allies, before meeting Yuna for proper mission initiation. She provides the Ghost Armor ensemble, conferring stealth advantages and simplified Ghost Stance achievement.
When prepared, execute solo infiltration of Castle Shimura’s keep sector. Utilize the iron hook for bridge underswing access to the cliffside adjacent to the fortress. Ascend to a building’s side where window entry becomes possible. Exercise patience while eliminating guards undetected; they’ll separate naturally with careful timing, and any alarm activation triggers mission failure with checkpoint reversion.
Once structure clearance completes, proceed to the upper level for Mongol encampment reconnaissance. You must follow the forward path to the exterior courtyard. Despite substantial enemy concentrations, successful navigation remains achievable through methodical, patient movement. This represents another instance where enemy avoidance supersedes elimination in most scenarios where circumvention proves feasible.
Execute rooftop descent and utilize the garden path’s overhead slacklines to bypass most opposition, though you’ll want to eliminate the watchtower archer ahead. At the line’s terminus, drop onto a tent and maneuver behind it to access a wall aperture—await guard departure to avoid detection.
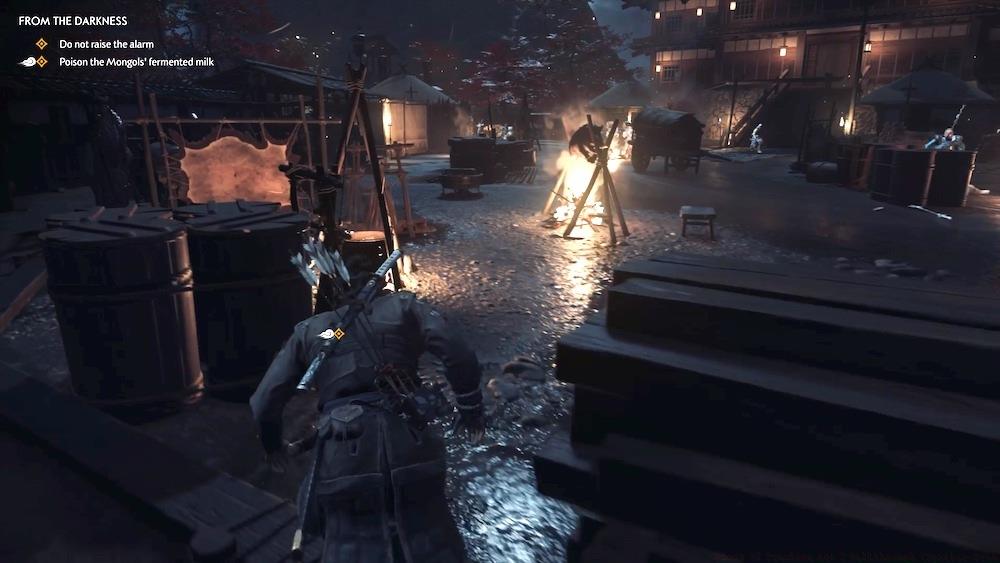
Now advance stealthily using tall grass coverage while adhering to the encampment’s side near the keep wall. Identify opportunities for path crossing to the camp’s right flank, where cover utilization facilitates fermented milk location access; maintain positioning between various tents and other objects plus the courtyard’s perimeter wall. Left-side navigation near the keep proper presents significantly increased difficulty. Reach both designated milk locations and interact undetected to initiate cinematic sequences.
Proceed upward to the keep for the culminating duel against Ryuzo. This opponent has augmented his attack repertoire: he now incorporates a shoulder charge capable of knocking you prone requiring evasion, plus frequently unblockable high kicks within his combinations. This enables extended unblockable assault sequences demanding defensive maneuvering. Ryuzo additionally integrates a delayed thrust technique into his offensive patterns; this can disrupt your party timing, so maintain vigilant observation. When he resheathes his blade, this indicates preparation for multi-strike combinations—maintain distance or counter with your own unblockable techniques like Heavenly Strike to interrupt his combat rhythm. Minimal damage application suffices for Ryuzo’s defeat and mission conclusion.
A Reckoning In Blood: Straw Hat Confrontation
Journey to Lord Shimura’s encampment in Old Toyotama Hills for consultation with him and Yuna. Your actual destination involves Fort Koyasan infiltration, achievable through either Mongol avoidance or systematic elimination. Stealth proves challenging in this segment due to limited approach vectors to the interior gateway, though precision archery facilitates navigation. Infiltrate the structures flanking the pathway’s left and right sides for utilization as flanking routes against patroling guards. These structures additionally provide effective escape pathways if detection occurs.
Upon successful gate penetration, cinematic sequences unfold. Following their conclusion, you’ll confront multiple Straw Hat ronin. This engagement presents heightened difficulty compared to standard encounters, as these masterless samurai demonstrate advanced combat proficiency. Stealth approaches prove difficult from your current position, though if attempting covert operations, penetrate the building and eliminate one or two before their companions detect your presence. However, a Standoff chain combined with Ghost Stance activation may provide superior tactical outcomes.

Eliminate all ronin to trigger cinematic progression. You’ll subsequently face an expanded engagement featuring Straw Hats integrated with Mongol forces. This combat scenario involves multiple waves and presents significant challenge, though Yuna provides combat support. Ensure she avoids encirclement and overwhelming during sequential wave engagements. Prioritize rapid ronin neutralization typically, though if possessing archery resources, eliminate them before their battlefield entry. Remain alert for canine units and Brutes as well. Several environmental assets remain available, including explosive barrels, for tactical advantage creation. Despite the engagement’s difficulty, total Mongol elimination concludes this narrative chapter.
The Fate of Tsushima: Castle Shimura Strategy
This extended mission demands substantial time investment, so ensure schedule availability rather than preferring other unresolved objectives completion. While long-term quest locking won’t occur, you’ll remain engaged for considerable duration. When prepared, consult the samurai commander at Lord Shimura’s encampment, plus remaining allies, before riding to meet Lord Shimura at the watchtower. (A Bamboo Strike at its foundation provides additional utility.)
You’ll then initiate the assault on Castle Shimura. The mission’s initial segment comprises a major engagement alongside all companions, employing familiar combat methodologies. During gate penetration, monitor rampart-positioned archers; eliminate them to simplify combat dynamics. Note that Brute elimination before their engagement proximity facilitates subsequent battle management. Should any allies fall, ensure revival before timer expiration or checkpoint restart becomes necessary.

Within the secondary gateway, monitor wall-positioned archers. Clear this courtyard area to initiate cinematic progression. The subsequent area features a hwacha bombarding your position with arrow volleys—your objective involves reaching and capturing this artillery piece. Several engagements may occur during advancement, though generally maintaining movement toward the hwacha while utilizing its fire against opposing forces proves effective. Eliminate the defensive group at its foundation before ascending the tower to commandeer the weapon for allied advancement facilitation. Target crimson explosive barrels near gateways for rapid Mongol force neutralization.
You’ll engage several additional major battles, though these remain tactically straightforward. Maintain proximity to allies for combat assistance, though ensure their survival. Combat continues until bridge arrival, where mission conclusion occurs.
Honor And Ash: Final Extraction
You must now completely extract from Castle Shimura, though the route remains clearly defined. Exit through the building’s window and remain concealed behind the bonfire group; navigate through the wooden structure to locate a far wall aperture. Beyond this point, advance along the cliff face’s right side, utilizing cart and tent concealment. Ascend to the subsequent area while maintaining right-side adherence for navigation completion. Upon encountering the fortress’s outer wall, locate a penetrable opening. Utilize the opposing rooftops and slackline for stable access.
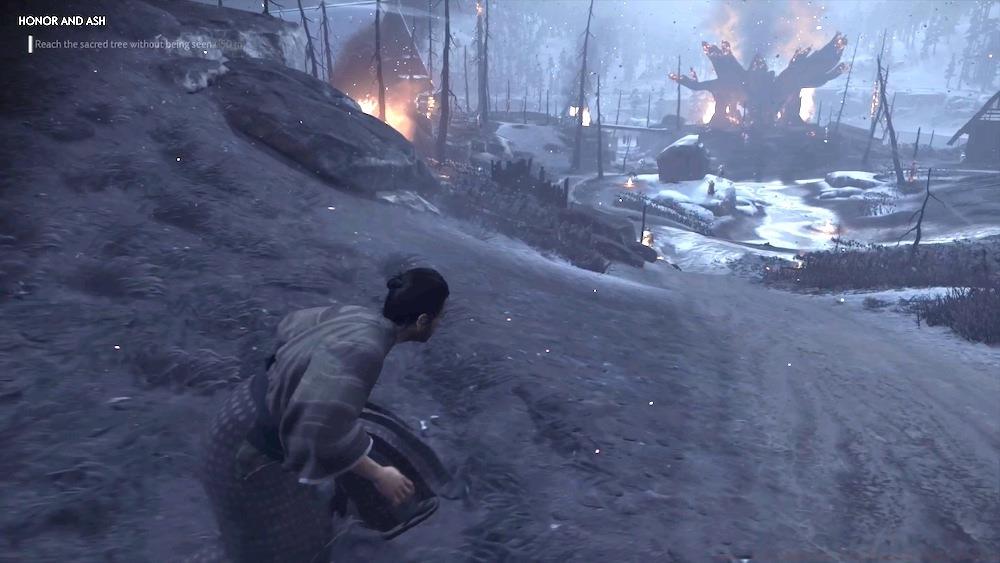
Following subsequent cinematic sequences, you regain control in the Endless Forest region. Ahead, Mongol forces incinerate a settlement while patroling its remains, necessitating advanced stealth application. Multiple viable routes exist through this territory with limited enemy density, though the optimal path likely ascends rightward near the isolated large structure. Utilize tall grass and building interiors for enemy circumvention and resource acquisition. A Record artifact rests near this building’s primary entrance.
Exit at the northern building extremity and proceed toward additional tall grass stands. With sufficient patience, patroling soldiers naturally create avoidance pathways during their random movements. Advance into the northern settlement’s large sacred tree and examine discovered corpses. Follow the cadaver trail northward while continuing examination to uncover narrative developments. Cinematic triggering occurs shortly ahead.
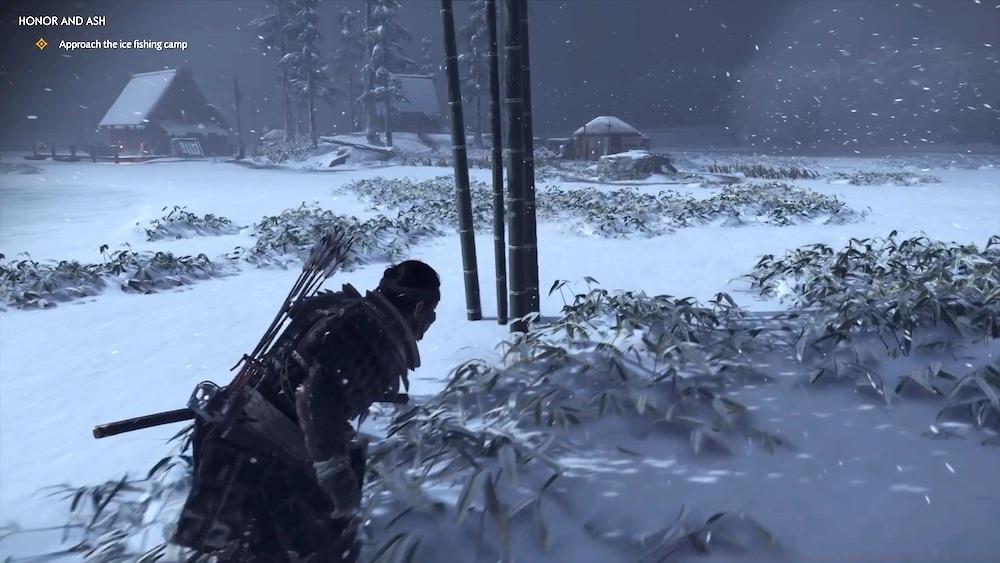
Upon consciousness recovery, retrieve your equipment and locate Yuna in an adjacent watchtower for strategic coordination. Accompany her to the frozen lake south of Jogaku Temple. After assessing the fishing village, navigate rightward for concealed approach utilizing tall grass coverage. Limited enemy presence exists, though detection endangers prisoners and enables temple alarm activation, so exercise caution to avoid detection or rapidly eliminate alerted enemies.
Ahead, rooftop ascension onto the nearest structure provides slackline access, facilitating comprehensive enemy assassination and ranged elimination. Following this, minimal defenders remain with prisoners near the docks—engagement should present minimal difficulty. Liberate the captives before meeting Yunta on a waterside rock. The tactical plan involves utilizing all available explosive barrels for Mongol destruction. Employ the alarm signal for enemy concentration, await their ice deployment, then eliminate them at distance. With efficient barrel utilization, bladed combat becomes unnecessary. However, Mongol archers employ their own incendiary projectiles, necessitating defensive awareness.
Remaining temple sector clearance becomes necessary. Yuna directs you toward the frozen waterfall, providing simplified temple infiltration for ambush execution. Approach the commander from behind and utilize the Slaughter technique for instantaneous Ghost Stance activation, streamlining elite combatant elimination. Following this, prioritize archer neutralization, as they now utilize toxic arrows mandating post-impact healing. Complete temple clearance and prisoner rescue for mission conclusion.
We provide extensive additional Ghost of Tsushima guidance and coverage to maximize your gaming experience. Consult our comprehensive Ghost of Tsushima guide directory, and if not yet completed, review our Ghost of Tsushima critical analysis.
Continue to Act 3
Ghost Of Tsushima Strategic Updates
Initiate dialogue with Shimura to establish mission parameters, then navigate strategically to the right flank upon exiting the keep to locate and coordinate with your allied forces. Locate Yuna positioned near the stable area, then commence the mounted expedition alongside Lord Shimura. This narrative segment represents a focused tactical operation: your team will encounter multiple significant engagements, requiring sustained survival tactics and coordinated support maneuvers to achieve mission success.
Your initial engagement requires neutralizing a Mongol reconnaissance unit while maintaining horseback superiority. Employ precision archery to systematically reduce enemy combat effectiveness before transitioning to melee confrontation. Expert players should aim for headshots to maximize damage output while maintaining mobility. Common mistake: remaining stationary while shooting – always keep your horse moving to avoid becoming an easy target. Time estimate: 2-3 minutes for optimal patrol elimination.
Proceeding from the initial engagement, you’ll launch a coordinated assault on Fort Ito. Shimura proves exceptionally capable in combat support, though the substantial enemy presence demands comprehensive elimination protocols. Prioritize identification and engagement of the Mongol Commander within the fortification – this high-value target often carries unique gear and provides significant strategic advantage when defeated.
Exercise extreme caution when confronting the Brute Mongol units distinguished by their yellow attire, who wield specialized explosive implements resembling primitive firearms. These combatants will ignite their weapons, generating powerful close-range detonations comparable to shotgun discharges. When you observe ignition sequences, execute lateral evasion maneuvers to create safe distance. Advanced tactic: if you can strategically position opposing forces between yourself and the detonation zone, you can effectively repurpose the Mongol ordnance against their own ranks. Optimization tip: use the Ghost Stance ability when facing multiple Brute Mongols to create crowd control opportunities. For comprehensive strategic planning, consult our Complete Guide to master similar tactical scenarios.
When reaching the creek area, descend to water level to maintain concealment from enemy patrols. Stay within the tall grass coverage while navigating toward your objective marker positioned in the larger water body ahead. You’ll observe mounted adversaries patrolling the shoreline, but they typically withdraw as you advance closer. Access Yarikawa Stronghold by slipping through the crevice adjacent to the waterfall. Following dialogue sequences, this narrative segment concludes and initiates the subsequent Yarikawa storyline progression.
Journey back to Old Yarikawa territory, specifically the Survivor encampment vicinity, to reconvene with Yuna. To establish trust with the Yarikawa faction, your mission involves locating their absent archer units. Search for investigative clues that will facilitate tracking the archers’ whereabouts—you’ll eventually discover them orchestrating an offensive operation against Mongol forces.
After coordinating with the archers, prepare an ambush position. Before Mongol forces arrive, identify tactical assets including explosive containers and hornet nests positioned along both road flanks. You’ll encounter three distinct enemy assault waves—allow the initial group to penetrate deeply into the engagement zone before initiating hostilities. The most effective elimination method involves detonating the substantial explosives wagon situated near the architectural gateway.
The secondary assault contingent emerges from your left flank, primarily consisting of archers; activating the hornet nest in that sector will significantly disrupt their formation. The final wave incorporates multiple Mongol Brutes that demonstrate arrow resistance, necessitating close-quarters combat with your katana. A Mongol Commander accompanies this group, though environmental distractions remain available to tilt combat momentum in your favor. Throughout the engagement, ensure Taka’s survival—his demise results in mission failure requiring restart. Upon eliminating all Mongol combatants, a cinematic sequence concludes this mission chapter.
Return to Yarikawa Stronghold for the decisive confrontation to halt the Mongol advance. Consult with Taka upon arrival, then proceed to the central keep for discussions with Yuna. Following cutscene events, Mongol forces launch their assault. Your primary objective involves repelling the invasion force.
While strategic complexity remains limited, sprint to the designated gateway where Mongols will breach defenses. Ensure appropriate armor configuration for the combat scenario—Samurai Clan Armor typically provides optimal performance, though Ronin attire offers resolve enhancement benefits that prove situationally valuable. Rotate combat stances systematically while employing projectile weapons and spectral armaments to manage enemy density and reduce Mongol numerical superiority.
After neutralizing all hostiles at the primary entrance, additional Mongols penetrate through the northern gate. Follow the rightward path to engage in that combat theater. The tactical situation mirrors previous encounters; eliminate all invading forces. When Yuna announces reinforcements assaulting the bridge, utilize your bow for suppression—explosive-tipped arrows demonstrate particular efficacy in this context.
Eliminate all opposition at the northern gate, prompting Mongol deployment of siege artillery against the settlement. Your new objective involves covertly traversing the Mongol encampment to disable these artillery pieces, though “covert” remains relative terminology as incidental skirmishes won’t critically impede progress. Remain within tall grass coverage when feasible, though any combat engagements should maintain manageable scale provided you avoid sprinting into concentrated enemy formations.
Advance uphill systematically. You’ll encounter limited resistance during ascent, including archers and a Brute unit, with additional defenders stationed at the summit guarding the siege engines. Destroying one artillery unit triggers reinforcement spawns to protect the remaining equipment; target archers initially since their incendiary arrows can inflict burning status effects, preventing their interference during other combat engagements.
With siege artillery neutralized, descend back into the encampment and approach Yarikawa Stronghold. Employ the iron grappling hook for rapid descent. The tactical advantage now favors you since most Mongol forces orient toward the town, enabling stealth approaches and assassination opportunities during your return to the fortress walls. Despite narrative suggestions of difficult re-entry, the process remains straightforward. Infiltrate the stronghold and navigate through remaining Mongol elements to reach the keep.
Begin by systematically eliminating all ronin combatants to initiate the critical narrative sequence. This triggers an expanded confrontation featuring Straw Hat mercenaries alongside Mongol warriors. The engagement unfolds across multiple successive waves, presenting significant tactical challenges, though you’ll benefit from Yuna’s combat support. Maintain constant awareness of her positioning to prevent encirclement by enemy forces as you progress through the combat phases.
Prioritize swift neutralization of ronin warriors in most scenarios, though archers can preemptively target them before they join the main battle. Remain vigilant for canine units and heavily armored Brutes throughout the engagement. Strategic environmental elements like explosive barrels provide tactical advantages when utilized effectively. While demanding, successful elimination of all Mongol forces concludes this narrative segment.
This represents an extensive mission commitment, so ensure adequate time allocation and consider completing other objectives beforehand. Though it doesn’t permanently restrict quest accessibility, you’ll be engaged for a substantial duration. When prepared, consult with the samurai commander at Lord Shimura’s encampment, interact with your companions, then proceed to the watchtower rendezvous point. (A Bamboo Strike training area is available at the structure’s foundation for skill refinement.)
Commence the assault on Castle Shimura with your assembled allies. The initial phase constitutes a large-scale battle where coordinated tactics prove essential. While advancing through the gateways, maintain awareness of archers positioned along the battlements; eliminate them from range to reduce defensive pressure. Advanced players can often neutralize Brutes from distance before close-quarters engagement becomes necessary. Should any companions fall in combat, immediate revival before the expiration timer is crucial to avoid checkpoint restarts.
Upon reaching the secondary gate perimeter, remain alert for additional archers along the walls. Secure this courtyard area completely to activate the next cinematic sequence. The subsequent zone features a hwacha artillery unit bombarding your position with volleys of arrows, requiring you to advance and capture this weapon system.
While minor skirmishes may occur during advancement, maintain forward momentum toward the hwacha position, strategically using its barrage against enemy concentrations. Eliminate the defensive group at the artillery base, then ascend the tower structure to commandeer the hwacha. Utilize this captured weapon to clear pathways for your allies’ advancement into subsequent areas. Identify explosive barrels positioned near gate structures to efficiently dispatch Mongol defensive formations.
Additional major engagements follow, though they maintain straightforward tactical requirements. Remain proximal to allied forces for combat assistance, while ensuring their survival throughout. The conflict persists until bridge access is achieved, concluding this narrative chapter.
The subsequent narrative continues directly from the previous conclusion. Allocate several minutes for weapon and armor enhancements, plus dialogue interactions with companions, before initiating the new tale with Yuna. She provides the advanced Ghost Armor set, delivering stealth performance enhancements and facilitating Ghost Stance activation through improved terror generation.
This specialized armor significantly boosts your stealth capabilities, making it particularly valuable for the upcoming infiltration sequence. The Ghost Armor’s unique properties include reduced enemy detection speed, increased resolve gains from stealth kills, and additional terror accumulation toward Ghost Stance. For comprehensive gear optimization strategies, consult our Weapons Unlock guide covering all equipment upgrade paths.
When prepared, execute a solo infiltration into Castle Shimura’s keep sector. Employ the iron grappling hook to traverse beneath the bridge structure, accessing the cliff faces adjacent to the fortress. Scale the building exterior to locate window entry points.
Exercise patience during guard elimination; they naturally separate through patrol patterns, and any alarm activation forces mission failure with checkpoint reversion.
After securing the building interior, ascend to the upper level for Mongol camp reconnaissance. Proceed along the designated route toward the distant courtyard area. Despite significant Mongol presence, methodical and patient movement ensures successful navigation. Frequently, bypassing enemies proves more effective than engagement in scenarios where avoidance is feasible.
Descend from the rooftop and utilize overhead slacklines above the garden pathway to circumvent most opposition, though elimination of the watchtower archer remains advisable. Upon reaching the line’s terminus, drop onto the tent structure and maneuver behind it to access a wall breach—timing your movement to coincide with guard patrol cycles to avoid detection.
Advance using tall grass coverage while maintaining proximity to the keep wall. Identify opportunities to cross toward the camp’s right flank, using cover elements to reach the fermented milk objectives. Maintain positioning between various tents and the courtyard perimeter wall. The left approach, near the main keep structure, presents substantially greater difficulty. Reach both designated milk locations and interact undetected to trigger the concluding cinematic sequence. For additional stealth tactics and class-specific approaches, reference our Class Guide for specialized infiltration techniques.
After regaining consciousness, gather your equipment and locate Yuna positioned in the adjacent watchtower to coordinate your strategic movements. Journey alongside her toward the glacial lake situated south of Jogaku Temple. Upon scouting the fishing settlement, navigate to the right flank to utilize the tall grass coverage for maintaining concealment during your approach. While enemy presence appears limited, detection could compromise captive safety and trigger alarm signals to the temple garrison, necessitating either complete stealth or rapid neutralization if discovered.
Progressing forward, ascend to the rooftop of the closest structure to access an overhead traversal line, providing superior vantage points for systematic assassination and ranged elimination of all hostile forces in the vicinity. Following this aerial approach, only minimal opposition remains guarding the captives near the waterfront, presenting negligible resistance for skilled combatants.
Liberate the hostages and subsequently rendezvous with Yunta stationed on a coastal rock formation. The tactical objective involves deploying multiple explosive casks to decimate Mongol forces. Activate the distress beacon to lure adversaries toward your position, patiently await their advancement onto the icy surface, then detonate the explosives from a safe distance. With precise barrel deployment, direct combat engagement becomes unnecessary. However, remain vigilant against Mongol archers employing incendiary projectiles that can prematurely trigger your explosives.
The temple complex requires complete liberation. Yuna will guide you toward the frozen cascade, offering an optimal infiltration route for ambushing the remaining Mongol contingent. Execute a covert approach behind the commander to utilize the Slaughter technique, immediately charging your Ghost Stance meter for enhanced combat capabilities against elite warriors. Subsequently, target archers as primary threats, as they now employ venom-tipped arrows that necessitate immediate healing after each successful strike. Secure the temple grounds, emancipate all remaining captives, and conclude the narrative sequence.
For seasoned players seeking mastery: Time your explosive detonations to maximize enemy cluster elimination while maintaining safe distance. When engaging archers, utilize environmental cover and quick-dodge techniques to avoid poison arrow impacts. The Slaughter ability against the leader not only fills your Ghost Stance but also creates a psychological impact on remaining enemies. Always clear perimeter guards before initiating the main assault to prevent reinforcement calls.
Action Checklist
- Master at least two combat stances and practice fluid transitions between them
- Upgrade key ghost weapons and practice strategic deployment in various combat scenarios
- Complete 3-4 Mythic Tales to unlock powerful techniques before major story missions
- Liberate 2-3 Mongol territories to gather essential upgrade resources
- Practice advanced parrying against brute enemies in isolated encounters to build muscle memory
- Complete all main story missions in any order for narrative progression
- Acquire Sakai Clan Armor and Ghost Armor for enhanced capabilities
- Complete Mythic Tales and Character Tales for ability enhancements
- Upgrade armor sets to maximum for optimal performance
- Liberate Mongol territories and complete side activities for 100% completion
- Coordinate with all allies and establish battle formations before engagement
- Use mounted archery to eliminate 3-4 enemies before close combat
- Identify and prioritize the Mongol Leader during fort assaults
- Master lateral dodging against Brute Mongol explosive attacks
- Position enemies between yourself and Brute Mongol detonations
- Navigate creek using tall grass concealment and infiltrate through waterfall crevice
- Locate missing archers by investigating evidence around Old Yarikawa
- Set ambush using explosive barrels and wasp nests
- Defend stronghold gates using stance variation and ghost weapons
- Sabotage siege weapons while prioritizing archer elimination
- Use iron hook for descent and execute flanking assassinations during return
- Eliminate ronin first in initial battle, use environmental explosives strategically
- Capture hwacha artillery early to clear Mongol defensive positions
- Acquire Ghost Armor and upgrade equipment before infiltration
- Utilize slacklines and environmental cover during stealth sequence
- Interact with both fermented milk locations undetected to complete mission
- Coordinate with Yuna at watchtower and proceed to frozen lake
- Utilize tall grass concealment for stealth approach to fishing village
- Access rooftops and slacklines for aerial advantage over enemies
- Execute explosive barrel ambush after luring enemies onto ice
- Infiltrate temple via frozen waterfall and eliminate leader for Ghost Stance
No reproduction without permission:SeeYouSoon Game Club » Ghost Of Tsushima Act 2 Walkthrough (Spoiler-Free)