TL;DR
- Master enemy prioritization and battlefield control to dominate early engagements
- Learn advanced movement techniques and positioning to outmaneuver opponents
- Optimize loadouts and resource management for maximum combat effectiveness
- Avoid common beginner mistakes that compromise tactical positioning
- Develop map awareness and team coordination for sustained success
This comprehensive guide provides everything required to excel during Battlefield 6’s initial campaign phase, focusing on practical application of core mechanics.
Important Notice: Our walkthrough maintains minimal narrative spoilers while delivering essential gameplay assistance. However, players seeking a completely blind experience should bookmark this resource for later reference rather than continuing.
Battlefield 6 represents a substantial gaming experience with extensive exploration opportunities and complex combat systems. The game challenges players to master multiple combat disciplines including precision targeting, defensive maneuvers, tactical positioning, and battlefield dominance. Each confrontation presents significant difficulty, particularly during early stages when essential tools and abilities remain locked.
Our specialized Battlefield 6 progression guide systematically navigates the primary campaign narrative, delivering optimized strategies for overcoming adversaries while securing valuable resources. We maintain strict narrative protection while providing crucial mission assistance.
Successful Battlefield 6 gameplay requires mastering target prioritization – identifying and eliminating high-value threats before engaging standard combatants. The Conquest game mode particularly emphasizes this skill, where eliminating key opponents can shift battle momentum dramatically.
Advanced players develop battlefield control through strategic positioning and environmental utilization. The Pax Armata
Movement optimization proves equally critical. Unlike traditional shooters, Battlefield 6 incorporates realistic momentum and inertia, making sudden direction changes punishable. Professional players recommend practicing advanced movement techniques during early Assignments to build muscle memory.
Common Mistake Alert: Many beginners underestimate the importance of cover utilization and reload discipline, frequently exposing themselves during vulnerable animation sequences. Always ensure adequate protection before engaging reload or equipment swap actions.
Below you’ll find the complete progression guide for Act 1, excluding introductory sequences that establish narrative context and provide fundamental gameplay tutorials. For subsequent campaign sections, transition to our Battlefield 6 Complete Guide for comprehensive coverage.
Act 1 typically requires 8-12 hours for completion, depending on side content engagement. The NATO faction missions emphasize tactical coordination and structured assaults, contrasting with more improvisational combat styles.
For players seeking specialized equipment guidance, our BF6 Weapons Unlock Guide details optimal loadout configurations for various playstyles and mission types.
Advanced Battlefield 6 tactics involve sophisticated loadout customization that aligns with specific mission parameters. The BF6
Map awareness development proves crucial for long-term success. Professional players recommend spending initial hours familiarizing with terrain features, choke points, and elevation advantages rather than rushing objective completion.
Team coordination fundamentals separate competent squads from dominant ones. Effective communication, role specialization, and combined arms utilization dramatically increase mission success rates. Our BF6 Class Selection Guide provides detailed analysis of complementary specialization combinations.
Optimization Tip: Allocate at least 30 minutes to practice range sessions with primary weapons before engaging critical missions. Recoil control and reload timing practice yields substantial combat effectiveness improvements.
Avoid the common pitfall of over-specialization during early gameplay. While mastering specific weapon categories proves valuable, understanding all available tools ensures adaptability to dynamic battlefield conditions.
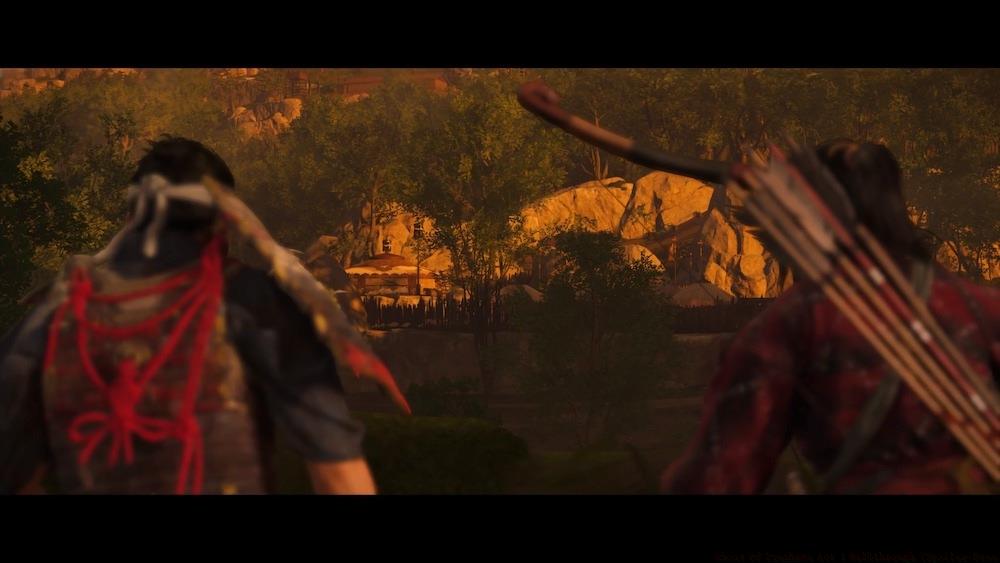
Ghost Of Tsushima News
- Ghost Of Tsushima Getting “Legends” Co-Op Multiplayer For Free
- Ghost Of Tsushima Review – Chaos In The Windy City
- Ghost Of Tsushima Mythic Tales Guide: How To Complete Them All
- + Show More Ghost Of Tsushima News Links (2)
- Ghost Of Tsushima Armor Guide: All Armor Sets And Locations
- Ghost Of Tsushima Walkthrough, Guides, Collectibles, And Tips (Spoiler-Free)
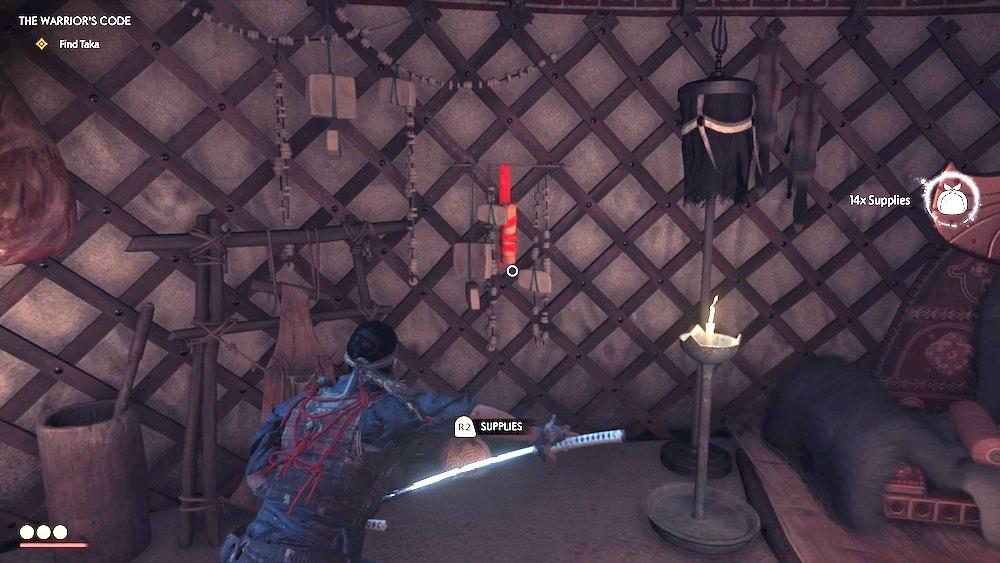
The Warrior’s Code
Upon gaining full control of protagonist Jin Sakai, you’ll encounter multiple mission options with flexible completion order. The Warrior’s Code serves as your formal introduction to stealth mechanics within Ghost of Tsushima, commencing when you journey to Kechi Fishing Village and encounter Yuna. Together, you’ll advance toward a Mongol detention facility.
The critical objective involves mastering the tools provided—particularly Focused Listening, which enables precise enemy detection across distances and through solid objects, similar to mechanics found in The Last of Us franchise. Employ Focused Listening to systematically locate and neutralize each Mongol combatant without triggering detection protocols.
While this encampment maintains modest dimensions, it contains substantial loot opportunities requiring thorough exploration. You’ll discover abundant supplies—the primary currency for all enhancement systems—distributed throughout tent interiors and exterior areas. While ascending the slope, exercise caution when entering the large tent housing a more formidable Mongol swordsman. Similar to other adversaries, he becomes vulnerable to silent elimination through patient observation and timing his back-turning movements.
Plunder the primary tent for crafting components and acquire your initial Mongol Artifact. Retrieve the Record from the adjacent table. Immediately outside this structure awaits one additional enemy combatant and a captive. Following complete neutralization of all hostiles, exit the compound through the perimeter breach adjacent to the watchtower beside the containment cage.
Directly south of your awakening location post-The Warrior’s Code resides a Fox Den. Locate the vulpine guide and pursue it to an Inari Shrine to obtain a new Minor Charm slot enhancement.
The Tale of Sensei Ishikawa
Navigate to Hiyoshi Springs and engage with the tavern proprietor. Accompany him woodland traversal to discover the pathway leading to Sensei Ishikawa’s training grounds. Scale the cliff formation and veer left during ascent to acquire the Aozora Headband mounted on an arrow shaft.
Conduct investigation of the dojo to locate Ishikawa; he’ll escort you to Fort Nakayama. You’ll encounter Mongol resistance during transit, though manageable for experienced players. Additionally, you’ll receive the Half-Bow ranged weapon apparatus during the expedition.
Collaborating with Ishikawa, you’ll establish an ambush perimeter around a proximate Mongol encampment. The instructional focus emphasizes your bow’s effectiveness for diversionary tactics or group elimination. Targeting torch braziers, hornet nests, and explosive containers can rapidly neutralize multiple adversaries. Adhere to Ishikawa’s tactical instructions and eliminate the Mongol forces. Remember that audible archer vocalizations signal impending projectile launches; rapid evasion maneuvers prevent thoracic arrow impacts.
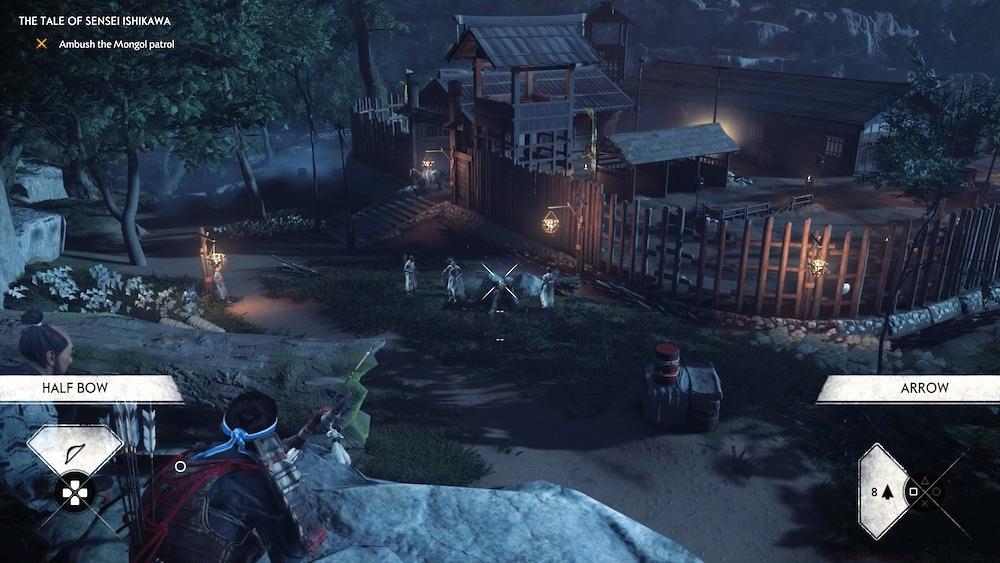
Crucially, this fortress contains a Mongol Leader—a specialized enemy classification with enhanced durability. Visual identification occurs through distinctive golden armor plating. Leaders require additional damage application for neutralization and frequently deploy more sophisticated, varied combat maneuvers than standard infantry. Prioritize Leader engagement upon appearance and expedite elimination. Leader executions provide supplementary benefits: upon neutralizing sufficient quantities, you’ll acquire new combat stances that improve effectiveness against specific enemy archetypes, including shield-bearers and polearm specialists.
Following complete clearance of Mongol presence from the fortress, conduct environmental investigation for narrative clues and mission completion. Note that the compound contains substantial material resources requiring collection, including Iron components essential for weapon enhancement systems. Iron acquisition remains exclusive to “Mongol Territory,” specifically forts and military strongholds, so collect during accessible opportunities.
Successfully completing The Tale of Sensei Ishikawa activates his comprehensive optional quest narrative. For detailed Ishikawa’s Tales documentation, reference our extensive Tales of Tsushima side-missions compendium.
The Tale of Lady Masako
Recruiting Lady Masako represents elevated priority since completing her initial narrative rewards you with new armor equipment, providing practical perk advantages and substantially outperforming the damaged samurai armor from initial sequences. To locate her narrative, travel southward toward Kuta Grasslands. Her navigation marker will guide you to her residential compound.
Approaching Adachi Estate reveals vacancy. Exercise tactical approach toward the smaller guest residence—an ambush scenario activates at the entrance.
You’ll encounter Masako after tracking the equestrian trail. She’ll escort you to the Golden Temple, likely your first encountered sanctuary settlement. Here, you can access weapon and armor enhancement services. Consult the armorer specialist to obtain the Samurai Clan Armor, replacing your initial damaged samurai armor. Multiple additional armor sets remain unlockable throughout Ghost of Tsushima, each featuring unique perk configurations—the Samurai Clan Armor mitigates incoming damage and augments health metrics. Enhancement occurs through supply and linen acquisition throughout the game world, but achieving maximum upgrade tiers additionally requires Silk components, acquired through character-specific tale completions.
Within settlements like Golden Temple and Hiyoshi Springs, you can additionally interact with civilians to receive intelligence regarding narrative rumors worth investigating. Engage the female NPC near the armorer for preliminary intelligence concerning a Mythic Tale. Pursue these narratives promptly rather than delaying, because Mythic Tales unlock premium equipment and ability enhancements within the game. Consult our Ghost of Tsushima Mythic Tales strategic guide for comprehensive information.
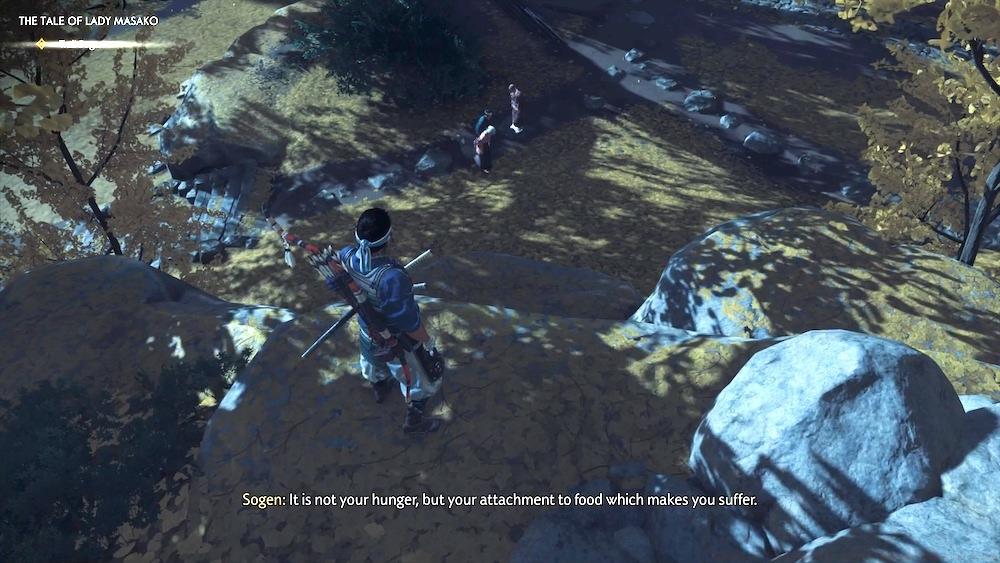
Following equipment enhancement completion, communicate with Sagen and the meditative monastic practitioner, then depart Golden Temple through its distant egress to rendezvous with Lady Masako. Your operational directive involves shadowing Sagen as he departs the temple complex en route to the Old Inn. Maintain ridge concealment and utilize tall grass coverage during Sagen surveillance, as he frequently conducts rear observation for pursuit detection at pathway divergences. Evasion remains manageable through maintained low profile positioning. Sustain visual tracking and you’ll maintain operational security.
Upon reaching the Old Inn, you’ll encounter significant combat engagement. If you’ve activated supplementary stances through Mongol Leader eliminations, ensure appropriate rotational deployment. You’ll confront diverse enemy types, necessitating target prioritization. Typically optimal strategy involves neutralizing formidable adversaries initially and any polearm-equipped combatants. Masako maintains competent self-defense capabilities, so concern regarding her status remains minimal—though ensure she avoids complete encirclement and tactical overwhelm. Locate Sagen on the secondary level of the inn establishment following enemy clearance, concluding the narrative sequence.
Successfully completing The Tale of Lady Masako activates her comprehensive optional quest narrative. For detailed Masako’s Tales documentation, reference our extensive Tales of Tsushima side-missions compendium.
The Broken Blacksmith
Meet Yuna in River Child’s Wetlands within a residential structure north of Azamo Bay to discuss the operational objective of rescuing her sibling, Taka. You’ll receive introduction to Kenji and potential infiltration methodology for the Mongol-occupied municipality. Accompany him until accessing the town interior, where you’ll receive additional stealth instruction, focusing on rooftop navigation protocols. Follow Yuna during her vertical ascent, then pursue the leftward pathway and maintain proximity to the slaver during urban traversal.
You can maintain rooftop surveillance with the slaver throughout market approach. Upon arrival, you’ll necessitate descent for plaza traversal, and the area contains substantial guard presence. Fortunately, their attentiveness remains suboptimal, and you’ll discover viable navigation routes despite dense personnel concentration.
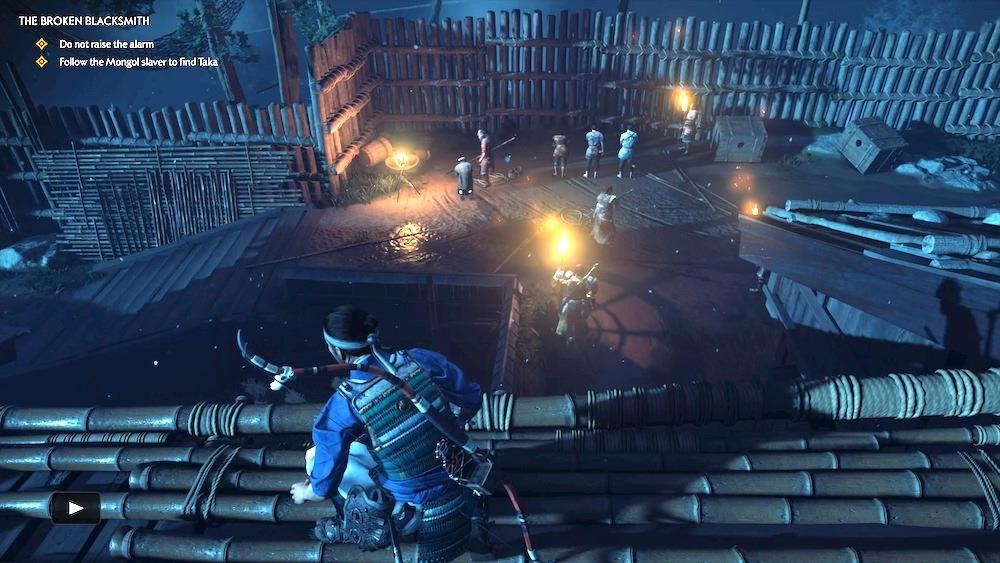
Commence by descending and executing the guard adjacent to the vessel. Following completion, navigate across exposed terrain proximal to the gate toward the opposing residential structure. While significant guard presence exists near the gate, many enemies within this mission initiate movement or patrol activation during proximity, facilitating evasion. Advance methodically and employ Focused Listening to verify clearance status. Through careful execution, you can either maintain exterior building proximity near the wall—though requiring guard engagement—or navigate through the building interior, eliminating several adversaries during progression.
Beyond the structure’s opposite side, maintain rear positioning behind the slaver during his street descent, enabling sustained proximity until Taka rendezvous. Subsequently, accompany Yuna and Taka during town egress. Following wall traversal, pursue the roadway, but utilize tall grass clusters, as you’ll require evasion of several Mongol patrol units. Simply employ concealment tactics and permit their passage to maintain operational security. Continue route advancement until Kenji appears with equestrian transport, concluding the narrative.
Successfully completing The Broken Blacksmith activates Kenji’s optional quest narrative. For detailed Kenji’s Tales documentation, reference our extensive Tales of Tsushima side-missions compendium.
Blood on the Grass
Additional ally recruitment remains necessary, so initiate communication with the Straw Hat Ronin faction to assess potential military augmentation. Navigate to Kishi Grasslands near the coastal region in Tsutsu to locate the quest initiation point—a combusting Mongol convoy apparently ambushed by the Straw Hats. Conduct investigation to activate the narrative sequence.

Pursue the casualty pathway to a recumbent Straw Hat operative—and Ryuzo. You’ll immediately receive assault from a substantial Mongol contingent. By this progression stage, you’ve likely developed proficient group engagement strategies, but within this combat scenario, prioritize archer elimination to prevent projectile harassment during engagement with more formidable adversaries. This represents significant combat encounter with multiple assault waves, so concentrate on neutralizing challenging enemies initially to preserve health resources. Note additionally that a Mongol Leader integrates within standard infantry, accompanied by a combatant wielding an oversized battle ax potentially causing tactical complications. While not immediately apparent, monitor for the ax-wielder’s sweeping attack maneuver—you can perform vertical evasion, and if impacted, it will project you airborne.
With substantial Mongol presence operational, optimal strategy potentially involves maintaining distance from formidable adversaries and eliminating weaker combatants initially. This tactical approach provides enhanced maneuvering space to evade major enemy offensive patterns, enabling close-quarters elimination.
Maintain operational partnership with Ryuzo until returning to the Straw Hat encampment, concluding the narrative sequence.
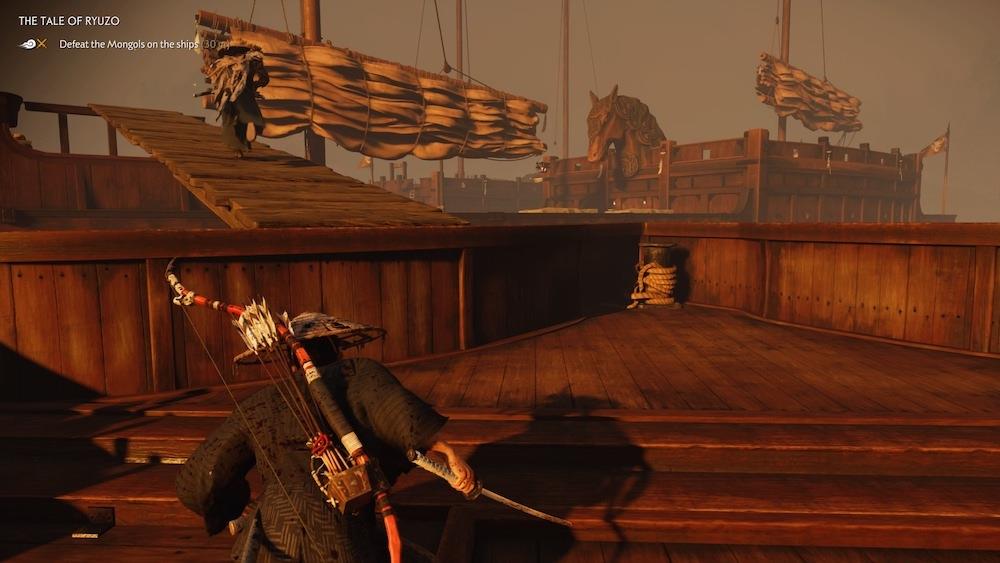
The Tale of Ryuzo
Communicate with Ryuzo within the Straw Hat encampment, and when prepared, navigate to Takuzudama Cemetery to prepare offensive operations against the fortress. You’ll necessitate stealth infiltration to access and deactivate the lighthouse signal apparatus, though not exceptionally challenging. Utilize the felled timber trunk to scale the perimeter wall onto an interior rooftop structure, then descend and circumnavigate the lighthouse rear perimeter. Enemy units typically maintain distance and initiate path clearance during approach, maintaining relatively unobstructed navigation. Access interior through the compact aperture in the rear wall, and you can ascend to the summit and deactivate the signal transmission.
Following completion, the Straw Hats will initiate assault. The Mongol forces will remain unaware of your rear positioning as the ronin forces charge them, enabling archer sniping if desired, or simply advance and join the engagement. Either methodology, eliminate archers with maximum efficiency and rapidity, because they’ll harass you during engagement with more challenging shield-bearing adversaries. Following Mongol elimination, communicate with Ryuzo.
After conducting approach assessment, descend along the coastal pathway with Ryuzo to establish rear positioning against the Mongol forces. Exercise caution to avoid detection, or you’ll necessitate combat progression to the vessel. Achieve boarding and you can advance to the bay vessels, though prepare for combat engagement during vessel traversal.
Conduct search of the initial vessel and you’ll advance onto its deck structure. Engage in combat progression, noting that you’ll confront a Mongol Leader among other hostile entities. Following their elimination, approach the subsequent vessel and employ your bow for enemy sniping; the inter-ship bridge provides effective cover against projectile impacts, so advance to Ryuzo’s concealment position. After clearing the following ship, you and Ryuzo will separate. Utilize the bridge structure to access the upper deck and execute the Mongol operative stationed there.
You can relatively easily execute stealth approach and eliminate all deck personnel, though refrain from opening the central containment unit unless seeking tactical chaos—a ursine specimen resides within with lethal capabilities. That stated, an arrow projectile can rupture the cage containment, releasing the bear to rampage through Mongol forces, and if you can deliver cranial arrow impacts, you can achieve significantly safer neutralization compared to bladed engagement. Predator hides provide substantial utility for ammunition capacity enhancement regarding consumable items, so worthwhile to dispatch the bear before departure.
Following completion, advance into the vessel’s cargo hold. Within the central captain’s quarters, you’ll discover a Mongol War Plans documentation scroll. Return to the initial ship and you’ll locate Ryuzo in critical condition. You’ll necessitate defeating this adversary rapidly before Ryuzo succumbs to hemorrhagic shock. You can additionally temporarily incapacitate him using kunai projectiles, providing revival opportunity for Ryuzo and tactical advantage through ally assistance. Either methodology, execute evasion maneuvers against the large combatant’s ax strikes; during his major vertical assault, he becomes vulnerable to dorsal attacks. Achieving neutralization concludes the narrative sequence.
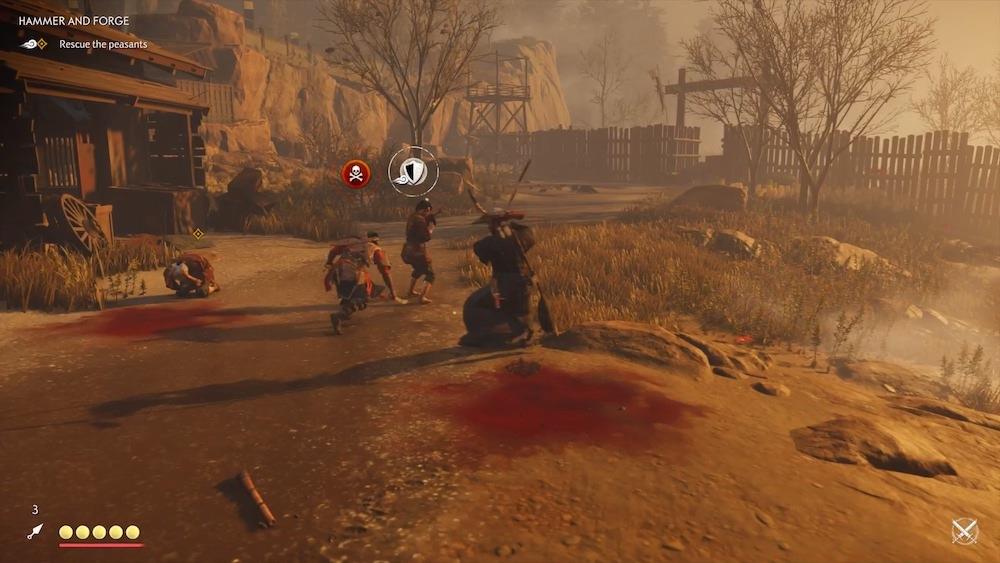
Hammer and Forge
Navigate to Komatsu and eliminate Mongol forces to rendezvous with Yuna, who will inform you that Komatsu faces imminent assault. You’ll subsequently necessitate defensive operations against Mongol reinforcement contingents.
Initially, you’ll require stealth egress from the forge facility and elimination of Mongol operatives to rescue captive villagers. Execute maximum effort to avoid detection, or the Mongol forces will attempt execution protocols against any hostages or peasants within proximity, and if neutralized, you’ll experience checkpoint regression. If combat activation occurs, monitor for crimson skull iconography above Mongol craniums indicating hostage targeting, and prioritize those military personnel. You’ll maintain brief temporal window before the Mongol actually executes the villager, though requiring rapid response to prevent fatalities.
Your primary objective involves a structure containing internal hostages. Clear hostile presence and locate their captives on the secondary level. Following acquisition, they’ll provide intelligence regarding a secondary group; descend to the riverine area and intercept another Mongol contingent pursuing multiple civilians. You’ll necessitate rapid neutralization, so employ arrows or supplementary tools to reduce enemy numerical superiority. Monitor for crimson skull iconography and prioritize those military units to prevent execution protocols.
Following hostage rescue completion, you must execute stealth return to the forge facility, potentially challenging with Mongol patrol activity potentially escaping detection. Optimal methodology involves veering leftward and utilizing the narrow passageway adjacent to the structures. Advance to the settlement’s distal extremity before ascending the slope to the forge—this should enable bypass of all regional Mongol presence and secure peasant return.
Subsequently, you’ll necessitate locating Yuna and assisting her rescue operations for additional villagers. Avoid bridge utilization; instead, conduct river crossing and eliminate the patrolling guard stationed there, maintaining leftward positioning relative to the window to prevent observation from another guard within your target structure during his outward gaze. When he completes rotational movement, advance through and neutralize him. You can subsequently breach the adjacent chamber and eliminate all personnel, or scale the ladder for rapid aerial assassination before combat engagement. Simply ensure prevention of stray Mongol operatives executing your peasant allies. Following completion, egress through your arrival pathway, recross the riverine barrier, and ascend the slope to the forge, maintaining vigilance for any patrol contingents.
With comprehensive personnel accounting, you’re prepared for defensive operations within the forge—which actually represents frustrating combat within confined spatial parameters. During Mongol assault initiation, deploy your bow apparatus and attempt archer elimination. Monitor additionally for canine units among military personnel, because their assault patterns can prove particularly aggravating and they remain unparryable. If you can projectile neutralize several canines before their approach, you’ll experience simplified engagement.
Yuna will maintain engagement with several adversaries, though you’ll confront multiple assault waves, and following initial sequences, combat will progress into the forge interior. You still cannot sustain peasant casualties, so if a Mongol initiates execution protocols, you’ll necessitate pursuit. Attempt to maintain exterior combat positioning optimally, because the confined interior spatial parameters interact poorly with Ghost of Tsushima’s camera systems. You additionally shouldn’t hesitate permitting Yuna to maintain engagement with one or two adversaries while you conduct perimeter management of any personnel deviating from preferred engagement zones.
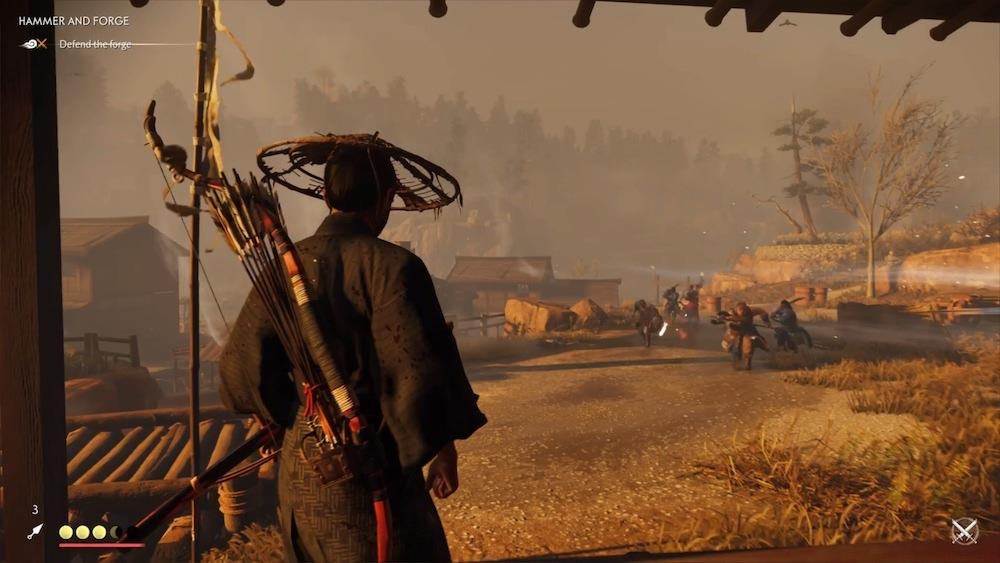
The assault waves will progressively intensify, incorporating enhanced swordsmen, polearm specialists, and shield-bearing combatants. You’ve developed proficiency handling these adversaries at this progression stage, so provided nobody initiates peasant execution protocols, you should maintain operational control through target prioritization. The optimal methodology for successful completion involves reliance on Ghost weaponry and supplementary techniques for crowd control, particularly if you can maintain exterior positioning for all, or majority of all, personnel outside the forge proper. Kunai projectiles can complete neutralization of injured adversaries or stagger charging units, for example, and if you possess explosive devices or smoke grenades, they can effectively disrupt enemy assault formations.
Approaching combat conclusion, a Mongol Leader will join the engagement, so either prioritize him for rapid elimination, or avoid him during elimination of subordinate forces to establish one-on-one engagement—whichever tactical style aligns with your preferences.
Following leader neutralization and remaining military personnel elimination, the peasants will achieve security status. This will enable official Komatsu acquisition, establishing it as a revisitable location for its various commercial establishments.
The Iron Hook
Communicate with Yuna and subsequently with Taka within Komatsu Forge to initiate this narrative, which represents elevated priority—it provides a grappling hook apparatus extensively utilized throughout remaining gameplay, and without it, you’re excluded from completing substantial optional activities throughout the island. Ryuzo will appear immediately afterward to provide rationale for testing your new equipment. Ride with Ryuzo until reaching the fortress, then advance leftward to locate the initiation point for cliff ascent.
Upon reaching the summit, you’ll necessitate navigation through the fortress compound, liberating Ryuzo’s personnel from their containment units. The iron hook provides convenient rooftop navigation capabilities. Initially deploy it to access the rightward watchtower for guard neutralization.
Your initial prisoner group remains positioned forward leftward. You’ll observe several guard personnel, plus two containment units against the fortress perimeter wall. The left containment unit houses an ursine specimen, and if you can projectile impact the locking mechanism, you can release the animal and permit its assault on Mongol forces during your observation. The containment unit requiring activation remains rightward, containing two of Ryuzo’s personnel.
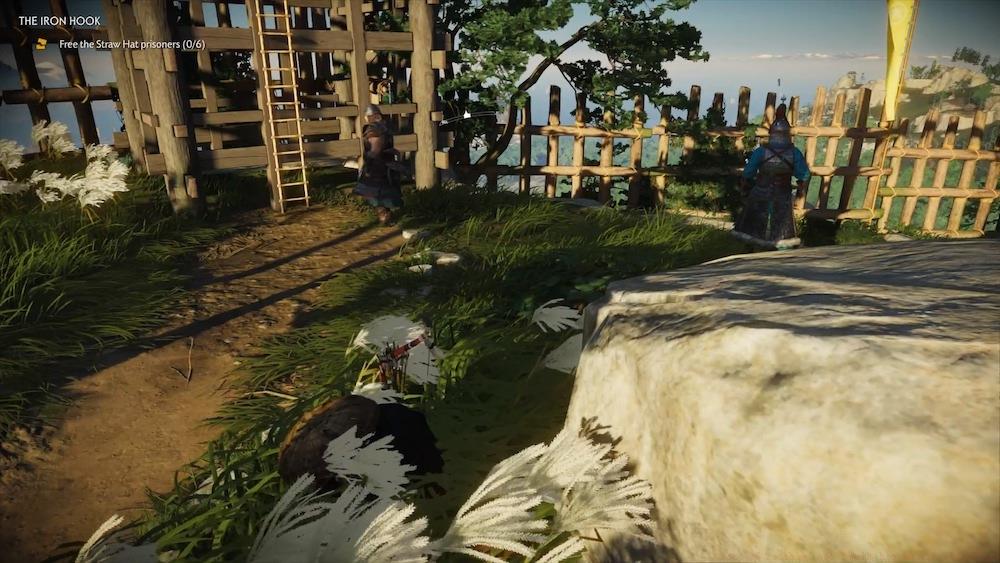
Optimal strategy involves attempted stealth circumnavigation and elimination of all guard personnel here to prevent future interference. Between rooftop navigation and tall grass utilization, they remain relatively manageable. When prepared, descend to the subsequent fortress sector, where you’ll observe a passageway containing two patrolling guards and several stationary personnel. Silent elimination of all these operatives remains, unfortunately, operationally unfeasible. You can achieve rear positioning behind at least one combatant using tall grass coverage and perimeter breach opportunity, though the remainder will initiate combat engagement. The positive intelligence indicates, if you can maintain these four personnel separation from remaining Mongol forces, you and your allies can neutralize them with minimal difficulty and without alerting additional personnel.
Following their elimination, advance upward and maintain concealment to liberate the remaining four ronin operatives. If you achieve sustained stealth operations, you might even employ assassination techniques for critical strikes against the Mongol leader positioned forward, significantly simplifying engagement when you inevitably activate remaining military forces. Note additionally that another ursine specimen remains positioned forward, rightward of the gate structure, that you can release during elevated, secure positioning.
Note: This fortress contains two ursine specimens, and you might consider releasing and neutralizing them before advancement. With Ryuzo’s personnel accompaniment, ursine engagement becomes simplified compared to wilderness encounters, and their hides will provide ammunition capacity enhancement for arrows, rapid-deployment items, and similar equipment. The optimal methodology for ursine handling involves distance engagement using your bow apparatus—if they achieve close proximity, they can prove exceptionally hazardous, though cranial impacts achieve rapid neutralization.
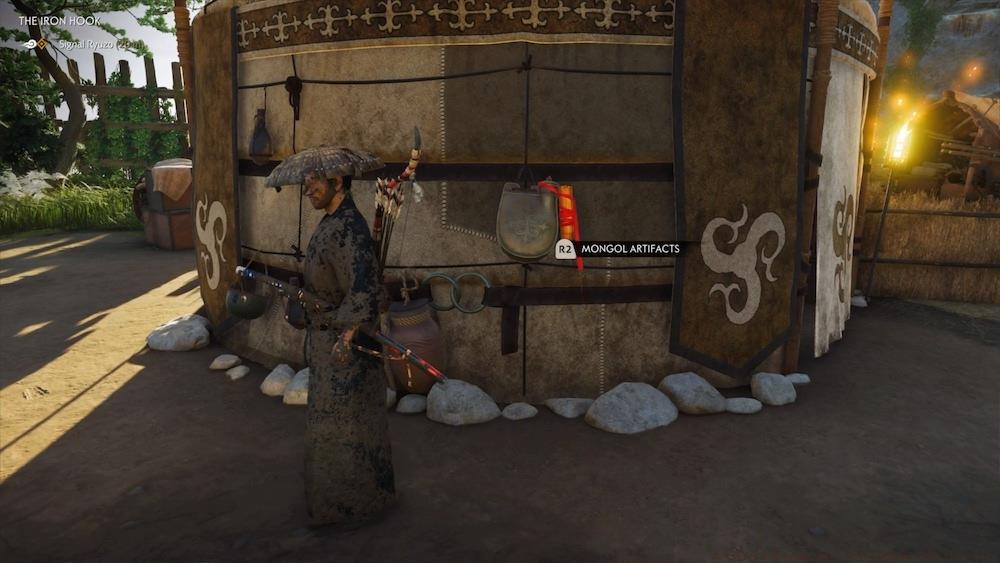
Ensure acquisition of the Hanging Pitcher Mongol Artifact from the circular tent’s exterior wall before advancement.
Following enemy clearance completion, you can activate the alarm system, signaling Ryuzo to initiate frontal gate assault. During activation, you’ll achieve rear positioning against a Mongol military contingent. Engage them according to your tactical preferences—with reinforcement support, you shouldn’t encounter operational difficulties achieving complete neutralization. Following completion, conduct comprehensive fortress sweep for supply resources before egress, concluding the narrative sequence.
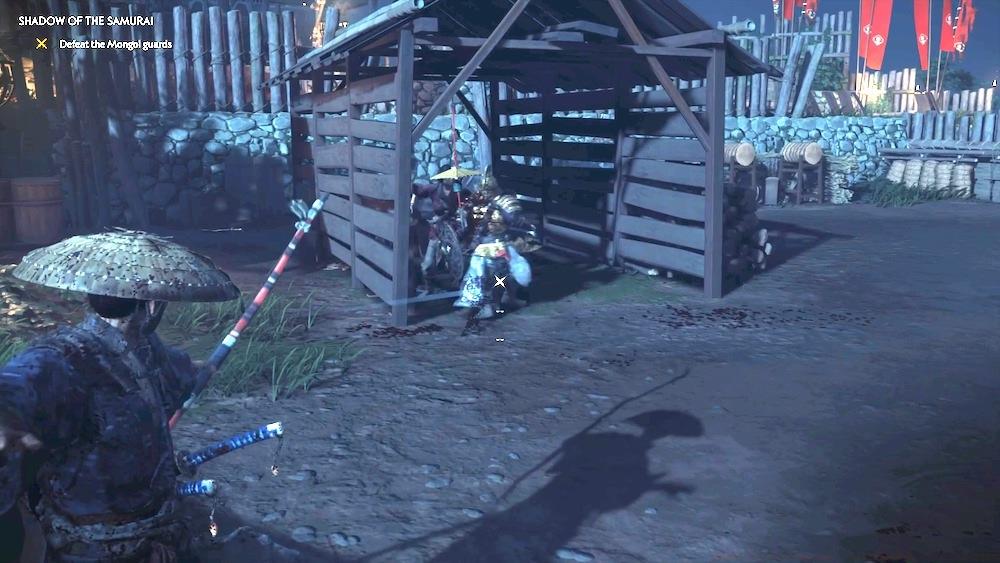
Shadow of the Samurai
Return to Komatsu Forge to activate final preparation protocols for your offensive operations against Castle Kaneda. Upon castle arrival, you’ll receive opportunity for communication with your allied forces. Following that, scale the cliff formation to access the castle’s courtyard perimeter. You’ll observe substantial guard presence, though through patient and methodical execution, you can achieve complete silent neutralization—they’ll typically separate during approach, providing elimination opportunities during isolation.
Once prepared, advance to the subsequent area with Lady Masako. You maintain selection between frontal entry with immediate combat engagement, or stealth circumnavigation. Either pathway remains operationally viable, though if selecting stealth methodology, you can employ your iron hook apparatus for approach from either the rightward cliff formation or the leftward structure. The building appears simplified for undetected area access, though either methodology, you’ll confront challenging progression. You’ll necessitate clearance of this area from Mongol presence before advancement capability.
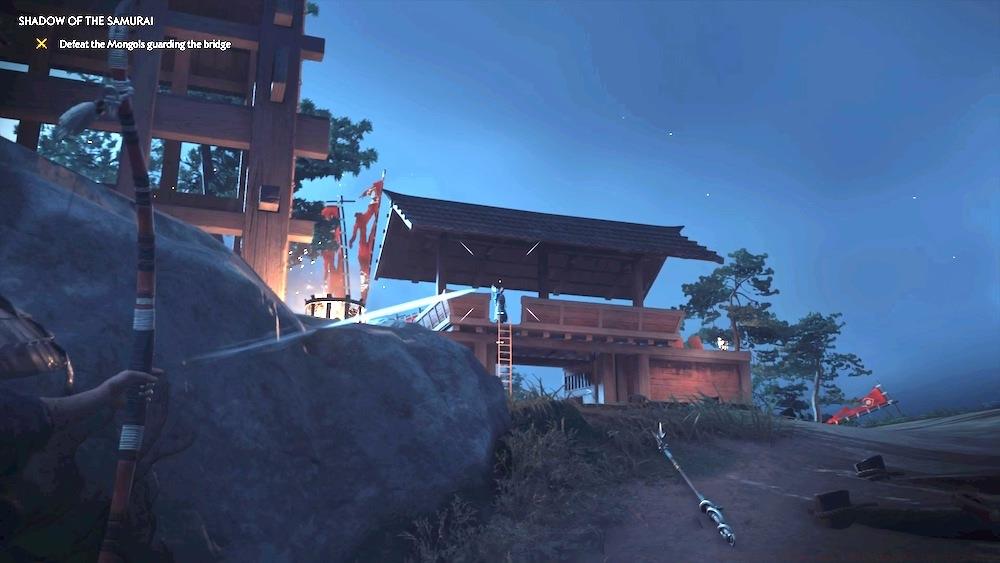
Subsequently, you’ll rendezvous with Yuna and approach the bridge gate structure. This represents challenging approach with minimal concealment options, so exercise caution. Initially, attempt cliff ascent and eliminate the proximate guard while maintaining concealment behind the ivy vegetation on the guard tower structure. Subsequently, descend, maintain concealment, and align projectile trajectory to eliminate the gate-summit archer. Following dual neutralization, you should maintain unimpeded area navigation provided you avoid excessive gate proximity. Advance to the rightward structure and the two personnel stationed on the observation platform behind it, facing outward over the cliff formation. If you possess Chain Assassination capability, you can achieve rapid dual elimination, leaving only several adversaries near the gate proper. Note that the helmet-equipped combatant cannot easily receive ranged neutralization using your halfbow apparatus—his armor will deflect cranial impacts. He’ll additionally deploy flashbang distraction devices, so maintain readiness. Neutralize them according to tactical preferences and advance forward until encountering the sealed gate on the bridge’s distal extremity.
You’ll necessitate alternative navigation around this gate structure, so scale the rightward cliff formation. You’ll access the rear courtyard area. Your primary operational directive involves gate activation for Yuna access, though if maintaining careful execution throughout this sector, you can achieve complete guard neutralization (or near-complete neutralization) without alert activation. Maintain peripheral area positioning following gate activation; eliminate the azure-clad guards rightward of the gate initially, then those in the rear corner, noting the Mongol Leader positioning in golden coloration—he remains wandering in the courtyard center and represents your final target. When he executes dorsal rotation (as does the large azure-clad personnel near him), neutralize the golden shield-bearing observer monitoring their conference. You should now achieve circumnavigation capability for the large personnel, then the two soldiers conducting archery training, and ultimately the leader himself.
A boss combat duel follows. Primarily, you should maintain operational capability without substantial assistance, though several maneuvers within this boss’s arsenal prove challenging. The initial involves the swirling sword technique where he drags the blade in terrestrial circular patterns. Execute significant rearward evasion into rolling maneuver upon detection, since effective sidestepping methodology remains unavailable. The secondary represents a rapid strike following blade sheathing, initiating combo sequences. You might detect the initial sword strike initiation, though he’ll pursue with secondary strike, so ensure preparation for dual rapid evasion to minimize damage reception. You can pursue with offensive maneuvers if executing sidestep evasion. Maintain patience and identify offensive opportunities and parry techniques to achieve victory.
Following duel completion, you’ll confront two large personnel and several archers. Draw the formidable combatants away from archer personnel to prevent harassment and emphasize evasion mechanics. Employ opportunistic projectile engagement until achieving elimination capability, then pursue archer neutralization. Within the subsequent structure, optimal strategy involves linking multiple showdown eliminations if you’ve activated that capability, since several adversaries employ large, sweeping weaponry. If unable to achieve showdown elimination, attempt clearance of minor sword adversaries initially, then neutralize one of the polearm specialists to establish spacious engagement for the large personnel. His ax weaponry will project you airborne, so execute significant distance evasion, not lateral movement. Engage him during technique intervals, and attempt forceful engagement using Water Stance heavy assault patterns to disrupt his defensive posture for supplementary damage application. If you maintain ghost weaponry like kunai projectiles, this represents appropriate deployment opportunity.
Following completion, ascend to the secondary level. You’ll receive opportunity for enemy assassination through paper door medium to acquire new technique knowledge. Continue ascent to the subsequent level where you’ll confront two additional swordsmen. Neutralize the azure-clad personnel initially with maximum rapidity, and transition to Water Stance configuration. The golden swordsman will ignite his blade, and you’ll become unable to parry his strikes during combustion state. He’ll employ three-strike combo sequences so ensure sustained evasion, then engage with heavy strike flurries to disrupt defensive posture and apply substantial damage. He doesn’t represent exceptional difficulty if maintaining distance and engaging during combo intervals.
Continue ascent to the subsequent level and you’ll confront another swordsman. Achieve neutralization to liberate Lord Shimura. You’ll engage one final significant combat scenario in the courtyard, though this instance, you’ll receive comprehensive allied assistance, significantly simplifying progression. Simply ensure sustained survival of all personnel during enemy neutralization according to tactical preferences. Following complete neutralization, Castle Kaneda becomes your operational territory and the narrative concludes, activating Act 2 progression.
We maintain substantial supplementary Ghost of Tsushima strategic guides and coverage to optimize your gameplay experience. Reference our comprehensive Ghost of Tsushima guide compendium, and if not previously accomplished, review our Ghost of Tsushima critical assessment.
Continue to Act 2
Ghost Of Tsushima Latest Updates
Once you gain complete control over Jin Sakai, the game presents multiple mission paths that offer genuine player agency. The order you tackle these objectives significantly impacts your early game experience and skill development. The Warrior’s Code serves as your formal introduction to Ghost of Tsushima’s sophisticated stealth combat system, initiating when you journey to Kechi Fishing Village and encounter Yuna. Your partnership with this key character leads directly to a Mongol detention facility where your stealth abilities will be thoroughly tested.
The essential strategy involves fully utilizing the tools at your disposal, particularly Focused Listening – a game-changing ability that enables precise enemy localization from considerable distances and through solid obstacles. This mechanic functions similarly to the listening mode in The Last of Us franchise, providing critical tactical intelligence. You can deploy Focused Listening to systematically identify and neutralize every Mongol soldier within the compound while maintaining complete stealth. This ability becomes increasingly vital as camp complexity grows, making early mastery a priority for efficient progression.
While this encampment isn’t extensive, it contains substantial loot opportunities that demand thorough exploration. You’ll discover abundant supplies scattered throughout the area, both inside tents and in open spaces – these resources serve as the primary currency for all your equipment enhancements and character upgrades. As you ascend the terrain elevation, exercise extreme caution when approaching the larger tent structure, as it houses a more formidable Mongol warrior equipped with superior combat capabilities. Similar to standard enemies, this elite opponent becomes vulnerable to silent elimination when you demonstrate patience and capitalize on moments when he presents his unprotected back.
Successful stealth operations in Ghost of Tsushima require understanding enemy patrol routes and visual cone limitations. The most common mistake players make is rushing eliminations instead of observing patterns first. For optimal results, always prioritize high-ground positions that provide comprehensive visibility while limiting your exposure. Advanced players should master the timing between guard rotations, typically allowing 5-7 second windows for safe movement between cover points. Remember that supplies respawn periodically, making repeated visits to cleared camps worthwhile for resource accumulation.
When planning your stealth approach strategy, consider that Mongol detection ranges vary based on weather conditions – rainy conditions actually reduce their visual acuity by approximately 20%. This environmental factor can be strategically exploited during more challenging infiltrations. For broader tactical understanding, consult our complete combat fundamentals guide which covers universal stealth principles applicable across multiple game environments.
Successfully finishing The Tale of Lady Masako opens up her comprehensive series of optional missions. For complete coverage of Masako’s narrative arcs, reference our detailed Complete Guide to side content management.
Begin by rendezvousing with Yuna at River Child’s Wetlands, located in a residence north of Azamo Bay, to discuss the critical operation to extract her sibling Taka. You’ll encounter Kenji, who presents an infiltration route into the Mongol-controlled settlement. Accompany him until you penetrate the town perimeter, where you’ll receive advanced stealth instruction emphasizing elevated traversal. Shadow Yuna during her ascent, then take the leftward route while maintaining visual contact with the slave trader navigating the urban landscape.
Maintain your elevated position tracking the slave trader across the rooftops until reaching the marketplace. Upon arrival, descending becomes necessary to traverse the open plaza, which contains substantial enemy presence. Fortunately, their observational skills remain limited, allowing strategic passage despite dense patrol concentrations.
Initiate by descending and executing a silent takedown on the sentry positioned beside the vessel. With this threat neutralized, advance across the exposed terrain toward the gateway-adjacent structure. Heavy guard deployment surrounds the entrance, but dynamic enemy movement patterns activate as you approach, creating temporary openings. Progress deliberately while employing Focused Listening to verify safe passage. With careful execution, you can either navigate the building’s exterior near the barrier—requiring engagement with one guard—or penetrate the interior, eliminating several opponents during transit.
Beyond the structure, maintain covert surveillance of the slave trader as he proceeds down the avenue, enabling relatively straightforward tracking until he reaches Taka’s location. Subsequently, follow Yuna and Taka during their exfiltraton from the settlement. After scaling the perimeter wall, adhere to the roadway while exploiting tall grass clusters for concealment, as Mongol reconnaissance units require evasion. Remain hidden during patrol passage then continue advancement. Persist along the route until Kenji arrives with mount provisions, concluding the narrative segment.
Completing The Broken Blacksmith activates Kenji’s supplemental mission chain. For exhaustive details on Kenji’s Tales, consult our comprehensive Weapons Unlock guide for strategic approaches.
Additional combat personnel remain essential, making negotiations with the Straw Hat Ronin imperative for force expansion. Travel to Kishi Grasslands coastal region in Tsutsu to locate the mission trigger—a destroyed Mongol supply column apparently ambushed by the Straw Hats. Examine the scene to initiate the tale.
Trace the casualty trail to discover a fallen Straw Hat operative—and encounter Ryuzo. Immediate Mongol assault follows this discovery. By this progression point, you should possess solid understanding of group engagement tactics, but this confrontation benefits significantly from prioritizing archer elimination to prevent ranged harassment during melee exchanges. This extensive engagement features multiple assault waves, so concentrate on neutralizing high-threat targets initially to preserve vitality. Note the inclusion of a Mongol Commander among standard troops, plus a heavy axe-wielding combatant presenting additional challenges. The axe fighter’s sweeping assault may not be immediately apparent—you can vault over this maneuver, but impact results in significant knockback.
Given the substantial Mongol numbers, optimal strategy involves creating distance from elite enemies while dispatching standard troops first. This generates improved maneuvering space to avoid powerful attacks, enabling closing distance for decisive eliminations.
Remain with Ryuzo until returning to the Straw Hat encampment to complete the tale. For advanced Class Guide tactics applicable to similar scenarios, review our specialized combat documentation.
Your mission begins with a covert extraction from the forge perimeter, requiring strategic elimination of Mongol patrols holding villagers captive. Maintaining stealth is paramount—if detected, enemies will immediately execute hostages, forcing mission restart from your last save point. Monitor for distinctive crimson skull indicators above Mongol soldiers, signaling imminent civilian executions that demand immediate intervention. While you have a brief reaction window, swift action is essential to prevent permanent casualties.
The primary objective involves securing a multi-story structure containing initial hostages. After neutralizing guards, locate captives on the upper level who will provide intelligence about additional prisoners. Proceed to the riverside to intercept a second Mongol squad pursuing fleeing civilians. Employ ranged weaponry to reduce enemy numbers systematically while maintaining focus on execution-priority targets marked by the red skull warning system.
Post-rescue navigation back to the forge presents significant stealth challenges with unpredictable patrol patterns. The optimal route involves veering leftward through constricted alleyways between buildings. Traverse the settlement’s perimeter before ascending the hillside approach—this path typically avoids most Mongol detection zones while ensuring civilian safety.
The subsequent phase requires rendezvousing with Yuna for additional rescue operations. Avoid bridge crossings entirely; instead ford the river and eliminate the patrol guard while positioning yourself left of the window sightlines to avoid detection from the target building’s interior sentry. Time your entry during his rotation cycle, then employ either direct assault or ladder-based aerial assassinations based on your combat preference. Ensure no stray enemies threaten civilians before retracing your route across the river and back to the forge, remaining vigilant for roaming patrols.
With all civilians secured, prepare for the forge defense sequence—a challenging confined-space engagement. As Mongols advance, immediately deploy your bow to neutralize archers positioned at the rear. Canine units present particular threats with unblockable attacks; eliminate them preemptively with arrows before they close distance to significantly reduce combat difficulty.
Yuna provides valuable distraction against select enemies, but you’ll face multiple assault waves with escalating intensity. After initial engagements, combat expands into the forge interior. Civilian protection remains mandatory—intercept any Mongol targeting executions immediately. Strategic positioning outside the structure is recommended due to camera navigation issues in tight quarters. Leverage Yuna’s crowd control abilities while you address enemies straying from the primary engagement zone.
Successive waves introduce increasingly formidable opponents including elite swordsmen, spear specialists, and shielded warriors. Apply previously mastered combat techniques while maintaining execution prevention as your primary focus. Ghost weapons prove essential for effective crowd management, particularly when maintaining exterior positioning. Kunai effectively finish wounded foes or interrupt charging enemies, while explosive devices and smoke grenades disrupt coordinated enemy advances with remarkable efficiency.
The concluding phase introduces a Mongol Commander to the battlefield. Employ either focused elimination tactics to remove him quickly or systematic minion clearance to isolate him for a final duel—select the approach aligning with your combat specialization.
Eliminating the commander and his forces secures the civilian population and establishes Komatsu as a controllable territory. This unlocks permanent access to various merchants and services within the settlement, providing ongoing gameplay benefits throughout your campaign.
Converse with Yuna followed by Taka at Komatsu Forge to initiate this critical narrative arc. Prioritize this questline as it rewards the grappling hook—an essential mobility tool with extensive utility across Tsushima. Without this equipment, numerous optional activities and exploration opportunities remain inaccessible, significantly limiting your gameplay experience. Ryuzo’s subsequent appearance provides immediate opportunity to test your new equipment during the fort infiltration sequence. Accompany him until reaching the fortress perimeter, then navigate leftward to locate the cliff ascent initiation point.
Before advancing from the Mongol encampment, ensure you collect the Hanging Pitcher Mongol Artifact positioned on the round tent’s exterior wall. Missing this collectible requires backtracking later for completion.
After neutralizing all hostile forces in the area, trigger the alarm mechanism to summon Ryuzo’s assault on the main entrance. This tactical diversion positions you advantageously behind Mongol defensive lines. With reinforcement support, systematically eliminate the disoriented soldiers using your preferred combat approach. Conduct a thorough resource sweep of the fortification before departure to maximize your equipment and supply reserves.
Return to Komatsu Forge to initiate final assault preparations for Castle Kaneda. Upon arrival, coordinate with allied forces before scaling the cliff face to access the castle’s central courtyard. Exercise patience during observation—enemy patrol patterns naturally create isolation opportunities for silent takedowns. Sleeping Mongols within structures present additional stealth elimination chances. Critical warning: detection triggers immediate mission failure, making careful approach paramount.
When prepared, advance with Lady Masako to the subsequent combat zone. You face a strategic decision: direct frontal assault or covert flanking maneuvers. Both approaches prove viable, though stealth routes utilizing your grappling hook from either the right cliffside or left building offer superior tactical positioning. The structural approach typically provides easier undetected access, though both routes present significant challenge. Complete area clearance of Mongol forces remains mandatory for progression.
Regroup with Yuna at the bridge gate approach—a notoriously exposed area with minimal concealment options. Initial positioning should utilize the elevated cliff with cover provided by guard tower ivy vegetation. Eliminate the nearest sentry while maintaining visual cover, then descend to neutral ground for sniper positioning against the gate-top archer. With both threats neutralized, maneuver freely while maintaining distance from the gate structure.
Proceed to the right-side building where two observers patrol the cliff-facing platform. If you’ve unlocked Chain Assassination, execute both simultaneously, leaving only gate-proximate enemies. Important tactical note: helmet-equipped soldiers possess arrow-deflecting armor, making ranged headshots ineffective. Additionally, they employ disorienting flashbang devices requiring anticipatory evasion. Neutralize remaining opposition using appropriate methods and advance to the sealed gate at the bridge’s terminus.
Circumvent the obstructed gate by ascending the right-side cliff face. This infiltration point deposits you within the rear courtyard area. Primary objective: secure gate access for Yuna’s entry. With meticulous execution, achieve near-total guard elimination without alerting reinforcements. Maintain perimeter positioning after gate activation; prioritize elimination of blue-uniformed guards gate-right, then rear corner positions.
Identify the Mongol Leader (distinguished by yellow attire) patrolling the courtyard center—designate him as final elimination target. When he positions with back turned (accompanied by adjacent blue-clad heavy soldier), eliminate the shield-bearing yellow-garbed observer monitoring their discussion. This creates tactical openings to circle for the heavy soldier elimination, then the archery practice duo, concluding with the leader himself.
Prepare for an intense one-on-one duel encounter. While generally manageable, specific boss techniques demand specialized countermeasures. The ground-sweeping circular sword slash requires backward rolling evasion—lateral movement proves ineffective. Additionally, watch for the rapid-draw attack following sword sheathing, which initiates a multi-strike combination.
Anticipate the initial strike but prepare for immediate follow-up—execute two rapid dodges to minimize damage intake. Successful evasion creates counter-attack opportunities through sidestepping maneuvers. Maintain defensive patience while identifying parry openings and attack windows to secure victory.
Post-duel, engage two heavy combatants supported by archer units. Tactically separate the melee fighters from ranged support to manage engagement complexity. Utilize constant dodging while employing opportunistic attacks. After neutralizing primary threats, pursue and eliminate archers.
Within the subsequent structure, optimal approach involves chaining multiple showdown executions if ability-unlocked. Alternative strategy: prioritize elimination of standard sword-wielders first, then address spear-users to create engagement space for the heavy ax-wielder. His powerful strikes launch players airborne—evade directly backward rather than laterally. Strike during attack recovery phases, employing Water Stance heavy attacks to degrade guard stability for increased damage. Ghost weapons like kunai provide excellent engagement control when available.
Upon completion, ascend to the second level where you’ll encounter an assassination opportunity through paper screen material, granting new technique acquisition. Continue upward to confront two additional swordsmen. Prioritize the blue-attired combatant for rapid elimination, then transition to Water Stance.
The yellow-garbed swordsman ignites his blade, creating parry-impossible attacks while flaming. He employs a three-strike combination requiring sustained evasion, followed by heavy attack flurries to break his defensive posture. Despite intimidating appearance, he remains manageable through distance maintenance and combo-interval striking.
Proceed upward to the next floor facing another swordsman. Eliminate him to secure Lord Shimura’s liberation. The culminating courtyard engagement now features full allied support, significantly reducing difficulty. Critical objective: maintain ally survivability while eliminating opposition through preferred methods. With complete enemy neutralization, Castle Kaneda falls under your control, concluding the tale and transitioning to Act 2.
Action Checklist
- Complete weapon familiarization drills at practice range (15-20 minutes)
- Master target prioritization by identifying and eliminating high-value threats first
- Practice advanced movement techniques including cover transitions and sprint management
- Optimize loadout configuration for specific mission parameters
- Develop map awareness by studying terrain features and strategic positions
- Complete Lady Masako’s tale immediately for Samurai Clan Armor acquisition
- Systematically eliminate Mongol Leaders to unlock essential combat stances
- Prioritize The Iron Hook mission for essential traversal equipment
- Collect Iron resources exclusively from Mongol territories for weapon upgrades
- Thoroughly loot all mission areas for supplies and collectibles
- Activate Focused Listening immediately upon entering any camp to map enemy positions
- Systematically loot all tents and containers before engaging enemies to maximize resource gain
- Identify and mark the elite warrior location, then plan your approach from elevated positions
- Wait for patrol isolation and back-turning moments before executing silent takedowns
- Utilize weather conditions to your advantage – rain provides significantly better stealth opportunities
- Execute silent takedowns from elevated positions before descending into guarded areas
- Use Focused Listening continuously to monitor patrol movements and timing
- Prioritize archer elimination in large engagements to minimize ranged damage
- Identify and neutralize Mongol Leaders early in combat sequences
- Complete ally questlines to unlock expanded gameplay options and narrative content
- Execute stealth approach to first hostage location, prioritizing red skull targets
- Rescue river pursuit hostages using ranged attacks and execution prevention
- Navigate return route using left-side alleyways to avoid patrols
- Complete Yuna rescue mission with window timing and assassination opportunities
- Defend forge against waves, utilizing Ghost weapons and exterior positioning
- Eliminate Mongol Commander using preferred engagement strategy
- Collect Hanging Pitcher Mongol Artifact from round tent exterior
- Clear initial camp, activate alarm for reinforcements, gather supplies
- Use stealth to eliminate courtyard guards without detection
- Execute bridge gate approach with sniper elimination and chain assassinations
- Defeat boss duel by recognizing attack patterns and proper dodging
- Clear interior areas using appropriate stances and ghost weapons
- Complete upper floor challenges and final courtyard battle
No reproduction without permission:SeeYouSoon Game Club » Ghost Of Tsushima Act 1 Walkthrough (Spoiler-Free)