TL;DR
- Season 3 introduces flooded maps, Marauder enemies, and drivable cars transforming gameplay dynamics
- Weekly challenges provide substantial XP boosts for Battle Pass progression and cosmetic unlocks
- Aquaman missions require specific location knowledge and timing for successful completion
- Secret Coral Buddies challenges offer hidden rewards through unconventional gameplay approaches
- Strategic planning and map familiarity significantly reduce completion time for all objectives
Fortnite Chapter 2’s third season has launched, bringing dramatic environmental shifts and fresh gameplay mechanics to the battle royale landscape. The island has undergone substantial flooding, creating new aquatic routes and altering traditional combat zones significantly.
Among the most notable additions are Marauder AI opponents that patrol specific regions, presenting both threat and opportunity for strategic players. These hostile NPCs drop valuable loot when defeated but require careful engagement tactics to overcome efficiently.
Vehicle enthusiasts will appreciate the long-awaited introduction of functional automobiles through the Joy Ride update. Cars provide enhanced mobility across the transformed terrain and introduce new combat possibilities with their customizable features and defensive capabilities.
Epic Games maintains its established pattern of releasing fresh mission sets each week throughout Season 3’s duration. These structured objectives serve as the primary mechanism for accelerating Battle Pass advancement beyond standard gameplay XP gains.
Successfully clearing challenge requirements rewards substantial experience point bonuses that directly contribute to level progression. Each Battle Pass tier unlocked provides access to exclusive character skins, emotes, weapon wraps, and additional cosmetic customization options.
This season introduces two specialized challenge categories beyond the standard weekly rotations. The Aquaman series offers thematic superhero skins, while Coral Buddies missions contain hidden objectives requiring discovery through exploration and experimentation.
Navigating whirlpool mechanisms at The Fortilla requires understanding their teleportation functionality. These aquatic vortices transport players between connected locations instantly, enabling rapid map traversal when utilized strategically during matches.
The swimming time trial at Dirty Docks demands efficient route planning and stamina management. Optimal paths typically involve utilizing underwater currents and avoiding surface exposure to maintain maximum swimming velocity throughout the course.
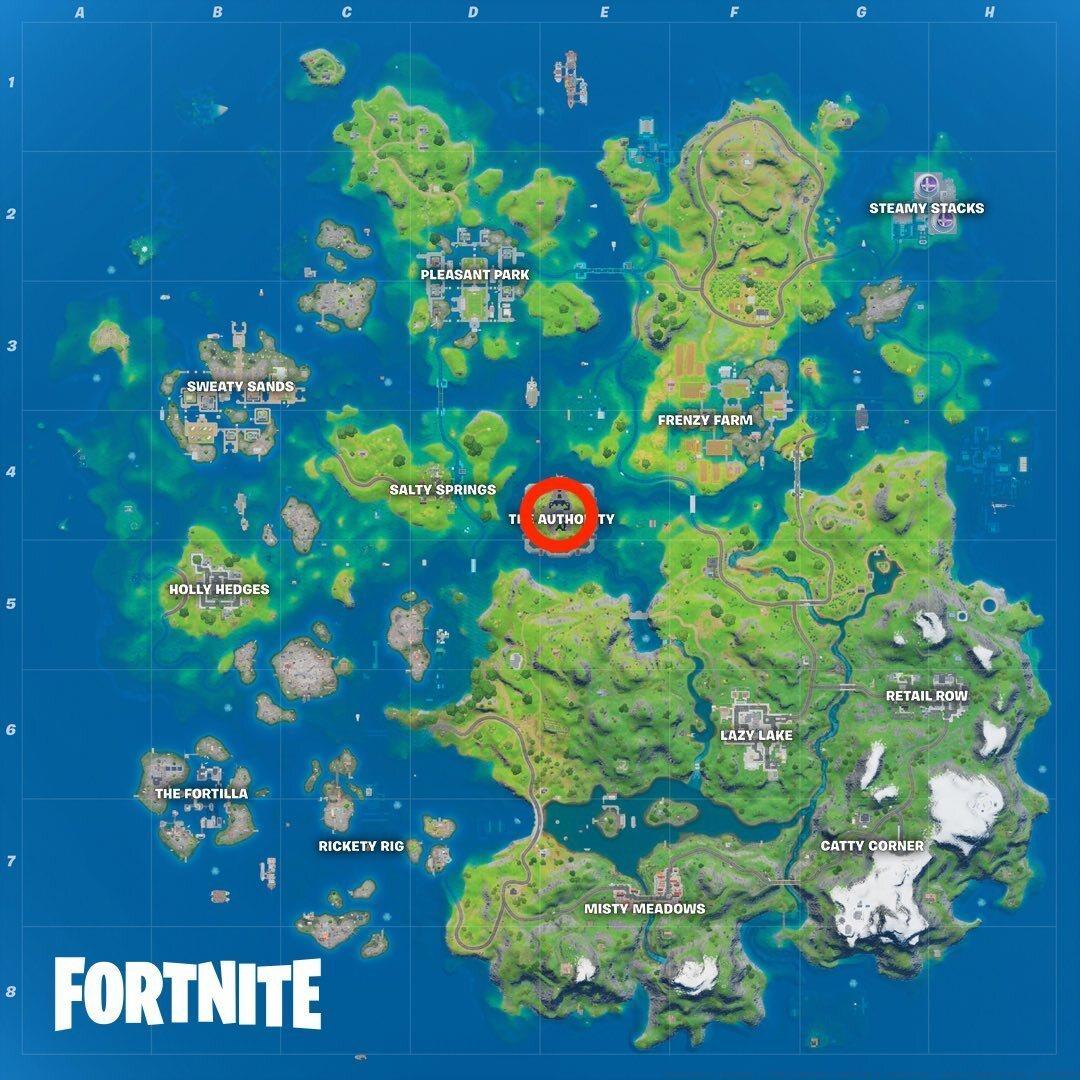
Locating the legendary trident at Coral Cove involves specific environmental interaction rather than simple item collection. Players must trigger a sequence of actions at precise locations to summon this powerful artifact.
Executing the waterfall dive at Gorgeous Gorge necessitates precise positioning and timing. The challenge registers completion only when players achieve sufficient aerial distance and proper entry angle into the water below.
The Coral Buddies challenge series operates differently from standard mission structures, requiring players to discover objectives organically through gameplay. These hidden tasks often involve interacting with specific environmental elements or achieving unusual gameplay milestones.
Unlike explicitly listed objectives, Coral Buddies missions typically activate only after meeting specific prerequisite conditions. These may include visiting certain locations in sequence, utilizing particular items, or achieving specific combat accomplishments.
Completion rewards for these clandestine missions include exclusive cosmetic items not available through Battle Pass progression or item shop purchases, providing unique customization options for dedicated players.
Efficient challenge completion requires strategic match planning rather than random gameplay. Prioritize objectives that can be accomplished simultaneously and select landing locations that provide access to multiple challenge requirements within single sessions.
Common execution errors include attempting whirlpool navigation without proper positioning, misunderstanding swimming trial checkpoint requirements, and overlooking subtle environmental cues for trident acquisition.
Advanced players should coordinate challenge completion with standard gameplay objectives. Combining elimination tasks with location-based missions maximizes time investment returns and accelerates overall progression rates significantly.
Regular consultation of updated guide resources ensures you remain informed about newly discovered strategies and weekly challenge rotations. Our comprehensive Complete Guide to gaming strategies provides additional framework for optimizing your approach to seasonal content.
Aquaman Challenges
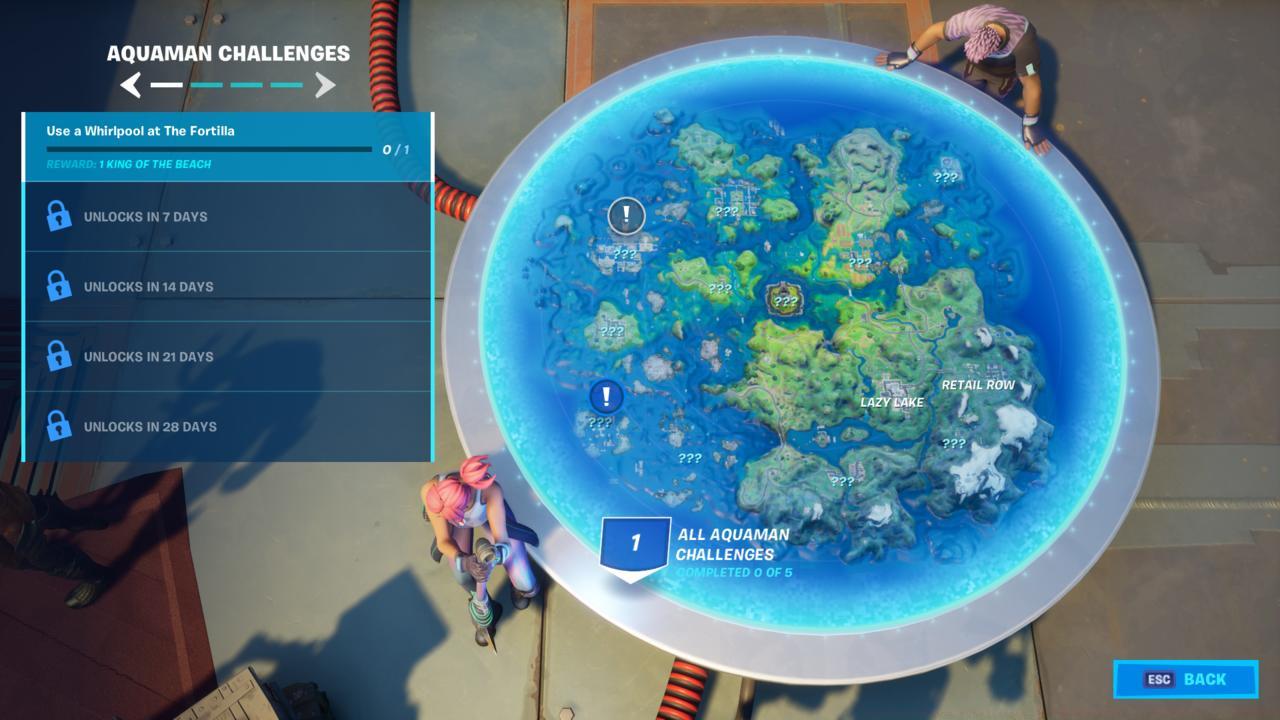
Season 3 Aquaman Challenges
- Use a whirlpool at The Fortilla
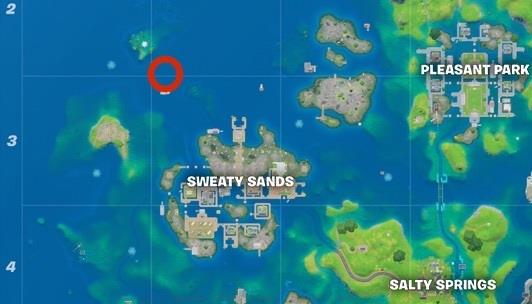
- Use a fishing pole to ride behind a Loot Shark at Sweaty Sands
- Catch different types of fish in a single match (2)
- Complete the swimming time trial at Dirty Docks
- Claim your Trident at Coral Cove
- Dive over the waterfall at Gorgeous Gorge while wearing the Aquaman outfit
Use A Whirlpool At The Fortilla
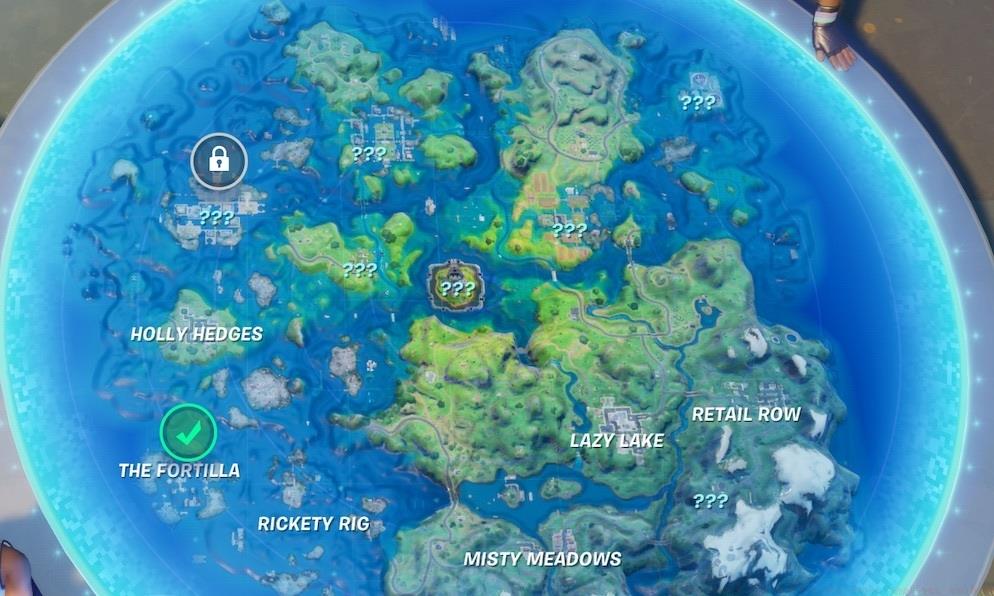
The Fortilla location
Mastering the whirlpool mechanics at The Fortilla requires strategic approach timing. Position yourself directly above the swirling vortex before initiating descent to ensure immediate activation. The Fortilla’s southern position relative to Holly Hedges makes it accessible from multiple drop routes. Experienced players recommend approaching from the northwest to avoid early confrontations with opponents. The King of the Beach loading screen reward provides excellent bragging rights for your collection. Many players underestimate the importance of altitude control when targeting whirlpools effectively.
Complete Swimming Time Trial At Dirty Docks

Dirty Docks location
The swimming time trial at Dirty Docks demands precise navigation through underwater checkpoints. Located in coastal grid H4, the trial features multiple clock icons requiring sequential activation. The Supreme Shell back bling cosmetic significantly enhances your character’s aquatic appearance. Advanced players suggest memorizing the checkpoint sequence to minimize unnecessary detours. The current flow patterns can either assist or hinder your progress depending on approach angle.
Claim Your Trident At Coral Cove
Aquaman Trident location map
Securing the legendary Trident at Coral Cove involves calculated risk management. The northwestern map position between B2 and B3 coordinates places the artifact on a prominent rock formation. The collection process requires uninterrupted focus, making you vulnerable to enemy attacks. Strategic positioning near cover while initiating the collection sequence can prevent unexpected eliminations. The extended animation duration requires environmental awareness for successful completion.
Dive Over The Waterfall At Gorgeous Gorge

Gorgeous Gorge waterfall location
Unlocking the Arthur Curry Aquaman variant through waterfall diving requires precise execution. The northern river location west of Lazy Lake offers multiple approach vectors. The automatic skin transformation upon surfacing provides immediate visual confirmation of challenge completion.
Week 9 Challenges
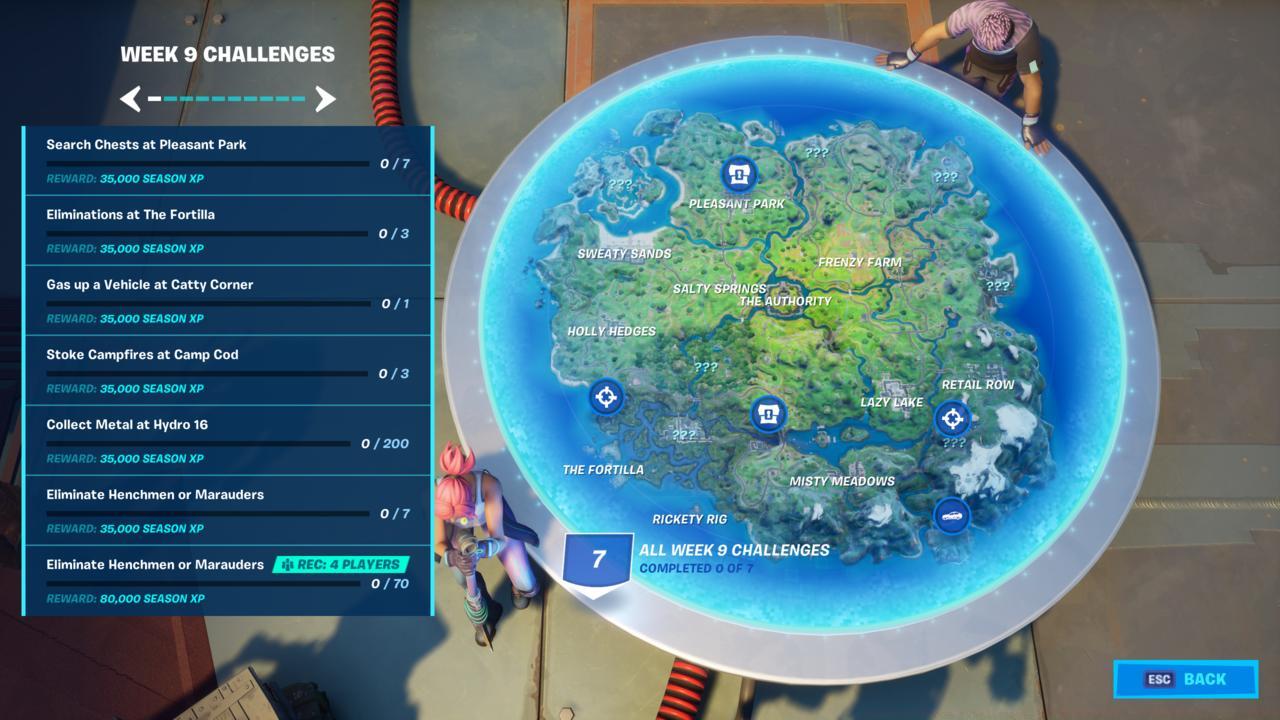
Week 9 challenges
- Search chests at Pleasant Park (7)
- Eliminations at The Fortilla (3)
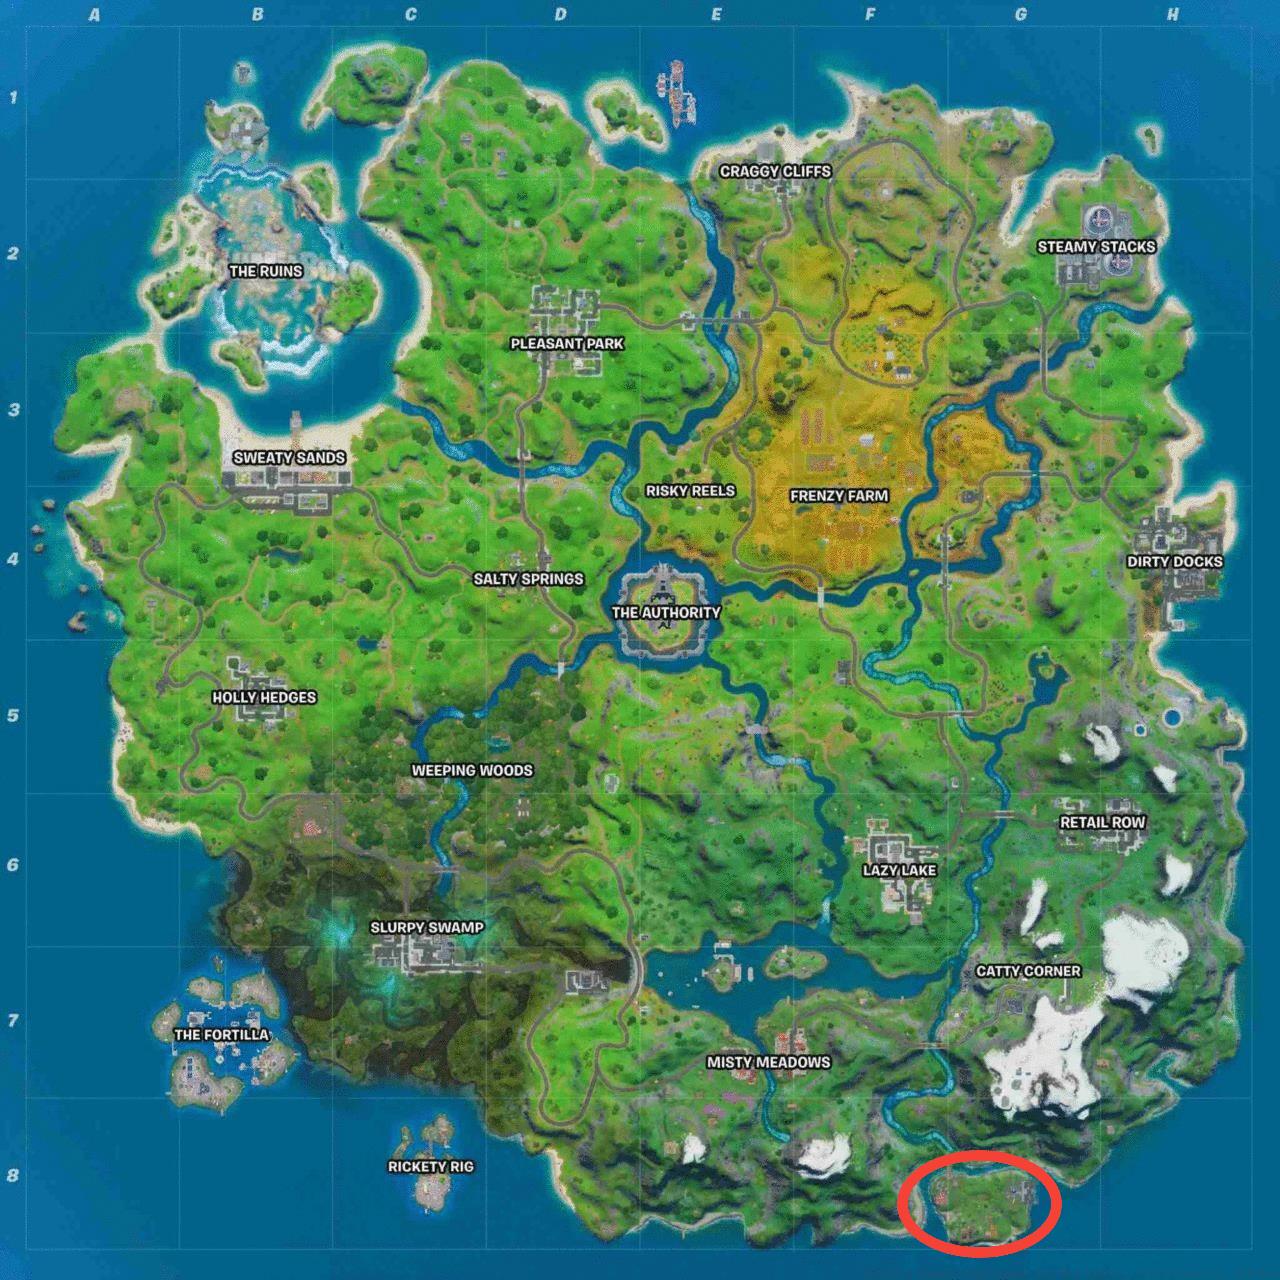
- Gas up a vehicle at Catty Corner (1)
- Stoke campfires at Camp Cod (3)
- Collect metal at Hydro 16 (200)
- Eliminate Henchmen or Marauders (7)
- Eliminate Henchmen or Marauders (70)
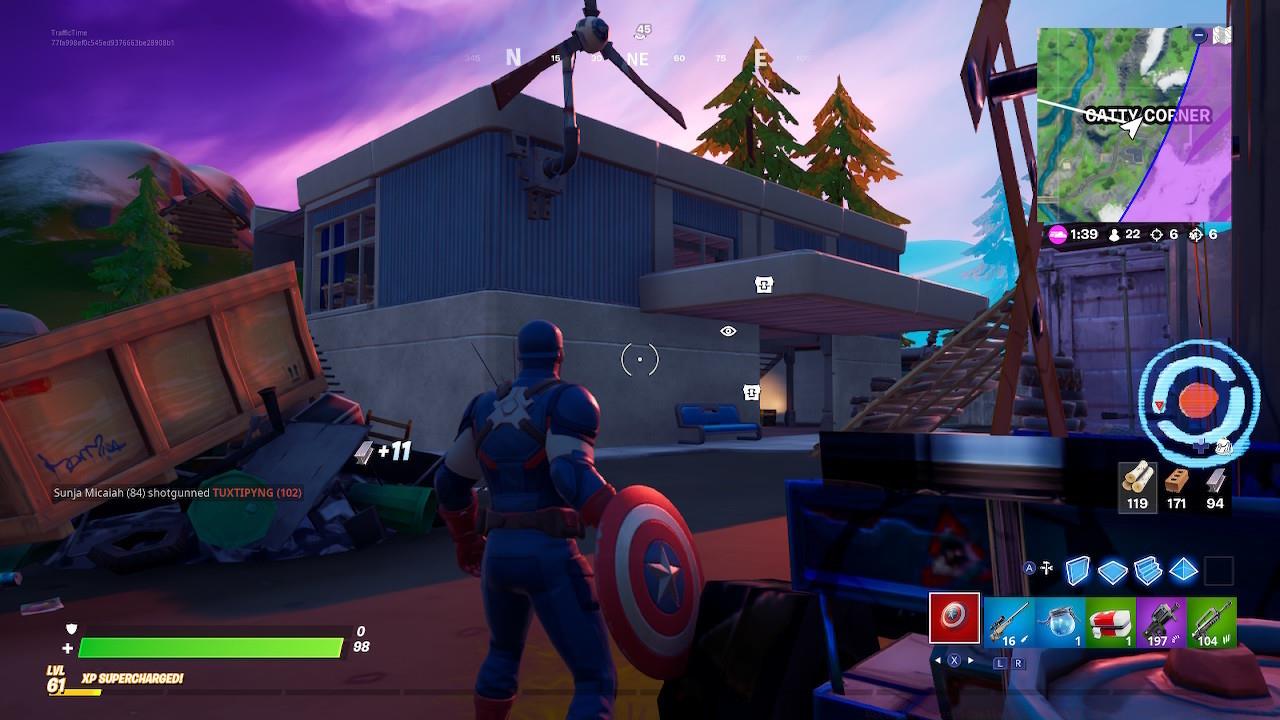
Gas Up A Vehicle At Catty Corner
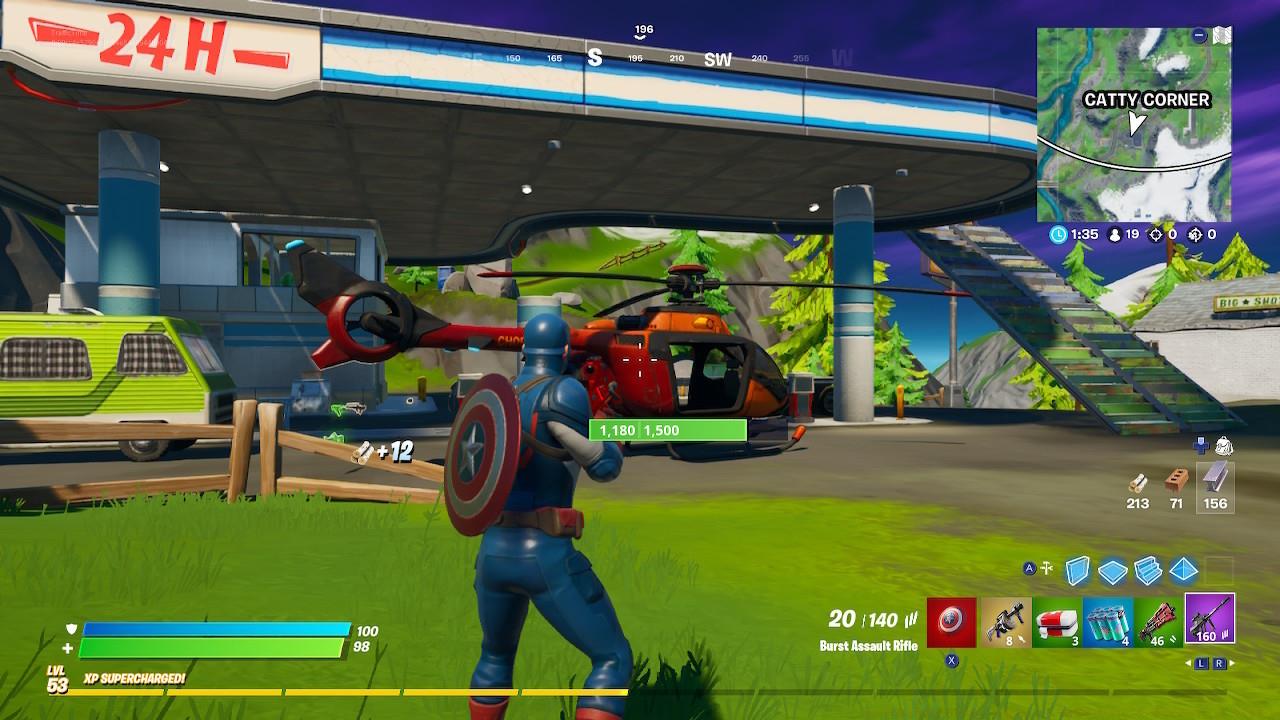
Gassing up a vehicle at Catty Corner
Vehicle refueling mechanics introduced in the Joy Ride update require specific interaction sequences. The southeastern G7 grid location features multiple gas stations with functional pumps. Proper vehicle positioning adjacent to fuel sources ensures prompt activation of refueling prompts. The southeastern positioning makes early game completion risky due to high player concentration.
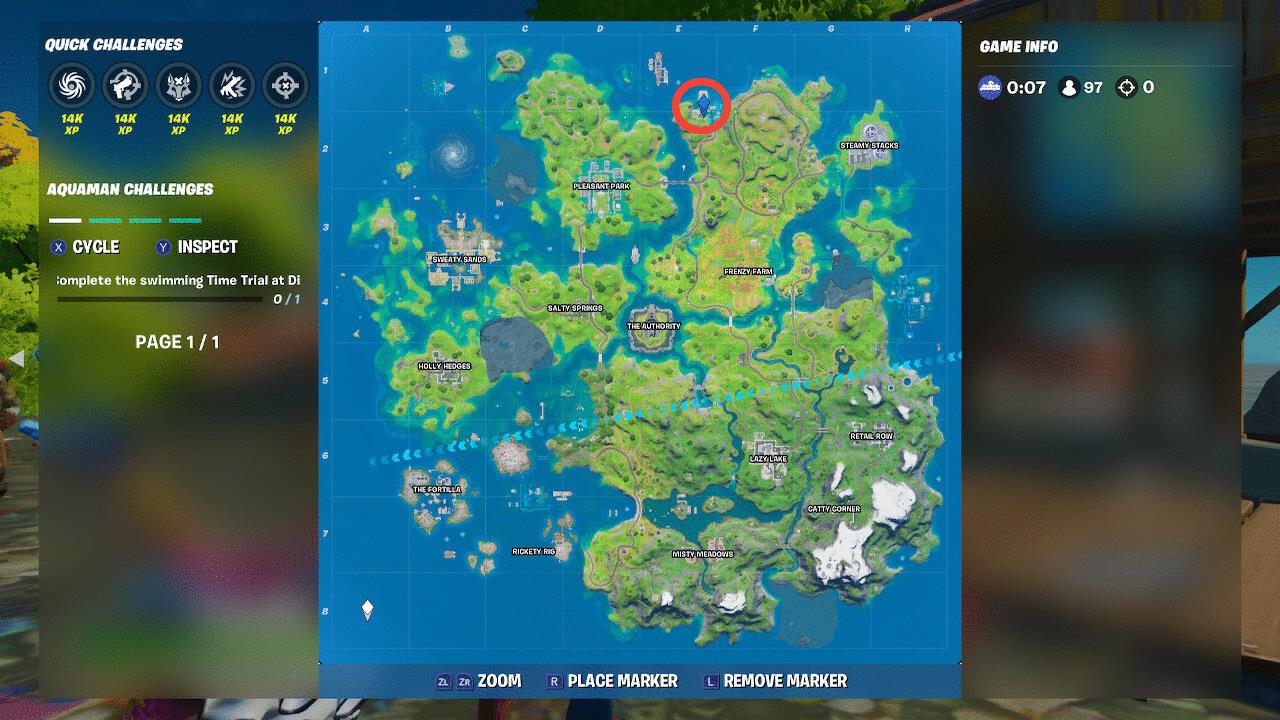
Stoke Campfires At Camp Cod
Camp Cod location
Campfire ignition requires proximity detection and specific emote activation. The isolated southern G8 island location provides relative safety from early engagements. Multiple campfire locations distributed throughout the area enable rapid challenge completion.
Collect Metal At Hydro 16
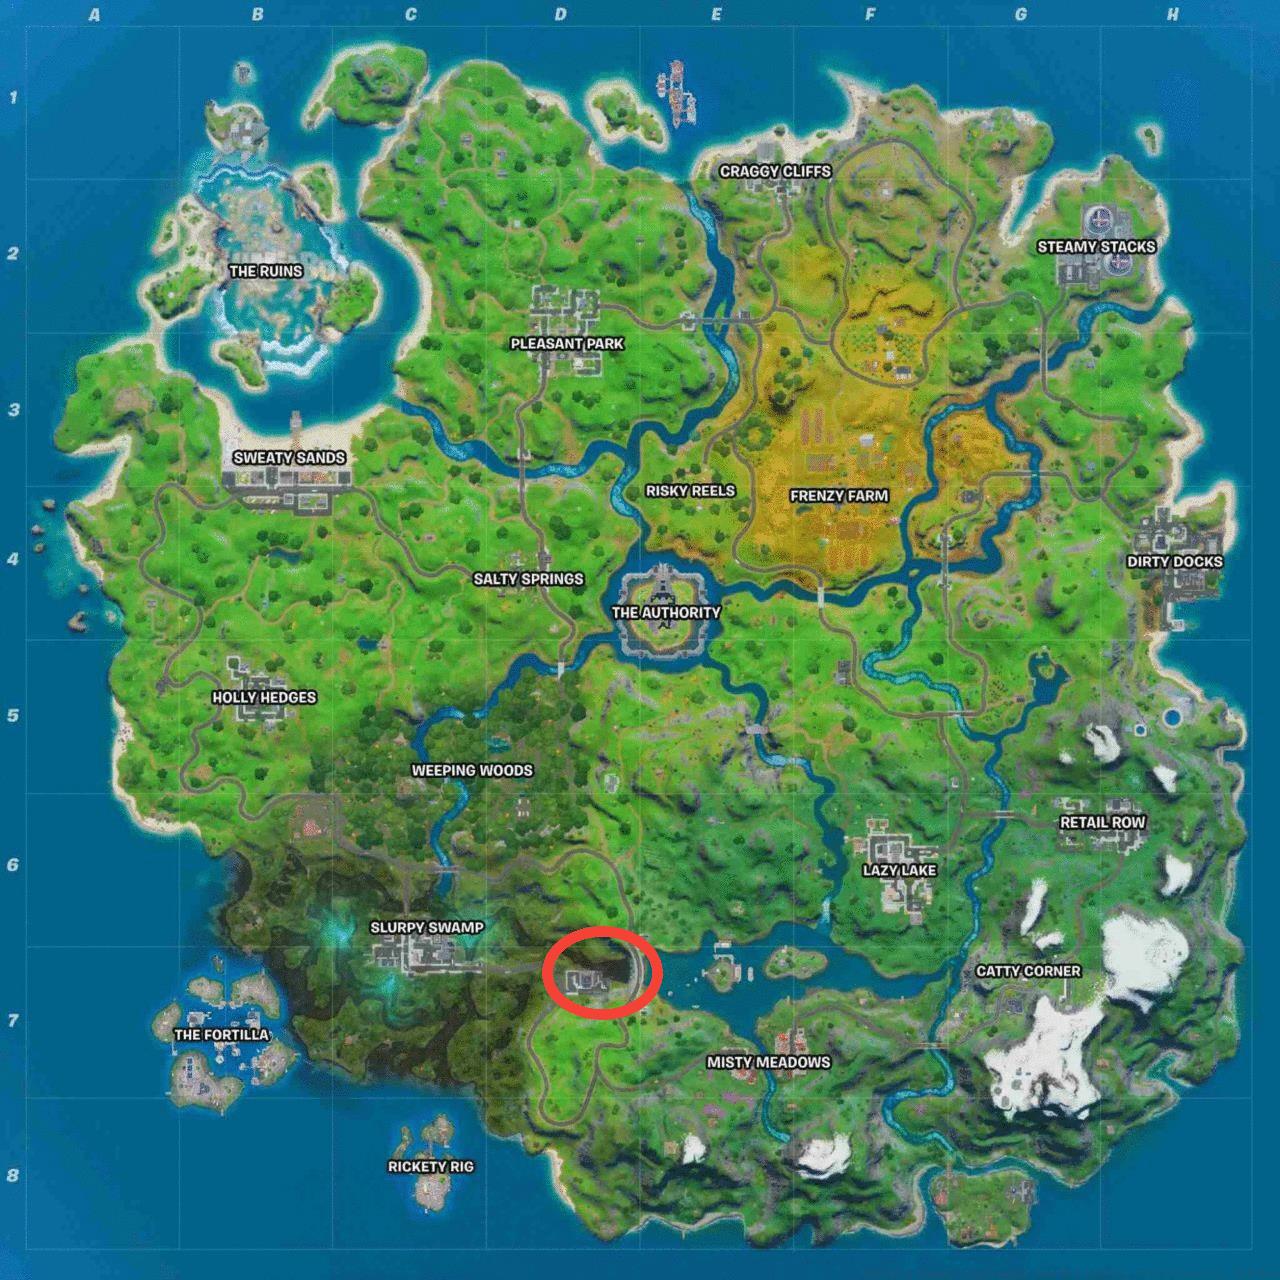
Hydro 16 location
Metal harvesting efficiency depends on targeting optimal resource nodes. The D7 grid dam location contains abundant metal sources including industrial equipment and structural components. Strategic harvesting prioritizes high-yield sources over scattered materials.
Week 8 Challenges

Week 8 challenges
- Search chests at Frenzy Farm (7)
- Eliminations at Salty Springs (3)
- Complete the boat time trial at Motorboat Mayhem
- Drive a car from Retail Row to Pleasant Park in less than 4 minutes
- Collect wood from Holly Hedges (500)
- Deal damage to opponents from inside a vehicle
- Deal damage to opponents from inside a vehicle (10,000)
Complete Boat Time Trial At Motorboat Mayhem

Motorboat Mayhem location
Boat time trial completion demands mastery of aquatic vehicle handling. The E7 grid location northwest of Misty Meadows features challenging navigation patterns. Marker sequencing requires anticipatory steering rather than reactive corrections.
Drive A Car From Retail Row To Pleasant Park In Four Minutes
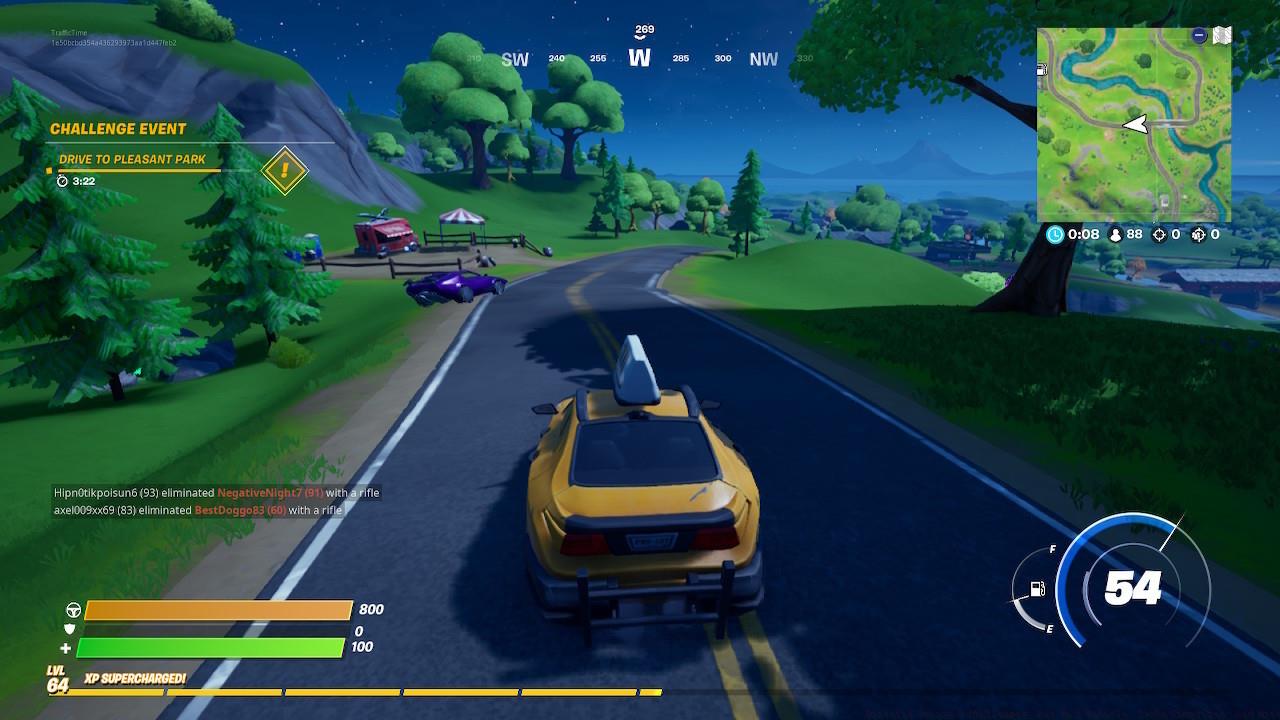
Week 8’s Drive to Pleasant Park challenge
Cross-map vehicle navigation efficiency depends heavily on terrain management. Paved road adherence significantly reduces travel time compared to off-road alternatives. Vehicle acquisition timing at Retail Row determines overall challenge success probability.
Week 7 Challenges

Week 7 challenges
- Search Chests at Retail Row (7)
- Gain health or shields from Slurp at Slurpy Swamp (100)
- Collect Floating Rings at Weeping Woods (5)
- Find balls of yarn at Catty Corner (3)
- Collect stone from Rapid’s Rest (300)
- Eliminate players (5)
- Eliminate players (50)
Find Balls Of Yarn At Catty Corner
Catty Corner
Yarn collection amidst robotic opposition requires tactical preparation. The G7 southeastern location features concentrated enemy presence around key objectives. Pre-challenge resource gathering at Lazy Lake provides necessary combat readiness.
Collect Stone From Rapid’s Rest

Rapid’s Rest location
Stone resource identification and harvesting efficiency determines challenge completion speed. The G6 grid location east of Lazy Lake contains abundant rock formations. River navigation provides the most efficient access route to the target area.
Week 6 Challenges

Week 6 challenges
- Deal damage at Rickety Rig (500)
- Eliminations at Pleasant Park (3)
- Land at The Authority and finish Top 25
- Catch a weapon at Stack Shack (1)
- Search Chests (10)
- Search Chests (100)
- Search Ammo Boxes at Salty Springs (7)
Catch A Weapon At Stack Shack

Stack Shack location
Weapon acquisition through fishing mechanics introduces unique gameplay dynamics. The A4 grid island location features specialized fishing equipment distribution. Successful weapon catching requires understanding of fishing spot mechanics and timing.
Week 5 Challenges
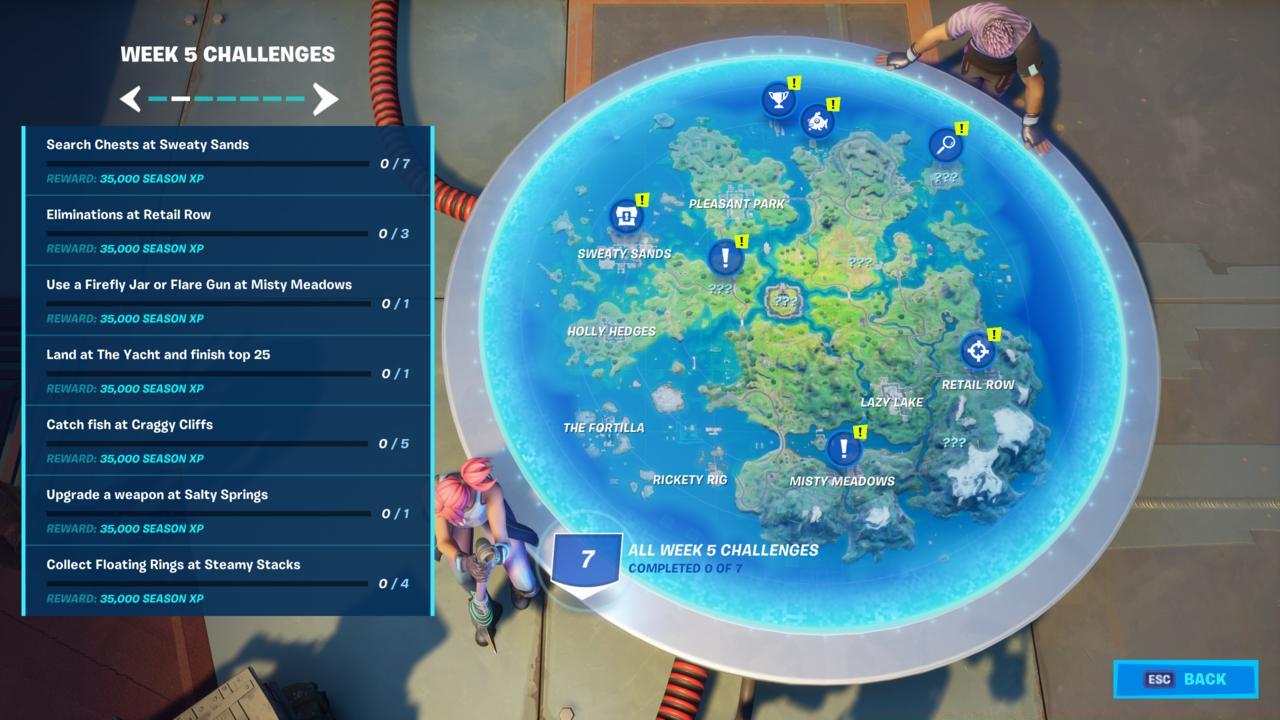
Week 5 challenges
- Search chests at Sweaty Sands (7)
- Eliminations at Retail Row (3)
- Use a Firefly Jar or Flare Gun at Misty Meadows
- Land at The Yacht and finish top 25
- Catch fish at Craggy Cliffs (5)
- Upgrade a weapon at Salty Springs
- Collect Floating Rings at Steamy Stacks (4)
Use A Firefly Jar Or Flare Gun At Misty Meadows
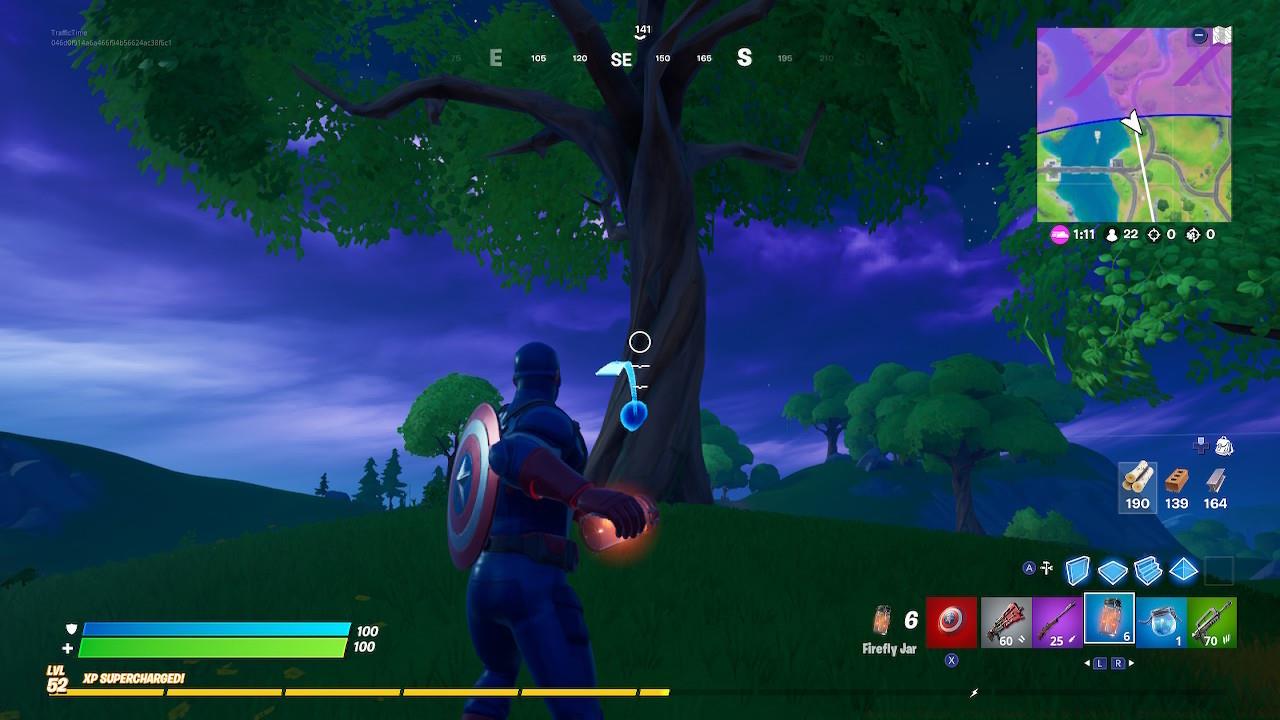
Firefly Jar
Specialized item acquisition and utilization requires understanding of spawn mechanics and timing. Firefly collection availability depends on in-game time cycles and environmental conditions. Strategic planning around item availability windows maximizes challenge completion efficiency.
Catch Fish At Craggy Cliffs
Craggy Cliffs location
Fishing mechanics mastery involves understanding bait distribution and catch probability. The northern E1 location features specific fishing pole spawn locations that experienced players can leverage for rapid completion.
Week 4 Challenges
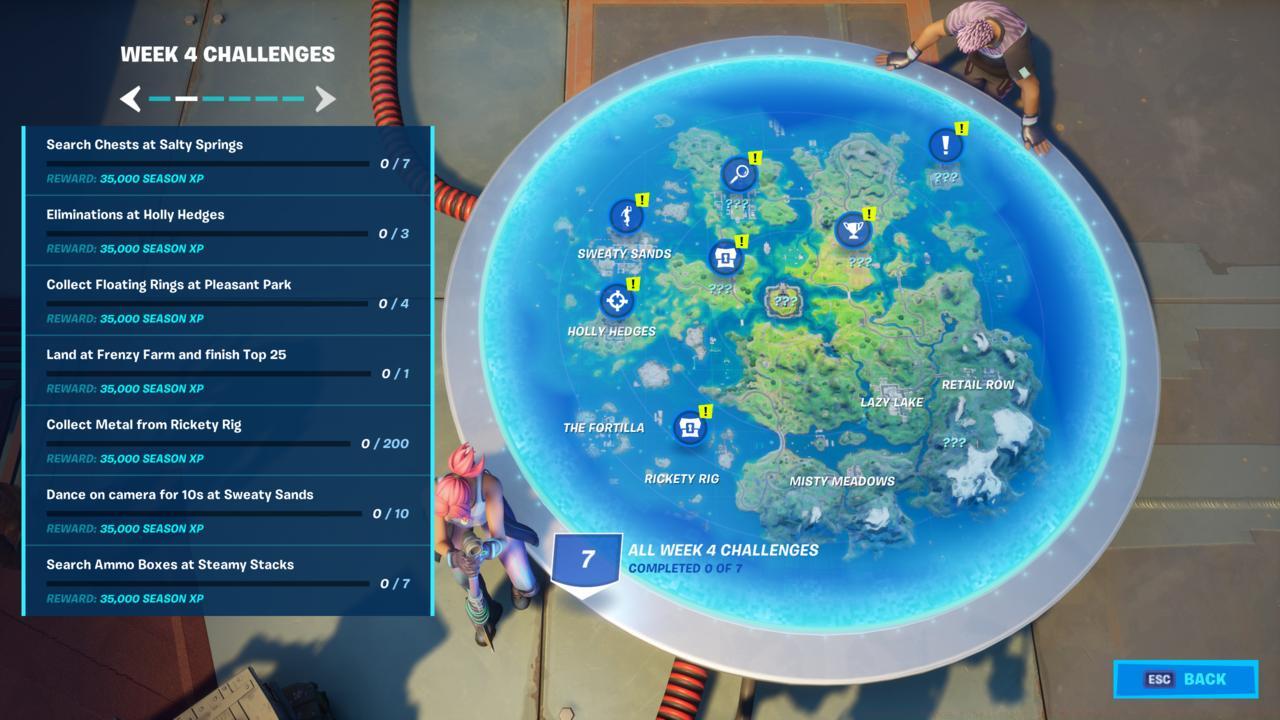
Week 4 challenges
- Search chests at Salty Springs (7)
- Eliminations at Holly Hedges (3)
- Collect floating rings at Pleasant Park (4)
- Land at Frenzy Farm and finish top 25
- Collet metal from Rickety Rig (200)
- Dance on camera for 10 seconds at Sweaty Sands
- Search ammo boxes at Steamy Stacks
Dance On Camera At Sweaty Sands
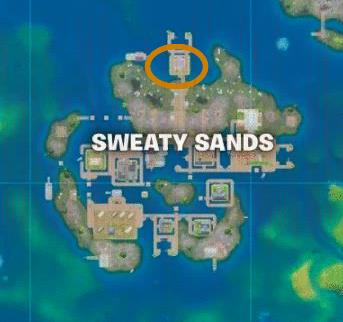
Sweaty Sands camera location
Camera interaction and emote execution timing determines challenge completion reliability. The northern beach positioning near the pier entrance provides multiple approach options. Environmental awareness prevents interruption during the required ten-second performance.
Collect Floating Rings At Pleasant Park
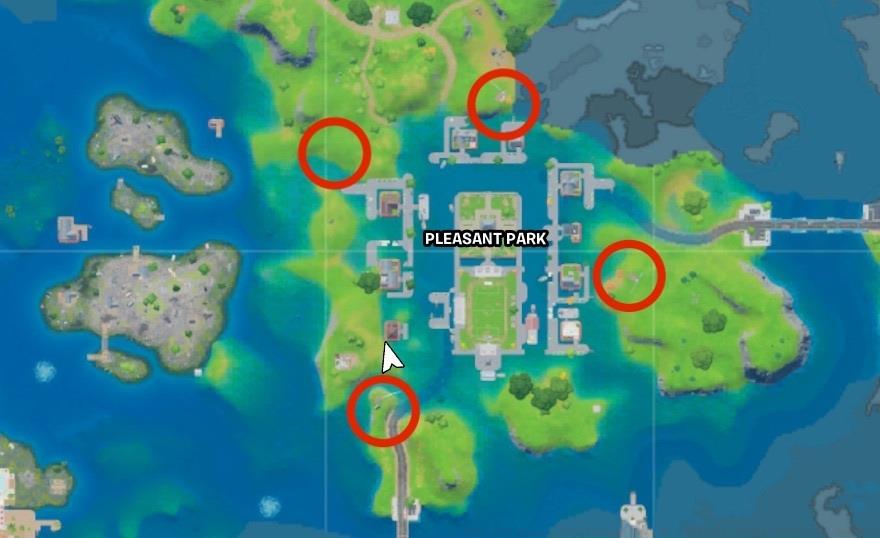
Pleasant Park floating ring locations
Floating ring collection efficiency depends on route optimization and movement technique. The D2-D3 grid location features strategic ring placement enabling efficient collection sequences.
Week 3 Challenges
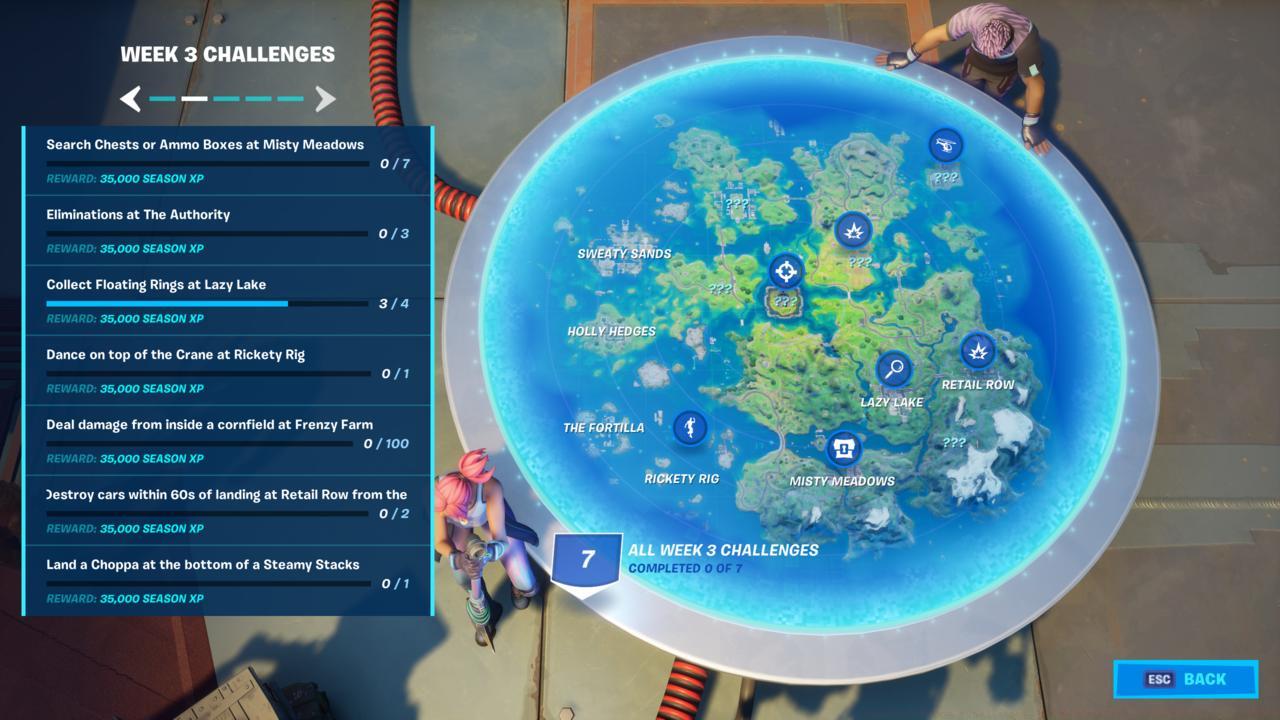
Week 3 challenges
- Search chests or ammo boxes at Misty Meadows (7)
- Eliminations at The Authority (3)
- Collect Floating Rings at Lazy Lake (4)
- Dance on top of the crane at Rickety Rig
- Deal damage from inside a cornfield at Frenzy Farm (100)
- Destroy cars within 60 seconds of landing at Retail Row from the Battle Bus (2)
- Land a choppa at the bottom of Steamy Stacks
Collect Floating Rings At Lazy Lake
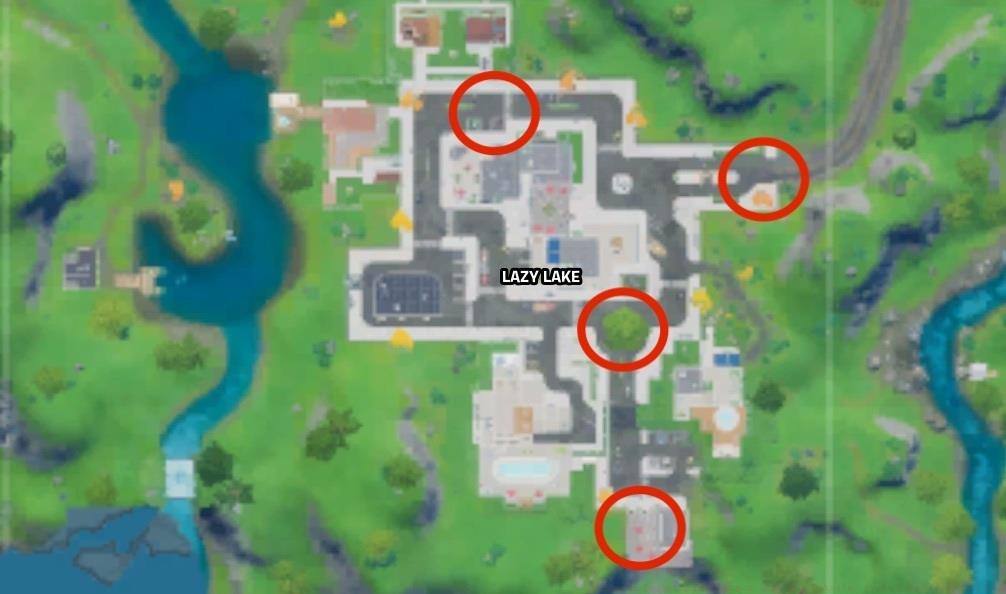
Floating ring locations
Ring collection strategy optimization involves understanding spawn patterns and accessibility. The distributed ring locations around Lazy Lake enable strategic collection routes minimizing exposure to opponents.
Land A Choppa At The Bottom Of Steamy Stacks
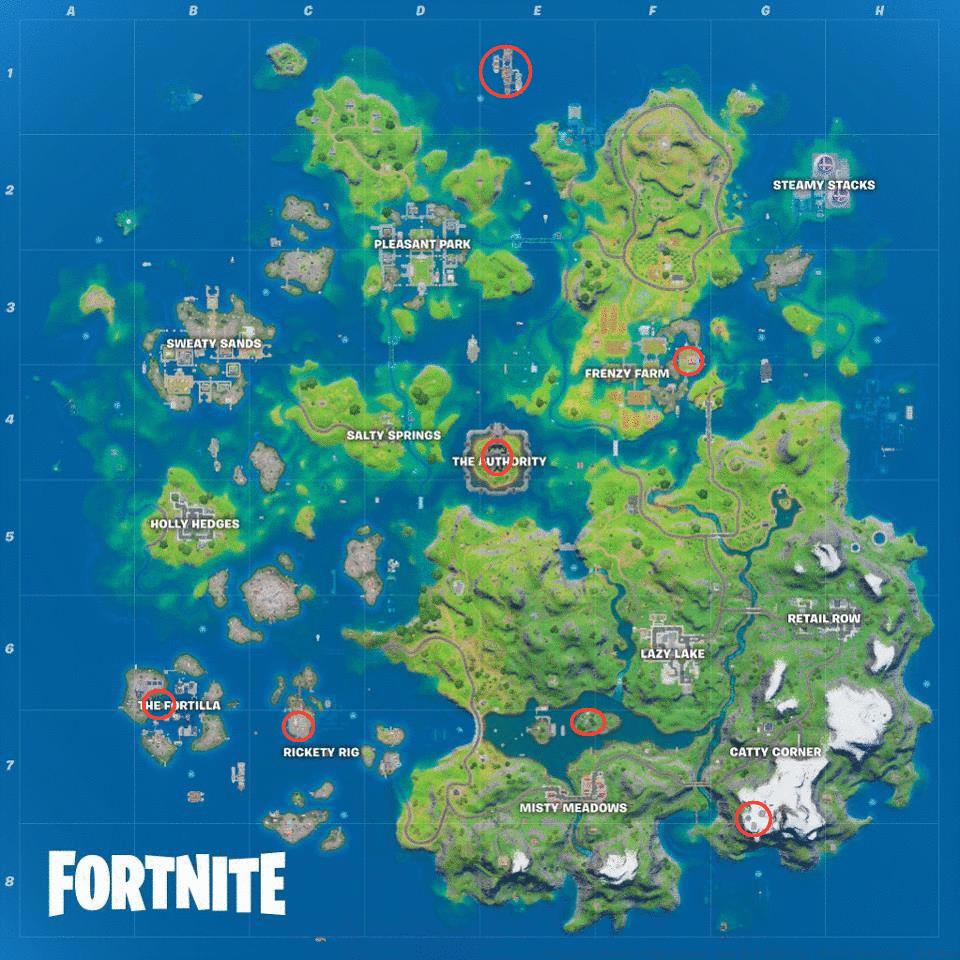
Choppa locations map
Helicopter acquisition and piloting skills determine challenge completion success rate. Strategic helipad targeting at Frenzy Farm or The Yacht provides reliable vehicle access. Navigation precision ensures successful landing within the designated Steamy Stacks area.
Week 2 Challenges
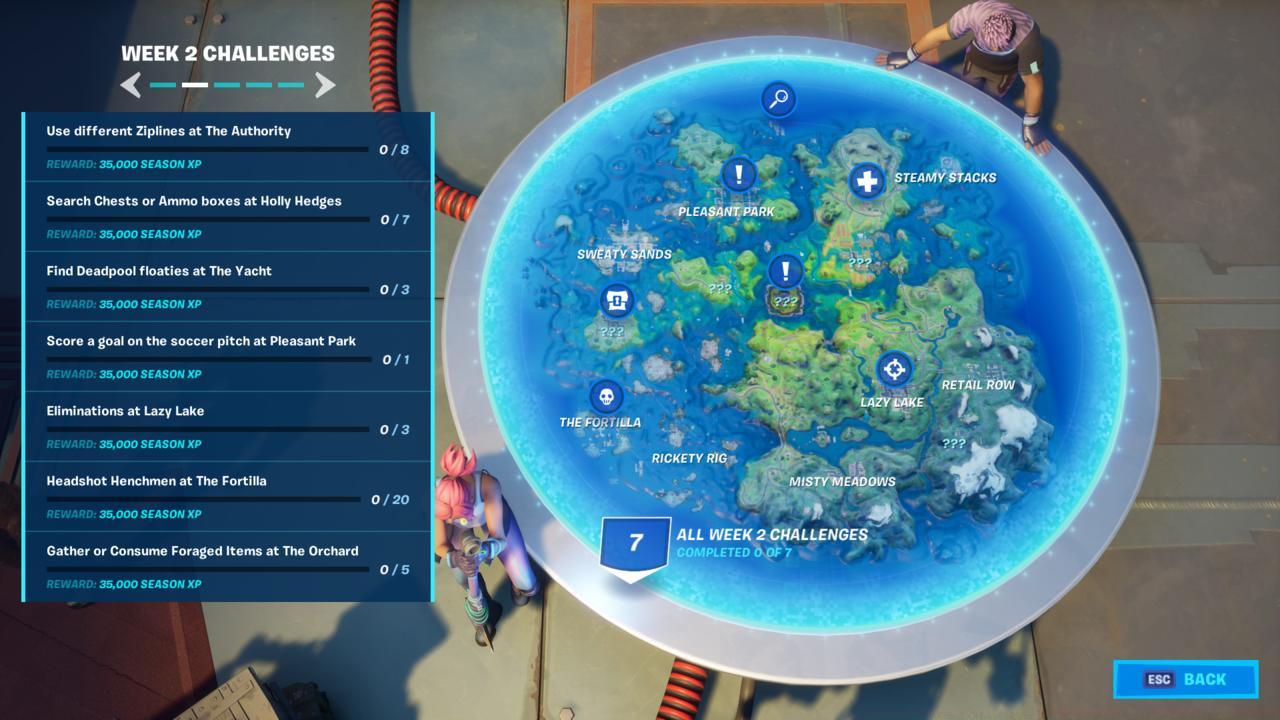
Week 2 challenges
- Use different ziplines at The Authority (8)
- Search chests or ammo boxes at Holly Hedges (7)
- Find Deadpool floaties at The Yacht (3)
- Score a goal on a soccer pitch at Pleasant Park
- Eliminations at Lazy Lake (3)
- Headshot Henchmen at The Fortilla (20)
- Gather or consume foraged items at The Orchard (5)
Find Deadpool Floaties At The Yacht
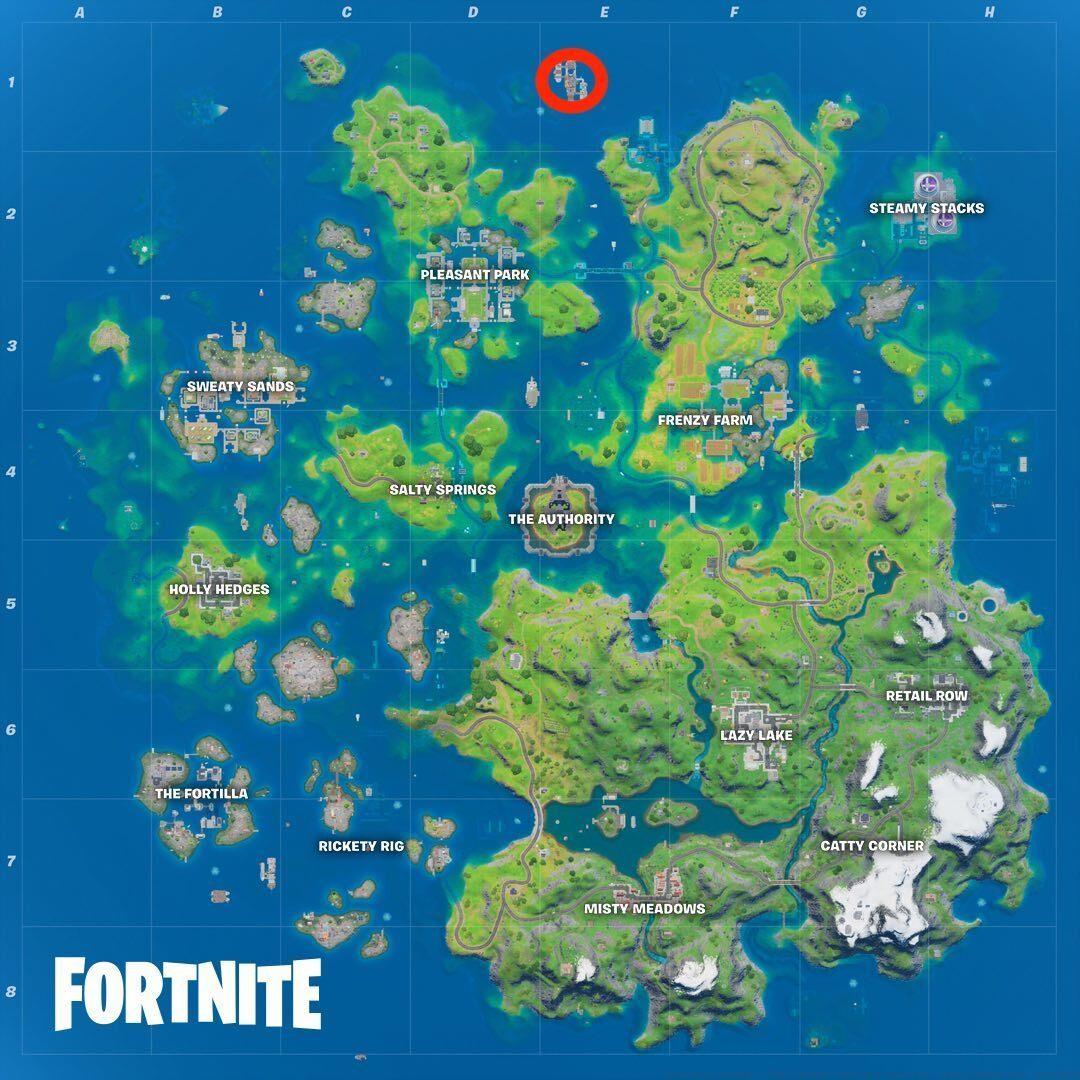
The Yacht location
Seasonal transition remnants provide unique collectible opportunities. The northern map location contains preserved environmental elements from previous seasons. Floatie distribution patterns follow logical placement around the destroyed vessel structure.
Use Different Ziplines At The Authority
The Authority location
Zipline network utilization efficiency depends on route planning and activation timing. The central map fortress location contains extensive zipline infrastructure enabling rapid traversal.
Gather Or Consume Foraged Items At The Orchard

The Orchard location
Foraged item mechanics involve understanding spawn locations and collection timing. The northern Frenzy Farm adjacent location features consistent item distribution patterns. Strategic collection routes minimize time investment while maximizing item acquisition.
Week 1 Challenges
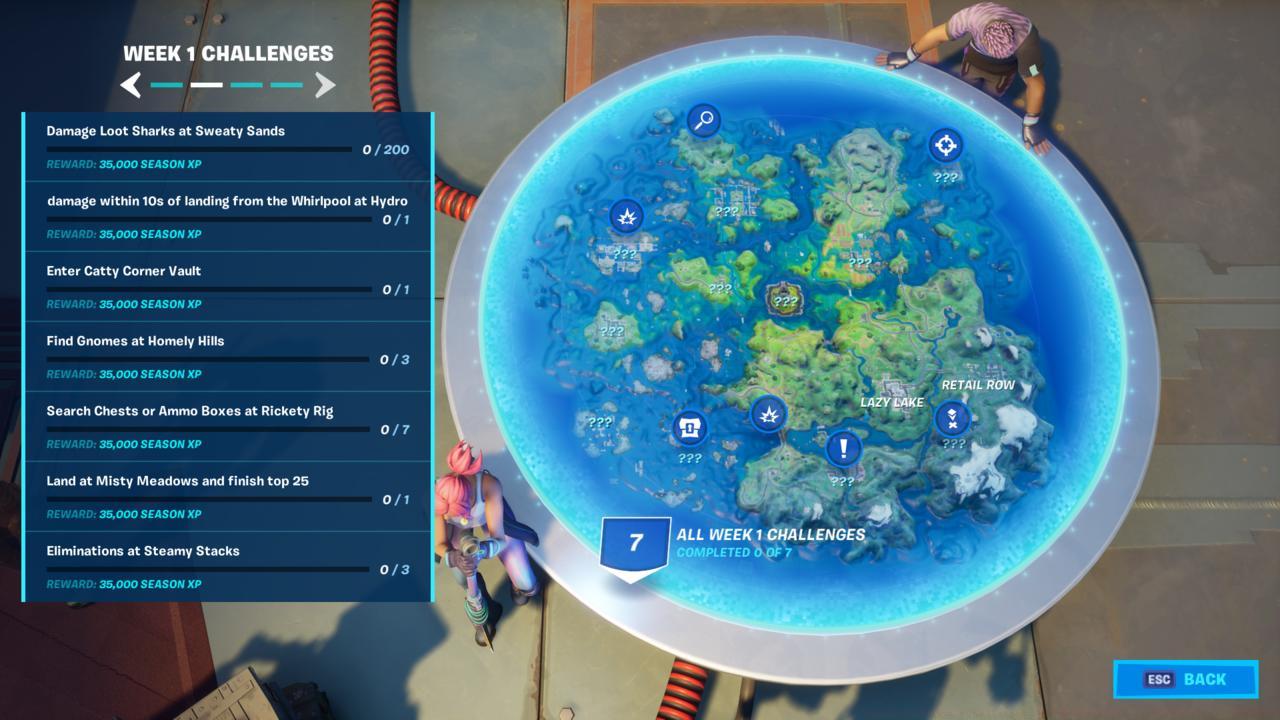
Week 1 challenges
- Damage Loot Sharks at Sweaty Sands (200)
- Deal damage within 10 seconds of landing from the whirlpool at Hydro 16
- Enter Catty Corner Vault
- Find Gnomes at Homely Hills (3)
- Search chests or ammo boxes at Rickety Rig (7)
- Land at Misty Meadows and finish top 25
- Eliminations at Steamy Stacks (3)
Find Gnomes At Homely Hills
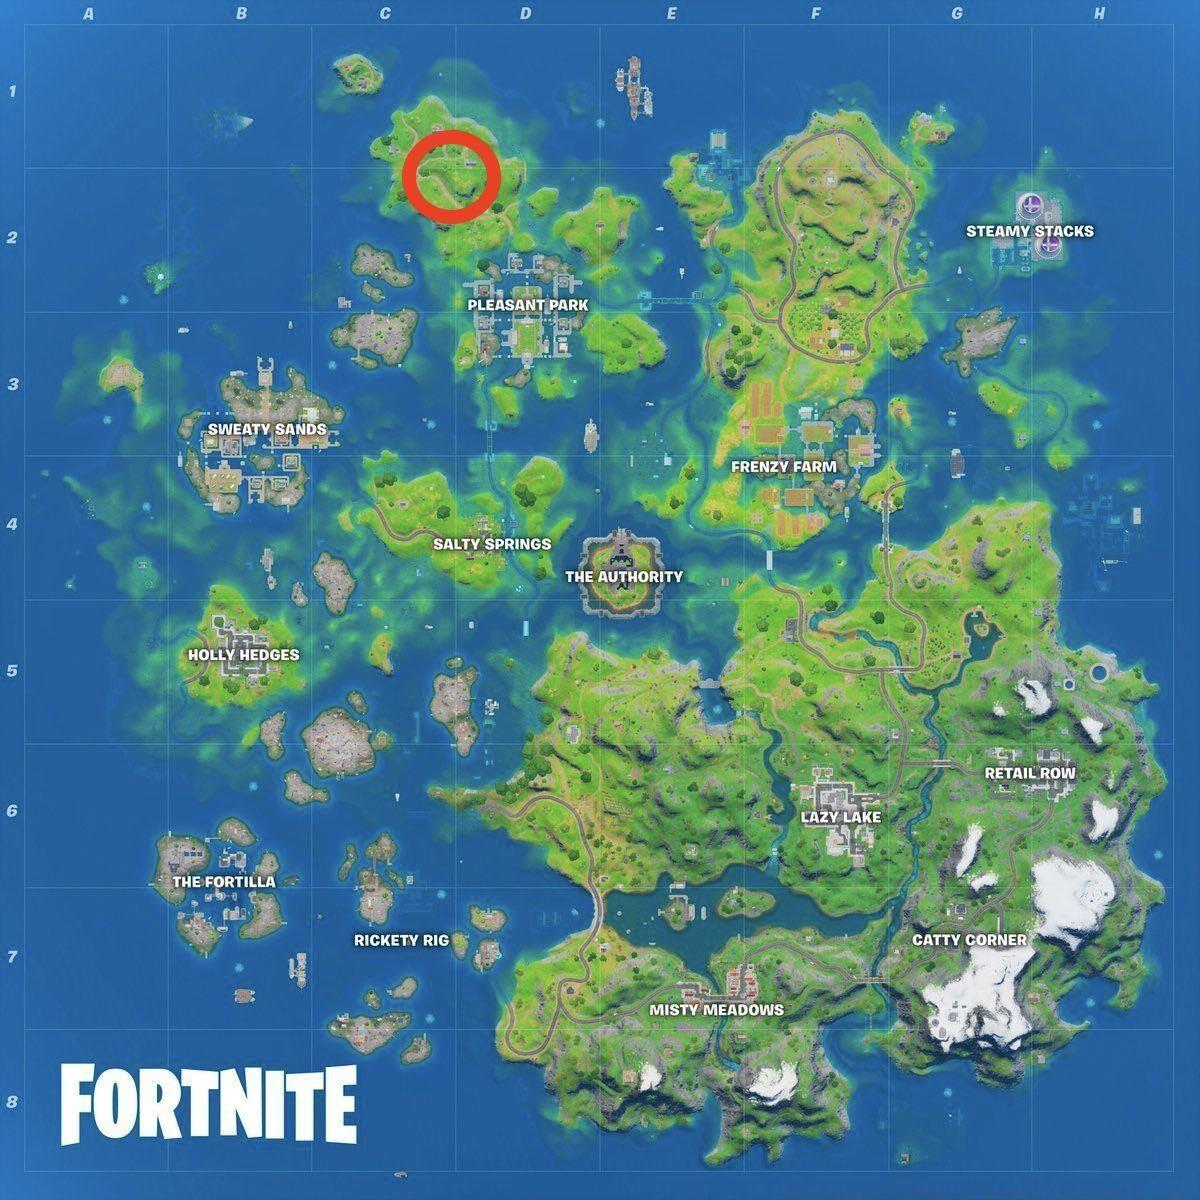
Homely Hills location
Gnome collection requires understanding of spawn mechanics and environmental interaction. The northwestern Pleasant Park adjacent location features specific gnome placement patterns. Environmental familiarity enables rapid target identification and collection.
Secret Challenges
Coral Buddies Wood Age Quest

Coral Buddies locations
Secret challenge completion provides exclusive cosmetic rewards unavailable through standard progression. The B1 grid island location contains unique interactive elements requiring specific resource contributions. The 100 wood requirement can be efficiently met through strategic palm tree harvesting around the immediate area. The isolated location provides relative safety from player interference during resource gathering. Advanced players recommend completing this challenge during off-peak hours to minimize competition for resources.
Fortnite News
- Fortnite Snap Quests – Where To Find All Tover Tokens And Unlock All Cosmetics
- Fortnite Chapter 3 Season 1 Map Changes
- Fortnite Miles Morales And Green Goblin Skins Teased On Chapter 3 Map
- + Show More Fortnite News Links (3)
- How To Use Tents In Fortnite: Campsites Explained
- Fortnite Victory Crowns Explained: Why Some Players’ Names Are In Gold
- All New Weapons And Items In Fortnite Chapter 3
Fortnite Season 3 introduces an exciting Aquaman-themed challenge series that rewards players with exclusive cosmetic items, including the coveted Aquaman outfit. These six specific water-based objectives test your navigation skills and strategic thinking across the flooded battle royale map.
The complete challenge list includes:
- Activate a whirlpool mechanism at The Fortilla location
- Successfully ride behind a Loot Shark using your fishing equipment near Sweaty Sands
- Capture two distinct fish varieties within one match session
- Finish the swimming time trial course at Dirty Docks efficiently
- Retrieve your ceremonial Trident from Coral Cove’s depths
- Perform a dramatic dive over Gorgeous Gorge waterfall while equipped with Aquaman attire
Successfully completing the initial whirlpool challenge immediately grants you the exclusive King of the Beach loading screen, providing visual confirmation of your progress.
The inaugural Aquaman challenge requires you to locate and utilize a whirlpool at The Fortilla, one of Season 3’s prominent new aquatic landmarks. This floating fortress complex sits strategically positioned south of Holly Hedges, making it easily accessible during your initial drop from the Battle Bus.
Optimal Approach Strategy: Deploy your glider early to ensure precise landing directly within The Fortilla’s central area. The whirlpools are typically found around the perimeter of the main structure, appearing as swirling vortexes in the water. Simply diving into any active whirlpool completes this objective instantly.
Common Pitfalls to Avoid: Many players mistakenly land at nearby Holly Hedges and attempt to swim to The Fortilla, wasting precious time and increasing vulnerability to enemy attacks. Instead, prioritize direct aerial descent to the whirlpool locations themselves.
Advanced Tactical Consideration: Complete this challenge during less contested periods by monitoring the Battle Bus flight path and selecting drops when The Fortilla isn’t directly under the route. Early-game completion ensures you can then focus on subsequent challenges without early elimination pressure.
Seasoned players can optimize their Aquaman challenge completion through strategic planning and multi-objective sessions. The fishing-related challenges particularly benefit from coordinated execution.
Multi-Challenge Optimization: Attempt the fish catching and Loot Shark riding objectives concurrently near Sweaty Sands, as this area typically spawns both shark activity and multiple fish varieties. Carry multiple fishing rods to increase efficiency.
Time Trial Mastery: The Dirty Docks swimming trial requires memorization of the optimal route. Complete several practice runs in Team Rumble mode where respawns allow for course familiarization without match elimination penalties.
Loadout Preparation: Before attempting the waterfall dive challenge, ensure you’ve already unlocked the Aquaman outfit through previous objective completion. Many players waste attempts by not verifying they meet the costume prerequisite first.
For comprehensive gameplay enhancement, consult our Class Guide to understand how different playstyles can approach these aquatic challenges most effectively.
The most demanding Week 7 Assignments involves locating yarn balls at Catty Corner, positioned in the southeast map quadrant within grid G7. You must gather three out of four scattered yarn balls to fulfill this objective. The primary complication stems from Kit, the automated feline guardian, and its mechanical sentinels that patrol the perimeter. Proper equipment preparation is essential before attempting this mission. We strongly advise initiating your approach at Lazy Lake to secure adequate weaponry and supplies before advancing toward Catty Corner.
Strategic Approach: Timing your assault during mid-game when initial combat has subsided can significantly reduce resistance. The robotic defenders follow predictable patrol patterns that can be exploited for stealthy infiltration. Consider approaching from the northern ridge line which provides elevated sightlines and cover opportunities.
Loadout Recommendations: Medium-range weapons with scopes prove most effective against the mechanical sentinels. Shotguns and SMGs struggle against their armored plating, making assault rifles or tactical rifles the optimal choice. For comprehensive weapon guidance, check our BF6 Weapons Unlock Guide covering all available armaments.
This objective appears straightforward: harvest 300 stone units from Rapid’s Rest. The actual complexity lies in locating this unmarked territory; since it lacks official designation, Rapid’s Rest doesn’t appear on your tactical map, though it’s situated directly east of Lazy Lake in grid G6. The most efficient access route involves landing at Lazy Lake and tracing the riverbank until reaching the destination. Upon arrival, efficiently mine stone from the abundant rock formations scattered throughout the zone to swiftly accomplish this task.
Navigation Precision: The river path features several distinct landmarks including a broken bridge and cluster of abandoned vehicles that serve as reliable navigation aids. Many players mistakenly venture too far east, missing the precise location entirely.
Harvesting Efficiency: Utilize your pickaxe’s heavy attack on larger rock formations for accelerated resource yield. The northwestern section contains the densest concentration of mineable stone, reducing collection time by approximately 40% compared to random harvesting. Team coordination allows simultaneous gathering while maintaining security patrols.
Damage Optimization: Rickety Rig’s multi-level structure creates ideal scenarios for explosive devices and area-denial weapons. Positioning on the central platform provides commanding sightlines while maintaining cover options. The 500 damage threshold can typically be achieved within 2-3 engagements using appropriate weapon selection.
Elimination Strategy: Pleasant Park’s residential layout favors close-quarters combat specialists. Shotguns and SMGs dominate here, though strategic positioning on rooftops can provide tactical advantages for medium-range engagements. The elimination requirements scale based on game mode selection.
Survival Tactics: The Authority presents intense early-game combat, making survival to Top 25 particularly challenging. Adopting a perimeter strategy and avoiding central structures during initial minutes dramatically increases success rates. For advanced tactical approaches, consult our BF6 Class Selection Guide for optimal loadout configurations.
Challenge Sequencing: Completing objectives in strategic order significantly reduces overall time investment. Begin with Rapid’s Rest stone collection while en route to Catty Corner, then focus on elimination tasks during natural combat progression. This integrated approach can cut completion time by 30-45 minutes compared to sequential tackling.
Loadout Specialization: Different challenges benefit from specific equipment configurations. For yarn collection at Catty Corner, prioritize mobility and medium-range engagement capabilities. Stone harvesting benefits from inventory optimization for resource carrying capacity.
Common Pitfalls: Many players underestimate the defensive capabilities at Catty Corner, arriving under-equipped. Others waste valuable time searching for Rapid’s Rest without utilizing the river navigation method. Understanding these common mistakes can prevent significant time loss.
Team Coordination Benefits: While all Week 7 challenges can be completed solo, team play offers distinct advantages. Elimination requirements can be shared among squad members, and coordinated assaults on defended positions prove far more effective. For comprehensive strategic guidance, our Battlefield 6 Complete Guide offers detailed team tactics and advanced gameplay mechanics.
Fortnite Season 3 introduces a fresh set of weekly challenges that demand strategic planning and precise execution. These objectives are designed to test your navigation skills, combat proficiency, and resource management abilities across the transformed island landscape. Understanding the map changes from Season 2 to Season 3 is crucial for efficiently completing these tasks while maximizing your Battle Pass progression.
The transition between seasons has significantly altered key locations, requiring players to adapt their strategies accordingly. While some areas like The Orchard remain consistent, others such as The Authority have undergone complete transformations that impact challenge completion approaches.
Completing the Holly Hedges challenge requires locating and opening seven chests or ammo boxes within this suburban area. Begin your search by targeting the residential buildings with blue roofs, as these typically contain multiple loot spawn points. The central gazebo and surrounding garden areas also frequently yield additional ammunition containers.
Pro Tip: Land directly on the northwesternmost house during your initial drop to secure early loot before other players arrive. Avoid spending excessive time in open areas where you become vulnerable to enemy attacks while searching.
Common mistakes include overlooking basement areas and attic spaces, which often contain hidden chests. Plan your route systematically from north to south to minimize backtracking and exposure to hostile players.
The Yacht location underwent dramatic changes following The Device event that concluded Season 2, but you can still locate three Deadpool floaties around its wreckage in the northern map region. These distinctive pink inflatables are scattered across the debris field and require careful navigation to collect.
Floaties typically spawn in four fixed positions: near the broken bow section, adjacent to the submerged stern, beside the collapsed mast, and close to the partially intact deck area. Approach from the eastern shoreline to access the area safely while maintaining cover from potential ambushes.
Advanced Strategy: Complete this challenge during less populated game modes or during off-peak hours to reduce competition for the floaties. The remains are visible on your map as a wreckage icon, making navigation straightforward once you understand the new terrain layout.
Scoring a goal on the soccer pitch at Pleasant Park requires understanding the game mechanics specific to this challenge. The soccer ball spawns near the center of the field, and you need to kick it into either goal to complete the objective.
Position yourself at an angle approximately 45 degrees from the goal posts for optimal shooting accuracy. Use controlled, single taps rather than powerful kicks to maintain ball control and positioning.
Avoid This Error: Many players waste time trying to score from midfield when approaching from the penalty box area significantly increases success rates. Complete this challenge early in matches before the area becomes contested by enemy squads.
Achieving three eliminations at Lazy Lake demands tactical combat planning in this urban environment. Focus on controlling the multi-story buildings surrounding the central lake area, as these provide superior sightlines and defensive advantages.
Select weapons suited for medium-range engagements, such as assault rifles or submachine guns, which perform effectively in this location’s mixed combat zones. The northeastern apartment complex offers particularly strong positioning with multiple escape routes and elevation benefits.
Expert Insight: Time your engagements during the mid-game phase when player concentration is typically lower than initial drop periods. Use the water features for unexpected flanking maneuvers against entrenched opponents.
Landing twenty headshots on Henchmen at The Fortilla requires precision aiming and understanding AI behavior patterns. Henchmen patrol specific routes and exhibit predictable movement patterns that you can exploit for consistent headshot opportunities.
Utilize suppressed weapons to eliminate individual targets without alerting nearby Henchmen groups. Approach from the eastern docks to engage isolated patrols before confronting larger concentrations near the central structures.
Optimization Technique: Position yourself on elevated platforms or behind cover to minimize return fire while lining up clean headshots. Complete this challenge across multiple matches to avoid frustration from repeated failures in single attempts.
Using eight different ziplines at The Authority presents unique mobility challenges in this fortified compound. The location features numerous zipline connections between its central tower and surrounding structures, providing multiple route options.
Begin your zipline circuit from the perimeter structures moving inward to minimize exposure to central area defenders. Each zipline activation requires simply approaching the connection point and interacting with the prompt that appears.
Safety Consideration: Monitor your surroundings before engaging each zipline, as you become vulnerable during transit. The northwestern ziplines typically experience less traffic than eastern routes, offering safer completion opportunities.
Gathering or consuming five foraged items at The Orchard remains consistent with Season 2 mechanics, though surrounding map changes affect approach routes. This agricultural area north of Frenzy Farm contains abundant food resources including apples, cabbages, and mushrooms.
Develop an efficient collection route starting from the northwestern apple trees, moving through the central cabbage patches, and concluding with the southeastern mushroom boxes.
Efficiency Tip: Consume foraged items immediately upon collection to simultaneously complete the challenge and gain health/shield benefits.
Avoid the common mistake of searching only obvious locations; check beneath tree canopies and behind farm structures for hidden spawn points. The eastern fence line often contains overlooked mushroom clusters that can quickly complete your requirement.
Action Checklist
- Study flooded map changes and new water routes before attempting navigation challenges
- Complete Aquaman whirlpool objective at The Fortilla during off-peak hours
- Practice swimming routes at Dirty Docks in Team Rumble mode for reduced pressure
- Solve trident environmental puzzle at Coral Cove using guided sequence
- Execute precision waterfall dive at Gorgeous Gorge with proper approach trajectory
- Explore hidden Coral Buddies missions through systematic location interaction
- Prioritize Aquaman challenges first for exclusive skin unlocks
- Study location maps before attempting specific challenges to minimize exploration time
- Complete vehicle-based challenges during low-population matches
- Gather necessary equipment before attempting guarded location challenges
- Complete secret missions for exclusive cosmetic rewards
- Drop directly to The Fortilla whirlpools south of Holly Hedges
- Equip fishing rod and locate Loot Shark near Sweaty Sands
- Catch two different fish types in single match
- Practice then complete Dirty Docks swimming time trial
- Retrieve Trident from Coral Cove then perform waterfall dive
- Land at Lazy Lake for initial gear acquisition
- Follow river east to Rapid’s Rest for stone collection
- Approach Catty Corner from northern high ground
- Complete elimination objectives during natural combat flow
- Focus on survival at The Authority for final placement objective
- Land at Holly Hedges northwestern house and systematically search 7 chests/ammo boxes
- Navigate to The Yacht wreckage and collect 3 Deadpool floaties using eastern approach
- Score soccer goal at Pleasant Park using 45-degree angle from penalty box
- Secure 3 eliminations at Lazy Lake using building control strategies
- Land 20 headshots on Henchmen at The Fortilla using suppressed weapons
- Use 8 different ziplines at The Authority following perimeter-to-center route
- Collect and consume 5 foraged items at The Orchard using northwestern route
No reproduction without permission:SeeYouSoon Game Club » Fortnite Season 3 Challenges: Gas Up A Vehicle, Stoke Campfires, And More