TL;DR
- Collect six Reactor 5 Keycards to strategically weaken the Air Buster before the boss fight
- Prioritize removing Big Bomber shells to eliminate the boss’s most devastating attacks
- Use Lightning Materia against mechanical enemies and magic to stagger Sweeper units
- Explore thoroughly to find hi-potions, ethers, and the valuable Bulletproof Vest
- Monitor sabotage progress on large screens throughout the reactor complex
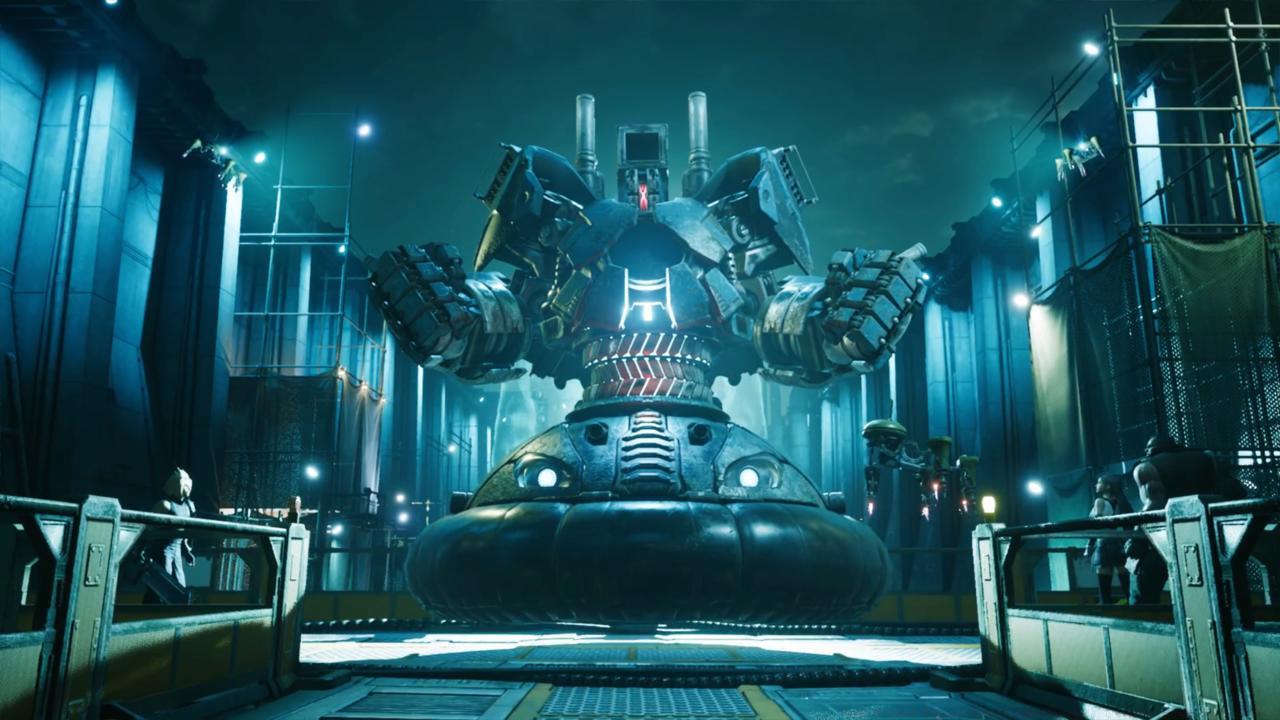
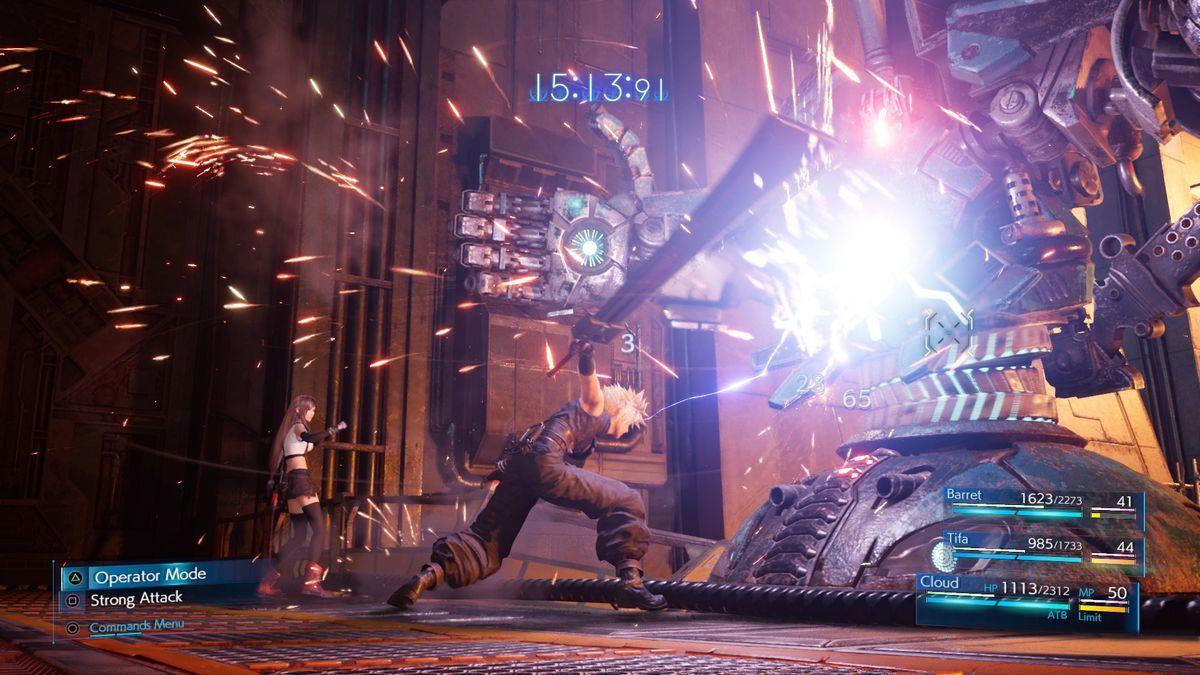
Final Fantasy 7 Remake’s seventh chapter presents players with a deceptive challenge that appears straightforward initially but escalates dramatically. While the level design simplifies compared to previous sections, the difficulty spike culminates in confronting Shinra’s formidable experimental weapon, the Air Buster. This mechanical behemoth represents one of the game’s first major skill checks.
Our comprehensive walkthrough provides detailed sabotage strategies and combat techniques to overcome this challenging encounter. We’ll guide you through every critical decision point, ensuring you collect all essential items, weapons, and Materia while avoiding common pitfalls that can derail your progress.

After your initial descent through the pipe system, immediately investigate the eastern sector to discover a chest containing three hi-potions – these healing items prove invaluable during the upcoming boss confrontation. Descend further to B5 level (verified via your map interface) where another container holds two additional echo mists. When engaging Monodrives and Slug-Rays in combat, search the perimeter for a chest with an ether to replenish your magical reserves.
Reaching the ladder base triggers an encounter with two Sweeper units. These mechanical adversaries possess specific vulnerabilities: target them with elemental spells to induce stagger status, then capitalize with powerful melee assaults. Proceed downward to B7 level, then advance along the walkway beyond the next descent point to locate a chest housing a Bulletproof Vest – this defensive gear significantly reduces physical damage taken.


Following the reactor bombing sequence and defeating the Elite Shock Trooper accompanied by two standard Shock Troopers, your mission updates to sabotage and destroy the Air Buster. This experimental Shinra war machine can be systematically weakened before your confrontation through strategic component removal.
Enter the B8 Air Buster laboratory and eliminate all Security Officers, then acquire the Reactor 5 Keycard mounted on the western wall. Utilize this access credential at adjacent control modules to redirect specific Air Buster components to disposal chambers, progressively reducing its combat capabilities. As you accumulate additional keycards, new sabotage options become available at subsequent control stations.
The sabotage system presents three strategic options: AI Core removal, Big Bomber shell elimination, or M Unit extraction. Disabling AI Cores impairs the boss’s mobility and prevents stun attacks; removing Big Bomber ammunition neutralizes its most destructive explosive capabilities; while extracting M Units yields random items for collection before the engagement – though this doesn’t diminish the Air Buster’s effectiveness. Your sabotage decisions should align with your combat approach, though eliminating all Big Bomber shells consistently proves most beneficial for survival.
Throughout this segment, you’ll discover six Keycards total. Methodically check each Air Buster status console in every laboratory to make informed sabotage decisions. The large monitoring displays scattered throughout the complex provide real-time feedback on your cumulative impact on the weapon system.
Another laboratory awaits on B7 level. Replicate the previous procedure and secure another Reactor 5 Keycard from the western wall. Similar to the prior facility, this area contains two control consoles. Before departing, thoroughly search the northwest corner behind destructible crates to obtain Lightning Materia – exceptionally effective against mechanical opponents.
Progressing to the subsequent corridor initiates combat with an Elite Shock Trooper supported by Sentry Rays. After neutralizing these threats, inspect the southwestern sector before advancing further. Another Reactor 5 Keycard awaits collection in this location.
Pro Strategy: Allocate Lightning Materia to multiple party members to maintain elemental pressure when MP depletes. Against Sweeper units, alternate between Fire and Lightning spells to accelerate stagger buildup. For the Air Buster confrontation, ensure at least one character has Healing Materia equipped alongside your offensive spells.
Action Checklist
- Collect all six Reactor 5 Keycards from laboratory walls and corridors
- Prioritize removing all Big Bomber shells at control consoles
- Acquire Lightning Materia from B7 lab northwest corner
- Defeat Sweeper units using magic to stagger followed by melee combos
- Monitor sabotage progress on large screens throughout the complex
No reproduction without permission:SeeYouSoon Game Club » Final Fantasy 7 Remake Walkthrough Chapter 7: A Trap Is Sprung (Spoiler-Free) Master Final Fantasy 7 Remake Chapter 7 with strategic sabotage tips and boss fight tactics