TL;DR
- Gyrfalcon’s Hauberk provides weapon damage buffs after invisibility and team overshields from finishers
- Reserve overshields require manual activation via class ability for strategic deployment
- Exclusive to solo Legendary/Master Lost Sector completion with specific daily rotations
- Optimize with Void 3.0 class ability builds for maximum uptime and team support
- Master the timing between invisibility cycles and overshield deployment for endgame content
Gyrfalcon’s Hauberk represents the pinnacle of Hunter Exotic armor, delivering substantial combat enhancements through weapon damage amplification, survival improvements, and accelerated ability recovery—all triggered by strategic use of invisibility mechanics.
Since Destiny 2’s Void 3.0 overhaul, stealth capabilities have transformed into essential components of Hunter gameplay. This chest piece, introduced during Season of Plunder, leverages the near-permanent invisibility potential of Void 3.0 to grant multiple tactical advantages for both individual players and fireteam members. Understanding how to acquire Gyrfalcon’s Hauberk and optimize its capabilities within your invisibility-focused loadouts is crucial for maximizing effectiveness.
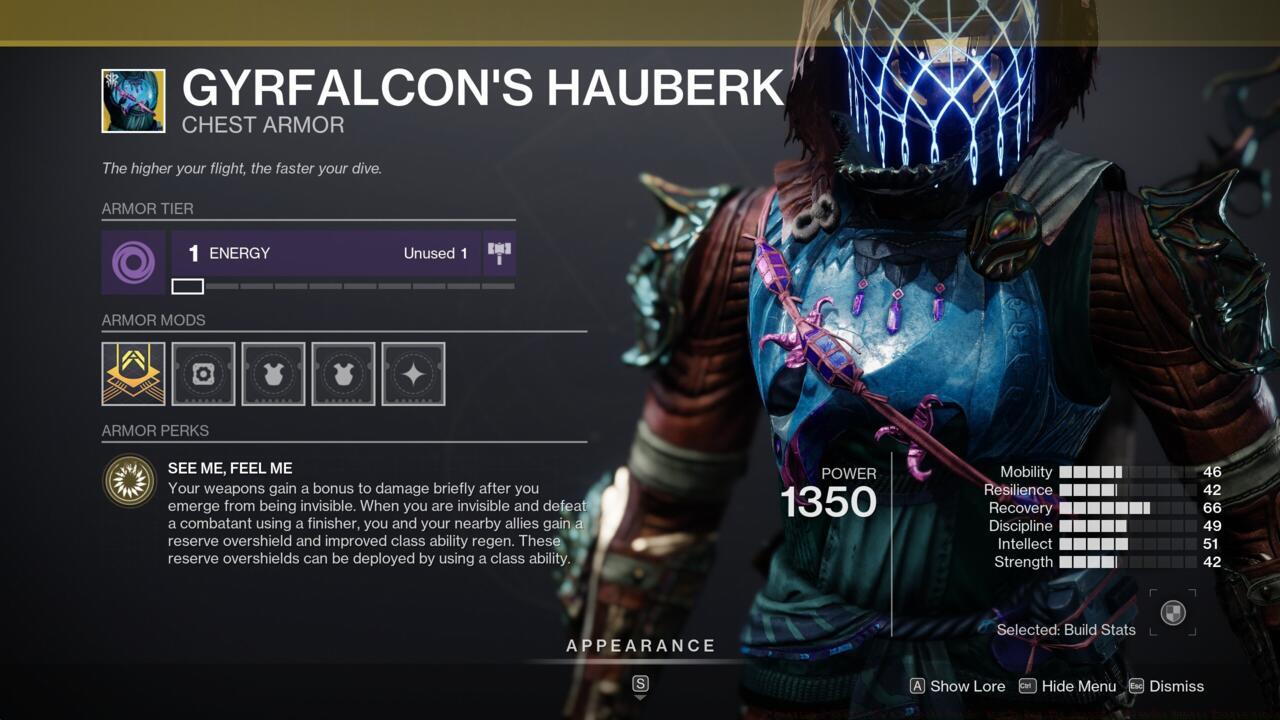
Gyrfalcon’s Hauberk provides comprehensive buffs to invisible Hunters and their allies.
Gyrfalcon’s Hauberk delivers substantial benefits to stealth-oriented Hunters and their accompanying teammates.
The exotic’s complex mechanics revolve entirely around actions performed during invisibility and the transition back to visibility. Its signature See Me, Feel Me perk provides multiple combat enhancements based on your stealth engagements. Typically, you’ll activate weapon damage bonuses after “emerging from invisibility”—meaning when your stealth effect naturally expires, you receive a temporary damage amplification for your firearms. Since weapon discharge immediately cancels invisibility, you can strategically trigger this damage boost at any moment by initiating fire while concealed.
While weapon enhancements are valuable, the perk’s secondary buff demands greater attention—activated by eliminating enemies with finishers while invisible. Executing a finisher on an unaware target grants accelerated class ability regeneration for you and nearby allies. Additionally, you and surrounding teammates receive a “reserve overshield,” introducing a novel protective mechanic. Unlike standard overshields that automatically apply additional protective layers over existing health, Gyrfalcon’s Hauberk creates reserve overshields that do not immediately augment your current shields. Instead, you manually deploy them using your class ability, allowing strategic timing of shield activation for maximum tactical advantage—a benefit extended to your fireteam members.
Hunters can activate stealth through multiple Void 3.0 methods depending on their configuration, including class ability usage, smoke bomb deployment, or achieving Stylish Executioner eliminations by defeating Volatile targets or using finishers and powered ability kills. Gyrfalcon’s Hauberk synergizes exceptionally well with builds emphasizing class ability-activated invisibility, given its class regeneration benefits, though any stealth-focused configuration can leverage its advantages.
- Firearms receive temporary damage enhancement following emergence from invisibility
- Eliminating enemies with finishers during stealth grants reserve overshields and enhanced class ability regeneration to you and nearby allies
- Reserve overshields are activated through class ability usage
Similar to other seasonal Exotics, Gyrfalcon’s Hauberk cannot be obtained through standard Exotic engram drops. Acquisition requires specifically completing solo Legendary or Master Lost Sectors. After adding the Exotic to your Collections, it becomes available in engram drops, but initial unlocking is exclusively through Lost Sector completion.
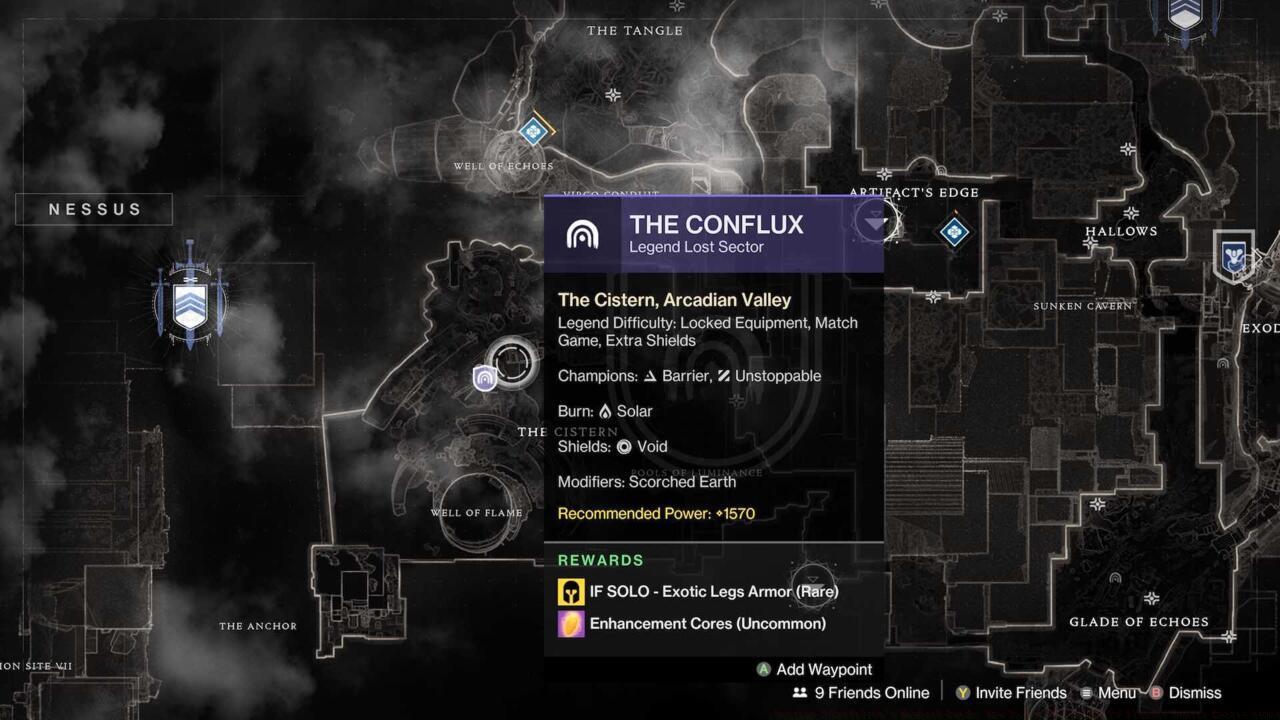
Understanding Legendary Lost Sector information screens is crucial for successful farming.
Lost Sectors rotate daily, with specific days featuring chest armor as the potential reward. Check the daily reset to identify when chest pieces are available—typically indicated by the armor icon next to the Lost Sector marker on your director. Preparation is key: ensure your Power Level meets or exceeds the recommended threshold (typically 1570+ for Legendary, 1600+ for Master).
Drop rates vary significantly between difficulties: Legendary offers approximately 25% chance per completion, while Master increases to around 33%. However, Master requires substantially more time investment, making Legendary often more efficient for farming.
Common mistakes include attempting Lost Sectors under-leveled, neglecting Champion mods, or using inefficient loadouts. Optimize your approach by studying the daily Lost Sector’s specific Champions and shields, then building your loadout accordingly. A well-prepared run typically takes 5-10 minutes on Legendary, while Master may require 10-20 minutes depending on skill and preparation.
Mastering Gyrfalcon’s Hauberk requires understanding advanced Void 3.0 synergies and combat sequencing. The most effective approach combines the exotic with specific aspects and fragments to create nearly permanent invisibility cycles.
For maximum effectiveness, pair with Trapper’s Ambush aspect and fragments like Echo of Obscurity and Echo of Persistence. This creates a loop where dodging makes you invisible, granting weapon damage buffs, while finishers during stealth provide overshields and ability regeneration—fueling your next dodge.
Advanced tactics involve timing your invisibility cycles to coincide with major enemy engagements. Use initial invisibility for positioning, emerge for damage phase, then use finishers on weakened targets to reset the cycle while protecting your team.
In endgame content like Grandmaster Nightfalls, the strategic deployment of reserve overshields becomes critical. Unlike automatic overshields that might waste during safe moments, Gyrfalcon’s reserve overshields allow you to save protection for critical moments like revives or objective captures.
Team coordination elevates this exotic from powerful to game-changing. Communicate with your fireteam about overshield availability and coordinate pushes around your invisibility cycles. The class ability regeneration benefit means your teammates can use their defensive abilities more frequently, creating substantial team-wide survivability.
Weapon pairing is crucial—submachine guns and sidearms benefit tremendously from the damage buff due to their rapid fire rates. Consider pairing with weapons that have repulsor brace for additional overshield generation, creating multiple layers of protection.
Action Checklist
- Check daily Lost Sector rotation for chest armor availability
- Prepare optimized loadout matching Lost Sector Champions and shields
- Complete solo Legendary Lost Sector (5-10 minutes per run)
- Build Void 3.0 Hunter with Trapper’s Ambush and persistence fragments
- Practice invisibility cycle: dodge → emerge for damage → finisher for overshield
- Coordinate with fireteam for overshield deployment timing
No reproduction without permission:SeeYouSoon Game Club » Destiny 2 Gyrfalcon’s Hauberk Guide: How To Get The Season Of Plunder Hunter Exotic Armor Master Gyrfalcon's Hauberk exotic perks, acquisition strategies, and advanced Hunter invisibility builds in Destiny 2