TL;DR
- Derealize mission launched without warning in weekly reset – access via Director
- Three Nether Blight locations require exploration: Hall of Souls, Trenchways, Mausoleum
- Symbol and Fragment collection system essential for progression and puzzle solving
- Barrow Dyad SMG features unique intrinsic perks and catalyst requiring specific completion
- Moment of Clarity upgrade currently time-gated – requires patience for full weapon potential
The Derealize Exotic mission represents Bungie’s latest surprise content drop in Destiny 2, appearing without announcement during the weekly reset. This stealth launch continues the developer’s tradition of unexpected additions that keep the community engaged and exploring.
Guardians worldwide discovered the new activity simultaneously, creating immediate buzz across the player base. Unlike previous Exotic missions that received promotional buildup, Derealize arrived completely unannounced, rewarding those who regularly check for fresh content.
Our comprehensive investigation reveals the mission’s starting location within the Director interface, along with power level recommendations and fireteam composition suggestions for optimal success rates.
- The Hall of Souls – Located in the northeastern sector, this area requires careful navigation through spectral enemies and environmental hazards. Watch for floating orbs that indicate proximity to blight concentrations.
- The Trenchways – This underground network features narrow corridors and vertical challenges. Blights here often appear near structural weaknesses or collapsed sections.
- The Mausoleum – The most challenging location with rotating platforms and timed sequences. Success here demands precise movement and quick target acquisition.
Symbol recognition forms the core puzzle mechanic throughout Derealize. Each symbol corresponds to specific actions or progression requirements, with some appearing only during particular mission phases.
Fragment collection follows a pattern-based system where sequencing matters more than sheer quantity. Common mistakes include collecting fragments out of order or missing hidden fragments in less obvious environmental locations.
Advanced players should note that certain symbol combinations trigger secret interactions, potentially rewarding additional loot or shortcut opportunities. This system shares similarities with raid mechanics but with adjusted complexity for solo play.
The Barrow Dyad SMG stands out with its unconventional design and unique perk combinations. The weapon’s intrinsic traits focus on close-quarters dominance with stacking damage modifiers.
Unlocking the catalyst requires completing specific challenges within the mission itself, not just finishing the activity. These challenges include precision kill thresholds, multi-kill requirements, and environmental interaction completions.
Regarding the Dyadic Ascension quest’s Step 5 and the Moment of Clarity upgrade, current evidence suggests this content remains time-gated. Similar to previous Destiny 2 Exotic quests, this likely unlocks in a future weekly reset or requires community completion milestones.
Common mission pitfalls include underestimating the ad density in final encounters and misreading symbol sequences. Many players waste significant time attempting to force progression on Step 5 before the content becomes available.
Optimization strategies involve specific loadout configurations that excel in each Nether Blight location. For Hall of Souls, bring long-range weapons; Trenchways benefits from close-range options; Mausoleum demands balanced loadouts.
Time estimates for mission completion range from 45-90 minutes depending on fireteam coordination and familiarity with mechanics. Solo players should budget additional time for learning phases and execution precision.
Nether Blights
Veteran Destiny 2 players exploring Episode Heresy will recognize the Nether activity as the starting point for this Exotic pursuit. While initial strategies suggested reloading until specific zones appeared, the current approach allows starting from any Nether landing zone—though some locations require more extensive searching. The critical element is locating a large Taken Blight, which may require multiple attempts due to RNG-dependent spawning mechanics.
.jpg)
The hidden path to the Blight.
When you spot the massive Taken Blight, navigate using concealed platforms that become briefly visible when deploying your Ghost. These platforms lead into the Blight, where you’ll discover a teleportation plate on the floor. This visual assistance system is crucial for players struggling with platforming sequences.
The Hall of Souls
For Hall of Souls navigation, proceed directly to the central platform typically occupied by this area’s boss. Continue through the statue-lined corridor until reaching the Hall of the Statues—the King’s Fall raid’s introductory area. Rather than crossing the bridge, scan the large pillar to your upper right. The Blight typically manifests as shown in our reference image. If absent, reset the activity rather than wasting time searching.
The Trenchways
The Trenchway offers the most straightforward Blight location. From your spawn point, advance toward the ritual-participating Tormentor near the columns. The Blight should be immediately visible, positioned atop another substantial pillar with invisible access routes.
The Mausoleum
Mausoleum navigation requires turning around from spawn and ascending platforms to the next tier. The Blight typically appears near the wall boundary. Based on extensive testing, this zone has the lowest Blight spawn frequency, making activity reset the most efficient approach when landing here.
Symbols and Fragments
Upon stepping onto the teleportation plate, your HUD’s lower left quadrant displays both a symbolic icon and directional guidance text. For instance, you might encounter “Something whispers to the right…”—precisely follow this instruction by stepping off in the indicated direction to trigger teleportation. You’ll materialize near a stone bowl containing a Taken Osseous Fragment; secure this crucial item immediately.
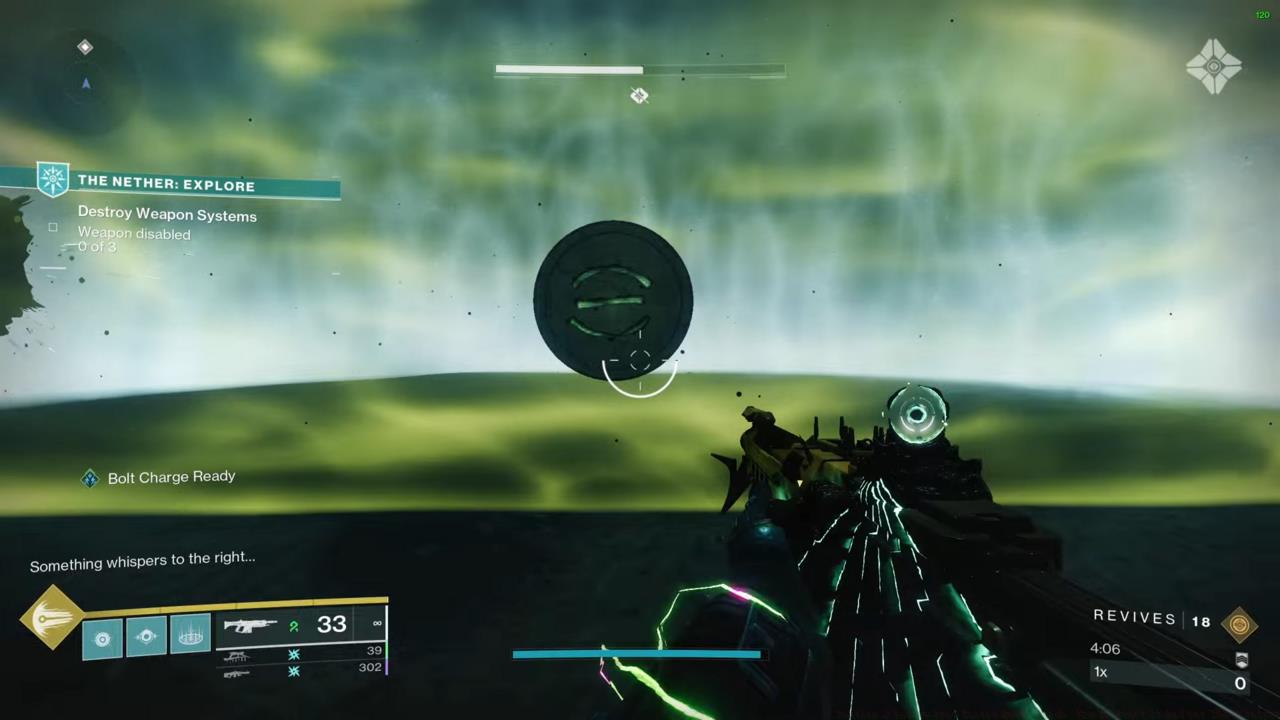
The symbol and its corresponding directive message
Scotopic Rune
Your next destination is the Slab within Eris’s Flat in the Lost City. Here, acquire and activate the Scotopic Rune upgrade—a tier three Runic Enhancement that unlocks The Taken Path quest. This next phase directs you to uncover Hive-concealed artifacts within Sorrow’s Harbor.
Lost Sector Blights
Navigate to the K1 Revelation Lost Sector in Sorrow’s Harbor, where you’ll encounter another Blight leading to a plate reminiscent of the Nether version. Carefully observe the displayed symbol, execute its directional command, eliminate the spawning Taken forces, then claim the fragment. Repeat this identical procedure in the Forgotten Shore Lost Sector, Veles Labyrinth, where the Blight resides within the maze section.
The Taken Osseous Fragment
Curse Quests
After conquering both Lost Sectors, return to the Slab in the Last City to initiate three distinct “curse” quests: Curse of Endurance, Curse of Urgency, and Curse of Revenge. These challenges unfold respectively in Altars of Sorrow, Hallowed Grove, and Nightmare Hunt: Pride. Each location contains a Taken Relic; defeating adversaries extends the relic’s timer. When accessibility permits, deposit the Taken Relic to progress.
Following this phase, re-enter the Nether activity. Similar to King’s Fall raid mechanics, each zone features an interactive Hive statue that summons a mini-boss upon activation. Vanquish this foe to obtain another Taken Osseous Fragment. Only upon completing every preceding stage will the Derealize Exotic quest properly commence.
Derealize Exotic Mission
Derealize Quest
This mission follows a relatively linear progression: initially confront Tormentors and additional Dread faction enemies while tracking a commander. Upon reaching the expansive arena, replicate previous mission-unlocking procedures by managing additional curses using another Taken Relic. Empower the curse through relic interaction to enable damage against the mini-boss. Repeat this cycle to defeat the boss, then advance to another phase involving Blight symbol identification.
Derealize Quest Entrance
Navigate through a compact jumping puzzle to secure the Corrupted Fragment. Proceed through an extended, more complex platforming sequence until confronting the ultimate boss encounter. Derealize contains substantial narrative depth, so attentive players will discover rich lore revelations throughout the experience.
Barrow Dyad Exotic drops guaranteed upon mission completion. Subsequently, another quest activates, enabling intrinsic upgrade acquisition for your new weapon. Note that Slab rank nine minimum is mandatory for this progression. Additional Fragment collection becomes necessary, though these are readily available within Nether activities.
Barrow Dyad Exotic SMG
This unconventional Submachine Gun features distinctive disc-shaped architecture. Its signature Panic Response Exotic perk generates Blight accumulation during damage dealing. During non-firing periods, Blight dissipates while the weapon’s magazine progressively replenishes. Executing a reload transforms accumulated Blight into Blighted Seekers—homing projectiles that pursue targets and inflict massive damage output.
Barrow Dyad Intrinsic Perks and Catalysts
Barrow Dyad incorporates multiple intrinsic perks alongside a catalyst system, though full unlocking operates on a time-gated schedule. Bungie has explicitly stated that Dyadic Ascension quest completion—involving the Moment of Clarity upgrade—cannot finish Step 5 until Heresy’s Act 2 launches in March.
The Dyadic Ascension quest advances through continued progression along the Path of Resolve, comprising seven total stages. After securing Barrow Dyad following our guide, retrieve the Dyadic Ascension quest from the Slab. This assignment requires locating additional Taken Osseous Fragments within the Nether. Currently, six Fragments exist per zone. Given the time-gating implementation, only 12 Fragment collections are presently necessary. With 18 total available but merely 12 required, we strongly advise collecting exactly 12 and preserving the remainder for future requirements. Our testing methodology involved selecting two zones and harvesting all Fragments from those locations, eliminating confusion about future collection requirements.
In subsequent weeks, additional quests will become accessible, including Dyadic Perfection and A Hammer’s Path (requiring Path of Ambition progression), and A Needle’s Path (demanding further Path of Resolve advancement). Additionally, A Silken Path necessitates Guardians gathering all Ravenous Wormspawn, while A Hundredfold Path requires comprehensive Tithing Wormspawn collection. This pattern suggests potential for up to six Barrow Dyad catalysts. Examination of the Barrow Dyad crafting interface reveals these intrinsic perks, traits, and their functionality become available through catalyst acquisition:
- High-Impact Reserves Refit – Trait – Final magazine rounds inflict enhanced damage.
- Hatchling Refit – Trait – Precision final blows or rapid multi-kills with this weapon generate a Threadling at the target’s position.
- One For All Refit – Trait – Striking three distinct targets boosts damage for moderate duration.
- Target Lock Refit – Trait – Sustained damage on a single target progressively increases.
The Hall of Souls Fragment locations
The Taken Fragments can be found in the Hall of Souls at the following locations:
Taken Osseous Fragment 1 – The Hall of Souls
From the Hall of Souls Spawn point, immediately turn right and ascend the platform to locate the initial Fragment.
Taken Osseous Fragment 2 – The Hall of Souls
From the first Fragment position, leap to the opposing platform and proceed along the hallway’s left flank. Continue advancement until discovering a bridge branching right toward an elevated platform. Beneath this structure, a ledge requires navigation to acquire the second Fragment.
Taken Osseous Fragment 3 – The Hall of Souls
From this location, return toward the bridge and track the chamber’s left wall from your current orientation. Shortly, columns will become visible to your left. Scale the initial column, then transfer leftward to another platform securing the third Fragment.
Taken Osseous Fragment 4 – The Hall of Souls
From the third Fragment, advance to the subsequent column then transition left to the platform. Scan downward and rightward for another ledge containing the fourth Fragment.
Taken Osseous Fragment 5 – The Hall of Souls
Navigate back upward to the bridge above the fourth Fragment’s platform. Proceed through the passageway into the King’s Fall raid initiation zone. Continue through the central corridor typically housing King’s Fall statues to discover the fifth Fragment concealed within a shadowy left-side alcove.
Taken Osseous Fragment 6 – The Hall of Souls
From this position, proceed forward through subsequent passages, bypassing the substantial Blight. Underneath the platform, along the left side rests the concluding Hall of Souls Fragment.
The Trenchway Fragment locations
The Taken Fragments can be found in the Trenchway at the following locations:
Taken Osseous Fragment 1 – The Trenchway
Descend rightward from the spawn location. The Fragment rests on a ledge positioned right of the Taken barrier.
Taken Osseous Fragment 2 – The Trenchway
Ascend from that point, advancing northwest up the stair structure. Continue westward, climbing onto a wall ledge. Follow these ledges sequentially, with the Taken Fragment occupying the fourth ledge position.
Taken Osseous Fragment 3 – The Trenchway
From here, descend from the ledge maintaining identical directional travel. A hollow structure adjacent to a massive white wall contains the third Taken Fragment internally.
Taken Osseous Fragment 4 – The Trenchway
Reverse direction returning toward the initial spawn zone. Proceed through the constricted white passageway beyond the Dread adversaries. Scale the ledge overlooking the intersection area. To your left resides the fourth Fragment.
Taken Osseous Fragment 5 – The Trenchway
From the fourth Fragment, traverse the crossing moving leftward. Ascend the wall’s structural components returning toward the center. Nearly opposite the fourth Fragment sits the fifth specimen, positioned on a triangular protruding ledge formation.
Taken Osseous Fragment 6 – The Trenchway
From this location, descend to the standard pathway, advancing leftward to maximum travel distance. Rotate facing the opposing platforms and summon your Ghost to reveal concealed platforms. Utilize these to cross to the opposite side. Affixed to the rear of a large, spiked rock formation rests the ultimate Trenchway Fragment.
The Mausoleum Fragment locations
The Taken Osseous Fragments can be found in the following locations in the Mausoleum:
Taken Osseous Fragment 1 – The Mausoleum
From the Mausoleum spawn location, rotate and ascend the substantial rock formation. Descend rightward to secure the initial Fragment.
Taken Osseous Fragment 2 – The Mausoleum
Reverse direction tracking rocks back toward spawn. Traverse the chasm beyond Taken enemies, underneath the most massive central platform. Along the right side rests the second Fragment.
Taken Osseous Fragment 3 – The Mausoleum
Advance toward the larger, green central region. Scale the central structural elements. The third Fragment occupies the highest structure.
Taken Osseous Fragment 4 – The Mausoleum
Turn back toward spawn following the chamber’s left boundary. With aerial Dread enemies to your left, the fourth Fragment lies beneath the large tentacle-like formation.
Taken Osseous Fragment 5 – The Mausoleum
Maintain identical directional progression, tracing rocks along the arena’s left flank. Confronting a substantial gap, to the right appears an even more massive rock formation. Approximately midway along this rests the fifth Fragment.
Taken Osseous Fragment 6 – The Mausoleum
Continue the previous directional path, descending toward the Taken energy pools. The concluding Fragment hides along the side of the initial major structure visible centrally, positioned on its right flank. You must press against the structure’s wall to trigger collection prompts if visibility proves difficult. Its coloration provides natural camouflage.
After gathering your 12 Taken Osseous Fragments, you’ll obtain Panic Response III, advancing the quest to Step 5—currently incompletable until Heresy’s Act 2. The Moment of Clarity upgrade from the Slab remains currently unavailable.
If you’re pursuing additional new Destiny 2 Heresy weaponry, including other Exotics, we maintain a specialized guide covering those as well.
For dedicated Destiny 2 players engaged in Episode Heresy content, the Nether activity serves as your primary hunting ground for exotic quest progression. Contrary to earlier assumptions that required specific landing zone spawns, current findings reveal you can initiate the exotic quest sequence from any Nether entry point. However, your search duration may vary significantly depending on initial positioning. The Taken Blight spawn mechanics operate on random generation principles, meaning you might encounter extended search periods before triggering quest advancement.
When the Blight fails to appear in documented locations, your most effective strategy involves closing and restarting the activity entirely. This reset approach addresses the random number generation (RNG) factors controlling Blight appearances. Understanding this fundamental mechanic prevents unnecessary time investment in fruitless searching.
Seasoned players recommend tracking spawn patterns across multiple sessions to identify potential spawn frequency trends, though these remain unconfirmed by official sources.
Navigating to the Hall of Souls Blight requires precise movement through distinct architectural landmarks. Begin by advancing to the central platform typically reserved for boss encounters in this zone. Proceed through the statue-lined corridor until you reach the vista overlooking the King’s Fall raid initiation area, commonly called the Hall of the Statues.
Crucially, avoid crossing the connecting bridge structure. Instead, direct your gaze upward and slightly rightward toward the massive supporting column. The Blight manifestation resembles our reference imagery above. Should visual confirmation fail, immediately execute the activity reload protocol rather than exhaustive searching.
Common navigation errors include proceeding too far across the bridge or misidentifying the correct pillar among multiple similar structures. The correct pillar typically displays subtle Taken energy effects even before the Blight fully materializes.
The Trenchway zone offers the most straightforward Blight acquisition opportunity among all Nether locations. Immediately upon spawning, orient yourself toward the Tormentor engaged in ritual activities near the structural columns. The Blight typically becomes visible almost instantly from your starting position, positioned high on another substantial pillar accessible via concealed platforms.
This location’s advantage lies in its immediate visual accessibility, requiring minimal navigation compared to other zones. The invisible pathway leading upward maintains consistent positioning, making repeat visits more predictable once initially located.
For optimal efficiency, pre-aim your view toward the pillar cluster while loading into the activity. This preparation shaves valuable seconds off your search time, especially during farming sessions.
Mausoleum navigation presents unique challenges due to its complex vertical architecture. From your initial spawn point, execute a 180-degree turn and ascend the platform sequence to the upper tier. The Blight typically manifests adjacent to the perimeter wall, though its appearance proves notably less frequent than other zones.
Based on extensive community testing, this particular Blight demonstrates the lowest spawn probability across all Nether locations. Consequently, if you find yourself beginning in the Mausoleum, the most time-effective approach involves immediate activity reloading rather than thorough area exploration.
Advanced players recommend monitoring spawn rotation patterns across multiple reload attempts, as sequential Mausoleum starts might indicate server-side rotation algorithms.
The concealed pathway to the Blight demands careful observation and precise platforming. Identify the substantial Taken Blight formation, then trace the sequence of invisible stepping stones leading into its core. After teleportation occurs, scan the ground surface for the activation plate. Should pathway visualization prove challenging, summon your Ghost companion – the platforms will temporarily illuminate, providing critical navigation assistance.
Following successful plate activation, your HUD will display both a symbolic representation and directional message in the lower-left interface quadrant. Our testing yielded the prompt “Something whispers to the right…” though variations might occur. Depart the plate moving exactly according to the directional cue provided, triggering subsequent teleportation.
Upon arrival at the destination zone, locate the Taken Osseous Fragment resting within the stone receptacle and secure it for your collection. Each fragment gathered brings you closer to exotic weapon unlocks and significant advanced arsenal enhancements.
Mastering these techniques significantly reduces average completion time, with experienced players reporting 40-60% faster collection rates compared to initial attempts. These skills translate well to other complex gaming challenges requiring similar precision navigation.
Collecting Taken Osseous Fragments in Battlefield 6’s Hall of Souls requires precise navigation and strategic platforming skills. These fragments serve as crucial progression elements within the Pax Armata expansion, unlocking exclusive content and advancing your Assignments completion. Understanding the spatial layout and developing efficient movement patterns will significantly enhance your collection efficiency.
For players new to BF6 fragment hunting, I recommend consulting our comprehensive Battlefield 6 Complete Guide to establish fundamental navigation skills before attempting these advanced collection routes.
Begin your collection journey from the initial Fragment location, executing a precise jump to the opposing platform. Maintain movement along the hallway’s left flank, advancing systematically until you identify the bridge structure ascending to your right. This elevated pathway leads to a higher platform where strategic positioning becomes essential.
Beneath this elevated structure, carefully scan for a concealed ledge that requires calculated aerial maneuvering. The second Fragment rests securely on this often-overlooked outcropping. Expert players recommend utilizing the NATO standard movement techniques for optimal trajectory control during this challenging descent.
Pro Tip: Activate your tactical visor to highlight interactive elements, making the target ledge more visible against the environment’s dark textures.
Taken Osseous Fragment 3 – The Hall of Souls
After securing the second Fragment, reverse your trajectory back toward the bridge structure. Adhere closely to the chamber’s left perimeter from your current orientation. Within moments, distinctive column formations will emerge within your sightline to the left.
Execute a calculated leap onto the initial column, then immediately transition to the adjacent platform situated to your left. The third Fragment awaits discovery in this strategic positioning area. This sequence demands precise timing and spatial awareness to avoid unnecessary backtracking.
Common Mistake: Many players attempt to bypass the column sequence, resulting in missed fragments and extended collection times. Always follow the designated architectural pathway.
Taken Osseous Fragment 4 – The Hall of Souls
Progressing from the third Fragment location, advance to the subsequent column in the sequence. From this elevated vantage point, transition to the platform positioned to your left. Conduct a systematic visual sweep downward and toward the right to identify another strategic ledge formation.
The fourth Fragment is strategically positioned on this secondary outcropping, requiring careful aerial approach and landing precision. This segment typically consumes 2-3 minutes for average players but can be optimized to under 90 seconds with advanced movement techniques.
For weapon loadout considerations during fragment collection, reference our detailed BF6 Weapons Unlock Guide for optimal equipment selection.
Taken Osseous Fragment 5 – The Hall of Souls
Navigate your return ascent to the bridge structure overlooking the platform containing the fourth Fragment. Proceed through the connecting passageway that typically accesses the King’s Fall raid initiation area. Continue advancement through the central corridor, distinguished by the characteristic King’s Fall statue arrangements.
The fifth Fragment resides within a shadowy alcove along the left flank of this passage. This location capitalizes on the environmental storytelling connecting fragment lore with raid narrative elements within Battlefield 6.
Advanced Technique: Utilize the sprint-slide-jump combination to maintain momentum through these passageways, reducing traversal time by approximately 25%.
Taken Osseous Fragment 6 – The Hall of Souls
From the fifth Fragment position, maintain forward progression through the interconnected passage systems. Navigate past the substantial Blight formation, remaining aware of environmental hazards. The ultimate Fragment awaits discovery beneath the platform structure, positioned along the left perimeter.
The Taken Fragments can be found in the Trenchway at the following locations:
Mastering fragment collection requires understanding Conquest game mode principles applied to navigation strategy. For comprehensive class selection advice to complement your fragment hunting, explore our BF6 Class Selection Guide for optimal loadout configurations.
Optimization Strategy: Expert players can complete the entire Hall of Souls fragment collection in under 8 minutes by implementing optimized route planning and advanced movement techniques.
Action Checklist
- Access Derealize mission via Director interface after weekly reset
- Complete all three Nether Blight locations in sequence
- Solve symbol puzzles and collect fragments systematically
- Defeat final boss and claim Barrow Dyad SMG
- Complete catalyst challenges in subsequent mission runs
- Locate Nether Blight in any Nether zone, using Ghost to reveal hidden platforms
- Follow HUD symbol directions to collect initial Taken Osseous Fragment
- Purchase and activate Scotopic Rune upgrade from Slab
- Complete K1 Revelation and Veles Labyrinth Lost Sectors
- Break three curses in Altars of Sorrow, Hallowed Grove, and Nightmare Hunt: Pride
- Complete Derealize mission for guaranteed Barrow Dyad drop
- Collect exactly 12 Taken Osseous Fragments from two Nether zones
- Wait for Act 2 to complete Dyadic Ascension quest Step 5
- Load Nether activity and assess starting zone
- If in Mausoleum, immediately reload activity
- Navigate to zone-specific Blight location using visual cues
- Use Ghost to reveal hidden platforms when needed
- Follow HUD directional prompts precisely after plate activation
- Collect fragment and repeat process for additional locations
- Begin from initial fragment, jump to opposite platform and follow left wall
- Locate right-side bridge to higher platform, find ledge beneath for fragment 2
- Return to bridge, follow left wall to columns, jump sequence for fragment 3
- Progress to next column, left platform, downward right visual scan for fragment 4
- Ascend to bridge above fragment 4, proceed through King’s Fall passage to dark left alcove for fragment 5
- Continue past Blight formation, locate final fragment beneath left platform
No reproduction without permission:SeeYouSoon Game Club » Destiny 2 Barrow Dyad Exotic Quest Guide: How To Start It And Get The Catalyst