TL;DR
- Shi No Numa returns enhanced with new Dark Aether storyline content in Vanguard Season 4
- Proper loadout preparation and team coordination significantly impact quest completion success
- Strategic positioning and resource conservation are crucial for surviving higher difficulty waves
- Understanding zombie spawn patterns and boss mechanics prevents common failure points
- Time-efficient routing can reduce completion time by 25-30% for experienced players
This comprehensive Zombies guide provides detailed strategies for conquering the main storyline quest in Season 4’s revitalized Shi No Numa map. We’ll cover essential preparation, execution techniques, and advanced optimization methods to ensure your success.
The Mercenaries of Fortune update has revitalized Call of Duty: Vanguard with the return of Shi No Numa, originally from 2008’s Call of Duty: World at War. This enhanced version maintains the classic round-based Zombies gameplay while introducing fresh narrative elements that expand Treyarch’s ongoing Dark Aether storyline. Our walkthrough delivers proven methods for navigating this challenging Easter egg quest efficiently.
Success in Shi No Numa begins long before the first zombie spawn. Weapon selection should prioritize versatility – consider bringing a long-range option for special enemies and a close-quarters weapon for crowd control. The Wonder Weapons available in this map can dramatically alter your strategy, so understanding their acquisition methods is crucial.
Team composition plays a vital role in quest completion. Ideally, coordinate with players who complement each other’s playstyles – having a dedicated objective runner, a high-damage dealer, and support players creates optimal synergy. Communication about resource allocation and role responsibilities prevents mid-game confusion and resource waste.
Resource management separates successful runs from failed attempts. Conserve points early by using melee attacks on initial waves, then strategically invest in door openings and weapon upgrades. Knowing when to purchase specific perks can mean the difference between survival and failure during critical moments.
The quest begins with activating three main generators scattered throughout the swamp area. Each generator requires protection during its activation sequence, so position team members strategically to cover choke points. The middle generator typically attracts the most zombie traffic, so assign your strongest player to this position.
Mid-game challenges involve collecting ritual components while managing increasingly difficult zombie waves. The spectral key fragments require precise navigation to hidden areas – memorize these locations beforehand to minimize time spent searching during actual attempts.
Final confrontation mechanics introduce unique boss behaviors that demand adaptation. The Dark Aether entity employs area denial attacks that can quickly overwhelm unprepared teams. Positioning near escape routes and maintaining constant movement are essential survival tactics during this phase.
Movement optimization significantly impacts survival rates. Master the slide-cancel technique to maintain momentum while evading zombie attacks. The swamp areas contain numerous environmental hazards – learning safe paths through these zones reduces unnecessary damage taken.
Wave management becomes critical around rounds 15-20. Avoid killing zombies too quickly during objective phases, as this can trigger premature special enemy spawns that complicate already challenging sequences.
Common errors include over-investing in early weapon upgrades instead of saving for essential perks. Many teams fail by neglecting to assign specific players to watch for flanking zombies during stationary objectives. Another frequent mistake involves misjudging the timing for Wonder Weapon usage – conserve these powerful tools for boss encounters and high-density situations.
Step 1: Build the Wonder Weapon
Successfully completing Shi No Numa’s Easter egg quest demands mastery of the map’s signature Wunderwaffe DG-2 Wonder Weapon. Your initial focus should center on efficiently opening critical pathways while gathering the essential components during early rounds. Proactively work on subsequent objectives while assembling the weapon, particularly since Step 2 presents optimal completion conditions during round five.
The Wunderwaffe DG-2 assembly station resides on a workbench within the Storage hut structure, though constructing a functional version requires locating multiple specialized parts. While the Mystery Box can randomly provide this powerful weapon starting at round 10, pursuing the structured quest path proves significantly more reliable for consistent success.
Initial Route Optimization: Beginning from your spawn location in the Main Hut’s upper level, invest 1,000 Essence to unlock the descending staircase. Prioritize opening the gateway connecting to Doctor’s Quarters to establish access for Step 2 completion during the fifth round. Following round five completion, you’ll accumulate sufficient resources to expand map access and continue weapon construction. The subsequent critical pathway lies outside the Main Hut adjacent to the massive Flogger trap mechanism – pay another 1,000 Essence to establish the route toward Fishing Hut.
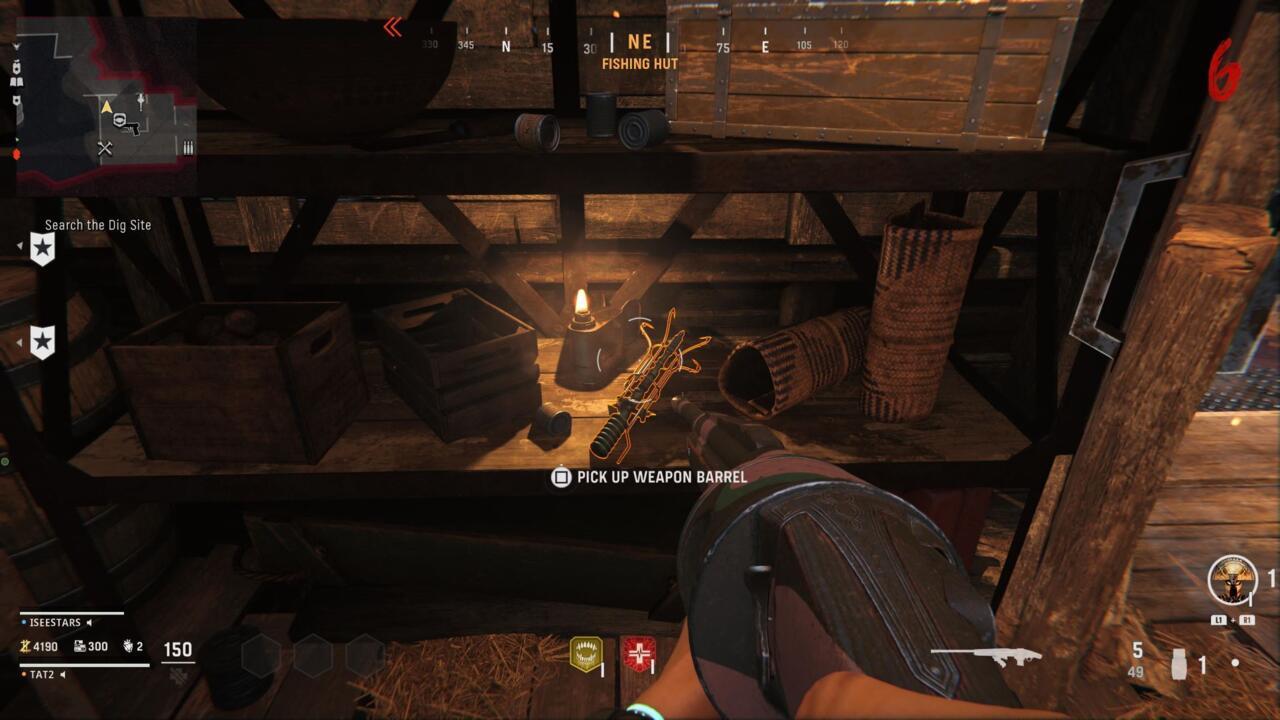
Fishing Hut Barrel part
Within Fishing Hut’s interior, locate the Barrel component positioned conspicuously on a shelf. This yellow-highlighted part becomes immediately visible when turning right upon entry. Transport this component to the northern map extremity where a distinctive green electrical box awaits in the waters near Comm Room exterior. Position the Barrel part within the electrical apparatus, then conclude the current round by eliminating remaining zombies to progress.
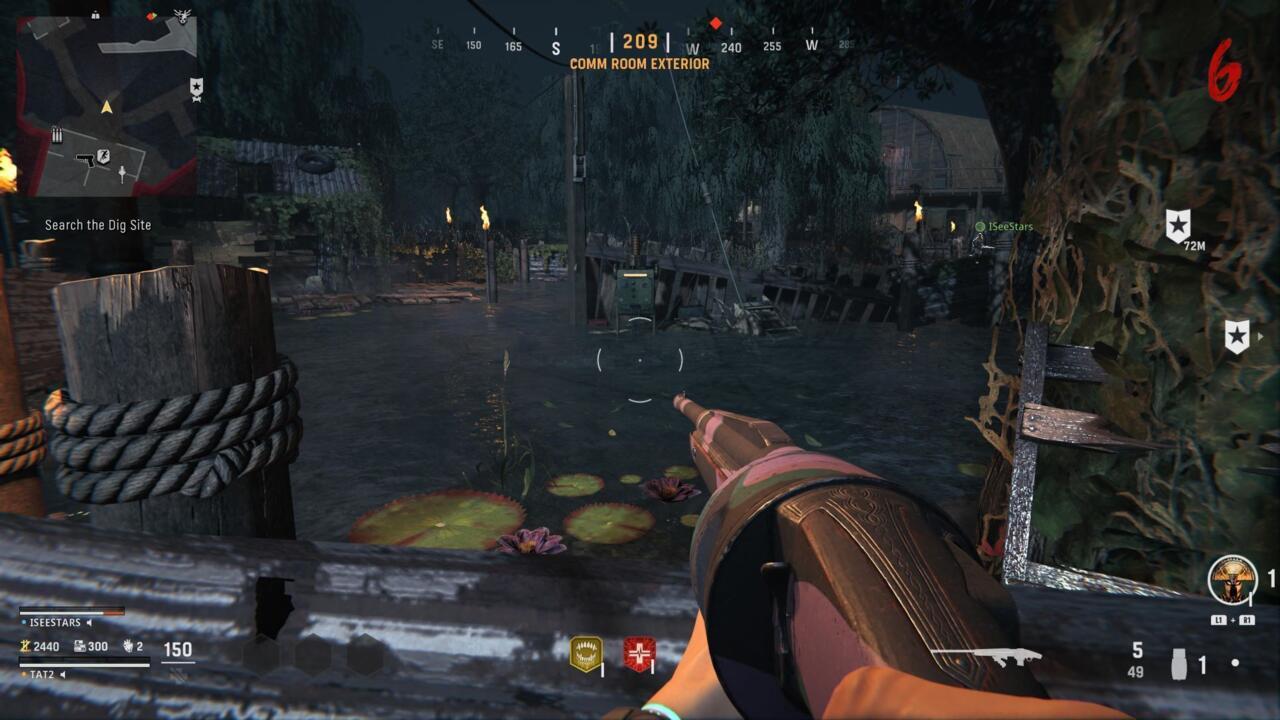
The green electrical box for Comm Room Exterior can be seen in the distance here
A powerful lightning strike will energize the box, initiating a defensive zombie wave. Survive this assault to acquire the second component, then immediately proceed into Comm Room to retrieve the charged Vacuum Tube from the interior radio equipment. Remember to collect the previously installed Barrel component from the electrical housing.
The third required piece – an Electrical Fuse – awaits discovery on an office desk. Transport this component to the Storage hut where an electrical trap mechanism requires activation. Initial interaction will damage the device, indicating fuse replacement necessity – conveniently, you already possess the required component. Secondary interaction installs the Electrical Fuse, enabling trap activation for zombie elimination. An audio cue confirms sufficient eliminations, charging the second Vacuum Tube component already positioned on the weapon workbench.
Advanced Enemy Management: The final component acquisition requires strategic engagement with Vanguard’s specialized Zaballa enemy type, which begins spawning at round 15. Upon reaching this threshold, lure a Zaballa combatant to the Excavation Room situated in the Main Hut’s lower level. The chamber contains a substantial Tesla coil apparatus mounted against the wall. Rather than rapid elimination, position yourself near the coil to allow her offensive capabilities to energize the mechanism. This phase presents considerable risk – employing decoy devices or monkey bombs to divert zombie attention from the coil significantly enhances survival probability.
Tesla coil in the Excavation Room
An audio confirmation signals successful coil charging, enabling retrieval of the final Vacuum Tube component from the adjacent table. Return to the Storage workbench to finalize construction of your Wunderwaffe DG-2 Wonder Weapon.
Step 2: Find the monolith, remove the vines
Monolith covered in vines outside of Doctor’s Quarters
Navigate to Doctor’s Quarters Exterior to discover the vine-encrusted monolith structure. Eliminating the obstructive vegetation requires strategic elimination of Boom Schreiers – Vanguard’s explosive specialist enemy classification – in proximity to the monolith. These adversaries arrive in designated assault waves, mirroring the hellhound round mechanics from the original Shi No Numa experience. The initial appearance occurs during round five, presenting the most favorable conditions for this objective. Missing this initial opportunity necessitates waiting for subsequent Boom Schreier assaults in later rounds.
Step 3: Solve the cipher
Proceed into the Doctor’s Quarters building interior to locate documentation featuring symbolic characters resembling Kanji script. The visible portion displays only partial symbols – complete revelation requires application of fire via molotov cocktail or thermite projectile. These incendiary devices drop randomly from eliminated zombies, though equipment crafting benches provide reliable alternatives.
Full list of symbols needed, so you can bypass the Molotov step and use this pic if needed
Cipher wheel component locations:
- Within the far right chamber of Doctor’s Quarters
- Positioned on a table within the Dormitory area, located in Main Hut’s lower level
- Located on a surface directly facing the Pack-a-Punch apparatus at Dig Site
Progressive Collection Strategy: After securing all three cipher components, position them upon the monolith structure. This activates a code input requirement demanding specific symbols for each wheel mechanism. Locating these three Kanji symbols requires exploring three predetermined map positions – prepare recording materials for accurate documentation.
CRITICAL NOTE: The required symbols undergo complete randomization each gameplay session, necessitating this procedure during every attempt. However, the document locations containing necessary symbols maintain permanent consistency.
Symbol discovery locations:
- On a table surface within the Main Hut’s lower-level Excavation Room sector
- Positioned on a radio-equipped desk inside Comm Room
- On the crafting workstation at Dig Site
Symbol location in Excavation Room, remember your symbol might not be the same as image shown
The Excavation Room symbol may conceal beneath blank documentation – employ firearm discharge or melee strikes to reveal the concealed symbol.
ESSENTIAL PREPARATION: Completing this phase and advancing requires having the Wunderwaffe DG-2 prepared and operational. Proceeding without this essential tool guarantees failure in the subsequent quest segment.
Utilizing the comprehensive symbol catalog originally discovered at Doctor’s Quarters, you’ll derive new symbols for monolith cipher input. For each of the three located Kanji symbols, identify their corresponding right-side symbols from the master list. These three derived symbols constitute the cipher input requirements.
Input the three symbols by rotating each disc
Input these symbols into the upper central positions of each disc mechanism, accomplished by rotating cipher discs to establish vertical alignment from top to bottom.
Step 4: Lockdown with Wonder Weapon
Execute this phase at the earliest opportunity, ensuring weapon upgrades and perk acquisitions are complete. Consult comprehensive Shi No Numa perk documentation for fountain localization. The Wonder Weapon remains absolutely mandatory for this segment.
Following successful code entry into the monolith, small stone pillars surrounding the structure will illuminate crimson and become interactive. The quantity corresponds to participant count – single for solo, dual for duo, etc. Every player must simultaneously activate their designated pillar to initiate area lockdown protocol.
All players in the match must activate a stone pillar
A zombie assault wave will engage your position. Regardless of solo or team attempt configuration, the Wonder Weapon bearer must eliminate zombies enveloped in blue atmospheric effects. These highlighted adversaries demonstrate enhanced velocity and aggression – supporting teammates should focus on standard zombie elimination and protecting the Wunderwaffe DG-2 operator. Strategic positioning demands eliminating blue-enhanced zombies in close proximity to the monolith, making decoy devices and/or monkey bombs invaluable for concentration near the objective area.
This segment presents considerable challenge, with difficulty scaling proportionally to round progression. However, failed attempts can be repeated during subsequent rounds. Successful completion triggers a brief cinematic sequence.
Step 5: Get Flogger Juice and mirror pieces
Positioned opposite Shi No Numa’s Flogger trap mechanism rests an object resembling a damaged perk fountain apparatus. Accumulate zombie groups and maneuver them into the activated Flogger mechanism. Successful Flogger eliminations gradually fill the fountain reservoir with “Flogger Juice,” which upon consumption grants temporary enhanced visual capabilities.
Flogger juice will fill this fountain
Utilizing the augmented perception provided by the juice, rapidly traverse the map environment to locate two mirror fragments. These components float conspicuously within or around any map structures, distinguished by aqua-colored luminous halos. You might also encounter crimson orbs during exploration – locating these orbs directs you toward mirror piece locations.
Should temporal limitations expire before completion, this procedure remains repeatable as needed. Simply eliminate additional zombies using the Flogger to replenish the fountain’s juice supply.
Step 6: Charging podiums and shooting orbs
Transport both collected mirror fragments to Dig Site location. Here you’ll interact with the central podium structure to position the components. Following interaction, luminous orbs materialize corresponding to participant count – singular for solo, dual for duo configurations.
Podium at Dig Site
Every participant must simultaneously approach and interact with their designated orb. Subsequently, the orbs ascend and disperse throughout the environment. Each player must pursue and successfully strike their orb three times consecutively, with orbital repositioning following each impact. Execute the sequence: discharge firearm, pursue, repeat until triple impact achievement. Failed attempts necessitate waiting until subsequent rounds for retry opportunities.
Upon successful completion, you’ll interact with the Dig Site podium again, this time initiating the culminating boss encounter.
Ensure comprehensive perk preparation. While not exceptionally demanding, the boss confrontation benefits from at minimum single Pack-a-Punch upgrade for the Wonder Weapon, providing augmented ammunition capacity and damage output. For alternative weaponry, the Einhorn shotgun maintains superior performance metrics within Zombies gameplay.
Step 7: Boss fight
Shi No Numa’s climactic boss engagement unfolds across three distinct phases. The antagonist demonstrates complete damage immunity during initial appearance. The inaugural phase operates similarly to Step 4’s lockdown mechanics, requiring Wonder Weapon elimination of blue-enhanced zombies near the podium structure.
Following successful completion, an azure energy field envelops the vicinity. Position the boss within this containment zone to establish vulnerability to offensive actions. Continue engagement until she reactivates immunity for the second phase.
Phase two mechanics closely resemble the initial round, except Boom Schreiers constitute the blue-enhanced adversaries requiring Wonder Weapon elimination near the podium. Upon phase completion, the blue containment field re-establishes, enabling continued boss damage. Repeat the sequence for the third and concluding round, featuring Vanguard’s heavy weapon specialist enemy classification as the designated blue zombies for Wonder Weapon elimination. Finalize health depletion to complete Shi No Numa’s primary narrative Easter egg quest. Achievement rewards include cinematic conclusion and exclusive calling card.
Consult comprehensive survival strategies for Shi No Numa mastery. For complete Vanguard Zombies narrative context, reference our comprehensive prologue documentation for Der Anfang, alongside main storyline Easter egg guidance for Terra Maledicta.
Successfully completing Shi No Numa’s challenging Easter Egg hinges on strategic acquisition and utilization of the map’s powerful Wunderwaffe DG-2 Wonder Weapon. Your initial focus should center on efficiently opening critical map areas during the opening rounds while simultaneously gathering essential perks and weapon components. Many players underestimate the importance of parallel task execution – you can significantly accelerate your progress by working on subsequent steps while assembling the Wonder Weapon, particularly since Step 2’s monolith interaction becomes available precisely at round five.
The fully assembled Wunderwaffe DG-2 awaits completion on a specialized workbench inside the Storage hut, though you’ll need to locate several scattered components before constructing a functional version. While technically obtainable through random Mystery Box drops, this method proves unreliable as the weapon doesn’t enter the rotation until round 10, creating unnecessary delays. Building through the dedicated quest path provides guaranteed access and better aligns with Easter Egg timing requirements.
Strategic Consideration: The Mystery Box approach consumes valuable points that could otherwise fund map progression, and the delayed availability disrupts your carefully planned round-by-round strategy. For consistent results, follow the structured component collection method outlined in subsequent steps.
Initial Movement: Beginning from your spawn location in the Main Hut’s upper level, immediately invest 1,000 Essence to unlock the staircase descending to the building’s lower section. Your subsequent priority should be activating the gateway connecting the hunting area to Doctor’s Quarters, ensuring this crucial zone becomes accessible exactly when needed for Step 2 during round five. Completing the fifth round typically provides sufficient accumulated points to expand your accessible territory while continuing Wonder Weapon assembly.
Secondary Expansion: The next critical pathway lies just outside Main Hut near the massive Flogger trap mechanism. Another 1,000 Essence investment here unlocks the route to Fishing Hut, where you’ll discover the barrel component essential for progression. This calculated unlocking sequence maximizes efficiency while minimizing backtracking.
Fishing Hut Barrel Component Location and Utilization
The barrel housed within Fishing Hut serves dual purposes – it’s not only part of the Wunderwaffe assembly but also plays a role in later Easter Egg stages. Advanced players should note that optimal essence farming in rounds 1-3 involves training zombies in the Main Hut area before utilizing the staircase for efficient elimination. This method accelerates point accumulation while maintaining control over the early-game environment.
Pro Tip: Always complete map exploration and component collection during zombie rounds rather than in dedicated search phases. This time-management approach ensures continuous progression while maintaining round advancement momentum.
CRITICAL WARNING: Before proceeding with this Easter egg step, ensure you have acquired the Wunderwaffe DG-2 wonder weapon. Attempting to continue without it will result in automatic failure of the subsequent quest phase.
Utilize the symbol reference document originally discovered in the Doctor’s Quarters area to decode the required cipher sequence. Each of the three Kanji characters you collected corresponds to a secondary symbol listed immediately adjacent on the reference sheet. These derived symbols from the right-hand column become your three-digit cipher combination for monolith activation.
Execute the three-symbol input by systematically rotating each cipher disc
Input the decoded symbols by manipulating the rotating cipher discs to position each character sequentially in the upper central alignment slots. The correct configuration displays all three symbols arranged vertically from top to bottom in a single column formation.
Complete this cipher input sequence during early rounds when zombie density remains manageable. Prioritize weapon upgrades and essential perk acquisition beforehand—consult our comprehensive Class Guide for optimal loadout configurations. Remember: the wonder weapon remains non-negotiable for progression.
Upon successful cipher entry, multiple stone pillars surrounding the monolith structure will illuminate with crimson energy. The game dynamically generates one active pillar per participant—single player receives one, duo receives two, etc. All players must simultaneously interact with their designated pillars to initiate the area containment protocol.
Every match participant must activate their assigned stone pillar concurrently
An aggressive zombie horde immediately assaults your position post-activation. The player wielding the Wunderwaffe DG-2 must exclusively eliminate zombies enveloped in distinctive blue aura. These enhanced adversaries demonstrate increased movement speed and aggression patterns—teammates should focus on neutralizing standard zombies while providing protective coverage for the wonder weapon user. Strategic positioning proves crucial: eliminate blue-glowing zombies within proximity to the monolith using tactical equipment like decoy grenades or monkey bombs to concentrate targets effectively.
This phase presents significant difficulty that escalates with each progressing round. Failed attempts can be re-initiated during subsequent rounds without permanent progression loss. Successful completion triggers a brief cinematic sequence indicating advancement.
Positioned opposite Shi No Numa’s operational Flogger trap mechanism resides a damaged perk fountain apparatus. Accumulate zombie groups and strategically lure them into the active Flogger trap’s kill zone. Each Flogger elimination contributes to filling the fountain reservoir with specialized “Flogger Juice” substance—consuming this liquid grants temporary enhanced visual perception capabilities.
For comprehensive weapon strategies that complement this Easter egg approach, explore our detailed Weapons Unlock guide covering optimal armaments for zombie containment scenarios.
Action Checklist
- Configure loadout with balanced weapon types and essential field upgrades
- Coordinate team roles and communication protocols before starting
- Execute generator activation sequence with proper choke point coverage
- Complete ritual component collection while managing zombie wave escalation
- Implement boss confrontation strategies with adaptive positioning and resource management
- Build Wunderwaffe DG-2 by collecting components from Fishing Hut, Comm Room, and Storage locations
- Eliminate Boom Schreiers near monolith during round five
- Solve cipher by collecting symbols from three fixed map positions
- Complete lockdown phase using Wonder Weapon on blue-enhanced zombies
- Collect mirror fragments using Flogger juice enhanced vision
- Charge podiums and shoot orbs three times each
- Defeat boss across three distinct phases with specific enemy requirements
- Unlock Main Hut staircase (1,000 Essence) and begin zombie training for point accumulation
- Activate Doctor’s Quarters gateway and prepare for round 5 monolith interaction
- Open Flogger trap pathway to Fishing Hut (1,000 Essence) and secure barrel component
- Complete Wunderwaffe DG-2 assembly at Storage hut workbench
- Execute multi-tasking strategy by progressing subsequent Easter Egg steps during zombie rounds
- Acquire Wunderwaffe DG-2 and upgrade weapons before attempting cipher
- Translate Kanji symbols using Doctor’s Quarters reference sheet
- Input three derived symbols via cipher disc rotation in vertical alignment
- Coordinate simultaneous pillar activation with all players
- Eliminate blue-hazed zombies near monolith using tactical equipment
No reproduction without permission:SeeYouSoon Game Club » CoD: Vanguard Zombies Shi No Numa Main Easter Egg Guide