TL;DR
- Battlefield 6 campaign contains 30 dog tags and 1 T-Rex collectible across 9 missions
- Finding all collectibles unlocks achievements/trophies and cosmetic rewards
- Strategic exploration and environmental awareness are key to locating hidden items
- Mission-specific tactics help optimize collection efficiency
- Use visual references and timing strategies to avoid missing opportunities
Mastering the collectible hunt in Battlefield 6 requires strategic thinking and thorough exploration. The campaign features 30 meticulously placed dog tags plus one special T-Rex toy dinosaur that serve as both completion challenges and reward triggers.
Successfully locating every hidden item unlocks all campaign-related achievements and trophies while providing exclusive cosmetic enhancements for your multiplayer experience. These rewards significantly enhance your Class Guide customization options.
Strategic collection involves understanding mission flow and environmental design. Many tags are positioned in areas that naturally guide player movement, while others require deliberate deviation from primary objectives.
Common collection mistakes include rushing through missions without proper environmental scanning and failing to utilize available tools like night vision or tactical equipment that reveal hidden pathways.
The opening mission contains both the unique T-Rex collectible and three strategically placed dog tags. This mission introduces players to the collection mechanics while establishing exploration patterns for subsequent levels.
The toy dinosaur is cleverly hidden in an area that many players overlook during their initial approach. Positioned in a non-combat zone, it requires careful environmental observation rather than combat proficiency.

T-Rex collectible in Always Faithful
Dog tag placement follows logical progression through the mission’s narrative flow. The first tag appears early, teaching players to scan their surroundings during lulls in combat.
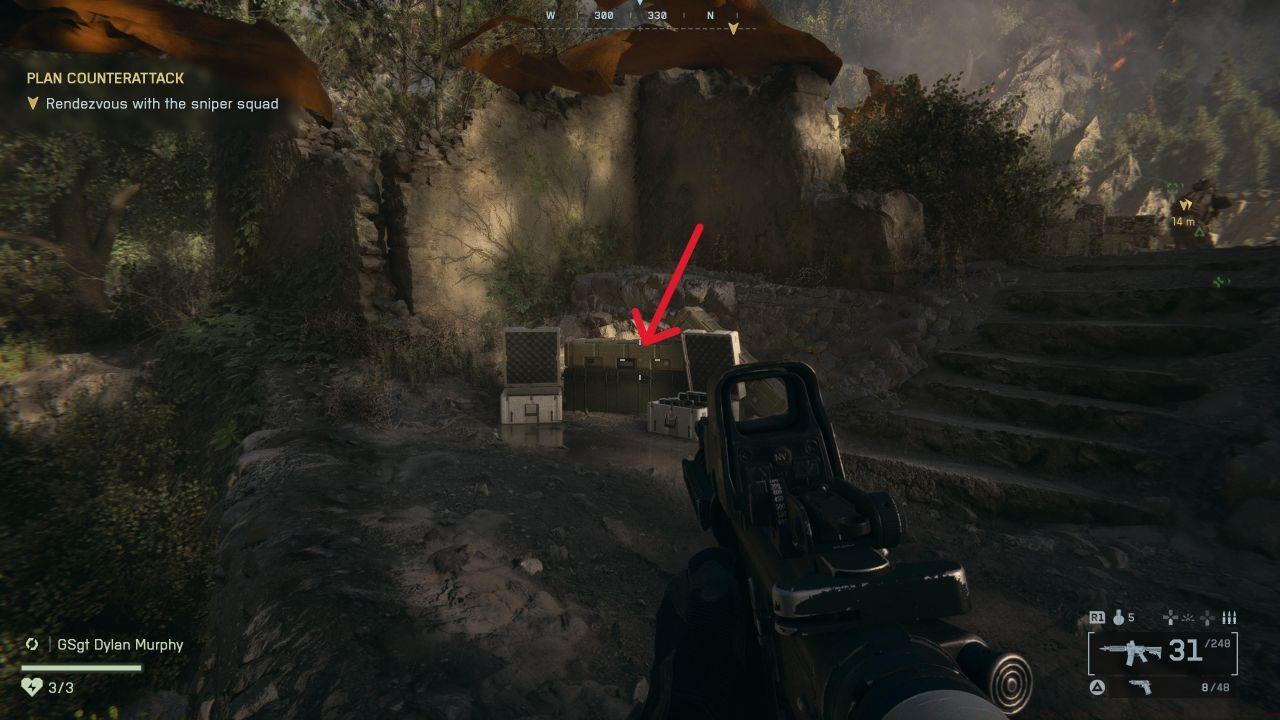
Always Faithful tag 1
Advanced players should note that certain tags become inaccessible after triggering specific scripted events. Planning your route before engaging objectives prevents missed collection opportunities.
Always Faithful tag 2
The final tag in this mission requires utilizing environmental elements that might not be immediately obvious. Look for interactive objects that differ from their surroundings.
Always Faithful tag 3
This mission emphasizes stealth and verticality in tag placement. Players must master both ground-level exploration and elevated positioning to locate all three collectibles.
The initial tag is positioned along the primary infiltration route, rewarding careful movement rather than rushed progression. Utilizing cover effectively provides additional scanning opportunities.
The Rock tag 1
Mid-mission tags require deviation from the most direct path to objectives. These placements encourage players to explore alternative routes that often provide tactical advantages.
The Rock tag 2
The final tag is cleverly hidden in an area that becomes hostile territory after certain triggers. Collecting it early prevents needing to fight through reinforced positions later.
The Rock tag 3
Pro tip: Use the mission’s stealth mechanics to your advantage. Remaining undetected provides more time for thorough exploration without combat interruptions.
Urban combat environments dominate this mission, with tags hidden in both obvious high-traffic areas and secluded locations that require puzzle-solving.
The first tag appears in a multi-level structure where vertical awareness is crucial. Checking both upper and lower floors reveals hidden pathways.
Operation Gladius tag 1
Mid-mission collection requires understanding the flow of urban warfare. Tags are often placed near strategic positions that provide overwatch or supply advantages.
Operation Gladius tag 2
The final tag involves environmental interaction that might not be immediately apparent. Look for objects that stand out from their surroundings or emit subtle visual cues.
Operation Gladius tag 3
Advanced strategy: Complete secondary objectives first, as they often lead you near collectible locations without additional detours.
This night operation presents unique challenges for collectible hunters. Limited visibility requires heightened auditory awareness and strategic use of available light sources.
The mission contains the highest concentration of dog tags, requiring meticulous exploration across multiple environments. Each tag placement teaches different aspects of nighttime combat navigation.
Night Raid tag 1
Early tags are positioned along primary infiltration routes, rewarding players who move cautiously and utilize cover effectively.
Night Raid tag 2
Mid-mission collectibles require understanding the mission’s pacing. Certain tags become inaccessible after specific narrative developments, so timing is critical.
Night Raid tag 3
The final tag is cleverly hidden in an area that many players bypass during extraction. Thorough perimeter checks before mission completion ensure no tags are missed.
Nigh Raid tag 4
Expert tip: Use the mission’s darkness to your advantage. Enemy patrol patterns are more predictable at night, allowing for strategic collection during lulls in activity.
This high-intensity mission challenges players to maintain collection focus during relentless combat. Tags are strategically placed to reward both aggressive and tactical playstyles.
The first tag appears early, establishing the mission’s collection pattern. Its placement encourages players to utilize the environment for protection while scanning for collectibles.
No Sleep tag 1
Mid-mission tags require quick thinking and spatial awareness. Their positions often provide tactical advantages if collected during combat sequences.
No Sleep tag 2
The final collectible is positioned in an area that becomes inaccessible after a major scripted event. Planning your route to collect it before triggering the event prevents needing to replay the mission.
No Sleep tag 3
Strategic approach: Use suppressive fire and tactical positioning to create collection opportunities during intense firefights.
Vehicle-centric gameplay defines this mission’s collection strategy. Tags are placed to encourage both on-foot exploration and strategic vehicle use.
The initial tag appears near early vehicle deployment areas, teaching players to combine mobility with collection efforts.
Moving Mountains tag 1
Mid-mission collectibles require understanding vehicle capabilities and limitations. Some tags are only accessible using specific vehicle types or maneuvers.
Moving Mountains tag 2
Advanced placement involves multi-stage access requiring both vehicle and on-foot approaches. These tags reward players who master the mission’s full gameplay spectrum.
Moving Mountains tag 3
Pro strategy: Utilize vehicle destruction sequences to access areas that are normally restricted or difficult to reach.
This defensive mission presents unique collection challenges with only two dog tags to locate. Their strategic placement reinforces the importance of positional awareness in combat scenarios.
The first tag is positioned in an area that becomes heavily contested later in the mission. Early collection prevents combat complications.
Nile Guard tag 1
The second tag requires understanding the mission’s defensive mechanics. Its placement encourages players to explore defensive positions that might be overlooked during intense combat.
Nile Guard tag 2
Expert insight: The limited number of tags in this mission doesn’t reduce their importance. Each represents a significant exploration challenge that complements the defensive gameplay.
This assault mission features aggressive tag placement that rewards bold movement and tactical aggression. All four tags are positioned to enhance offensive gameplay rather than hinder it.
The initial tag appears during the opening assault phase, establishing the mission’s collection rhythm. Its position provides a tactical advantage if collected early.
Operation Ember Strike tag 1
Mid-mission tags require maintaining offensive momentum while scanning for collection opportunities.
Operation Ember Strike tag 2
The final tags are positioned in high-risk areas that provide significant tactical rewards. Their collection often turns the tide of difficult combat encounters.
Operation Ember Strike tag 3
Operation Ember Strike tag 4
Advanced tactical approach: Coordinate tag collection with objective completion to maximize efficiency and maintain combat effectiveness.
The campaign finale presents the ultimate collection challenge with four strategically placed dog tags that test everything learned throughout previous missions.
The opening tag reinforces fundamental collection principles while preparing players for the mission’s unique challenges. Its placement provides early success momentum.
Always Forward tag 1
Mid-mission tags require perfect timing and route planning. Their positions are designed to complement the mission’s narrative climax rather than distract from it.
Always Forward tag 2
The final tags are positioned to reward players who have mastered the game’s movement and combat systems.
Always Forward tag 3
Always Forward tag 4
Completion rewards include exclusive weapon skins and player cards that showcase your collection achievement. These enhancements integrate perfectly with your Weapons Unlock progression.
Master collection strategy: Use the mission’s pacing to your advantage, collecting tags during natural lulls in the intense final sequences.
Action Checklist
- Complete each mission on easy difficulty first to learn tag locations without pressure
- Use mission checkpoints strategically to minimize replay time for missed tags
- Study environmental details – tags are often near distinctive objects or lighting
- Consult visual guides for complex tag locations requiring specific sequence triggers
- Complete collection before finishing campaign to avoid missing time-sensitive opportunities
No reproduction without permission:SeeYouSoon Game Club » Battlefield 6 – All Campaign Collectibles And How To Find Them Complete guide to finding all 30 dog tags and T-Rex collectible in Battlefield 6 campaign missions