TL;DR
- Complete Act 2 prerequisites including Gauntlet of Shar and Nightsong rescue
- Recruit Jaheira strategically before descending into the Mind Flayer Colony
- Master the three-phase boss fight with specific ability counters for each stage
- Make critical story decisions in the colony that affect companion availability
- Acquire powerful legendary gear including Ketheric’s Netherstone for Act 3
Successfully defeating Ketheric Thorm requires meticulous preparation throughout Act 2. This climactic encounter serves as the culmination of your journey through the Shadow-Cursed Lands, demanding both strategic planning and combat proficiency.
Act 2 Prerequisites
Before confronting the necromancer lord, you must complete several critical objectives:
- Navigate to Moonrise Towers – Multiple routes lead to this region, but the safest path involves securing protection from the pervasive Shadow Curse that blankets the area.
- Acquire curse protection – Obtain either a functioning Moonlantern or secure the Pixie’s Blessing to safely explore the dangerous territories.
- Conquer the Gauntlet of Shar – This elaborate dungeon contains numerous environmental puzzles and combat challenges that test your party’s versatility.
- Rescue the Nightsong – Freeing this powerful entity not only provides narrative satisfaction but also grants crucial combat assistance during the initial phase.
Companion Management
Strategic companion selection dramatically impacts your success probability. Ensure your party includes:
- A dedicated healer with strong AoE capabilities
- At least one high-damage dealer capable of burst damage
- A character with mobility or teleportation abilities for phase transitions

Properly managing Jaheira’s recruitment timeline ensures you maximize her combat effectiveness.
The initial assault on Moonrise Towers presents a large-scale battle scenario where tactical positioning and spell management determine victory.
Cultist Battle Strategy
This expansive combat area features over two dozen cultist adversaries, though you’re supported by Harper reinforcements. Key combat considerations include:
- Priority Target: Disciple Z’rell – Her Black Hole spell creates dangerous crowd control situations that can immobilize multiple party members simultaneously.
- Elevated Archer Positions – Multiple cultist archers occupy elevated wooden beams, presenting both targeting challenges and vulnerability to area effects.
- Optimal Spell Selection – Deploy area-of-effect abilities like Ice Storm and Fireball in the central open area to maximize damage against converging enemies.
Loot Collection
Thorough looting following this engagement yields substantial rewards:
- Multiple rare and very rare equipment pieces
- Soul Coins for specific companion interactions
- Mind Flayer Parasite Specimens that enable illithid power progression
Strategic positioning and spell timing are crucial for overcoming the numerical disadvantage in the tower assault.
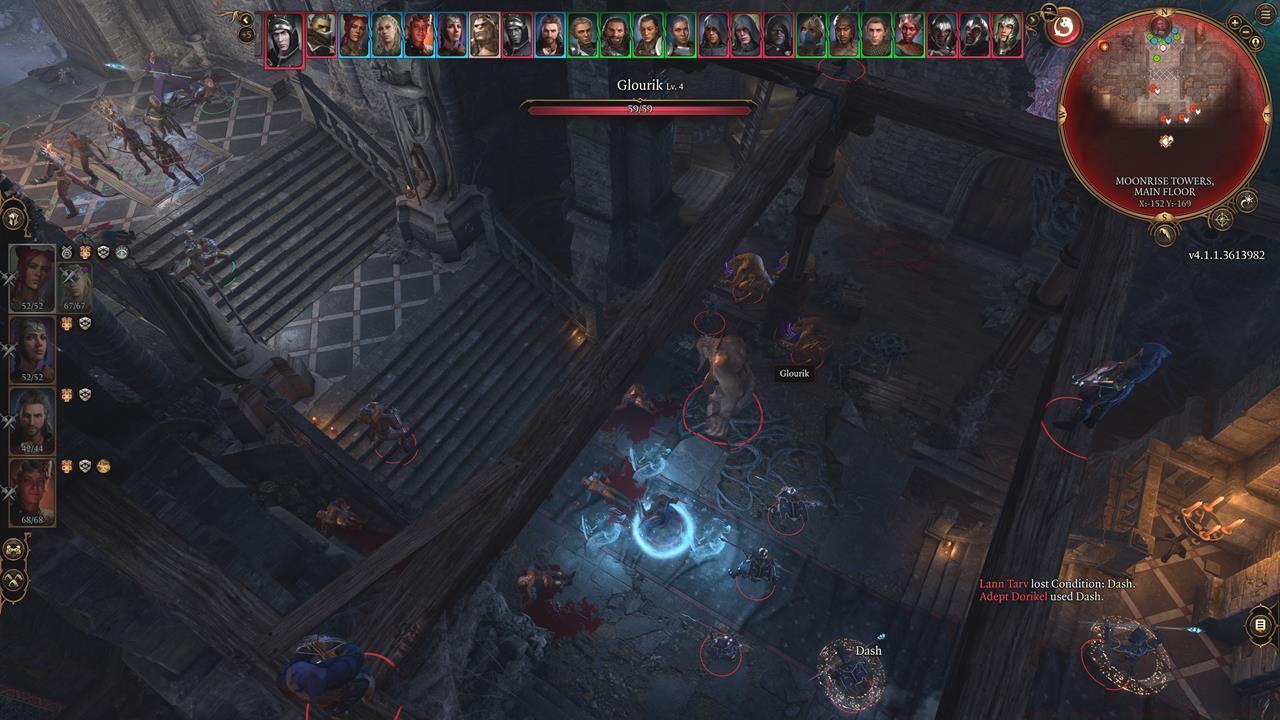
The first direct encounter with Ketheric Thorm occurs at the tower’s summit, introducing his core combat mechanics and setting the stage for subsequent phases.
Combat Mechanics
This initial phase establishes Thorm’s tactical patterns and introduces key mechanics you’ll encounter throughout the multi-stage battle:
- Necrolite Spawning – His Incubate Death ability summons additional Necrolite reinforcements each turn, creating escalating pressure.
- Melee Counterattack – Thorm retaliates against close-range attackers with powerful bashes that can knock characters prone.
- Environmental Hazards – The confined tower top space limits mobility and positioning options.
Transition Strategy
Once you reduce Thorm’s health to approximately 40%, a dramatic cinematic triggers the transition to subsequent phases. Critical actions during this transition include:
- Securing Jaheira as a permanent companion before descending
- Positioning characters optimally for the sudden environment change
- Managing the unexpected separation of party members during the collapse
The phase transition involves both narrative development and practical combat considerations that affect your strategic options.
Beneath Moonrise Towers lies an extensive Mind Flayer Colony that serves as the setting for the final confrontation. This area combines exploration, narrative choices, and combat encounters.
Prisoner Rescue Decisions
The colony presents several morally complex scenarios with lasting consequences:
- Pod Chamber Dilemma – Releasing captured NPCs including Zevlor provides temporary combat assistance but triggers immediate Mind Flayer hostilities.
- Mizora’s Imprisonment – The devil Mizora offers a pivotal choice regarding Wyll’s infernal pact.
- Restoration Point Access – Strategic use of the colony’s restoration facilities can determine survival in the final phases.
Story Progression Choices
Critical narrative junctions in this area include:
- Mizora’s release requiring a Strength check, with failure consequences including Wyll’s permanent departure.
- Gale’s potential self-destruction via the Netherese Orb, representing an alternative but ultimately unsuccessful story path.
Navigating the colony’s moral dilemmas and combat challenges requires balancing immediate tactical advantages against long-term narrative consequences.
The conclusive battle against Ketheric Thorm unfolds in two distinct sub-phases within the colony’s central chamber, culminating in his transformation into the Apostle of Myrkul.
Phase 2.1 Strategy
The second round introduces new tactical considerations and environmental factors:
- Nightsong Rescue Priority – The chained Nightsong in the arena’s rear section can be freed using characters with enhanced mobility or teleportation capabilities.
- Mind Flayer Reinforcement Management – Additional illithid combatants join the fray, requiring adaptive targeting priorities.
- Necrolite Spawn Control – Thorm continues spawning Necrolites, creating attrition-based pressure.
Effective Nightsong liberation transforms the combat dynamic, providing sustained damage output against Thorm.
Phase 2.2 Transformation
Upon depleting Thorm’s health bar, he undergoes a dramatic metamorphosis into the Apostle of Myrkul, introducing devastating new abilities:
- Bone Chill Aura – This persistent area effect prevents healing and revival of downed characters through conventional means.
- Necrolite Consumption – The apostle can absorb Necrolites to gain the Finger of Death spell, capable of eliminating characters in a single strike.
- Burst Damage Windows – Identify and exploit brief vulnerability periods following major ability animations.
The final transformation represents the ultimate test of your party’s damage output, survival capabilities, and adaptive combat strategies.
Successfully defeating Ketheric Thorm yields substantial rewards that significantly enhance your capabilities for Act 3.
Equipment Analysis
The legendary equipment obtained from this encounter includes:
- Ketheric’s Warhammer – Deals 3-15 base damage with +1 enhancement and additional 1d4 psychic damage, making it exceptionally effective against certain enemy types.
- Ketheric’s Shield – Provides +2 AC bonus while enhancing spell effectiveness and enabling reactive combat maneuvers.
- Reaper’s Embrace – This heavy armor offers substantial damage reduction at the cost of mobility penalties.
Story Consequences
The narrative implications of this victory extend throughout the remainder of your campaign:
- Acquisition of Ketheric’s Netherstone, one of three essential items for controlling the Elder Brain.
- Revelation of critical story elements through discovered correspondence.
- Transition to Baldur’s Gate proper, marking the conclusion of Act 2 and beginning of the final story arc.
For comprehensive guidance on optimizing your character builds and equipment choices, consult our BF6 Weapons Unlock Guide which covers advanced gear progression strategies.
Action Checklist
- Complete all Act 2 prerequisites including Gauntlet of Shar and Nightsong rescue
- Recruit Jaheira before descending into the Mind Flayer Colony
- Position AoE casters strategically during tower assault
- Free Nightsong quickly in Phase 2.1 using mobility characters
- Focus burst damage during Apostle of Myrkul transformation windows
- Collect all legendary rewards including Netherstone for Act 3 progression
No reproduction without permission:SeeYouSoon Game Club » Baldur’s Gate 3 – How To Beat Ketheric Thorm Master the multi-phase Ketheric Thorm boss fight with strategic preparation and combat tactics