TL;DR
- Access Balthazar’s room by persuading Commander Z’rell with DC14-16 checks
- Pull only the upper-right protruding book to avoid traps and activate the plinth
- Insert a heart into the plinth to reveal the hidden ritual chamber
- Combine Broken Lantern and Pixie at the ritual circle for Shadow Lantern
- The Moonlantern in Balthazar’s room protects against Shadow Curse
Discover the concealed chamber hidden behind Balthazar’s mysterious bookcase in Baldur’s Gate 3, a puzzle that reveals the necromancer’s darkest secrets.
Baldur’s Gate 3 presents numerous intricate puzzles demanding strategic thinking. The bookcase enigma within Balthazar’s quarters unveils a necromancer’s clandestine laboratory. This comprehensive walkthrough explains solving Balthazar’s Bookcase puzzle step-by-step, plus utilizing the Ritual Circle discovered in the secret room.
The Balthazar’s Bookcase challenge resides within Moonrise Towers, a pivotal location accessible during Act 2. After arriving in the Shadow-Cursed Lands, your mission involves infiltrating Moonrise Towers to advance your primary objectives.
Upon reaching Moonrise Towers, maintain stealth operations to avoid alerting cultists who would overwhelm your party. Proceed upstairs where Commander Z’rell stands to your left. Successfully navigate DC14-16 Persuasion skill checks to demonstrate allegiance to the Absolute. She will subsequently provide the key granting access to Balthazar’s private chambers.


Left: Disciple Z’rell provides access to Balthazar’s room; Right: A cautionary note warns acolytes against handling any books.
Navigate to the right-side corridor and unlock the door using the acquired key. Inside awaits a macabre tableau featuring multiple corpses and extensive blood spatter. The essential Moonlantern occupies the chamber’s center, crucial for providing protection against the Shadow Curse.
You’ll immediately notice a bookshelf containing several extendable books available for interaction. Resist immediate engagement with these objects.
Adjacent to the entrance, locate a note directed toward acolytes. Studying its contents reveals Balthazar’s prohibition against anyone handling his literary collection. Incorrect interactions trigger hazardous consequences including toxic gas emissions or corpse reanimation.
Left: Disciple Z’rell grants entry to Balthazar’s quarters; Right: A written notice cautions followers against contacting any volumes.
To successfully resolve the Baldur’s Gate 3 Balthazar’s Bookcase puzzle, execute these precise actions:
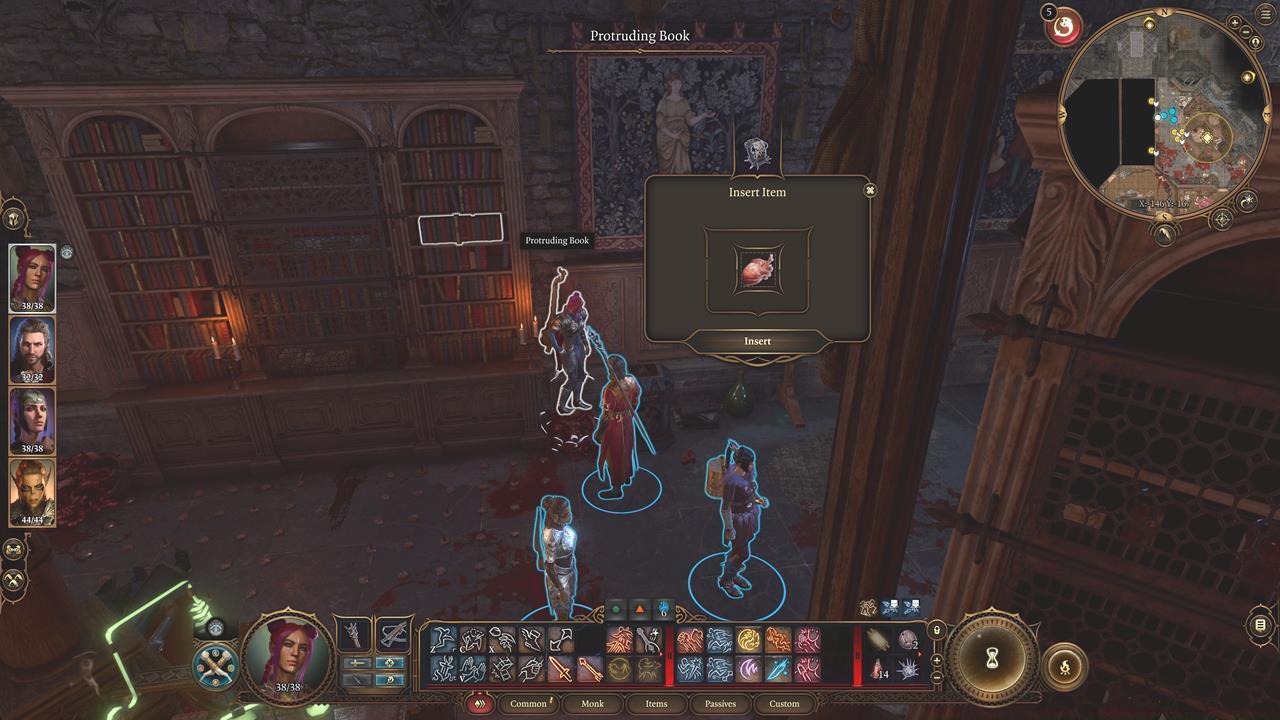
After gaining plinth access, implant a heart to unveil a secret chamber.
Following successful bookcase manipulation, the stone plinth becomes interactive. Inserting a heart organ into this receptacle causes the bookcase to shift sideways, exposing a previously hidden passageway. This reveals Balthazar’s personal ritual space containing powerful necromantic artifacts.


Left: The Ritual Circle apparatus; Right: Fuse a Damaged Lantern with a Pixie being to create a Shadow Lantern.
Left: The Ritual Circle configuration; Right: Merge a Fractured Lantern and a Pixie entity to manufacture a Shadow Lantern.
The ritual circle enables creation of the Shadow Lantern by combining a Broken Lantern with a captured Pixie. This advanced item provides superior shadow curse protection compared to standard Moonlanterns. Successfully navigating this puzzle chain rewards players with unique necromantic capabilities and story progression advantages.
Action Checklist
- Persuade Commander Z’rell with DC14-16 checks to obtain Balthazar’s room key
- Locate the bookcase and identify only the upper-right protruding book
- Pull the correct book to activate the stone plinth mechanism
- Insert a heart into the plinth to reveal the hidden ritual chamber
- Use the ritual circle to combine Broken Lantern and Pixie for Shadow Lantern
No reproduction without permission:SeeYouSoon Game Club » Baldur’s Gate 3 – Balthazar’s Bookcase And Ritual Circle Guide Master Balthazar's hidden bookcase puzzle and ritual circle secrets in Baldur's Gate 3