TL;DR
- North Trench Tower is located at Spaceport’s northern tip and requires careful navigation
- The Spaceport Trench Tower Key must remain in your inventory throughout the entire mission
- Verify you’re at the correct tower before using your key to avoid wasting it
- Expect heavy player traffic and enemy patrols requiring tactical positioning
- Complete the quest by uploading files at the glowing terminal inside the tower
Embarking on the Turnabout mission in Arc Raiders presents a critical objective from Celeste that demands precision and strategic planning. This high-stakes operation requires you to infiltrate the North Trench Tower within Spaceport’s dangerous territory to upload sensitive blackmail documentation.
Upon accepting this challenging assignment, Celeste equips you with a single Spaceport Trench Tower Key that serves as your access credential. Maintaining possession of this essential item throughout your entire raid is absolutely mandatory for mission success. Given the contested nature of the quest location, experienced players recommend securing your Spaceport Trench Tower Key in a protected inventory slot to prevent accidental loss during combat encounters.
Losing your Spaceport Trench Tower Key creates a significant setback, rendering quest completion impossible until you acquire a replacement. Similar to most key items in Arc Raiders, acquisition rates remain notoriously unpredictable—though community data suggests residential districts offer marginally improved discovery chances. Should you misplace your key, prepare for extensive farming sessions across Spaceport’s urban zones.
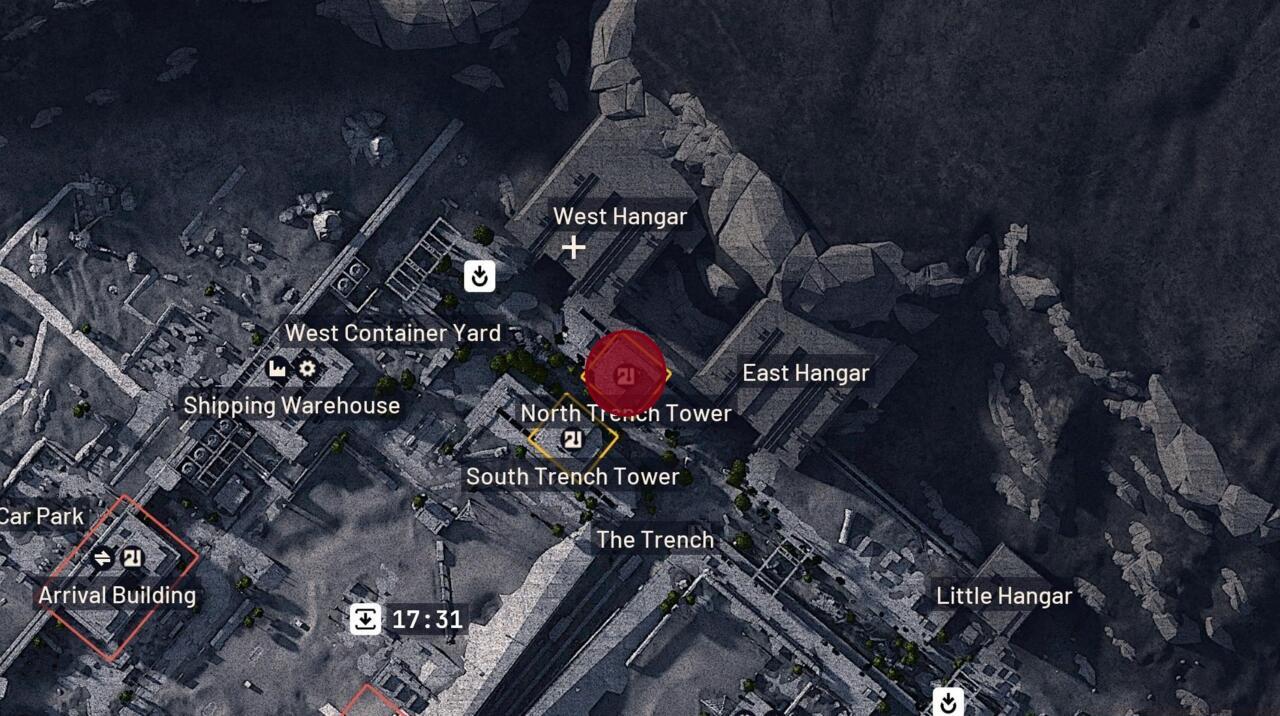
North Trench Tower
The North Trench Tower occupies the extreme northern boundary of Spaceport’s combat zone, marked by intense player competition and environmental hazards. This high-traffic objective attracts numerous raiders simultaneously pursuing the same goal—or opportunistically hunting distracted players. Remain exceptionally vigilant when approaching this location due to multiple threat vectors.
Hostile encounters frequently include Bastion units patrolling the area beneath the point of interest, complemented by aerial Rocketeers scanning from above. Essentially, this represents one of Spaceport’s most dangerous locations requiring calculated, cautious advancement tactics.
Successful navigation to the tower demands awareness of both player versus player dynamics and AI enemy patterns. Consider approaching during lower population server times or utilizing distraction techniques to minimize confrontation risks. For comprehensive navigation strategies, consult our Complete Guide to enhance your tactical positioning skills.
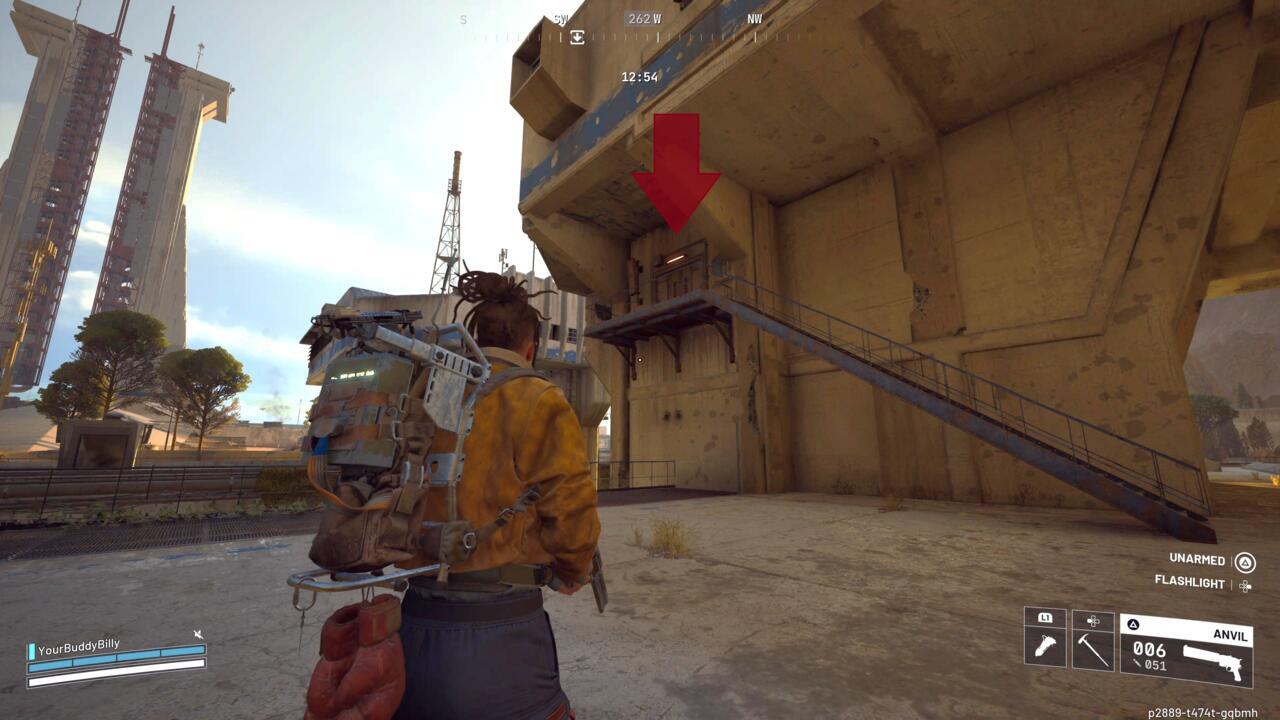
Provided you’ve maintained possession of your Spaceport Trench Tower Key throughout your journey, access the structure via staircases on either building flank. Unlock the corresponding door to gain entry to the secured interior.
Critically verify your positioning at the North Trench Tower before utilizing your key, since the Spaceport Trench Tower Key also functions at the South Trench Tower—potentially wasting this valuable single-use item! This common mistake has frustrated countless players who then face the arduous key reacquisition process.
Immediately after unlocking and crossing the threshold, ascend the staircase on your left or right (corresponding to your chosen entry point). The upper chamber contains a distinctive glowing yellow terminal interface for uploading the blackmail documentation to Celeste, finalizing your mission objectives. Proper equipment selection from our Weapons Unlock guide can significantly improve your survival chances during this vulnerable interaction period.
Execute the upload sequence at this specialized terminal to conclude your contractual obligations to Celeste and collect your well-earned rewards.
Upload the blackmail files at this terminal.
For players facing key recovery scenarios, implement systematic looting routes through Spaceport’s residential sectors, where key drop probabilities appear slightly elevated. Allocate 15-30 minutes per farming session, focusing on containers and loot caches with higher rarity ratings. Class specialization from our Class Guide can optimize your looting efficiency during these recovery efforts.
When encountering competing players at the tower, consider employing deception tactics—feign departure then circle back once they’ve completed their objectives. Alternatively, form temporary alliances to secure the area, though remain prepared for potential betrayal during the upload process.
Optimization strategies include scouting the perimeter before approach, identifying escape routes, and timing your upload during server population dips (typically early morning or late night hours). Advanced players recommend completing secondary objectives nearby before attempting the tower to maximize raid efficiency.
Mission completion typically requires 5-10 minutes from approach to upload, though this extends significantly if encountering resistance. Always prioritize key preservation over aggressive play, as reacquisition often demands substantially more time than cautious advancement.
Action Checklist
- Secure Spaceport Trench Tower Key in protected inventory slot
- Navigate to Spaceport’s northern extreme, monitoring for Bastion and Rocketeer patrols
- Verify North Trench Tower location before key usage
- Ascend stairs and interact with glowing terminal to upload files
- Complete upload sequence and extract from hostile territory
No reproduction without permission:SeeYouSoon Game Club » Arc Raiders Turnabout Quest Guide Complete guide to locating North Trench Tower and successfully uploading blackmail files in Arc Raiders