TL;DR
- Gather 4 Wires before attempting the quest – essential for generator repair
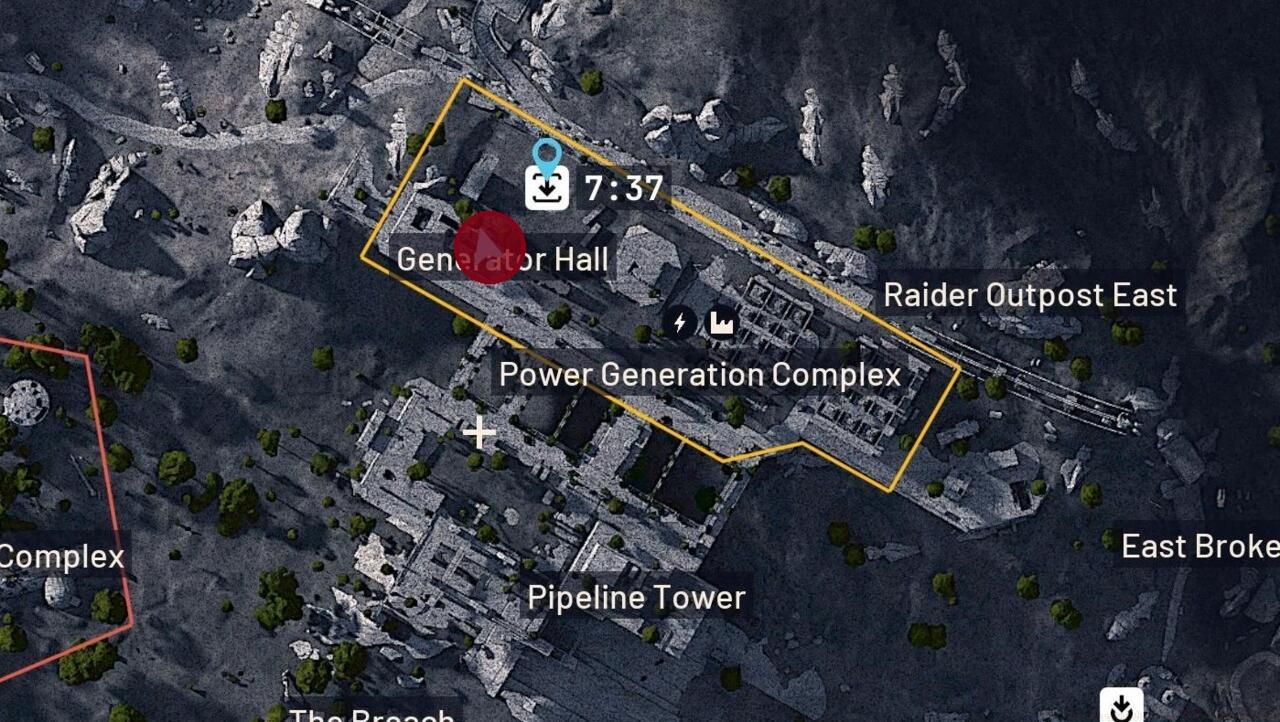
- Locate Generator Hall in northern Dam Battlegrounds, Power Generation Complex left side
- Use ground openings for quick access rather than conventional entry points
- Complete both generator repair AND power switch activation to finish quest
- Expect heavy enemy presence and prepare combat strategies accordingly
Arc Raiders consistently challenges players with technical repair missions, transforming combat specialists into makeshift engineers. The Flickering Threat assignment sends operators to Dam Battlegrounds to restore a critical power generator, continuing this mechanical theme. If you’re struggling with navigation or execution, this comprehensive walkthrough provides the clarity needed for success.
While extraction isn’t mandatory for Flickering Threat completion, securing 4 Wires remains absolutely essential for generator restoration. Ensure you collect these components beforehand or scavenge them within the Power Generation Complex during exploration. Without these specific items in your inventory, mission progression becomes impossible.
Proper preparation significantly impacts mission efficiency. Consider these preparatory steps: gather surplus wires for potential mistakes, equip medium-range weapons for the confined spaces, and study the map layout to minimize navigation errors. These proactive measures can reduce completion time by 30-40% compared to unprepared attempts.
The Generator Hall occupies the western sector of the Power Generation Complex in Dam Battlegrounds’ northern territory. This installation experiences consistent foot traffic from both ARC forces and independent raiders, necessitating tactical readiness for potential engagements. The area’s architectural design features multiple access points, though some offer distinct advantages.
Generator Hall exterior showing primary access points and surrounding terrain
Upon reaching the Generator Hall perimeter, the game triggers a repair prompt for the malfunctioning generator. This assumes you’ve acquired the necessary 4 Wires during your preparation phase. Seasoned players recommend approaching from elevated positions to survey enemy movements before committing to entry.
Navigation efficiency dramatically improves when utilizing the elongated ground openings rather than conventional doorways. These vertical access points bypass several interior corridors and reduce exposure to patrols. Alternative routes through adjacent hallways remain available but typically require 45-60 additional seconds of traversal time.
Execute the generator restoration using your collected 4 Wires. Position yourself between the twin elevator structures and examine the westernmost unit’s terminus to activate the repair interface. Engage with this prompt to initiate the mechanical restoration sequence. However, this represents only the initial phase – power reactivation requires separate completion.

Generator repair interface location between elevator structures
Depart the Generator Hall through the southernmost doorway at the corridor’s end. Ascend the staircase system, proceeding through two consecutive doorways, then immediately pivot left and traverse two additional doors. Within this chamber, locate the corner-mounted control panel and interact to energize the system, finalizing the assignment. Many players overlook this secondary requirement, assuming generator repair alone suffices.
Power activation control panel location in adjacent room
The complete process typically requires 8-12 minutes for experienced players, while newcomers should allocate 15-20 minutes accounting for navigation learning and combat encounters. The most time-efficient route involves dropping through ground openings, completing repairs, then taking the southern exit directly to the power room.
Optimizing your Flickering Threat approach involves several advanced techniques. First, consider completing nearby Assignments simultaneously to maximize efficiency. Second, utilize suppression weapons to control enemy advance while performing repairs. Third, memorize the power room route to eliminate hesitation during the critical final phase.
Common mistakes include: attempting the quest without verifying wire inventory, engaging unnecessary combat that alerts additional enemies, missing the secondary power activation requirement, and using slower conventional entry points. Awareness of these pitfalls improves success rates substantially.
For players struggling with the combat aspects, our Class Guide provides detailed breakdowns of optimal loadouts for engineering-focused missions. The Support class particularly excels in these scenarios with enhanced durability and team utility.
Environmental awareness proves crucial – listen for distinct mechanical sounds indicating generator status and enemy footsteps signaling approaching threats. The generator emits audible humming when operational, while power activation produces recognizable electrical arcing sounds.
If you’re enjoying this technical mission guidance, our Complete Guide offers comprehensive coverage of Arc Raiders’ mechanics, while the Weapons Unlock resource helps optimize your combat capabilities for future challenges.
Action Checklist
- Collect 4 Wires from inventory or Power Generation Complex
- Navigate to northern Dam Battlegrounds, Power Generation Complex west side
- Use ground openings for rapid Generator Hall access
- Repair generator between elevators using 4 Wires
- Activate power switch via southern exit and staircase route
No reproduction without permission:SeeYouSoon Game Club » Arc Raiders Flickering Threat Quest Guide Complete guide to locating and repairing the Generator Hall in Arc Raiders with expert strategies