TL;DR
- Find two clock plate pieces to repair the Gallery clock and advance Chapter 2
- Retrieve the garden piece using bolt cutters and hose mechanics from the well
- Solve Perosi’s room astrology puzzle using journal clues and painting manipulation
- Complete the puzzle by placing both pieces in the correct clock positions
- Save 15-20 minutes with strategic item collection and puzzle-solving approaches
Progressing through Chapter 2 of Alone in the Dark demands locating two essential components for restoring a decorative timepiece. This critical path objective blocks advancement until both fragments are recovered and properly installed.
Returning to Derceto mansion in the second chapter, your central mission involves mending the clock plate situated on the upper level within the Gallery area. Success requires securing both missing segments before continuing the narrative. One fragment hides within the garden vicinity, while the second remains concealed inside Perosi’s personal quarters.
Pro Tip: Before hunting for clock pieces, ensure you’ve thoroughly explored the first floor for essential tools. Many players waste time backtracking by not gathering required items first.
Retrieving the initial clock plate component involves solving an environmental puzzle centered around the garden well. This structure likely caught your attention during initial exploration in Chapter 1, but remained inaccessible until now.
To extract the submerged artifact, you must first obtain the Bolt Cutters. Should you lack this tool, locate it within the first floor’s Small Parlor. Enter the chamber and approach the doorway secured by a visible lock and chain mechanism. The space will undergo a supernatural transformation, becoming partially inundated with water. Search the corner desk to find the Bolt Cutters, then employ them on the chained entrance to restore the room to its normal state. Proceed to the Garden area and utilize the cutters to breach the shed.
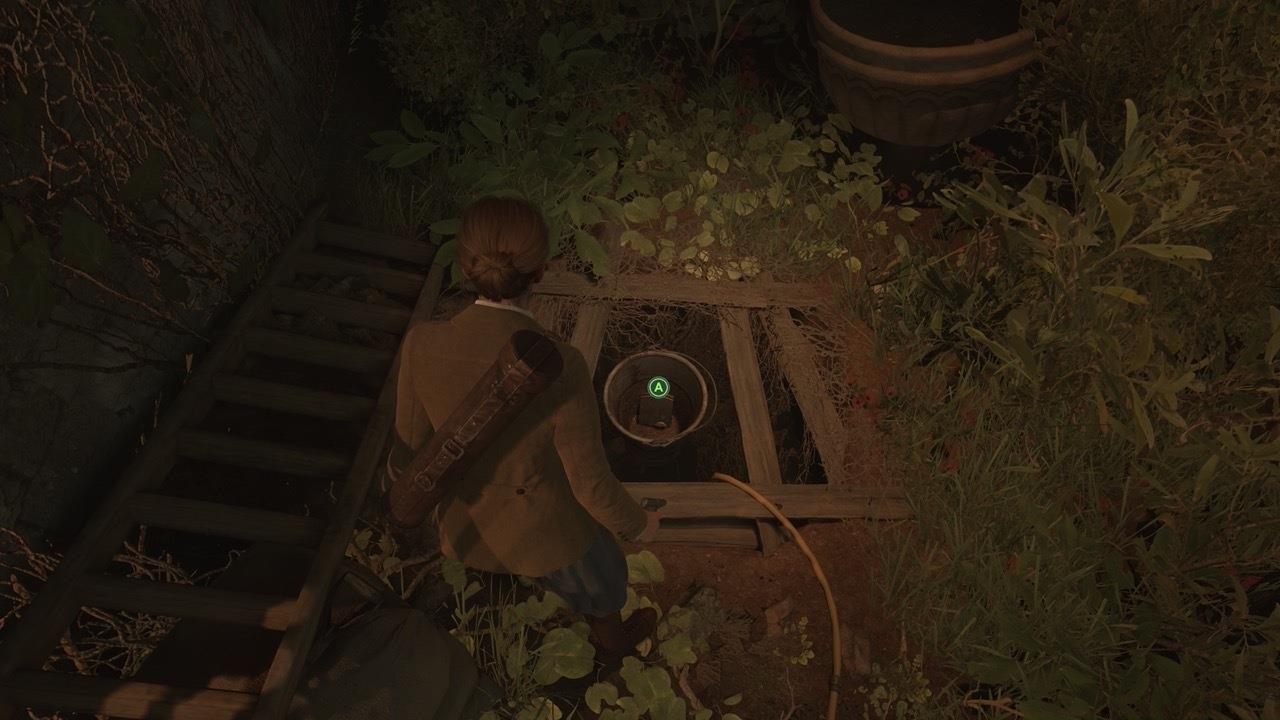
Strategic positioning near the well allows efficient retrieval once the water level rises sufficiently.
Within the shed interior rests a hose apparatus, designed to connect with the existing hose terminus near the well foundation. Trace the deployed hose back to its water source connection and activate the flow, inundating the well chamber and elevating the plate fragment to within reach.
Common Mistake: Players often attempt to access the well prematurely. The bolt cutters are absolutely mandatory—don’t waste time trying alternative methods.
The secondary clock plate component awaits discovery within Perosi’s Room, positioned on the second story along the corridor leading from the Gallery clock location. Access demands Room Key #6, located on the first floor within the Clerk’s Office resting upon a table surface. Once secured, enter Perosi’s chamber to encounter a secured container protected by a combination lock featuring celestial symbols.
Upon the bedding rests a journal containing an illustrated astrology wheel, correlating numerical values with various zodiac signs. This specific documentation proves repeatedly valuable throughout your adventure, with this representing its initial application.
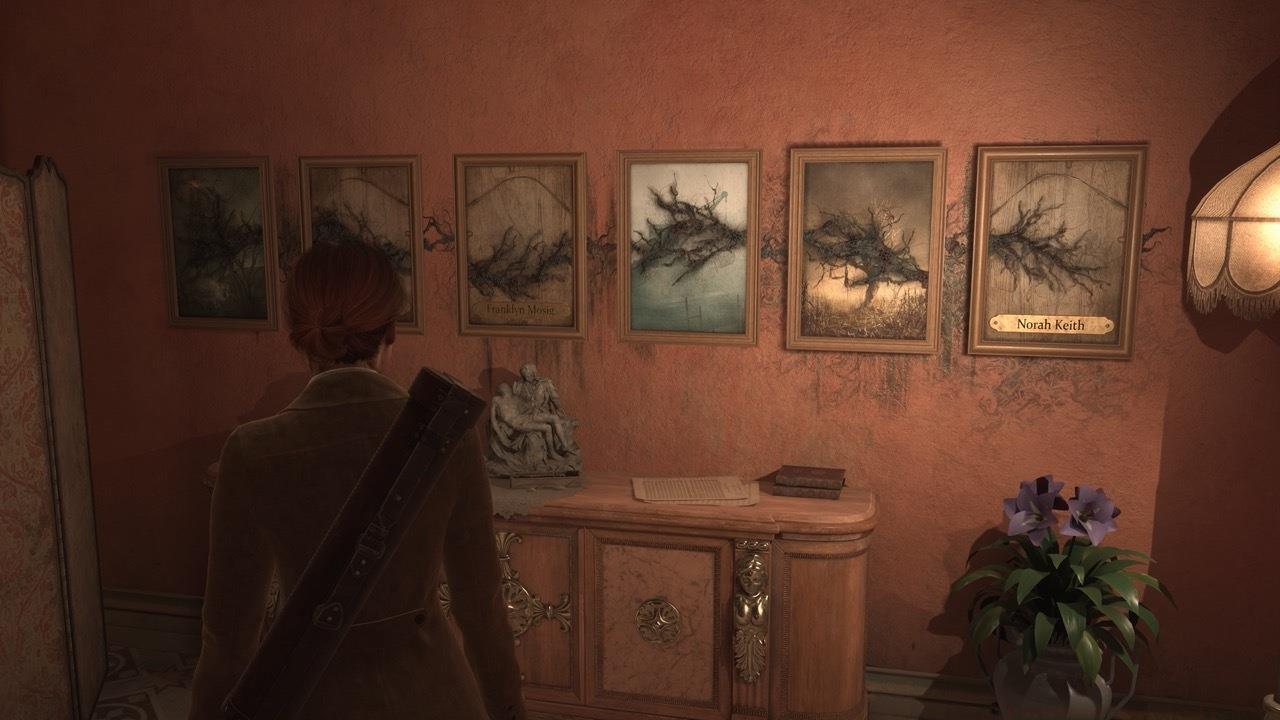
Correct painting manipulation reveals the necessary name sequences through rot pattern completion.
A sequence of six artworks displays decaying patterns traversing their surfaces; you must invert specific paintings to finalize the decay markings, exposing three individual names as demonstrated in the reference imagery.
Strategic flipping of the second, third, and sixth paintings produces the required visual solution.
These three revealed identities correlate with numerical assignments visible on a ship crew portrait within the room, specifically 2, 9, 4, constituting the lock’s combination sequence. These digits correspond to Pisces, Libra, Taurus respectively, establishing the precise symbol input order for the locking mechanism. The coveted clock plate fragment resides within the unlocked container.
The celestial combination requires exact symbol sequence: Pisces, Libra, then Taurus without deviation.
Advanced Strategy: Document the astrology wheel numbering system thoroughly—this cipher recurs in later chapters. Smart players photograph or sketch the journal page for future reference.
With both clock plate fragments successfully acquired, return to the Gallery location housing the incomplete timepiece. Carefully position each component into their designated slots within the clock face mechanism.
Proper alignment creates the complete circular pattern necessary for progression.
Successful installation triggers narrative advancement, unlocking subsequent chapter events and new exploration opportunities throughout Derceto mansion.
Time Estimate: Efficient players complete both retrievals in 25-35 minutes. New players should budget 45-60 minutes accounting for exploration and puzzle-solving time.
Action Checklist
- Collect Bolt Cutters from Small Parlor on first floor
- Access garden shed and connect hose to well system
- Retrieve Room Key #6 from Clerk’s Office
- Solve Perosi’s room astrology puzzle using journal clues
- Assemble both plate pieces in Gallery clock
No reproduction without permission:SeeYouSoon Game Club » Alone In The Dark – Chapter 2 Clock Puzzle Guide Master the clock plate puzzle in Alone in the Dark Chapter 2 with expert strategies and time-saving tips