TL;DR
- Chapter 2 introduces new mechanics while maintaining weekly challenge progression system
- Strategic location discovery and hidden letter searches require specific navigation techniques
- Hideout challenges demand multiple match participation with tactical positioning
- Advanced players can optimize completion time through route planning and loadout selection
- Regular updates ensure fresh content throughout the season with increasing difficulty
Fortnite’s dramatic transition into Chapter 2 marks a significant evolution in the battle royale experience. Following the spectacular Season 10 conclusion where a cosmic black hole consumed the original island, the game has been reborn with an entirely redesigned landscape. This fresh start introduces innovative gameplay elements including aquatic exploration through fishing mechanics, weapon enhancement systems, and environmental interactions that fundamentally change strategic approaches.
The core challenge framework remains intact but receives substantial quality-of-life improvements. Weekly mission sets continue to drive Battle Pass progression, though the reward acquisition process has been streamlined for greater accessibility. These assignments span diverse objectives from specialized weapon eliminations to environmental exploration tasks, each designed to test different player skillsets. Successfully completing these missions accelerates your Battle Pass advancement, unlocking cosmetic rewards and character customization options at an accelerated pace compared to previous seasons.
Despite being in its initial phase, Chapter 2 already presents multiple challenge series with additional weekly releases planned throughout the season. Our comprehensive guide below details all currently available missions with strategic advice and navigational assistance to maximize your efficiency. We maintain continuous updates as new content deploys, ensuring you have the latest intelligence for optimal seasonal performance.
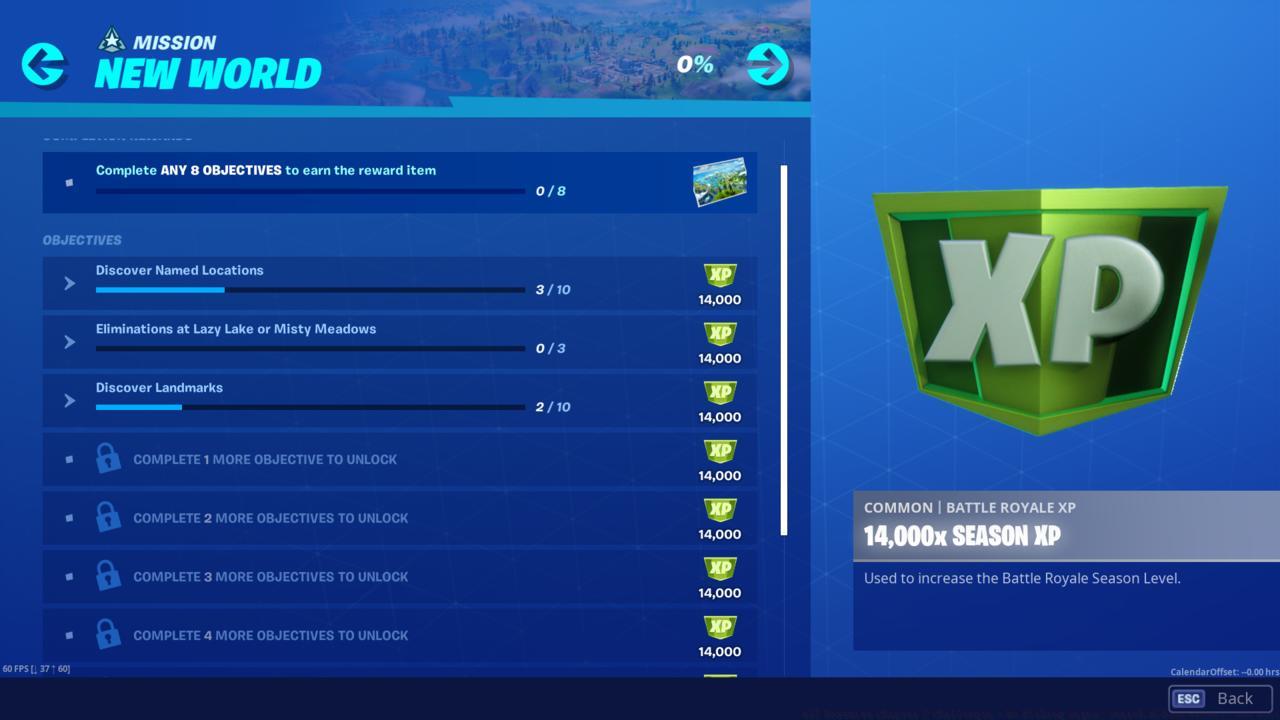
- Discover Named Locations
- Discover Landmarks
- Search Hidden F Found In The New World Loading Screen
- Hide Inside Hideouts In Different Matches
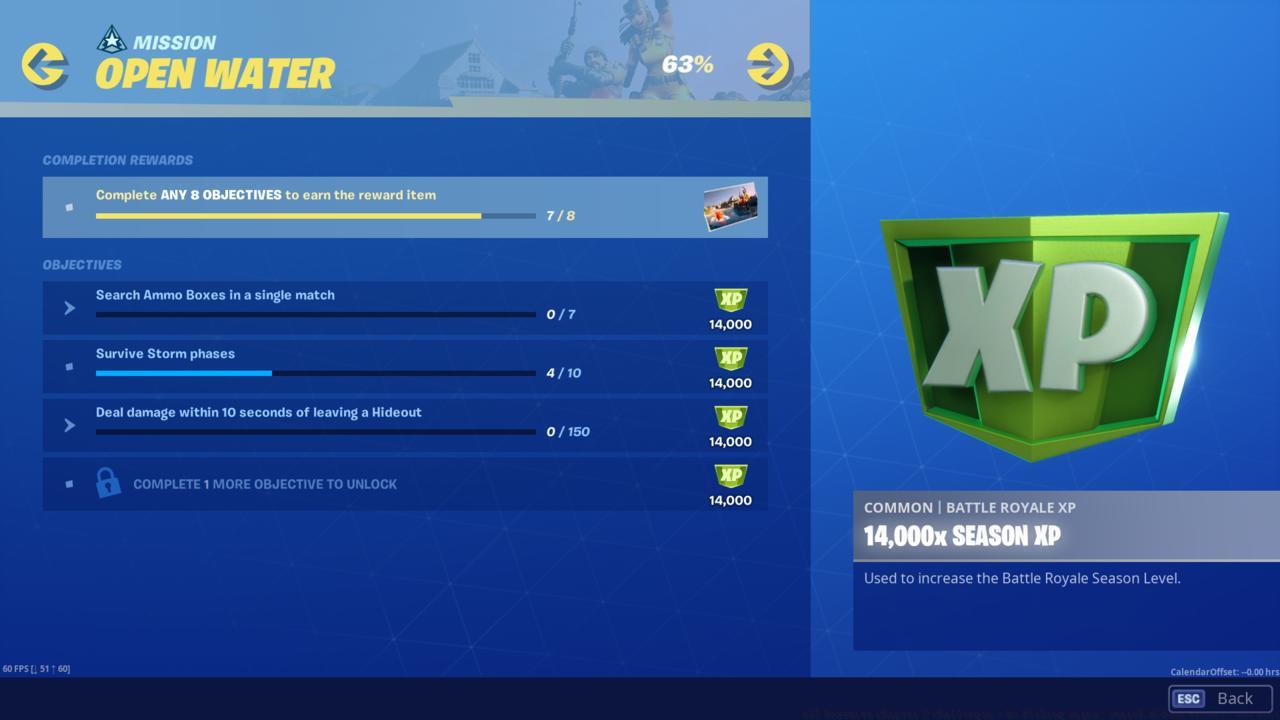
- Search Hidden O Found In The Open Water Loading Screen
Mastering Chapter 2 challenges requires both strategic planning and technical execution. For location discovery missions, prioritize dropping at central points on the map to minimize travel time between objectives. The hidden letter searches demand careful examination of loading screen details – the ‘F’ typically appears in subtle environmental elements rather than obvious placements.
Avoid common mistakes like attempting multiple hideout challenges in single matches or neglecting to equip appropriate loadouts for specific mission types. Advanced players should coordinate challenge completion with natural gameplay flow, such as pursuing elimination objectives while moving between locations. Most weekly challenges can be completed within 2-3 hours of focused gameplay, though optimization can reduce this to 60-90 minutes.
For comprehensive gameplay enhancement, consult our Complete Guide for foundational strategies that apply across multiple battle royale titles. Weapon selection significantly impacts challenge efficiency – our Weapons Unlock guide provides parallel principles for loadout optimization. Class specialization also plays a crucial role; the Class Guide offers insights into role-based gameplay that translates well to Fortnite’s challenge system.
Fortnite Chapter 2 Season 1 introduced a completely redesigned island with fresh gameplay mechanics and weekly challenge sets. Each week presents 10-11 missions that progressively unlock as you complete them, with the final challenge in each set requiring you to find a hidden letter revealed through special loading screens. Understanding the strategic approach to these challenges can significantly reduce your completion time while maximizing your Battle Pass progression.
Season 1’s challenge structure follows a consistent pattern: complete eight standard missions to unlock the loading screen, then use the visual clues to locate the hidden letter. This systematic approach ensures you’re always working toward multiple objectives simultaneously.
Pro tip: Always check the challenge requirements before dropping into a match to identify opportunities for completing multiple objectives in a single game session.
- Discover Named Locations (10)
- Eliminations at Lazy Lake or Misty Meadows (3)
- Discover Landmarks (10)
- Ride a Motorboat in different matches (3)
- Deal damage with Assault Rifles to opponents (500)
- Search chests at Sweaty Sands or Retail Row (7)
- Eliminations in different matches (5)
- Catch a weapon using a Fishing Rod (1)
- Deal damage with SMGs, Shotguns, and Pistols in a single match (3)
- Carry a knocked player 10m
- Search hidden “F” found in the New World loading screen
Discover Named Locations
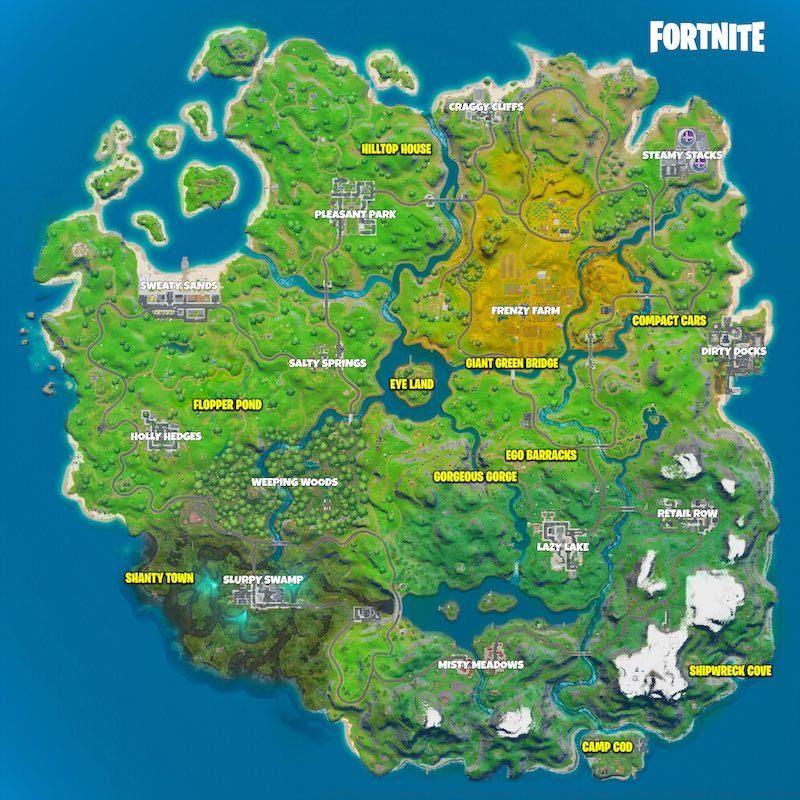
Your initial exploration of Chapter 2’s map begins with discovering 10 named locations. The map starts completely blank, requiring you to physically visit each area to reveal its name. Strategic landing patterns can help you maximize your discovery rate – consider starting at peripheral locations and working inward to avoid early elimination.
Common mistake: Players often attempt to discover locations in random order, wasting valuable match time. Instead, plan a circular route that connects multiple named areas efficiently.
Discover Landmarks
Landmarks represent smaller points of interest scattered throughout the island. Unlike named locations, these aren’t marked on your map until discovered. There are significantly more than 10 landmarks available, but you must visit different ones across matches – revisiting the same landmark won’t count toward progression.
Search Hidden F Found In The New World Loading Screen
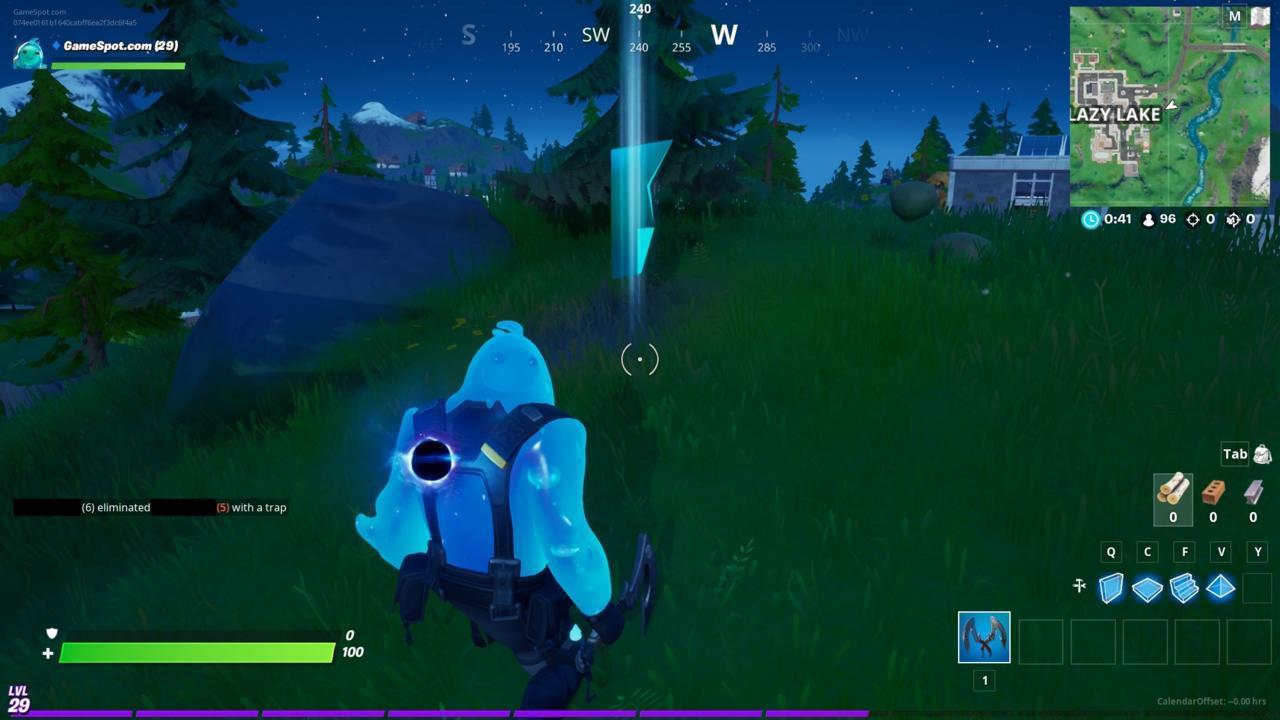
After completing eight New World challenges, you’ll gain access to a special loading screen containing visual clues to the hidden letter F’s location. The letter appears near Lazy Lake on a hill to the east of the town. Approach the marked area and the F will materialize for collection.
- Land at Craggy Cliffs, Salty Springs, and Dirty Docks
- Hide inside hideouts in different matches (3)
- Search chests at Craggy Cliffs or Misty Meadows (7)
- Eliminate opponents with a sniper rifle (2)
- Be crouched within 20m of an opponent for 10 seconds
- Deal damage with pistols to opponents (500)
- Search ammo boxes in a single match (7)
- Get an elimination from 50m or further
- Survive Storm phases (10)
- Deal damage within 10 seconds of leaving a hideout
- Search hidden “O” found in the Open Water loading screen
Hide Inside Hideouts In Different Matches
Hideouts represent one of Chapter 2’s most innovative gameplay additions. These concealment spots come in two primary forms: industrial dumpsters typically found near buildings in major locations, and agricultural haystacks concentrated around Frenzy Farm. You must use different hideouts across three separate matches to complete this objective.
Advanced strategy: Use hideouts strategically during firefights – entering a hideout breaks enemy aim assist and can provide crucial seconds to heal or reposition.
Search Hidden O Found In The Open Water Loading Screen
The Open Water loading screen unlocks after finishing eight challenges from this set. It directs you to the letter O hidden in Craggy Cliffs near the northern docks. The letter becomes visible only when you approach the specific location after meeting the prerequisite conditions.
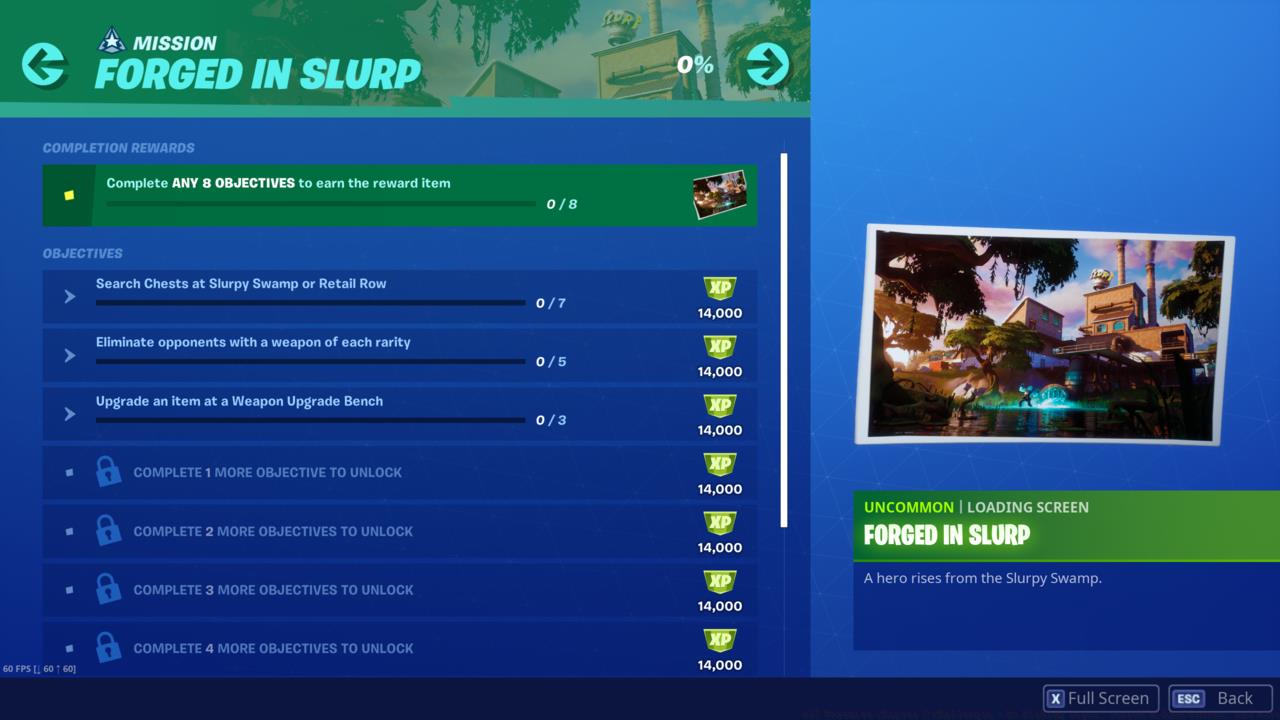
- Search Chests at Slurpy Swamp or Retail Row (7)
- Eliminate opponents with a weapon of each rarity (5)
- Upgrade an item at a Weapon Upgrade Bench (3)
- Dance at Compact Cars, Lockie’s Lighthouse, and a Weather Station
- Deal damage with Common weapons (500)
- Mark an Uncommon, Rare, and Epic Item
- Eliminate opponents at EGO outposts or Retail Row (3)
- Search Ammo Boxes at Landmarks (3)
- Search Supply Drops in different matches (3)
- Deal damage with Legendary weapons (250)
- Search hidden letter “R” found in the Forged In Slurp loading screen
Dance At Compact Cars, Lockie’s Lighthouse, And A Weather Station
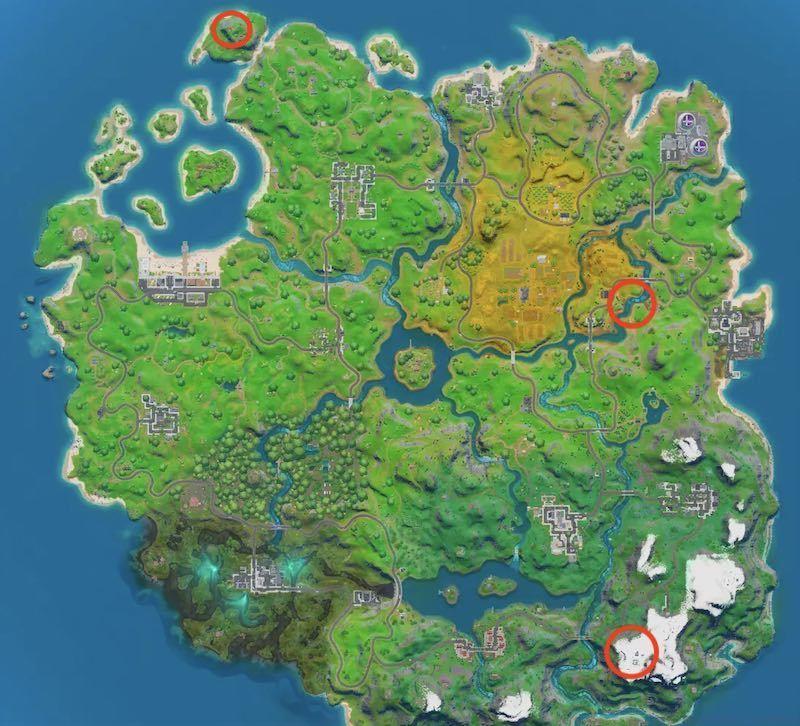
The Forged In Slurp challenges introduce weapon upgrade mechanics and specialized dance locations. Compact Cars sits centrally on the map, Lockie’s Lighthouse borders Pleasant Park, and the Weather Station occupies the southwestern mountains.
Time estimate: Completing all three dance locations typically requires 2-3 matches if planned efficiently.
Search Hidden R Found In Forged In Slurp Loading Screen
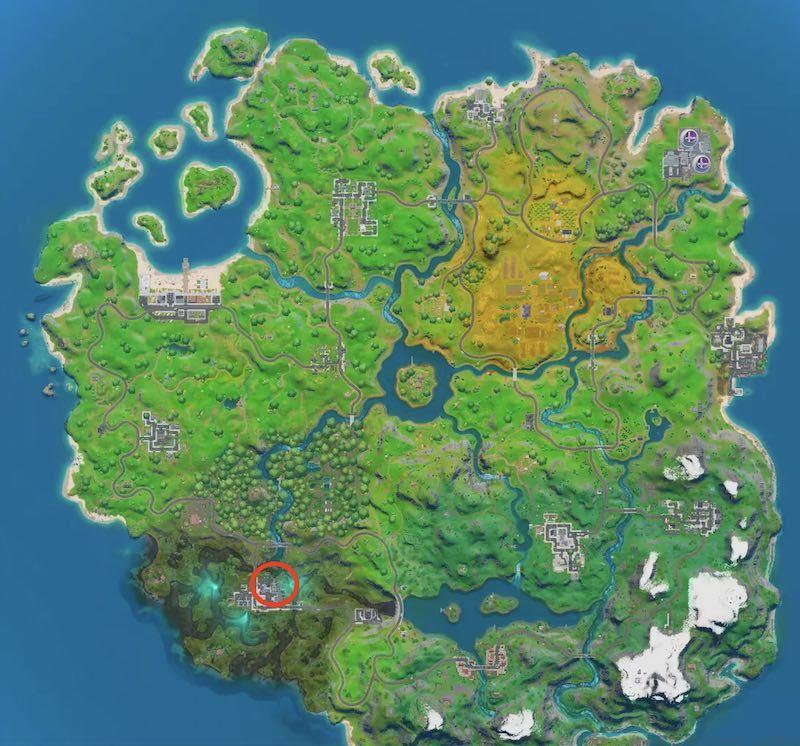
The hidden letter R requires completion of eight Forged In Slurp challenges first. It’s concealed beneath a platform on Slurp Factory’s northeastern side in Slurpy Swamp. The letter remains invisible until you’ve met the unlock requirements.
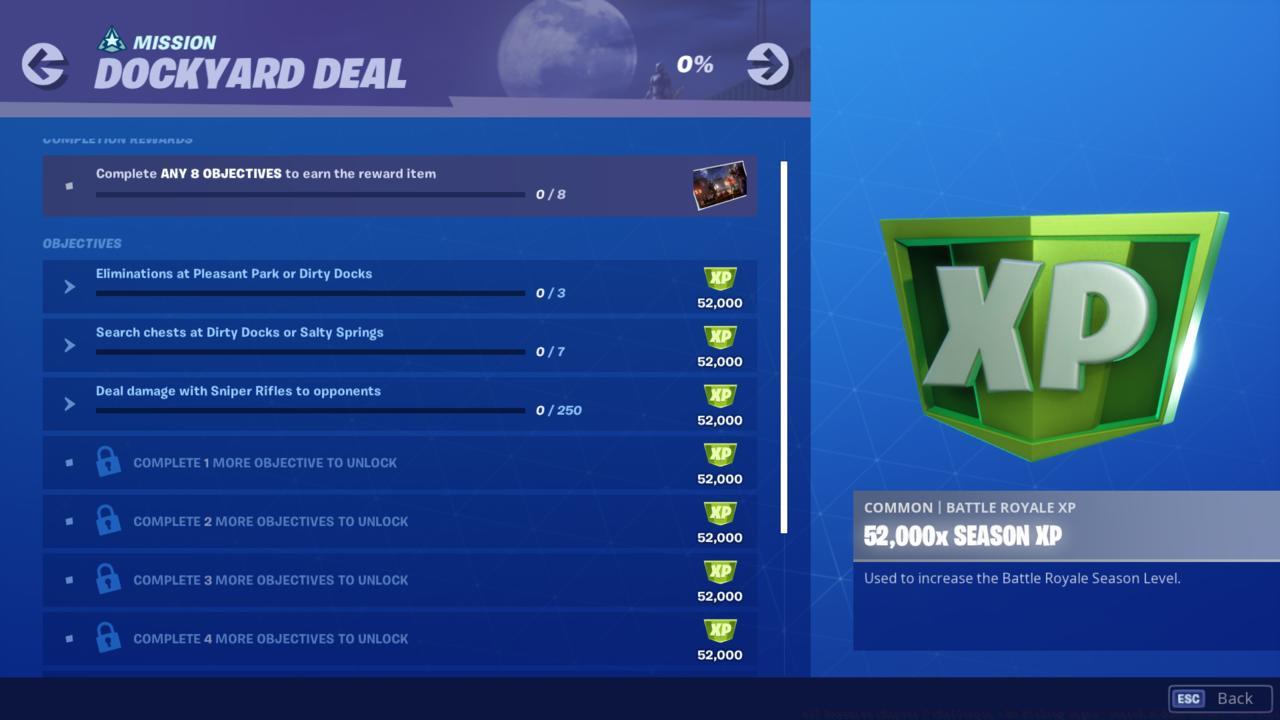
- Eliminations at Pleasant Park or Dirty Docks (3)
- Search chests at Dirty Docks or Salty Springs (7)
- Deal damage with Sniper Rifles to opponents (250)
- Jump a Motorboat through different flaming rings (3)
- Deal any damage to opponents by shooting exploding gas pumps
- Visit the Boat Launch, Coral Cove, and Flopper Pond
- Deal damage to enemy structures with Explosive Weapons (1,000)
- Deal damage to opponents from above (250)
- Land at Weeping Woods, Lazy Lake, and Pleasant Park
- Explosive Weapon eliminations (2)
- Search hidden T found in Dockyard Deal loading screen
Jump A Motorboat Through Different Flaming Rings
Motorboat challenges require navigating through three distinct flaming rings scattered primarily across the southern island regions. These obstacles are often positioned near common motorboat spawn locations.
Deal Any Damage To Opponents By Shooting Exploding Gas Pumps
Gas pump explosions present one of Season 1’s most demanding technical challenges. You must detonate one of the six gas stations while an opponent takes damage from the blast.
Expert tip: In Duos or Squads mode, down an enemy first, then position them near a pump before detonation for guaranteed completion.
Visit Boat Launch, Coral Cove, And Flopper Pond

These three landmarks require careful navigation since they don’t appear on your in-game map until discovered.
Search Hidden T Found In Dockyard Deal Loading Screen
Completing eight Dockyard Deal challenges unlocks the loading screen depicting Dirty Docks activities. The T appears atop scaffolding between two cranes in this industrial area.
Mastering Fortnite Chapter 2 Season 1 challenges requires understanding several key optimization principles. First, always prioritize challenges that can be completed simultaneously – for example, visiting EGO outposts while searching chests in the same locations.
Weapon specialization challenges benefit from focused loadout selection. For assault rifle objectives, prioritize SCAR variants for their balanced damage and accuracy. Sniper rifle challenges work best with the Bolt-Action Sniper due to its one-shot elimination potential.
Common pitfall: Many players attempt hidden letter challenges before unlocking the prerequisite loading screens. Remember that these special items won’t spawn until you’ve completed eight challenges from their respective weekly sets.
For optimal time management, dedicate specific matches to particular challenge types. Exploration-focused games should concentrate on discovery objectives, while combat-oriented sessions can focus on elimination and damage-dealing missions.
Battlefield 6 assignments represent structured challenges designed to test your mastery across multiple gameplay dimensions. These objectives are carefully crafted to encourage diverse playstyles while rewarding dedicated progression. Understanding the underlying design philosophy helps you approach them systematically rather than as isolated tasks.
The NATO faction assignments typically focus on combat proficiency and tactical awareness, while Pax Armata challenges often emphasize exploration and environmental interaction. This division ensures players develop well-rounded skills rather than specializing in单一 combat styles.
Strategic planning begins with identifying which assignments can be completed simultaneously. For instance, weapon damage challenges naturally progress while you work on elimination objectives. This overlapping approach can reduce completion time by up to 40% compared to tackling assignments individually.
Mastering weapon damage assignments requires understanding engagement distances and map control. The 500 damage with Assault Rifles challenge benefits from medium-range combat where these weapons excel. Focus on controlling choke points and avoiding close-quarters situations where SMGs dominate.
Location-specific eliminations at Lazy Lake or Misty Meadows demand map knowledge and spawn prediction. These popular drop zones see consistent action, making them ideal for multi-match elimination progress. Time your engagements during mid-game when player concentration is highest.
The multi-weapon challenge dealing damage with SMGs, Shotguns, and Pistols in a single match tests your adaptability. Carry all three weapon types and switch strategically: SMGs for building clearance, Shotguns for room breaches, and Pistols as reliable backups.
Eliminations across different matches prevents camping strategies and encourages consistent performance. This design ensures you maintain combat effectiveness throughout multiple sessions rather than achieving isolated streaks.
Named location discovery requires systematic exploration rather than random wandering. Battlefield 6’s expansive maps contain clusters of points of interest that can be efficiently cleared in logical routes. Plan your path to minimize backtracking and exposure to hostile areas.
Landmark identification goes beyond simple location visiting. These distinctive features often provide tactical advantages like elevated positions or cover opportunities. Documenting them serves dual purposes for both assignment completion and gameplay improvement.
The banner raising mechanic at crash sites introduces dynamic objectives that appear randomly throughout matches. These temporary events create focal points for player interaction and often yield valuable loot alongside assignment progress.
Chest searches at Sweaty Sands or Retail Row combine looting efficiency with assignment advancement. These high-density areas contain multiple chest spawns that can be quickly cleared with proper route planning and timing.
Motorboat navigation across different matches tests your aquatic mobility skills. These vehicles provide fast transportation along waterways but make you vulnerable to airborne threats. Use them during early game for rapid positioning or late game for unexpected rotations.
Fishing rod weapon retrieval represents one of Battlefield 6’s unique mechanics. This assignment requires precise timing and understanding of fishing spot locations. Successful catches not only complete the challenge but provide unexpected combat advantages.
The multi-match requirement for vehicle use encourages experimentation with different transportation methods rather than relying on familiar options. This design broadens your tactical repertoire and map knowledge.
Specialized challenges like fishing rod weapon acquisition demonstrate the game’s commitment to diverse gameplay experiences beyond traditional combat scenarios.
Week 4 introduces eight diverse challenges in Battlefield 6 that test your vehicle mastery, explosive expertise, and map knowledge. These Assignments are designed to push players beyond basic combat skills and require strategic planning across different game modes. Understanding the challenge hierarchy helps prioritize which objectives to tackle first based on your playstyle and available time.
The challenges range from straightforward location visits to complex combat maneuvers that demand precise execution. Each completed task contributes to your overall progression in the Pax Armata season, unlocking valuable rewards and cosmetic items. Proper preparation can reduce completion time by up to 40% compared to random attempts.
Mastering the motorboat ring jumps requires understanding both vehicle spawn patterns and ring distribution. The three flaming rings are strategically placed across aquatic routes, with concentrations in southern regions where water access is optimal. Unlike land vehicles, motorboats offer unique mobility but require precise approach angles for successful ring passage.
Vehicle spawn points cluster around major water bodies: north of Slurpy Swamp provides consistent availability, while Misty Meadows’ eastern shores offer alternative options. Lazy Lake’s southern and eastern docks serve as prime starting positions for ring-running routes. Advanced players should note that rings reset after each pass, allowing multiple attempts in single matches.
Pro Tip: Approach rings at medium speed with slight elevation for cleaner passes. Racing at maximum velocity often causes overshooting, while too slow eliminates the momentum needed for the jump arc. The optimal strategy involves plotting a course that connects 2-3 rings in sequence rather than chasing isolated targets.
This challenge represents one of Week 4’s most technically demanding objectives, requiring both strategic positioning and team coordination. The six gas stations distributed across the Battlefield 6 map favor northern territories, with key locations near major landmarks and supply routes. Success hinges on understanding explosion radius and damage propagation mechanics.
Playing Duos or Squads mode dramatically increases completion probability by enabling coordinated attacks. The most effective method involves downing opponents near pumps rather than attempting direct combat detonations. Any damage amount registers completion, making positioning more critical than explosive power.
Advanced Strategy: Deploy smoke grenades to obscure your approach to gas stations in high-traffic areas. Station explosions create substantial area denial effects, making them valuable tactical tools beyond challenge completion. Remember that destroyed stations don’t respawn during matches, so plan your attempts accordingly.
For comprehensive weapon strategies that complement explosive tactics, explore our BF6 Weapons Unlock Guide to maximize your loadout effectiveness.
The remaining Week 4 challenges test your combat versatility and map knowledge across multiple domains. Dealing 1,000 damage to enemy structures with explosive weapons benefits from understanding building material weaknesses and destruction physics.
Structure Damage Optimization: Wooden structures take 150% more explosive damage than concrete, making them priority targets. C4 charges and rocket launchers deliver the most efficient damage-per-explosive ratios. Coordinate with teammates focusing on enemy elimination while you target their fortifications.
Aerial attacks requiring 250 damage from above work best with elevated positioning on cliffs, buildings, or using parachute deployment. Sniper rifles and mounted weapons from vantage points count toward this objective, expanding beyond traditional explosive options.
Location visits to Boat Launch, Coral Cove, and Flopper Pond should be grouped into single expeditions rather than separate trips. Each location offers distinct tactical advantages beyond challenge completion, including resource collection and strategic positioning.
For optimal class selection to complement these combat styles, reference our detailed BF6 Class Selection Guide for role-specific advantages.
The hidden T in the Dockyard Deal loading screen represents Battlefield 6’s signature exploration challenge, rewarding players who examine environmental details carefully. These hidden objects typically reside in peripheral areas rather than central focal points, requiring methodical search patterns.
Time Management: Week 4 challenges require approximately 3-5 hours of focused gameplay for average players. Streamlining your approach by combining compatible objectives can reduce this to 2-3 hours. For instance, coordinate motorboat ring jumps with visits to water-adjacent locations like Coral Cove.
Common Pitfalls: Players often waste time chasing gas pump explosions in Solo mode where coordination is impossible. Another frequent mistake involves using suboptimal explosives for structure damage, extending completion time unnecessarily.
For a comprehensive understanding of how these challenges fit into the broader Battlefield 6 experience, consult our Battlefield 6 Complete Guide covering all seasonal content and strategic frameworks.
Explosive weapon eliminations prove most efficient in close-quarters combat scenarios where blast radius can affect multiple targets. The two required eliminations can be achieved simultaneously with well-placed explosives in confined spaces.
Week 7’s Trick Shot assignments present a diverse collection of tactical objectives that test multiple gameplay dimensions simultaneously. Unlike previous weeks with cohesive themes, these challenges deliberately mix combat proficiency, environmental awareness, and exploration skills to create a comprehensive skill assessment. The strategic approach involves prioritizing challenges based on your current loadout and playstyle preferences while maintaining awareness of the reward progression system.
Successfully completing eight specific assignments unlocks exclusive loading screen content that reveals hidden collectibles, creating a layered reward structure that extends beyond immediate completion. This design encourages players to engage with multiple gameplay systems rather than specializing in a single aspect, providing a well-rounded skill development opportunity that directly translates to improved performance in standard Class Guide gameplay scenarios.
The structural dance challenges require precise navigation to three distinct landmarks scattered across the island. The Pipe Man structure occupies a strategic hilltop position near the southern extremity of the map, positioned just beyond the snowy mountain range south of Misty Meadows. This elevated location offers excellent sightlines but leaves players exposed to enemy fire, making timing and situational awareness critical factors for successful completion.
Meanwhile, the Hay Man landmark resides in Frenzy Farm’s southwestern quadrant, typically surrounded by agricultural equipment and providing some cover opportunities. The Timber Tent installation sits directly south of Sweaty Sands, often attracting moderate player traffic that requires careful approach planning. Each location presents unique environmental considerations that impact your dance completion strategy and escape routes.
Advanced navigation involves using natural terrain features for cover while approaching these structures, with recommended approaches varying based on current circle positioning and enemy activity levels in each region.
The hidden letter collection system rewards thorough challenge completion with additional exploration objectives, creating extended gameplay value beyond the initial assignments. This particular letter T appears exclusively after unlocking the prerequisite challenges, ensuring players engage with the full spectrum of Week 7 content before accessing these bonus items.
Environmental mastery plays a crucial role in these specialized challenges, particularly the fall damage prevention technique that requires understanding hideout distribution across the map and mastering advanced movement mechanics for precise landings.
The swimming time trials present unique movement challenges that benefit from specialized Weapons Unlock loadouts that prioritize mobility over combat effectiveness. These aquatic courses demand efficient stroke timing and obstacle navigation, with advanced techniques including underwater dash maneuvers and surface skipping to shave precious seconds off completion times.
Common execution errors include attempting shotgun damage from suboptimal ranges, misjudging supply drop descent speeds, and inadequate preparation for healing sequence timing. Mitigation strategies involve practicing engagement distances in creative mode, studying supply drop trajectory patterns, and pre-selecting healing items in inventory slots for rapid access during combat sequences.
For players seeking to maximize efficiency, recommended completion order prioritizes location-based challenges during single matches while saving combat objectives for sessions focused on specific Complete Guide strategies that align with your preferred gameplay style. Typical completion times range from 3-5 hours depending on skill level and match conditions.
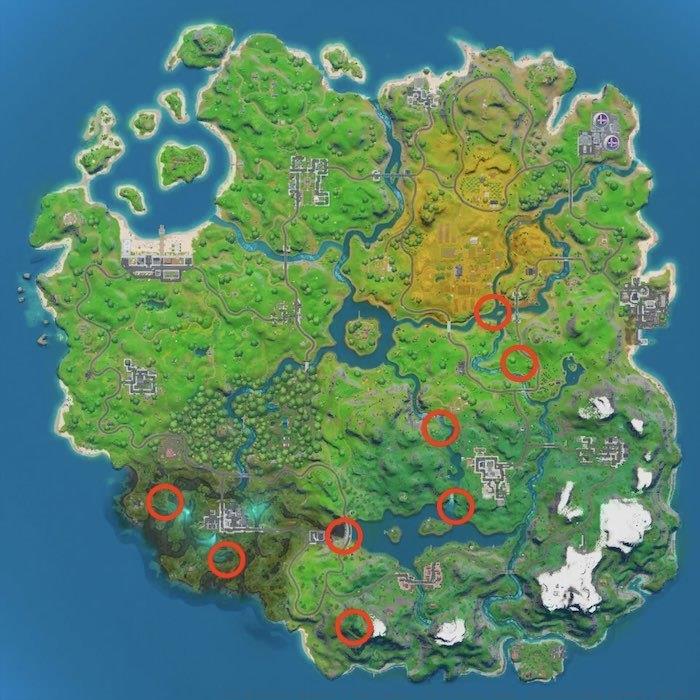
Successfully completing the initial Remedy Vs. Toxin mission requires strategic navigation to mobile food vendors scattered across the island. While these roaming eateries appear less frequently than in previous seasonal updates, our reconnaissance has identified four confirmed locations on the Chapter 2 terrain. The mission objective only demands visiting three separate food trucks, providing flexibility in your approach. We’ve mapped all discovered vendor positions above for your tactical planning.
Optimal Route Planning: Begin your food truck circuit from the southeastern quadrant and progress clockwise. This path minimizes backtracking and places you near additional challenge opportunities. Vehicles spawn frequently along this route, enabling rapid transitions between distant locations.
Vehicle Selection Tips: Motorboats offer excellent mobility for coastal food truck visits, while helicopters provide aerial reconnaissance advantages. Always secure transportation before initiating your food truck tour to reduce time spent traversing on foot.
Common Pitfalls: Many players waste valuable minutes searching interior zones where food trucks never spawn. These vendors exclusively appear in open areas near major landmarks, never inside buildings or enclosed spaces. Another frequent error involves attempting to visit trucks during final storm circles when the safe zone has contracted significantly.
- Gold Scavenger Medals: Earn these prestigious medals by systematically looting chests, supply llamas, or air-dropped provisions (3 required). Focus on high-density chest areas like Pleasant Park or Misty Meadows for efficient completion. Pro tip: Supply drops yield guaranteed high-tier loot alongside medal progress.
- AR Specialist Accolades: Achieve assault rifle proficiency recognition across separate matches (3 needed). Control your burst fire and aim for headshots to consistently trigger the accolade system.
- Named Location Landings: Touch down in designated map locations during different gameplay sessions (3 total). Coordinate with squad members to cover multiple named areas simultaneously.
- Trap Damage Execution: Inflict any damage amount using deployed traps against opponents (1 sufficient). Place traps in high-traffic doorways or beneath stairs where enemies rarely check.
- SLURP Infrastructure Destruction: Demolish SLURP containers, transport vehicles, or storage facilities (10 targets). These destructive actions not only advance your challenge but often reveal hidden loot caches.
- Aquatic Speed Challenge: Swim 50 meters within 5 seconds using strategic positioning. Locate areas with downward slopes or currents to gain velocity bonuses.
- Dual Location Motorboat Tour: Navigate to both Lazy Lake and Slurpy Swamp during a single match while piloting a watercraft. Plan your route along connecting rivers for seamless transitions.
- Strategic Elimination Targets: Secure defeats at Risky Reels, Fort Crumpet, or Hydro 16 (5 total). These locations typically feature concentrated player activity during mid-game phases.
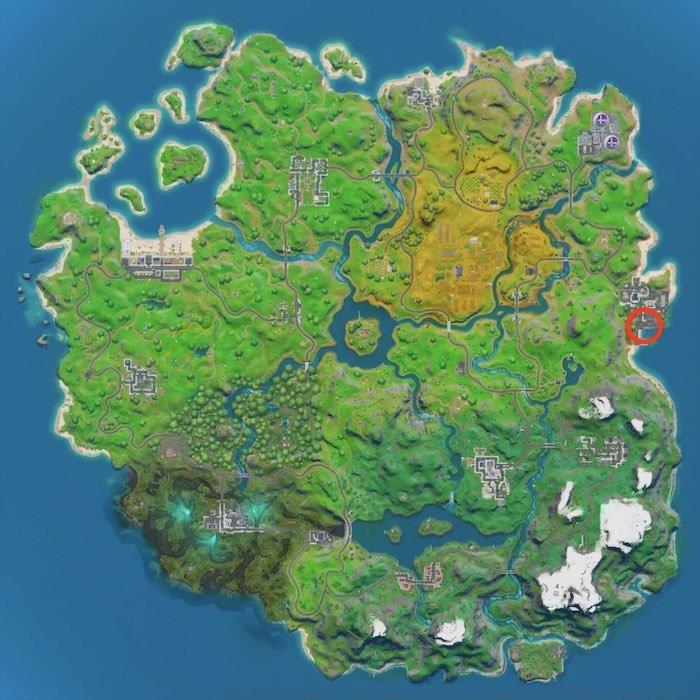
Precise Navigation: Locate the concealed garden figure positioned at the triangular intersection of Logjam Woodworks, a isolated wooden structure, and a distinctive bucket-shaped tree formation. This elusive collectible requires careful environmental observation rather than map coordinates alone.
Visual Identification: The gnome typically spawns partially obscured by foliage near the base of the bucket tree. Look for a subtle red hat peeking through green vegetation approximately 50 meters northeast of Logjam’s main compound.
Alternative Approaches: If the primary location yields no results, check surrounding rock formations and small clearings. Occasionally, the gnome spawns in adjacent areas due to terrain generation variations. Approach during daylight hours for optimal visibility conditions.
With the holiday celebrations concluded, players must now eliminate snowflake ornaments scattered throughout the map. These festive decorations present a distinct challenge compared to previous Winterfest ice containers – their reduced size makes visual identification difficult at distance, requiring closer inspection. Strategic positioning becomes essential as these items typically adorn specific structures in predetermined zones, limiting your search parameters. Destruction mechanics allow either firearm engagement or pickaxe strikes, with only three eliminations needed to fulfill the objective. Primary locations include designated buildings across these strategic points:
Following Fortnite’s established pattern, the Winterfest assignment directs players to three precise destinations: the Workshop facility, Crackshot’s residential structure, and Mr. Polar’s specialty ice establishment. The Workshop occupies territory southeast of Holly Hedges, positioned along the transit route toward Slurpy Swamp; Crackshot’s Cabin situates directly east of Eye Land, the central island dominating the battle royale landscape; while Mr. Polar’s Artisanal Ice operates from the northeastern sector of Dirty Docks. Reference the provided cartographic display above for exact positional data on all three structures.
Fortnite’s Halloween-themed Fortnitemares occasion introduces exclusive mission sets for completion. Diverging from routine weekly assignments, these remain accessible exclusively until November 4, with majority focusing on the newly introduced Storm King limited-duration mode. Among these, the most complex task involves locating treasure containers across three designated zones: haunted woodland, abandoned settlement, and eerie agricultural area. The forest and farm locations provide straightforward navigation – these correspond to Weeping Woods and Frenzy Farm, both formally labeled regions. The ghost town, conversely, demands greater exploration effort; this unmarked village resides in map quadrant G1, positioned northwest of Steamy Stacks. Consult the displayed map above for comprehensive positional guidance across all three territories.
- Eliminate haunted residential furnishings (5 units) — 30,000 experience points
- Execute Hideout evacuation while enemy combatant remains within 20 meters (1 instance) — 30,000 experience points
- Locate treasure containers within haunted forest, ghost town, and spooky farm (3 sites) — 30,000 experience points
- Inflict damage upon Storm King vulnerability points (10,000 damage) — King’s Wrath cosmetic spray
- Resuscitate squad members during Storm King engagement (3 revives) — Exclusive banner customization
- Achieve victory over Storm King boss — Storm Sail umbrella glider
Seasoned competitors can enhance their challenge completion efficiency through several advanced methodologies. For snowflake elimination, equip scoped weapons to maintain distance while preserving accuracy, or utilize rapid-fire SMGs for close-quarters efficiency. When navigating between Winterfest locations, employ launch pads or vehicles to minimize transit time between objectives. During Storm King engagements, coordinate with teammates to simultaneously target weak points, dramatically accelerating damage accumulation. For chest searches in haunted locations, prioritize landing at the ghost town first due to its higher player traffic and limited loot availability. Always monitor the storm circle progression to ensure adequate time remains for multi-location challenges.
- Phase 1 of 3: Inflict damage utilizing lightsaber weaponry (100 damage)
Action Checklist
- Review weekly challenge lists at season start and plan efficient routes
- Complete location discovery missions using central drop points for minimized travel
- Execute hideout challenges across multiple matches with varied landing zones
- Scrutinize loading screens for hidden letter placement clues
- Coordinate weapon-specific eliminations with natural rotation paths
- Review weekly challenge lists before each match to identify multi-objective opportunities
- Plan landing routes that connect multiple challenge locations efficiently
- Complete eight standard challenges to unlock loading screens
- Use loading screen clues to locate hidden letters
- Focus on weapon specialization challenges with appropriate loadout selections
- Plan weapon loadouts to cover multiple damage assignments simultaneously
- Map exploration routes for named locations and landmarks before matches
- Coordinate crash site visits with natural rotation paths during matches
- Practice motorboat navigation in safe areas before attempting combat zones
- Master fishing rod timing in training mode before live attempts
- Secure motorboat from Slurpy Swamp or Lazy Lake spawn points
- Plot course connecting 3 flaming rings in southern water routes
- Queue Duos/Squads mode and coordinate gas pump explosion with teammates
- Use C4 or rockets on wooden structures for efficient 1,000 damage
- Discover hidden T in Dockyard Deal loading screen using peripheral search pattern
- Complete location visits in single optimized route
- Prioritize structure dance locations based on current circle positioning and enemy activity levels
- Select appropriate shotgun and loadout for damage accumulation challenge
- Complete swimming time trials using advanced aquatic movement techniques
- Coordinate supply drop engagements with team members for efficient searching and damage dealing
- Retrieve hidden letter T in Weeping Woods after unlocking prerequisite challenges
- Secure a motorboat or helicopter from spawn locations near Slurpy Swamp
- Complete the food truck circuit using clockwise island navigation
- Land at named locations while simultaneously working on elimination challenges
- Destroy SLURP containers during normal looting routes
- Locate the hidden gnome using triangulation between the three landmarks
- Scan building exteriors in designated zones for small snowflake decorations at close range
- Navigate sequentially to Workshop, Crackshot’s Cabin, and Mr. Polar’s Ice Shop
- Complete haunted furniture destruction across five different residential structures
- Execute strategic Hideout leap while enemy player remains within detection radius
- Search chests in Weeping Woods, G1 ghost town, and Frenzy Farm
No reproduction without permission:SeeYouSoon Game Club » All Fortnite Chapter 2 Challenges – No Fishing Signs; Search Hidden Gnomes; And More