TL;DR
- Boost packs require at least one point in Boost Pack Training skill to activate
- Rank 1 unlocks basic functionality while higher ranks improve fuel efficiency and regeneration
- Low gravity planets dramatically enhance boost pack effectiveness and flight duration
- Early game gear like the Constellation Pack provides solid starting performance
- Advanced techniques enable tactical advantages in combat and terrain navigation
Experience aerial freedom as you soar through Starfield’s diverse landscapes using your personal propulsion system. These mobility devices, commonly referred to as jetpacks in other sci-fi universes, transform how you navigate planetary surfaces and overcome environmental challenges.
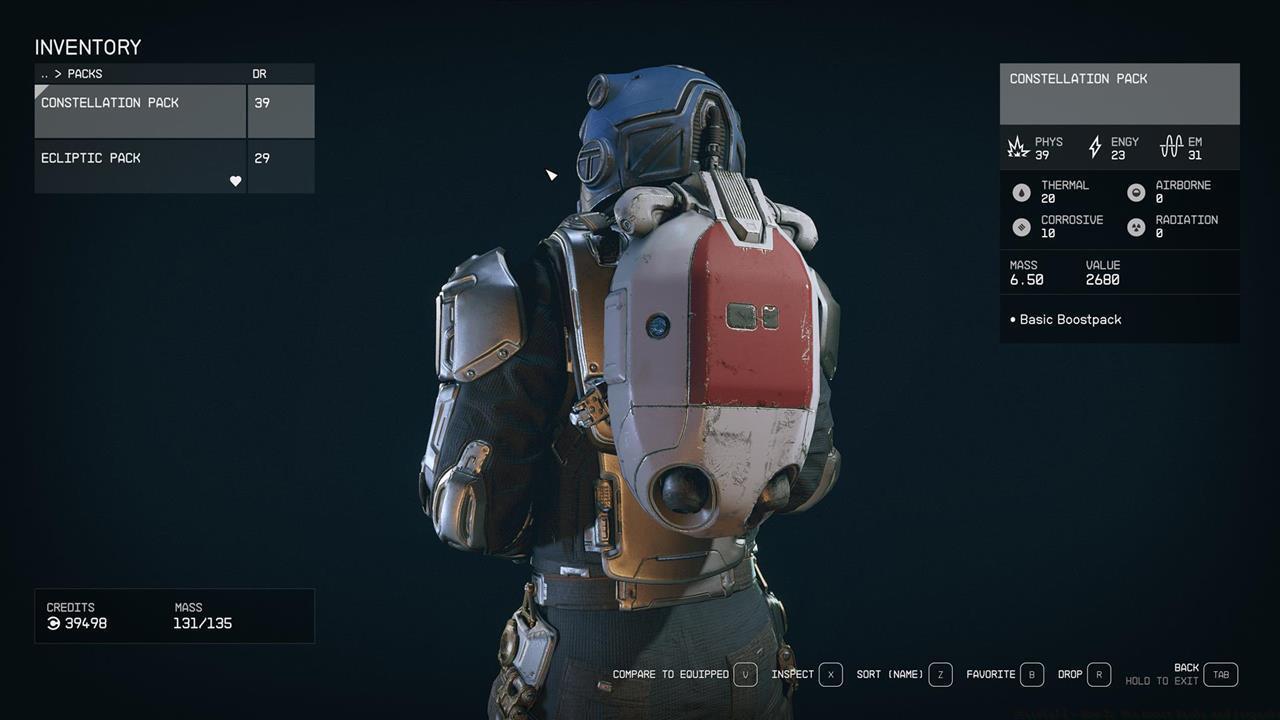
The Constellation Pack provides reliable early-game mobility and serves as your introduction to aerial navigation mechanics.
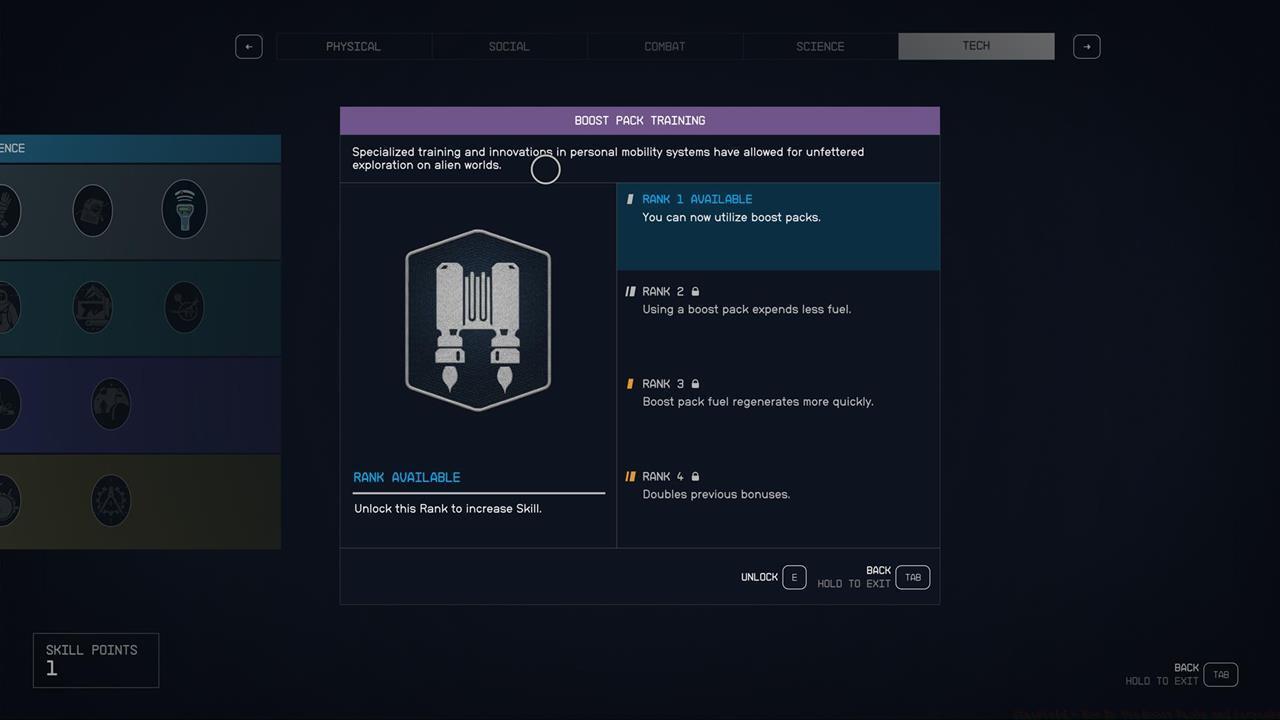
Boost pack activation demands a fundamental investment: allocating one skill point to the Boost Pack Training ability. This foundational skill unlocks your capacity to engage the propulsion system, transforming your movement capabilities instantly. Many newcomers mistakenly believe they can use boost packs immediately upon acquiring the gear, but the skill prerequisite remains non-negotiable.
The Boost Pack Training skill follows a progressive enhancement path with four distinct tiers of capability improvement. Each rank builds upon the previous, creating a compounding effect on your aerial mobility potential.
- Rank 1 – Unlocks basic boost pack functionality; this initial investment enables all fundamental aerial maneuvers
- Rank 2 – Reduces fuel consumption by approximately 30%, extending your flight time significantly
- Rank 3 – Accelerates fuel regeneration rate by 40%, minimizing downtime between boosts
- Rank 4 – Amplifies previous rank benefits by 100%, effectively doubling fuel efficiency and recovery speed
Mastering the Boost Pack Training skill tree transforms your planetary exploration capabilities and tactical options.
Strategic skill point allocation proves crucial for optimization. We strongly advise securing Rank 1 early in your campaign, as this single point investment delivers the core functionality needed for most exploration scenarios. The higher ranks, while beneficial, represent specialized enhancements rather than essential capabilities for standard gameplay.
Gravitational variations across planetary bodies create dramatically different boost pack performance characteristics. Low-gravity environments particularly enhance your aerial capabilities, allowing extended flight durations and heightened maneuverability.
Environmental mastery separates novice users from experts. On worlds with reduced gravitational pull, your boost pack transitions from a simple jumping aid to a genuine flight mechanism. This enables creative problem-solving approaches, such as bypassing hostile encounters by soaring over enemy positions or navigating treacherous mountainous terrain that would otherwise require lengthy detours.
Advanced practitioners develop techniques like “boost chaining” – executing consecutive short bursts to maintain altitude without full fuel depletion. Another sophisticated method involves using boost packs for rapid directional changes during combat, creating unpredictable movement patterns that confuse adversaries. For those interested in broader tactical approaches, our Class Guide explores complementary mobility strategies.
Common mistakes include over-investing in higher ranks prematurely and failing to adapt techniques to planetary gravity conditions. Many players unnecessarily max out the skill tree when Rank 1 suffices for 80% of exploration needs, wasting precious skill points that could enhance other capabilities.
Your boost pack’s performance characteristics vary significantly based on the specific model and modifications installed. The Constellation Pack represents an excellent starting option, balanced between fuel capacity and thrust power, but numerous superior alternatives await discovery throughout your journey.
Equipment progression follows a natural evolution path. Early-game packs provide basic functionality, while end-game models may offer specialized capabilities like stealth-enhanced propulsion or combat-optimized burst acceleration. Understanding these nuances helps you select gear aligned with your playstyle priorities.
For comprehensive gear optimization strategies that extend beyond boost packs, consult our Weapons Unlock guide for integrated loadout planning.
Optimization extends beyond the pack itself to related systems. Your spacesuit’s weight distribution affects balance during flight, while certain helmet mods can provide aerial targeting assistance. These interconnected systems create a holistic mobility framework that experienced players master for maximum effectiveness. Additional strategic insights can be found in our Complete Guide to synergistic equipment combinations.
Action Checklist
- Allocate one skill point to Boost Pack Training Rank 1 immediately when available
- Experiment with basic boost techniques on low-gravity planets to understand flight mechanics
- Practice boost chaining and directional changes in safe environments
- Evaluate higher skill ranks only after addressing other core combat and exploration abilities
- Upgrade to specialized boost pack models once you’ve mastered fundamental techniques
No reproduction without permission:SeeYouSoon Game Club » Starfield – How To Use Boost Packs And Jetpacks Master Starfield's boost pack mechanics with essential skills, gear tips, and advanced movement strategies