TL;DR
- Locate the puzzle in the Castle gallery after exiting the Dungeon area
- Collect four weapon ornaments from three murals and one knight sculpture
- Activate the gate by shooting animal symbols and pulling the stag rope
- Match swords to knight’s life stages: Iron, Golden, Bloodied, Rusted
- Complete puzzle efficiently in under 5 minutes with proper preparation
Successfully navigating the Castle Sword Puzzle requires understanding its precise location within Resident Evil 4’s intricate level design. This challenging environmental puzzle appears in the Castle’s gallery section, which you’ll discover after progressing through the Dungeon area. The space features elaborate decorative elements and multiple murals portraying knightly themes that provide essential visual clues.
The gallery environment serves as more than just scenery—it’s an interactive puzzle room where careful observation of the knight depictions reveals the solution methodology. Unlike earlier environmental challenges, this puzzle demands symbolic interpretation rather than straightforward combat or item collection.
Securing all four weapon ornaments is your primary objective before attempting the puzzle solution. The initial three decorative swords are conveniently positioned on separate murals throughout the gallery space, easily accessible for collection. However, the fourth ornament presents a more complex acquisition challenge.
The final weapon piece rests on a detailed sculpture portraying a dying knight, but accessing it requires activating the nearby gate mechanism. This involves illuminating three distinct animal symbols: the stag features an interactive rope you can pull directly, while the bird and snake symbols demand precise shooting of their respective plates located on the right-hand side of the chamber.
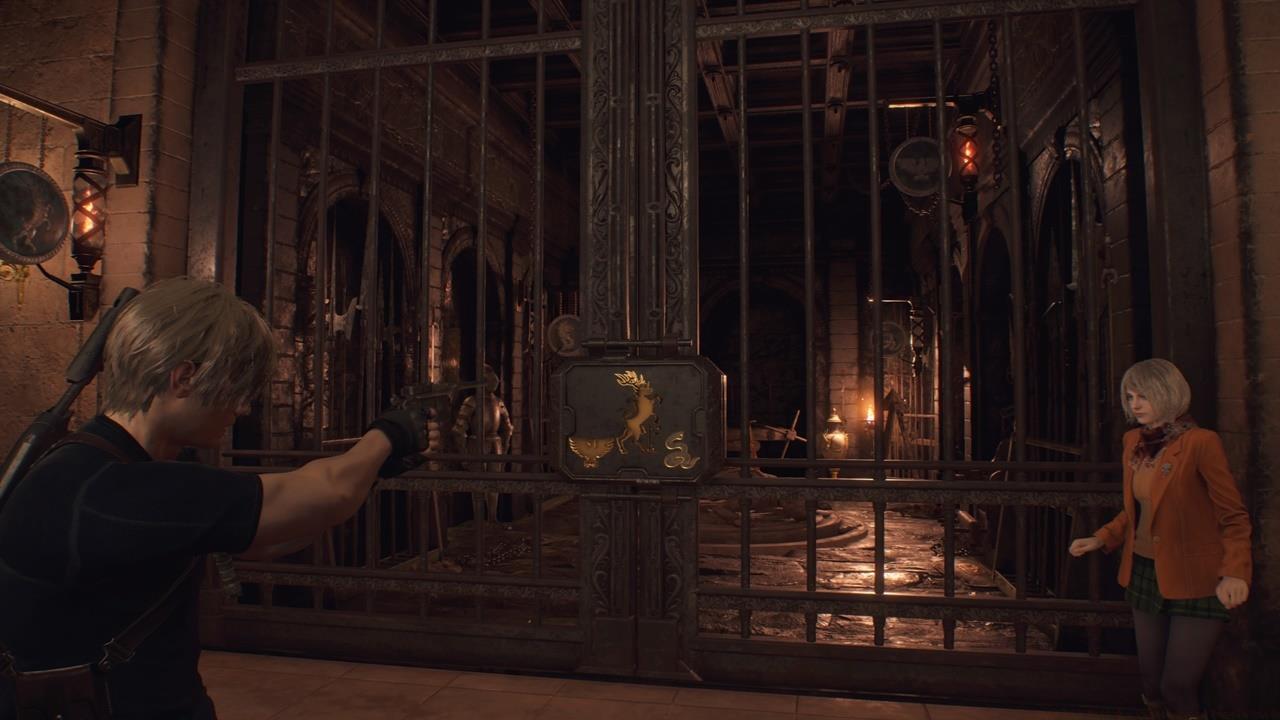
Strategic positioning is crucial when activating the gate symbols—ensure you have clear sightlines to the bird and snake plates while maintaining cover from potential enemy interruptions.
Pro tip: Equip a handgun with improved accuracy before approaching this section, as missing shots on the animal symbols wastes valuable ammunition that could be better utilized against Castle inhabitants.
With all four ornamental swords acquired, the actual puzzle solution revolves around interpreting the knight’s life journey depicted across the murals. Each sword corresponds to a specific phase in the warrior’s narrative, requiring thoughtful placement based on symbolic meaning rather than random trial and error.
The solution follows this logical progression through the knight’s lifecycle:
- Typical Hero (first mural): Iron Sword – This initial depiction shows conventional heroic posing where iron appropriately matches the practical armor aesthetic.
- Knighted (second mural): Golden Sword – The ceremonial anointing by royalty logically pairs with an extravagant golden weapon symbolizing honor and status.
- Battle (third mural): Bloodied Sword – Combat scenes naturally demand a weapon showing evidence of conflict, making the blood-spattered blade the obvious choice.
- Death (final sculpture): Rusted Sword – The knight’s demise concludes the narrative arc, with rust representing faded glory and the passage of time since his heroic deeds.
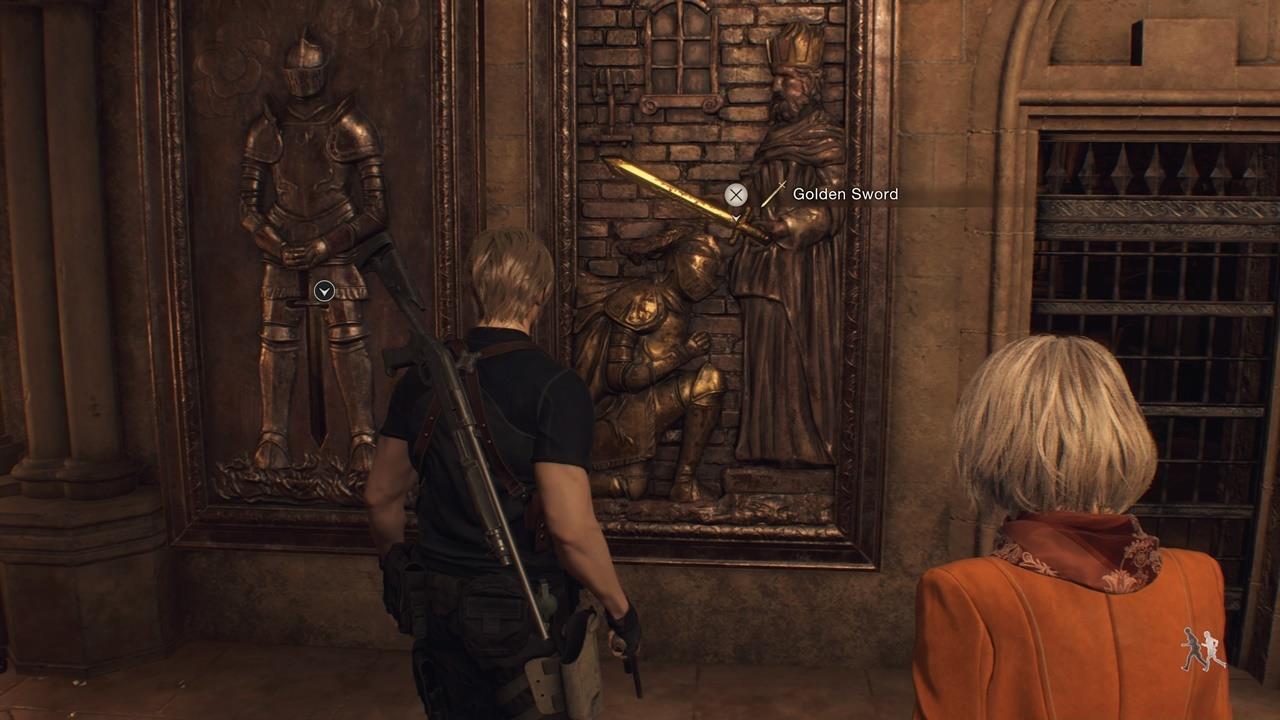
Observe how each mural’s artistic details reinforce the correct sword selection—the ceremonial context of the second mural clearly indicates luxury, while the battle scene’s violence demands visual evidence of combat.
Common mistake: Players often misplace the golden and iron swords, failing to recognize that the ‘Knighted’ ceremony represents peak prestige while ‘Typical Hero’ signifies humble beginnings.
Mastering the Castle Sword Puzzle involves more than just correct sword placement—strategic preparation significantly impacts your efficiency. Allocate approximately 3-5 minutes for complete puzzle resolution when properly equipped and prepared.
Optimization approach: Before entering the gallery, ensure your inventory contains at least 15 handgun rounds specifically reserved for activating the animal symbols. Enemy clearance beforehand prevents interruptions during the precise shooting requirements.
Critical error prevention: The most frequent mistake involves rushing the symbolic interpretation without carefully examining mural details. The golden sword specifically causes confusion when players overlook the ceremonial context of the anointing scene.
For speedrunners and advanced players, sequence breaking is possible by pre-shooting the bird and snake symbols while approaching the murals, potentially saving 45-60 seconds. However, this advanced technique requires precise positioning and may not be suitable for first-time solvers.
Remember that puzzle mechanics in Resident Evil 4 often follow environmental puzzle principles seen in other survival horror titles, where environmental storytelling provides the solution framework.
Action Checklist
- Clear the gallery area of enemies before attempting the puzzle
- Collect three sword ornaments from the knight murals
- Activate gate symbols: pull stag rope, shoot bird and snake plates
- Retrieve fourth sword from dying knight sculpture
- Place swords according to knight’s lifecycle: Iron, Golden, Bloodied, Rusted
No reproduction without permission:SeeYouSoon Game Club » Resident Evil 4 – Castle Sword Puzzle Guide Master the Castle Sword Puzzle with expert strategies and avoid common mistakes in Resident Evil 4