TL;DR
- Prismatic subclass unlocks early but requires extensive exploration for all fragments
- Three fragments automatically earned through main campaign mission completion
- Lost City region contains additional fragments requiring puzzle solving and exploration
- Post-campaign activities and adventures provide remaining fragment acquisition opportunities
- Strategic planning significantly reduces time investment for complete fragment collection
The Prismatic subclass becomes available during your initial mission in The Final Shape campaign, offering immediate access to its core abilities. However, achieving the subclass’s full potential demands thorough exploration of the Pale Heart region to collect every available fragment.
Destiny 2’s latest expansion introduces Prismatic as a groundbreaking hybrid subclass system. While you gain basic functionality from the campaign’s outset, each additional fragment you unlock dramatically enhances your customization options and combat effectiveness.
Primary subclass components become accessible by finishing main story missions and subsequent adventures. To obtain all fragments for complete Prismatic customization, you must thoroughly explore the Pale Heart’s hidden areas, uncovering secrets and solving numerous environmental puzzles scattered throughout the landscape.
Our comprehensive guide details every fragment location within the Pale Heart, organized by their map positions. Some fragments are campaign rewards, others require patrol exploration, and several are tied to specific activities across each region. Here’s everything you need to know about fragment acquisition.
- Campaign
- Facet of Bravery – Ascent: Earned upon completing the Ascent mission, this fragment enhances your resilience during intense firefights. It’s particularly effective when combined with defensive abilities from our Class Guide strategies.
- Facet of Devotion – Dissent: Unlocked after finishing the Dissent mission, this fragment improves ability regeneration rates and support capabilities.
- Facet of Sacrifice – Iconoclasm: Obtained upon Iconoclasm mission completion, this fragment provides offensive bonuses when your health is critical.
- Facet of Bravery – Ascent: This fragment automatically appears in your inventory after the Ascent mission concludes. No additional steps required.
- Facet of Devotion – Dissent: Mission completion reward that immediately enhances your subclass without requiring post-mission collection.
- Facet of Sacrifice – Iconoclasm: Final campaign mission reward that completes your initial fragment set, preparing you for advanced customization.
- The Lost City
- Facet of Grace: Located in a hidden chamber behind a waterfall in the central plaza area. Requires solving a light-based puzzle sequence to access.
- Facet of Mending – Outskirts, The Lost City: Found in the northwestern outskirts sector, concealed within a collapsed building. Demands platforming skills and enemy clearance.
- Facet of Mending – Outskirts, The Lost City: This fragment is particularly valuable for support-focused builds, significantly improving your healing and restoration capabilities. It complements weapon strategies detailed in our Weapons Unlock guide.
- Complete The Final Shape campaign missions
- Collect campaign reward fragments (Bravery, Devotion, Sacrifice)
- Explore Lost City outskirts for Mending fragment
- Solve central plaza puzzle for Grace fragment
- Test fragment combinations in different activity types
- Complete campaign missions to unlock Ascent, Dissent, and Iconoclasm facets
- Gather Vestiges of Light from Cysts and Overthrow events
- Solve the Hive rune puzzle in The Landing’s crystal cave
- Locate all Ghost shells in The Lost City Outskirts
- Charge generators in The Divide using proper energy orb combinations
- Defeat Tormentors using Transcendence when Bound enemies appear
- Scan aircraft wreckage areas thoroughly during Ascent mission climbing sequences
- Ignore right-waypoint after Dissent boss fight, explore left hallway instead
- Locate Cabal war beast statue in final mission, take left passage to hidden alcove
- Utilize door frames for vertical boosts to access upper ledges
- Prioritize mobility loadouts and environmental cue recognition training
- Memorize Hive rune sequences before entering crystal chambers
- Collect 5 Vestiges from Cysts and Overthrow events
- Use observation apertures to identify pedestals without triggering enemies
- Master Transcendence timing for Bound enemy elimination
- Navigate specific canopy and root locations using directional cues
- Navigate from The Impasse to the valley statue in The Transgression
- Acquire and maintain Darkness seed buff for toxic cave protection
- Destroy all Eyes of Suffering to remove enemy shields during each wave
- Activate Transcendence and eliminate the Tormentor boss
- Collect Prismatic chest key and unlock your reward
Maximizing your fragment collection efficiency requires strategic planning. Begin by completing the campaign to unlock your initial three fragments, then systematically explore each region. The Lost City fragments typically require 15-25 minutes each to locate and acquire, depending on your puzzle-solving speed and combat proficiency.
A common mistake is attempting fragment collection before finishing the campaign, which can lead to unnecessary backtracking. Instead, focus on main story progression first, then utilize your full mobility toolkit for exploration. Advanced players should prioritize fragments that synergize with their preferred playstyle, as described in our Complete Guide to battlefield operations.
Optimize your route by grouping fragments geographically. The Pale Heart’s verticality means some fragments are easier to collect with certain movement abilities, so consider your subclass loadout before beginning your collection journey.
Facet of Bravery – Ascent
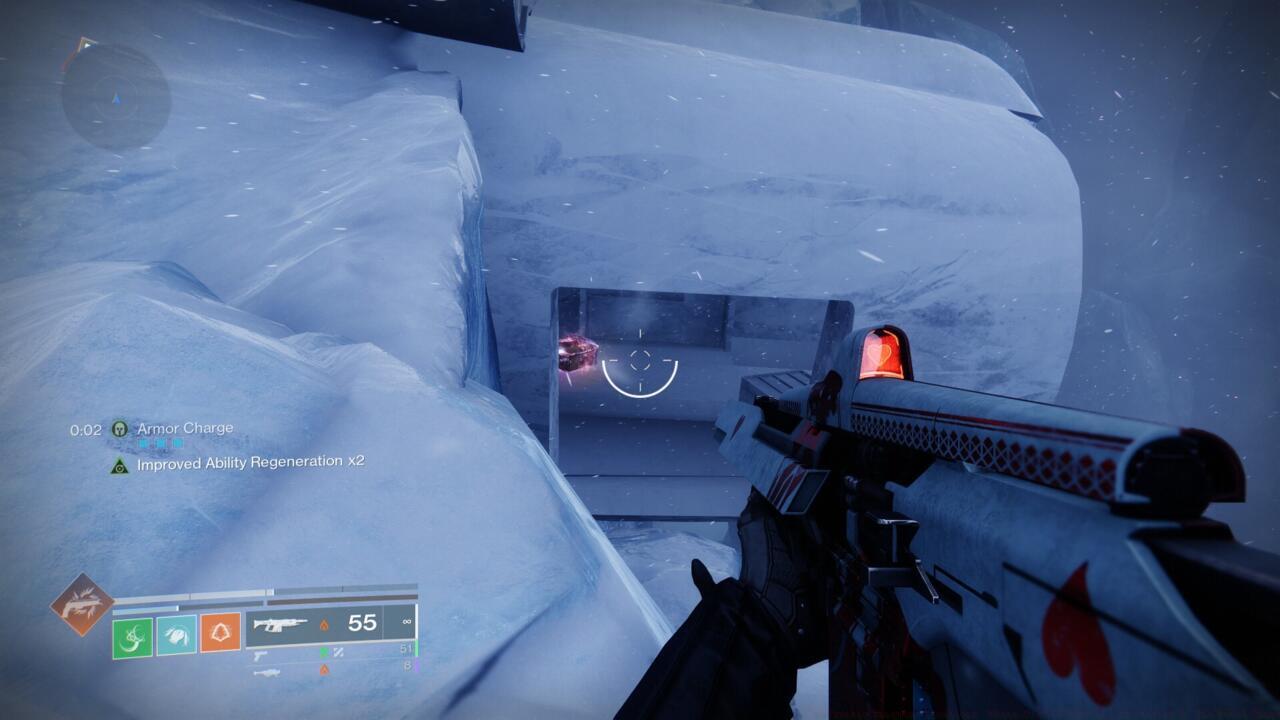
Navigate to the lower aircraft wreckage to locate the Facet of Bravery.
During your progression through the Ascent mission, you’ll reach The Impasse—a treacherous frozen mountain ascent. As you scale the cliffs, watch for two bisected plane fuselages embedded in the ice. Follow the accessible route toward the aircraft remnants, then descend into the lower section where a Prismatic container awaits discovery.
Facet of Devotion – Dissent
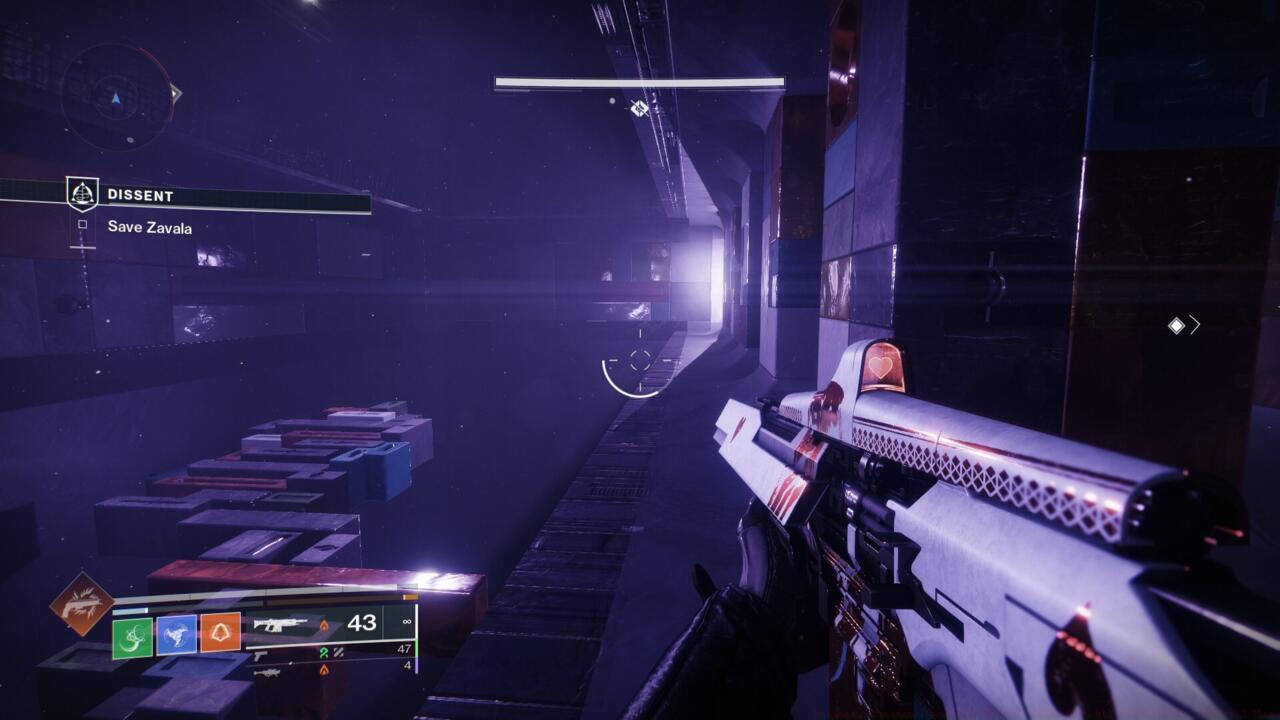
After exiting the boss encounter, traverse this walkway and proceed toward the illuminated section at the chamber’s opposite end.
Complete the Dissent mission by overcoming the final Scorn adversary. Your Ghost will alert you to the collapsing environment as escape routes disintegrate behind you. While fleeing the disintegrating staircases, enter a more stable structure. Although your navigation marker indicates a right turn, advance directly along the corridor. Behind a structural column, you’ll discover the concealed Prismatic container.
This container remains readily accessible behind the pillar, allowing swift acquisition during your evacuation.
Facet of Sacrifice – Iconoclasm
When you encounter this object, proceed leftward.
This fragment becomes accessible during the concluding story mission. Progress through the initial three combat zones where Rally Banners can be deployed. Following your victory over the Ogre commander, advance deeper into the pyramid architecture until reaching a fragmented canine sculpture (representing a Cabal war beast).
The luminous marker on the wall indicates the passage leading to the Prismatic container.
From this position, two exit paths present themselves. Choosing the left passage leads to a compact, shadowy recess. Search overhead for the wall illumination—this designates an aperture accessible for entry. Ascend (utilizing the door frame on your left for additional elevation) to reach the ledge, enter the opening, and navigate through the darkness until emerging in a small chamber housing the prismatic container.
Facet of Grace
Proceed toward the azure structure to locate the Prismatic container in the adjacent region.
Advance beyond Micah-10 and descend into the Lost City. Upon exiting the Tower, turn right and traverse the substantial chasm toward the blue edifice featuring orange rooftop markings. A perimeter route encircles the blue building, with another structure positioned ahead. Circumnavigate to locate an entry point into the building, where the Prismatic container resides internally. Approaching proximity triggers a notification about Omens materializing, accompanied by Dread combatants. Eliminate them—focus particularly on the Weaver distinguished by its orange health indicator. Upon its defeat, a second Omen alert appears, requiring you to track and neutralize it.
Locate the subsequent Omen adversary by pursuing the platforms highlighted in yellow.
Return to the vicinity fronting the Tower entrance and proceed directly across to the yellow-marked platforms. Eliminate all hostile entities and the Weaver to initiate a third Omen spawn.
The ultimate Omen awaits along this crimson route.
Journey back to the central Tower-adjacent area and now cross to the scarlet platform. Follow the trajectory to an additional enemy cluster and final Weaver. With its elimination, a new message announces The One Foretold’s arrival. Return to the main sector to encounter a Tormentor.
As standard protocol, eliminate all opposition here. Inflicting sufficient damage on the Tormentor activates protective barriers generated by Bound adversaries, necessitating Transcendence activation to neutralize them. Continue combat until the Tormentor falls, releasing a Prismatic key, then revisit the blue route to locate and unlock the container.
Facet of Mending – Outskirts, The Lost City
This container demands preliminary exploration involving multiple concealed Ghost shells throughout the district. Initiate from the Tower transmat location and progress toward the Lost City. Traverse the rooftop landscape moving entirely westward—retracing your initial campaign portal transition route. Upon reaching the Outskirts sector, encounter Hive assailants in a compact garden courtyard surrounded by commercial structures. The egress appears on your right, but delay exiting through that archway.
Alternatively, remain attentive to the auditory cue your Ghost emits when scannable objects are nearby. Deploying your Ghost while proximate to targets causes it to orient toward the sought item. The initial shell rests upon the signage support arm affixed to the wall in an alley left of the exit arch. Ascend atop it and employ the Activate function to collect your first Ghost.
The primary Ghost shell remains positioned inconspicuously atop these signage structures.
Proceed through the Outskirts. Subsequently, you’ll approach this area’s boundary. Four square platforms span the extensive gap ahead. Rather than crossing them, approach the edge and survey downward to discover scaffolding and staircases. Descend to locate the subsequent Ghost on a crate adjacent to the stairs.
Descend to this scaffold structure and search for the Ghost shell on a container beneath the staircase.
Cross the chasm to continue. You’ll access a new structure and descend. After emerging outdoors again, reorient toward the recently traversed doorway. An overhanging canopy above the entrance permits ascension, where another Ghost awaits.
Ascend onto this overhang to discover the Ghost shell positioned on a container.
Continue tracking the path to encounter another Ghost immediately below the substantial tree you navigate through. Proceed to the amber-hued metallic architectural element you pass beneath. Mount it to locate the Ghost nestled against the circular structure.
The concluding Ghost shell resides beneath the orange annular fixture embedded in the tree.
Beyond the large tree, observe a Pyramid technological construct featuring a central pressure plate encircled by the recently recovered Ghosts. Position yourself on the plate to summon multiple Dread combatants. Engage four distinct assault waves as the plate energizes, culminating with a Subjugator confrontation. After inflicting adequate damage, Bound Dread entities materialize, requiring positioning near the adjacent Prismatic source to accumulate Transcendence charge, shatter their defenses, and render the Subjugator susceptible again. Replicate this procedure once more when the Subjugator regains invulnerability. Upon its destruction, it releases a key for the Prismatic container adjacent to the substantial Ghost.
Facet of Justice
This Prismatic container remains concealed within the crystalline cavern region traversed during the campaign. From The Landing transmat point, proceed leftward and navigate along the cliff face toward the caves, then pursue the route until discovering a circular side chamber with dual levels and a substantial Solar crystal at the summit.
Upon acquiring the crystal, Hive sigils manifest throughout the room. Additionally, three runes appear beneath the crystal. Each peripheral rune corresponds to a pedestal placement location, requiring sequential crystal positioning according to vertical arrangement from highest to lowest.
Memorization of the three vertically stacked runes beneath the crystals, identification of their room positions, and crystal placement in corresponding locations unlocks the container.
The complication arises when entering the chamber’s center to observe the runes—they vanish while Dread combatants spawn to assault you. To determine crystal placement destinations, observe through the aperture near the crystal’s origin point and enumerate pedestals to locate corresponding positions. Shadow Thralls materialize to harass you during this process, though they present minimal threat.
Each crystal placement triggers enemy engagements, culminating with multiple Ogre and Dread adversaries. Typically, Bound reinforcements appear providing protective barriers to commanders, necessitating Transcendence utilization to eliminate them for mission completion. Collect the key upon conclusion to access the Prismatic container.
Facet of Awakening – Memory: Refractions of Light
Distinct from numerous other Prismatic containers, Memory of Light variants demand acquisition of five Vestiges of Light artifacts scattered throughout the Pale Heart. These obtain through Cyst explorations within the Alone in the Dark assignment from Micah-10, plus Light Offering containers located in Overthrow event zones. Accumulating five Vestiges of Light combines them into a Memory artifact, revealing new exploration sectors on the Pale Heart cartographic interface. Navigate to these locations and investigate to discover the Prismatic containers.
Ascend to locate the Prismatic container positioned upon the arboreal and climbing vegetation overhead.
The investigation zone for Refractions of Light directs you to The Refraction. Arriving there, you’ll traverse beneath interwoven tree and branch networks. Mount the arboreal structures to discover the Prismatic container concealed atop the canopy.
This location reveals the Prismatic container’s position within The Refraction.
Facet of Generosity – Memory: Blooming of Light
This represents another Memory of Light container, necessitating additional Vestiges of Light collection through elimination of luminous adversaries within Cysts. Once possessing Memory: Blooming of Light, your objective simplifies—transmat into The Blooming and advance southward toward the substantial circular Tree of Silver Wings at the area’s center. The container remains nestled between dual root structures on the western flank (rightward from initial spawn location).
Facet of Dominance – Memory: Seclusion of Light
Upon acquiring the Memory: Seclusion of Light investigation sector, this container resides precisely where anticipated.
Re-enter a Cyst and accumulate additional Vestiges of Light. Once possessing five Vestiges of Light, you should receive a Memory artifact—if it’s Memory of Seclusion, navigate toward Zavala’s cabin. Access The Seclusion from The Blooming for optimal routing. Upon arrival, proceed left toward the cascade terminating the shallow watercourse traversing the area’s midsection. Mount the fallen timber positioned between the rock formations here to discover the container immediately behind them at the summit.
Facet of Command
While advancing through The Divide—a region patterned after the Cosmodrome wall sector—you’ll eventually encounter a Hive Shrieker with an adjacent Prismatic container positioned directly along the route connecting The Impasse to The Seclusion, proximate to the substantial frozen jump vessel. The unlocking mechanism isn’t immediately apparent; the required puzzle solution remains concealed nearby.
You can traverse the apertures in this barrier to locate the generators requiring energization to access the Prismatic container.
Immediately beyond the container along the corridor’s side rests a panel wall, with certain sections dislodged creating passages through the barrier. Identify sufficiently sized openings to pass through, discovering multiple Fallen technological components including a computer interface and dual generators. Interacting with the terminal summons a Scorch Cannon—employ it to detonate the terminals, fracturing the ice obstructing access. Utilize the cannon to eliminate the ice encasing the energy spheres required for generator charging.
Employ this interface to summon a Scorch Cannon, capable of destroying the ice and liberating the energy spheres necessary for generator energization.
The challenge involves locating energy spheres to completely power the generators. The necessary energy spheres remain trapped within ice accumulations, distributed throughout the adjacent territory. Exploration throughout the vicinity becomes necessary. One resides immediately beyond the Prismatic container, though accessing it requires descending from the walkway and investigating the lateral area to locate it at the chamber’s extremity, upon a platform. Additional spheres locate along corridors in both directions away from the container and within side chambers.
You’ll discover two Solar spheres, three Arc spheres, and two Void spheres. Each sphere contributes varying energy quantities to the generator, quantified by green illumination units activating upon insertion. Your objective entails fully charging each generator—totaling 10 units—without exceeding capacity.
For independent puzzle resolution, omit subsequent information. Otherwise, understand that Arc spheres provide two power units, Solar spheres contribute three units, and Void spheres supply four units. Consequently, implement two Solar and two Arc spheres in one generator, and two Void plus one Arc sphere in the secondary generator.
Once both generators reach complete charge, engage multiple Dread adversaries, including a Subjugator, to obtain the key and access the container.
Facet of Honor – Memory: Divisive Darkness
Similar to Memories of Light, Memories of Darkness require accumulation of five Vestiges of Darkness to formulate a memory artifact revealing an exploration zone within the Pale Heart. Vestiges of Darkness obtain through resolution and access of corrupted containers in Overthrow territories.
Corrupted containers exhibit this appearance, and their resolution yields a Vestige of Darkness.
To locate the container for the Divisive Darkness memory, navigate to the frozen mountain within The Divide. Ascend completely to the mountain’s peak. Reaching the summit, survey over the structural edges at the cliff’s periphery on the right when facing the facility access route. The Prismatic container awaits discovery near the scenic overlook.
Descend over the structural edges atop The Divide’s mountain to discover this container.
Facet of Defiance
Search for the cavern situated on The Transgression’s northern aspect.
Initiate from The Impasse transmat location and proceed eastward into The Transgression. Continue advancement until reaching a valley featuring a Guardian statue centrally positioned with an impaling spike through their torso. From the sculpture, turn leftward to observe a cave ahead featuring orange illumination. Entering reveals toxic atmospheric conditions inflicting damage. This gameplay element recurs throughout the campaign, ensuring familiarity. Position adjacent to and discharge upon the Darkness seed near the cave entrance to acquire a protective enhancement shielding from the poisonous air, maintaining refreshment while within the cavern whenever the duration expires.
Locate and eliminate these Suffering Eyes to deactivate adversary protective barriers for elimination.
Advance completely to the cavern’s rear section to locate the Prismatic container. Identify the triangular fragment object centrally located within the chamber and activate it. Invulnerably shielded combatants materialize. Evade them due to their invulnerability, instead searching for the circular Taken Acolyte Eyes distributed throughout. Locate the ocular entities, which remain somewhat concealed, and eradicate them all to render adversaries vulnerable for elimination.
Replicate the identification and elimination procedure three times. Each iteration spawns additional shielded adversaries, intensifying the urgency of locating the Eyes progressively. Upon complete eradication, multiple Dread combatants appear, accompanied by a Tormentor. Employ Transcendence to render the Tormentor susceptible, though once accomplished, you can defeat it to obtain your Prismatic container key.
Consult our comprehensive Destiny 2: The Final Shape guide hub for extensive additional information regarding all discoverable game content.
During your progression through the Ascent operation in Battlefield 6’s narrative campaign, you’ll encounter The Impasse region—a frost-covered mountainous terrain requiring careful ascent. This challenging vertical environment contains two aircraft wreckages embedded within the icy cliff face, with the crucial Facet of Bravery concealed within the lower fuselage section.
The Impasse presents a multi-stage climbing sequence where environmental awareness becomes critical. As you scale the frozen peaks, maintain visual contact with the distinctive aircraft remnants positioned along the rock formation. Follow the primary route leading toward these wreckages, then execute a controlled descent into the bottom aircraft body where a Prismatic container awaits discovery.
Strategic navigation through this mission requires understanding the vertical level design—many players miss the chest by rushing through the climbing sections without proper environmental scanning.
After concluding the primary combat engagement in the Dissent operation and eliminating the Scorn commander, your extraction phase begins. The structural integrity of the arena deteriorates rapidly, creating an urgent escape scenario where timing becomes essential.
Proceed along the collapsing stairway system as you evacuate the boss location until reaching more stable architecture. Your navigation marker will typically guide you toward the right passage, but the valuable container resides in the opposite direction—sprint to the hallway’s terminus where a Prismatic chest is positioned behind structural support.
The container placement allows for rapid acquisition during your withdrawal sequence, though many operators mistakenly follow the waypoint system and miss this opportunity. This exemplifies why understanding Class Guide mobility options can significantly impact collection efficiency.
Common extraction errors include: prioritizing speed over exploration, ignoring alternative routes, and failing to recognize environmental cues indicating hidden content locations.
This essential campaign component becomes accessible during the concluding story mission sequence. Advance through the operation, successfully completing the initial three major engagements where deployment of Rally Banner equipment is permitted.
Following your victory over the Ogre commander, progress further into the pyramidal architecture until encountering a distinctive sculpture resembling a segmented canine creature—more accurately identified as a Cabal war beast representation.
The illuminated marker on the wall surface indicates the entry point leading toward the Prismatic container destination.
From this junction, two egress options present themselves. Select the left passage to enter a compact, shadowy recess. Survey the upper area for the wall illumination—this signifies an aperture suitable for traversal. Execute an upward movement (the door framework on your left provides an effective platform assist) to reach the ledge, crouch through the opening, and proceed through the darkness until emerging in the adjacent chamber containing the prismatic chest.
Advanced navigation tip: The blue structural element visible in the distance serves as a reliable orientation marker for locating the Prismatic container in the subsequent area. Understanding these environmental signals is crucial for efficient Complete Guide completion.
Optimizing your Prismatic chest acquisition requires strategic planning beyond basic location knowledge. Experienced operators recommend allocating 15-20 minutes per chest during initial attempts, with efficiency improving to 5-10 minutes with route familiarity.
Critical errors to avoid: rushing through escape sequences without environmental scanning, blindly following waypoint markers in non-linear sections, and underestimating the value of backtracking opportunities. Many players miss the Dissent mission chest by assuming the collapsing structure prevents exploration.
Loadout optimization: Equip mobility-enhancing gear and consider Weapons Unlock options that facilitate rapid movement through complex environments. The Assault class typically provides the most effective toolkit for these collection challenges.
Environmental mastery: Develop familiarity with light sources as navigation aids, structural color coding as orientation markers, and audio cues indicating nearby interactive elements.
The Prismatic chest concealed within the crystalline cavern region represents one of the more intricate environmental puzzles you’ll encounter after completing the campaign storyline. Beginning from The Landing transmat zone, navigate leftward along the cliffside pathways until you reach the cave network entrance. Progress through the winding tunnels until discovering a circular chamber featuring dual levels, crowned by an immense Solar-infused crystal formation at its apex.
Upon retrieving the central crystal, intricate Hive sigils materialize throughout the chamber’s perimeter. Simultaneously, three distinct runic symbols manifest in vertical alignment beneath the crystal itself. Each surrounding rune correlates to specific pedestal locations where the crystal can be deposited, requiring you to systematically place the crystal at each corresponding pedestal following their vertical sequencing from highest to lowest position.
Success demands precise memorization of the three-rune sequence displayed beneath the crystal, identification of their matching counterparts around the chamber’s circumference, and sequential crystal placement at each designated location to activate the chest’s unlocking mechanism.
The primary complication arises from the chamber’s defensive systems – entering the central area to view runes causes immediate sigil disappearance while spawning aggressive Dread combatants. To properly identify pedestal locations, utilize the observation aperture near the crystal’s initial position to visually trace and count pedestals corresponding to each rune. While Shadow Thrall distractions will appear during this process, they present minimal threat compared to the main combat encounters.
Each successful crystal placement triggers escalating enemy waves, culminating in challenging engagements against multiple Ogre units and enhanced Dread adversaries. Standard protocol involves Bound forces materializing to provide protective shielding to boss-level enemies, necessitating strategic deployment of your Transcendence ability to eliminate shield providers before focusing on primary targets. Upon completion, collect the activation key to access the Prismatic chest’s valuable contents.
Unlike standard Prismatic chest mechanics, Memory of Light variants demand acquisition of five Vestiges of Light artifacts scattered throughout the Pale Heart landscape. These fragments can be obtained through two primary methods: exploring Cyst locations as part of the Alone in the Dark mission chain from Micah-10, and accessing Light Offering chests discovered within active Overthrow event zones. Upon collecting five Vestiges of Light, they automatically combine into a unified Memory artifact, which then reveals a new search sector on your Pale Heart Director map interface. Navigate to this designated area and conduct thorough exploration to locate the special Prismatic chest.
Ascend through the environment to discover the Prismatic chest positioned among elevated branches and vine networks overhead.
The search perimeter for Refractions of Light directs you toward The Refraction zone. Upon arrival, you’ll traverse beneath dense arboreal tangles and interwoven branch structures. Scale the tree formations to locate the Prismatic chest hidden atop the canopy layer.
This marks the precise location for discovering the Prismatic chest within The Refraction sector.
This represents another Memory of Light chest variant, requiring renewed collection of Vestiges of Light by eliminating luminous enemies within Cyst encounters. Once you obtain Memory: Blooming of Light, navigation becomes straightforward – transport to The Blooming transmat point and proceed southward toward the massive circular Tree of Silver Wings dominating the area’s center. The chest rests securely nestled between two substantial roots on the western flank (directly rightward from your initial spawn position in this region).
Begin your journey at the transmat zone located within The Impasse area, then proceed eastward into The Transgression region. Continue advancing along the main path until you encounter a distinctive valley featuring a central statue depicting a Guardian figure impaled by a massive spike through their chest. From this landmark statue, make a left turn to spot a cave entrance emitting a distinctive orange glow in the distance. Upon entering this cavern, you’ll immediately notice the hazardous atmosphere inflicts continuous damage due to toxic air – a recurring environmental mechanic throughout the campaign missions. To survive this poisonous environment, position yourself adjacent to the Darkness seed near the cave entrance and fire upon it to acquire a protective buff that neutralizes the toxic effects. Maintain this protection by refreshing the buff whenever the timer indicator approaches expiration while exploring the cave interior.
Your primary objective involves locating and eliminating the specialized Eyes of Suffering scattered throughout the cavern. These ocular entities, when destroyed, will automatically deactivate the protective shields surrounding the hostile forces, rendering them susceptible to conventional weapon damage. A common mistake players make is prioritizing shielded enemy elimination instead of focusing on the eyes first – this wastes valuable ammunition and time. Strategic positioning near cover while scanning for these targets significantly improves survival rates during this phase. Advanced players recommend using area-of-effect weapons to quickly clear multiple eyes when they cluster together, though precision weapons work better for distant or elevated targets.
Progress deeper into the cave’s rear sections to discover the coveted Prismatic chest container. Locate the triangular splinter object positioned centrally within the chamber and initiate activation. This triggers the appearance of multiple adversaries protected by impenetrable shielding systems. Rather than engaging these invulnerable foes directly, shift your focus to locating the circular Taken Acolyte Eyes strategically hidden throughout the environment. These ocular targets require thorough searching as they’re often concealed in shadowy alcoves, behind rock formations, or atop ledges. Eliminating all visible eyes will temporarily disable the enemy shields, creating brief vulnerability windows for elimination. This eye destruction sequence repeats through three distinct phases, with each subsequent wave introducing additional shielded combatants that intensify the search urgency. The first wave typically takes 2-3 minutes, the second 3-4 minutes, and the final wave 4-5 minutes for completion, depending on player skill level and loadout efficiency.
After successfully neutralizing all ocular targets across the three activation waves, a final enemy contingent emerges featuring multiple Dread-type adversaries accompanied by a formidable Tormentor. This boss-level opponent requires specific tactical approaches – you must activate your Transcendence ability to temporarily nullify the Tormentor’s damage resistance properties. Once vulnerable, concentrate all available firepower on critical weak points while maintaining situational awareness of the supporting Dread enemies. The Tormentor features distinct attack patterns including ground slams, void projectiles, and teleportation maneuvers that necessitate constant repositioning. Successfully defeating this powerful foe rewards you with the essential key needed to unlock the Prismatic chest. For comprehensive strategies on optimizing your class abilities and weapon configurations to handle similar challenging encounters, consult our detailed gameplay guides.
Action Checklist
No reproduction without permission:SeeYouSoon Game Club » Prismatic Fragment Locations: Where To Find Them All In Destiny 2: The Final Shape