Master the Blossomdance Boon skill to maximize seasonal rewards and combat effectiveness in Monster Hunter Wilds
Understanding Blossomdance Boon Mechanics
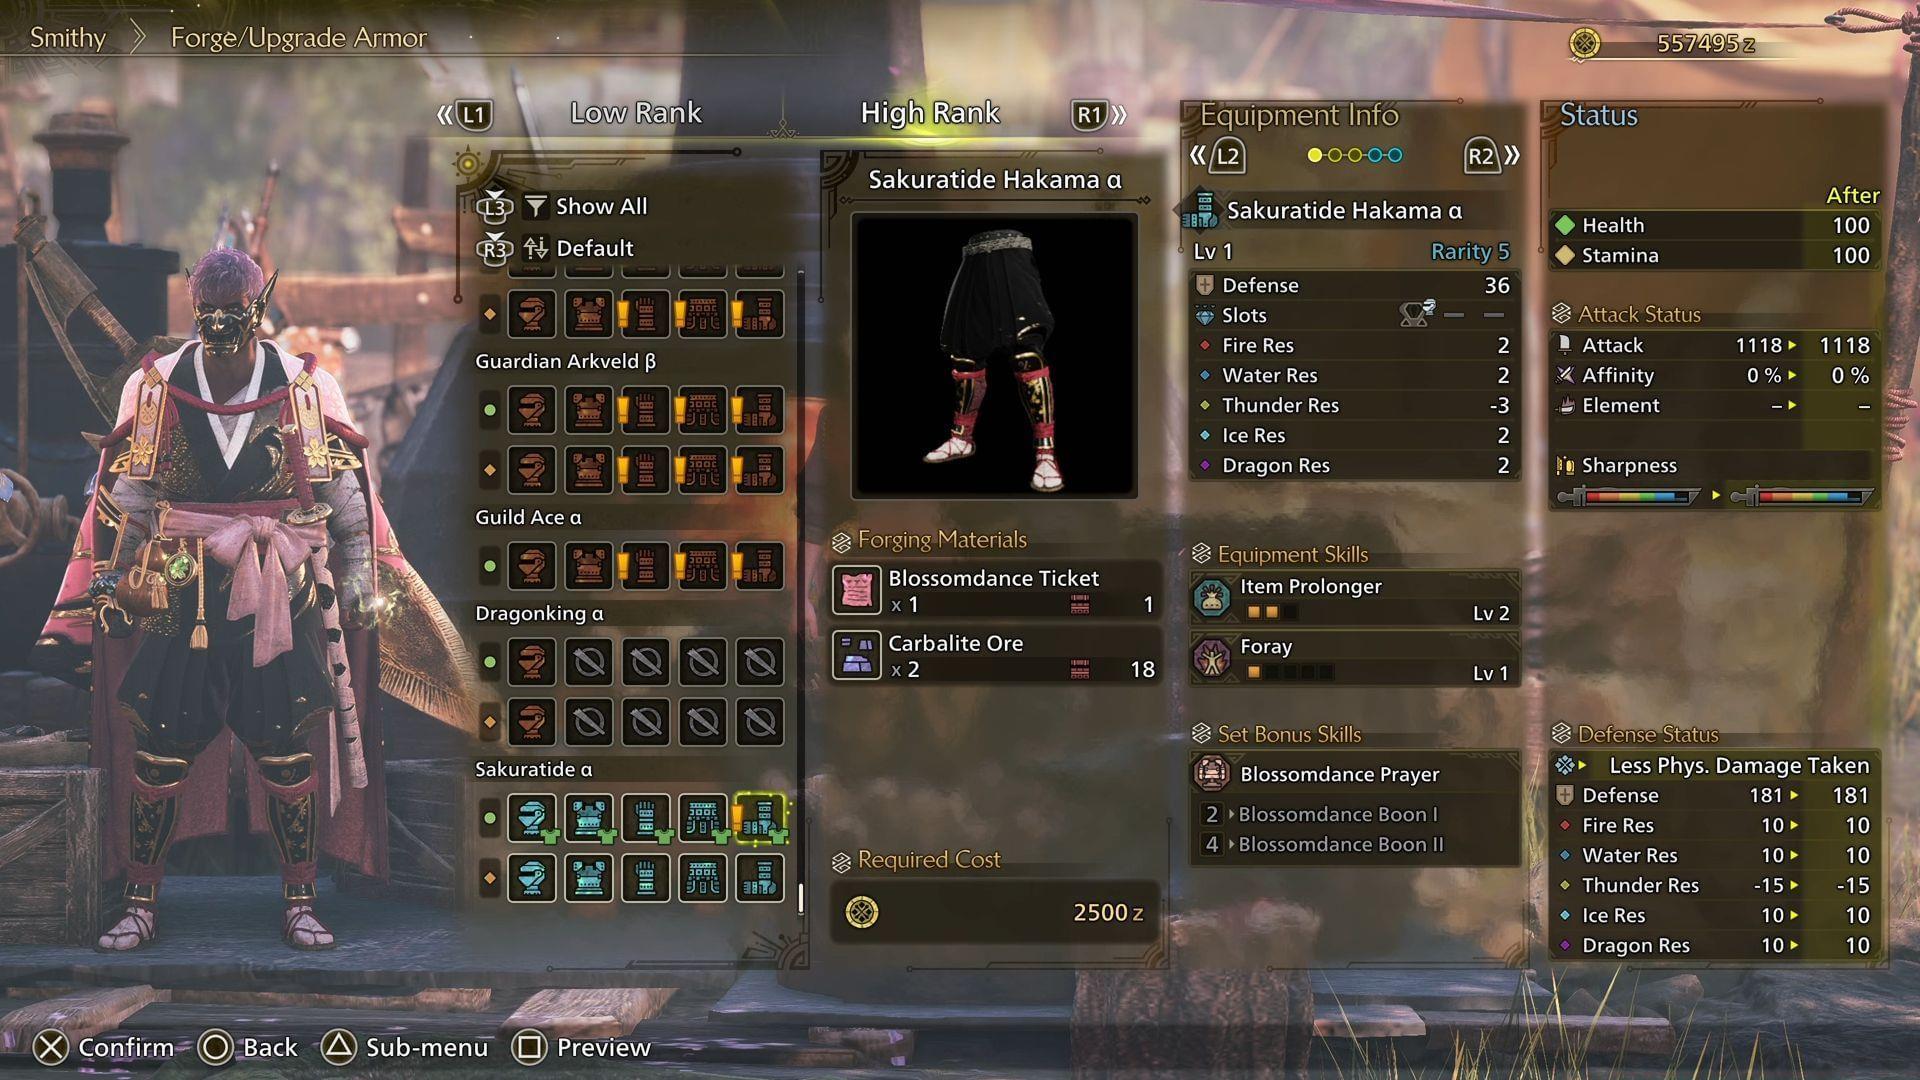
The Blossomdance Boon ability, part of the Blossomdance Prayer system, becomes accessible when equipping pieces from the Sakuratide α Armor Set in Monster Hunter Wilds. This seasonal armor collection was introduced alongside the Festival of Accord Blossomdance celebration, which commenced on April 23, 2025, at 12:00 AM UTC and concludes on May 7, 2025, at 11:59 PM UTC.
This set bonus skill operates on a tiered activation system where the benefits scale according to how many armor pieces you’ve equipped from the collection. Understanding this progression is crucial for optimizing your build.
- Blossomdance Boon I (2 pieces): Unlocks the ability to receive exclusive seasonal items as additional quest completion rewards during the active Blossomdance festival period.
- Blossomdance Boon II (4 pieces): Enhances the base seasonal reward functionality while providing substantial combat advantages, increasing your attack power by 9% and bolstering defense by 50 points.
Maximizing Your Seasonal Rewards
When activating either Blossomdance Boon tier during the seasonal event, hunters can obtain various exclusive items including Blossomdance Tickets, Blossomdance Vouchers, Pick-a-meal Vouchers, Blossom Barrel Bombs, and Barrel Bowling Vouchers. The specific rewards are randomly distributed, but strategic play can significantly improve your acquisition rates.
Seasoned hunters should prioritize higher-level quests as they typically yield greater quantities of seasonal items. The reward multiplier applies consistently whether you initiate quests yourself or participate through SOS flares and lobby invitations, making cooperative play exceptionally rewarding during this period.
Pro Tip: Focus on Master Rank and high-difficulty investigations during the event window. These typically provide 2-3 seasonal items per completion compared to just 1 from lower-rank quests. The time investment per item becomes much more efficient, especially when coordinating with a full team running similar builds.
The beauty of this system lies in its flexibility – you can join ongoing quests mid-hunt and still receive the full seasonal reward benefits, making quick SOS responses highly profitable.
Advanced Combat Optimization
Blossomdance Boon II delivers a substantial 9% attack increase alongside 50 additional defense points, creating significant combat advantages for dedicated hunters. This statistical boost operates multiplicatively with other damage modifiers, making it particularly powerful when combined with attack-boosting skills and consumables.
The complete Sakuratide α Armor Set includes multiple components that work synergistically:
- Sakuratide Headgear α
- Sakuratide Mail α
- Sakuratide Braces α
- Sakuratide Faulds α
- Sakuratide Greaves α
For maximum effectiveness, pair the 4-piece bonus with weapons that benefit greatly from raw damage increases, such as Great Swords, Hammers, and Heavy Bowguns. The 9% attack modifier becomes exceptionally valuable on weapons with high motion values, while the 50 defense provides crucial survivability against endgame monsters.
Advanced Strategy: Consider mixing the Sakuratide pieces with other armor sets that provide complementary skills like Critical Eye, Attack Boost, or Weakness Exploit. This creates a powerful hybrid build that maximizes both your seasonal farming efficiency and combat performance.
Common Mistakes and Pro Tips
Blossomdance Boon proves incredibly valuable for hunters seeking exclusive seasonal items during Monster Hunter Wilds’ Festival of Accord Blossomdance, but many players undermine their efficiency through avoidable errors.
Avoid These Common Pitfalls:
- Running low-rank quests exclusively – the time-to-reward ratio is significantly worse than high-rank investigations
- Ignoring SOS opportunities – joining ongoing quests can yield seasonal items much faster than starting fresh hunts
- Failing to prepare properly – bring gathering gear and meal vouchers to maximize each hunting session’s value
- Overlooking the defense bonus – the 50 defense from Boon II enables more aggressive playstyles against tough monsters
Expert Preparation Strategy: Stockpile resource-intensive consumables before the event begins. Craft additional Blossom Barrel Bombs using the vouchers you earn, creating a stockpile for future challenging hunts. The Pick-a-meal Vouchers should be saved for particularly difficult investigations where the right meal skills can make or break your success.
Remember that the seasonal items have multiple uses beyond their immediate purpose. Blossomdance Tickets often craft exclusive cosmetic items, while vouchers can be traded for rare materials at the melding pot.
No reproduction without permission:SeeYouSoon Game Club » Monster Hunter Wilds Blossomdance Boon Skill explained Master the Blossomdance Boon skill to maximize seasonal rewards and combat effectiveness in Monster Hunter Wilds