TL;DR
- Weapon upgrading requires rescuing blacksmith Gerlinde in Pilgrim’s Perch
- Umbral Realm navigation is essential for reaching Gerlinde’s location
- Strategic combat against spiked helmet enemies prevents early game frustration
- Soulflaying multiple Umbral spots unlocks the path forward
- Proper realm management between Axiom and Umbral saves time and resources
Securing a skilled blacksmith becomes essential for enhancing your combat effectiveness in Lords of the Fallen. Unlike many action RPGs where weapon improvement systems are immediately available, this game requires you to complete a specific rescue mission first.
Weapon enhancement represents a core progression mechanic in Soulslike titles, and Lords of the Fallen maintains this tradition with its own unique implementation. However, access to this crucial feature isn’t granted at the start of your adventure. You must locate and free a blacksmith called Gerlinde by thoroughly exploring the early-game region known as Pilgrim’s Perch. This comprehensive walkthrough details her exact location and the steps to unlock weapon upgrading capabilities.
Before initiating any weapon improvements, your primary objective involves locating and rescuing Gerlinde within Pilgrim’s Perch. Your expedition commences from the Bellroom vestige checkpoint, which serves as your operational base for this mission.
Position yourself facing the vestige marker, then proceed through the exit on its right side. Eliminate the assortment of hostile creatures occupying this chamber before advancing deeper into the cavern system until you emerge outdoors. You’ll need to leap onto the suspended platform to your left, followed by another jump to reach the opposite side. Important note: if you’re currently in the Umbral Realm, you can pivot and utilize your lantern to construct a temporary bridge for returning across.
Advance along the extended pathway and confront the challenging adversary wearing protective headgear at its terminus, then descend using the ladder. Subsequently, ensure you transition into the Umbral Realm, as progression becomes impossible within Axiom. Once established in Umbral, take the subsequent ladder downward into an expansive zone populated with numerous enemies. You can choose to engage them in combat or simply sprint past to the area’s far side and ascend the ladder adjacent to the concluding structural support.
Upon reaching the summit, navigate around the perimeter and climb one additional ladder upward, then traverse the narrow bridge present here and defeat the opponent waiting on the opposite end. Avoid utilizing the effigy at this location to revert to Axiom—maintaining your Umbral state remains necessary for reaching your target destination regardless.
Proceed downward to the subsequent walkway and continue forward while dealing with hostile encounters along your route. At the pathway’s conclusion, another ladder will transport you to encounter two of those formidable spiked helmet-wearing opponents, presenting a significant combat challenge during the game’s initial stages. If feasible, draw their attention then retreat up the ladder to employ projectile spells or consumable items to reduce their vitality before direct engagement.
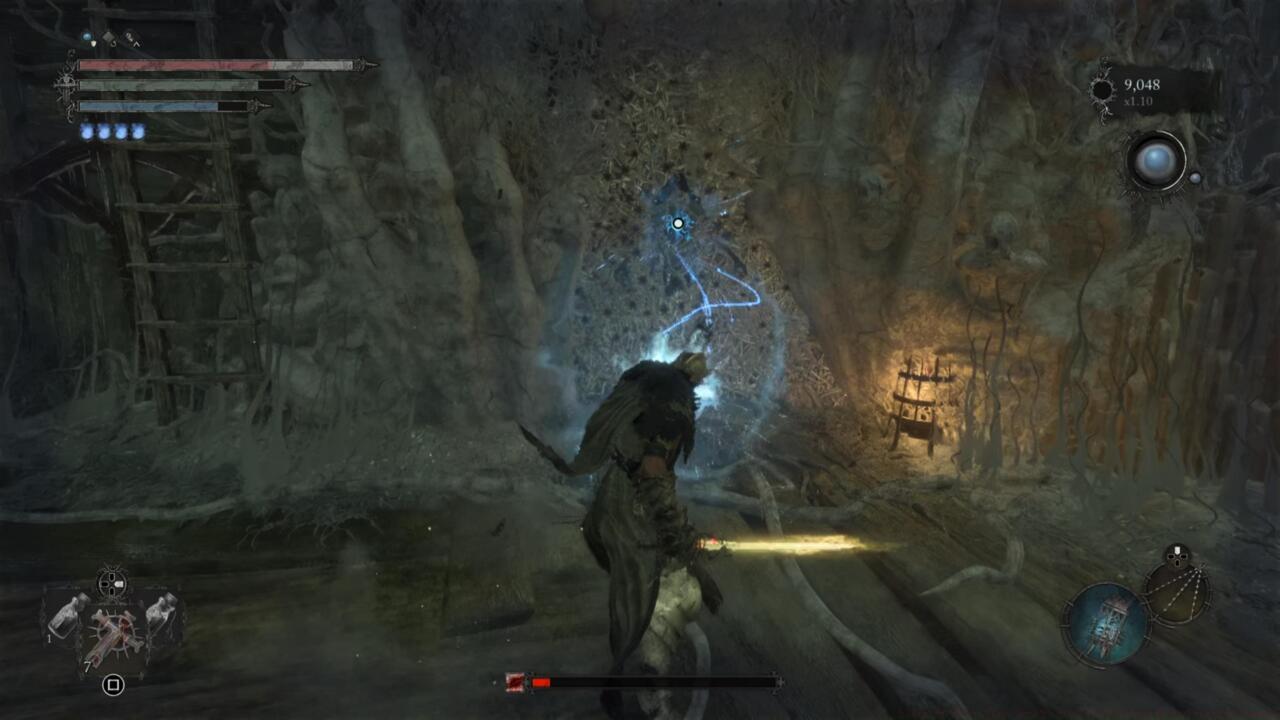
This door can only be soulflayed once you’ve removed the Umbral entity blocking the way.
After neutralizing the hostile forces, you’ll discover an Umbral obstruction blocking advancement, indicating the requirement to locate and execute soulflay maneuvers on specific points throughout the vicinity while remaining in the Umbral Realm. Below are their precise positions.
- The initial soulflay location is positioned above and slightly rightward of the Umbral obstruction.
- A secondary soulflay point typically resides behind destructible environmental elements nearby.
- The third critical spot often appears near elevated platforms requiring precise jumping maneuvers.
Successfully soulflaying all designated locations will dismantle the Umbral barrier, granting access to Gerlinde’s prison cell. Once liberated, she will relocate to Skyrest Bridge, where she establishes permanent blacksmith services for your weapon enhancement needs.

Thanks for the key, big guy.
Mastering the intricate relationship between Axiom and Umbral realms represents one of Lords of the Fallen’s most sophisticated gameplay systems. Strategic realm switching not only facilitates navigation but also unveils hidden pathways and resources. For players seeking comprehensive mastery of game mechanics, our Complete Guide provides additional advanced strategies.
Action Checklist
- Travel from Bellroom vestige through right exit and defeat initial enemies
- Navigate cavern system, perform platform jumps, and transition to Umbral Realm
- Defeat spiked helmet enemy and descend ladders to open area
- Locate and soulflay all Umbral spots to remove barrier
- Rescue Gerlinde and return to Skyrest Bridge for weapon upgrades
No reproduction without permission:SeeYouSoon Game Club » Lords Of The Fallen: How To Find The Blacksmith And Upgrade Weapons Complete guide to finding Gerlinde, upgrading weapons, and mastering Lords of the Fallen mechanics